Hello everyone, it’s me. In the previous articles we have learned in general about a Vue Project. Now let’s go a little deeper. In this section we will learn about the Vue Object and its lifecycle. I will still use the project again in this article .
1. Vue Instance
We will focus on the code of the main.js file, our project will run from here. Let’s take a look at the main.js file’s code
1 2 3 4 5 6 7 8 9 10 | ### main.js import Vue from 'vue' import App from './App.vue' Vue.config.productionTip = false new Vue({ render: h => h(App), }).$mount('#app') |
As can be seen, our Vue app will start running from here. A Vue application will consist of a Vue root (initialized with new Vue with its properties) and Vue components, forming a comnponent system for the purpose of reuse. As can be seen, in main.js, we create a root vue object. This object will render the App component imported from the App.vue file and mount it on the tag with the id of app . We can see more clearly through the index.html file
1 2 3 4 5 6 7 8 9 10 11 12 13 14 15 16 17 18 19 | ### index.html <!DOCTYPE html> <html lang=""> <head> <meta charset="utf-8"> <meta http-equiv="X-UA-Compatible" content="IE=edge"> <meta name="viewport" content="width=device-width,initial-scale=1.0"> <link rel="icon" href="<%= BASE_URL %>favicon.ico"> <title><%= htmlWebpackPlugin.options.title %></title> </head> <body> <noscript> <strong>We're sorry but <%= htmlWebpackPlugin.options.title %> doesn't work properly without JavaScript enabled. Please enable it to continue.</strong> </noscript> <div id="app"></div> <!-- built files will be auto injected --> </body> </html> |
Vue will support us to create Vue app according to SPA concept, so we will have only one index.html page as a single view. The content of the views will be rendered with javascript instead of <div id="app"></div> , that’s why when we view source, we can’t see the whole html content as usual (but see with Chorme DevTools still okay). Several properties in a Vue instance:
- data: contains global variables of a Vue instance
- filter: filters the data before being displayed
- watch: Tracks and updates a variable as the data changes
- computed: is
một thuộc tính được tính toáncomputedmột thuộc tính được tính toán, which means that the method defined in this will be treated as a property. - methods: a list of methods in a Vue instance
2. Vue lifecycle
On the Vue homepage, there is a very classic and detailed picture of Vue hooks and life cycle.
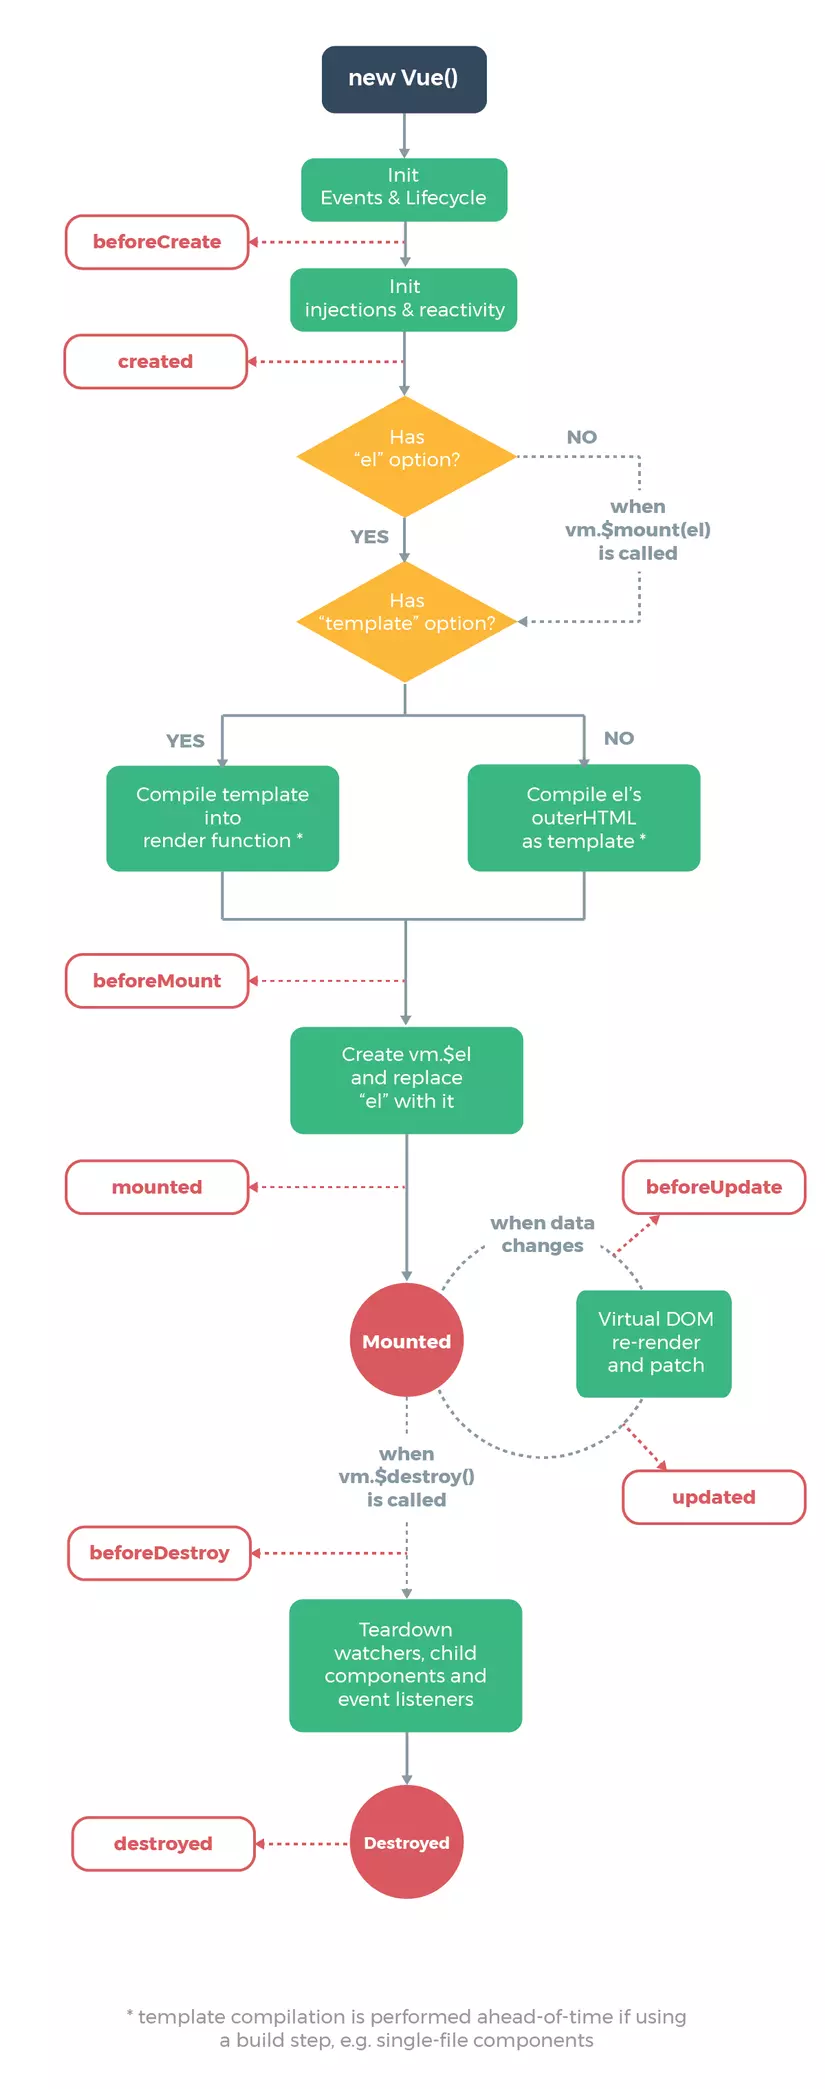
- Created The initialization process that takes place first in the component. Here, we can manipulate data in
dataormethods. During this process, the virtual DOMs aremountandrenderand cannot interact with them - Mounted Now that the components have been successfully initialized, we have full control over the
data,methods, and even the DOMs in thetemplate. - Updated The process when data changes or there are events that cause the component to re-render.
- Destroyed Called when the component has been destroyed.
We try to replace the code in the HelloWorld.vue file with the following
1 2 3 4 5 6 7 8 9 10 11 12 13 14 15 16 17 18 19 20 21 22 23 24 25 26 27 28 29 30 31 32 33 34 35 36 37 38 39 40 41 | ### HelloWorld.vue <template> <div class="hello"> <h1>{{ msg }}</h1> <h2>Filter Msg : {{msg | removeZero}}</h2> <button @click="changeMsg">Change</button> </div> </template> <script> export default { data() { return { msg: "Hello World", } }, created() { console.log("Created") }, mounted() { console.log("Mount") }, updated() { console.log("Update") }, destroyed() { console.log("Destroy") }, filters: { removeZero(value) { return value.replaceAll('0', '1') } }, methods: { changeMsg() { this.msg = `${this.msg}0` } } }; </script> |
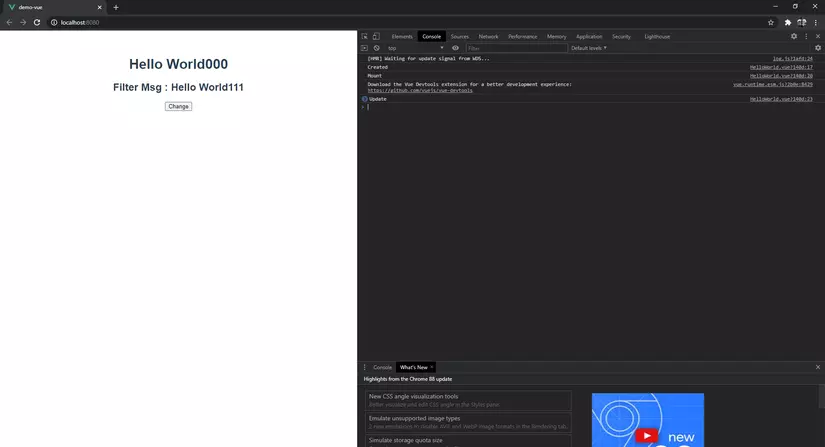
When the change button is clicked, the event click is triggered and calls the changeMsg function declared in methods, which will change the value of the msg variable. This value will change the value of the <h1> tag, so the value of the <h2> tag will be filtered through one filter, converting all ‘0’ to ‘1’. In addition, with lifecycle hooks, we can also handle them before these hooks run using the before hooks like beforeCreate , beforeMount , beforeUpdate , beforeDestroy (as in the image above).
Result
Ok, done! I will end this article here. Hope to see you again in the following articles.