Whenever we build iOS apps, this question always comes to mind, choosing which model for a new project. The most used model in iOS is MVC. Most developers use MVC for their projects. Small projects work well with MVC. But as the size of the project increases, it starts to mess with your source code.
I am always looking for a good model to use, but we shouldn’t adhere to one in our project strictly. Not all models are good enough to give you everything. Each model has advantages and disadvantages. If we have too many modules, we can decide on the module model. Some modules are suitable for MVVM, but maybe the new module doesn’t work well with MVVM, so we can use alternative models like MVP, VIPER. So we shouldn’t rely entirely on a single model, we can test it in modules instead.
There are a lot of articles available on the internet that explain the definition, pros and cons of MVVM, so here I will focus more on practical implementation instead of just reading the definition.
Begin
In this project, we build a simple application using MVVM. In most of our applications, we have a ViewController, get data from the server, and display it in the UI. We will perform the same behavior using MVVM.
Here is the result we expect from this article.

Here, we will use a dummy web service available on the internet
http://dummy.restapiexample.com/api/v1/employees
This web service provides us a list of employee data and we will show it to the tableview.
Overview of ingredients and roles
View Controller: Only do things related to UI – Show / get information, part of view layer
ViewModel: Get information from VC, process all this information and send it back to VC.
Model : These are your models, nothing much here. It is similar to the model in MVC model, it is used by ViewModel and updates whenever ViewModel sends new update.
Let’s structure our code and create the required files in their respective groups. So we create 3 files, each file in a group (Model, ViewModel, APIService)
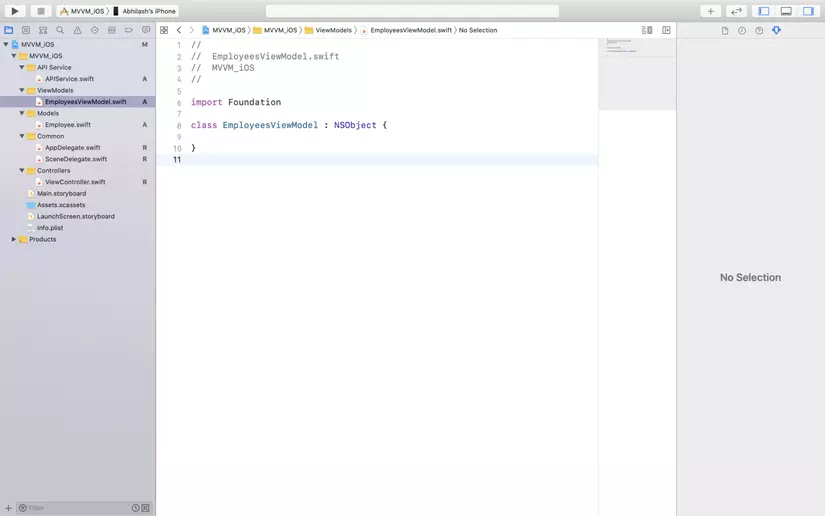
Model
Model represents simple data. It simply holds the data and does not do anything with logic. You can simply say it’s a data structure that we expect from our API.
Here we can test the response for the above URL and we will create a model class for this response. You can create your own model or vice versa you can use any online model.
1 2 3 4 5 6 7 8 9 10 11 12 13 14 15 16 17 18 19 20 | // MARK: - Employee struct Employees: Decodable { let status: String let data: [EmployeeData] } // MARK: - EmployeeData struct EmployeeData: Decodable { let id, employeeName, employeeSalary, employeeAge: String let profileImage: String enum CodingKeys: String, CodingKey { case id case employeeName = "employee_name" case employeeSalary = "employee_salary" case employeeAge = "employee_age" case profileImage = "profile_image" } } |
The application flow will look like this:
- ViewController will be called and View will have a reference to ViewMdoel
- View will receive some user actions and View will call ViewModel
- ViewModel will request APIService and APIService will send response back to ViewModel
- When we receive a response, the ViewModel notifies the View through binding
- View will update UI with data
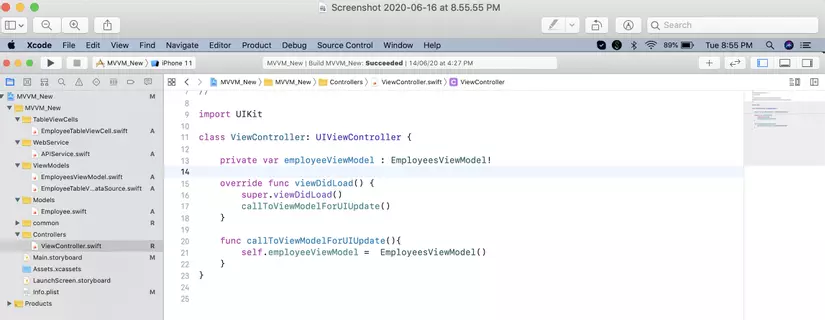
Now, we will start writing code in sequence. First ViewController will be called and from ViewController we call ViewModel class. We don’t bind them now, so we can do it later.
ViewModel
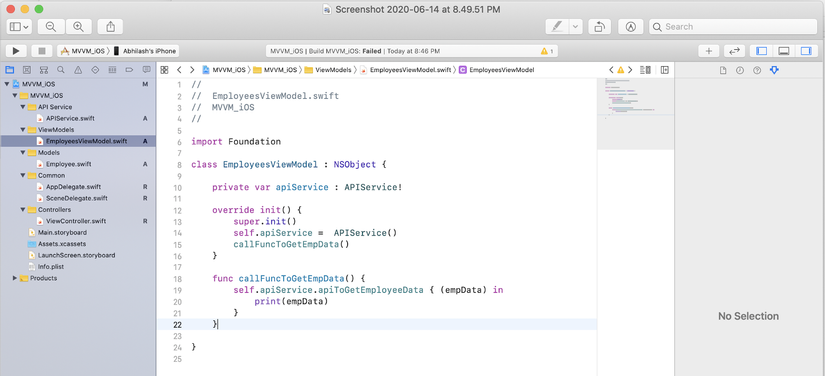
ViewModel is the main component of this model. ViewModel doesn’t know what View is and what View does. This makes this model easier to test and removes complexity from the view.
In ViewModel we will call APIService and get data from server
When we write code in ViewModel class, it will give you some error because we haven’t implemented API Service class yet. So now we will implement the API Service class
API Service
API Service is a simple class, where we get employee data using URLSession. You can use any of the networking models. From our ViewModel class, we will call the API Service.
1 2 3 4 5 6 7 8 9 10 11 12 13 14 15 16 17 18 19 | import Foundation class APIService : NSObject { private let sourcesURL = URL(string: "http://dummy.restapiexample.com/api/v1/employees")! func apiToGetEmployeeData(completion : @escaping (Employees) -> ()){ URLSession.shared.dataTask(with: sourcesURL) { (data, urlResponse, error) in if let data = data { let jsonDecoder = JSONDecoder() let empData = try! jsonDecoder.decode(Employees.self, from: data) completion(empData) } }.resume() } } |
When we get response in ViewModel. Now it’s time to bind the ViewController and ViewModel
MVVM Bindings
MVVM binding plays an important role in our project. The way we communicate between ViewModel and ViewController is very important. We can bind in many ways.
1 2 3 4 5 6 7 8 9 10 11 12 13 14 15 16 17 18 19 20 21 22 23 24 25 26 | import Foundation class EmployeesViewModel : NSObject { private var apiService : APIService! private(set) var empData : Employees! { didSet { self.bindEmployeeViewModelToController() } } var bindEmployeeViewModelToController : (() -> ()) = {} override init() { super.init() self.apiService = APIService() callFuncToGetEmpData() } func callFuncToGetEmpData() { self.apiService.apiToGetEmployeeData { (empData) in self.empData = empData } } } |
We create a property in ViewModel named bindEmployeeViewModelToController
1 2 | var bindEmployeeViewModelToController : (() -> ()) = { } |
This property is required to call from ViewController.
We create other properties in the ViewModel called empData of type Employees (Model) that hold the result from the APIService and notify the View that there has been a change.
1 2 3 4 5 6 7 8 9 10 | private(set) var empData : Employees! { didSet { self.bindEmployeeViewModelToController() } } |
empData is set to the response received from API Service, using observer property, as soon as we get the response value of the API, the empData’s didSet will be called and we have called bindEmployeeViewModelToController () inside of the didSet of empData.
When we get data from ViewModel to View, now is the time to update UI
View
To get data from ViewModel, we link the ViewModel property inside ViewController
1 2 3 4 5 6 | self.employeeViewModel.bindEmployeeViewModelToController = { self.updateDataSource() } |
1 2 3 4 5 6 7 8 9 10 11 12 13 14 15 16 17 18 19 20 21 22 23 24 25 26 27 28 29 30 31 32 33 34 35 36 37 38 39 40 | import UIKit class ViewController: UIViewController { @IBOutlet weak var employeeTableView: UITableView! private var employeeViewModel : EmployeesViewModel! private var dataSource : EmployeeTableViewDataSource<EmployeeTableViewCell,EmployeeData>! override func viewDidLoad() { super.viewDidLoad() callToViewModelForUIUpdate() } func callToViewModelForUIUpdate(){ self.employeeViewModel = EmployeesViewModel() self.employeeViewModel.bindEmployeeViewModelToController = { self.updateDataSource() } } func updateDataSource(){ self.dataSource = EmployeeTableViewDataSource(cellIdentifier: "EmployeeTableViewCell", items: self.employeeViewModel.empData.data, configureCell: { (cell, evm) in cell.employeeIdLabel.text = evm.id cell.employeeNameLabel.text = evm.employeeName }) DispatchQueue.main.async { self.employeeTableView.dataSource = self.dataSource self.employeeTableView.reloadData() } } } |
To update the interface, you could write the TableView code in the ViewController, but to keep the ViewController less cluttered, we will separate the EmployeeTableViewDataSource class extend from the UITableViewDataSource.
1 2 3 4 5 6 7 8 9 10 11 12 13 14 15 16 17 18 19 20 21 22 23 24 25 26 27 28 29 30 | import Foundation import UIKit class EmployeeTableViewDataSource<CELL : UITableViewCell,T> : NSObject, UITableViewDataSource { private var cellIdentifier : String! private var items : [T]! var configureCell : (CELL, T) -> () = {_,_ in } init(cellIdentifier : String, items : [T], configureCell : @escaping (CELL, T) -> ()) { self.cellIdentifier = cellIdentifier self.items = items self.configureCell = configureCell } func tableView(_ tableView: UITableView, numberOfRowsInSection section: Int) -> Int { items.count } func tableView(_ tableView: UITableView, cellForRowAt indexPath: IndexPath) -> UITableViewCell { let cell = tableView.dequeueReusableCell(withIdentifier: cellIdentifier, for: indexPath) as! CELL let item = self.items[indexPath.row] self.configureCell(cell, item) return cell } } |
As I said that each model has pros and cons, if we have a lot of advantages when using MVVM, there are also some disadvantages as follows:
- For starters, MVVM is difficult to implement
- For simple UI applications, MVVM may be overkill, MVC is sufficient
- For large applications, binding data will be complex, so debugging will be more difficult
Conclude
Here, we’ve finished building a simple application using the MVVM model, Hope this helps. Thank you
This is a pretty good article, useful and easy to understand that I read while I started learning about MVVM in Swift. Everyone can refer to the original article here