Introduce
Android architectural patterns are evolving day by day. As we develop applications, we begin to have new challenges and problems. New patterns will be discovered as we continue to tackle similar challenges. As Android Devs, we already know the MVC, MVP and MVVM patterns are the most commonly used patterns. They all use the command programming method. With this approach, although most of our problems will be solved, we still face a number of issues related to thread safety, maintaining the state of the application. With this section, let’s take a look at what the MVI architecture model is, how it addresses these challenges and how to get started with MVI.
In this blog we will learn about
What is MVI architecture? How does MVI work? Advantages and disadvantages of MVI Create a project with an MVI architecture
Source: https://blog.mindorks.com/mvi-architecture-android-tutorial-for-beginners-step-by-step-guide
What is MVI architecture?
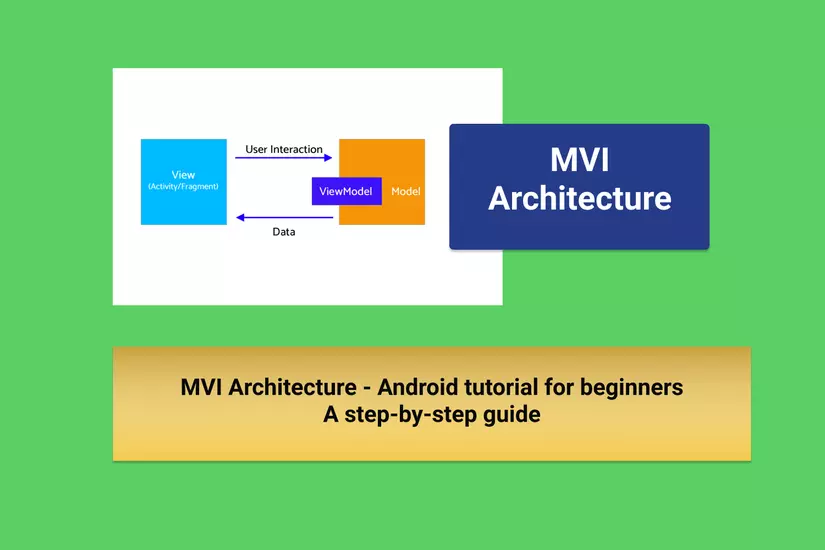
MVI stands for Model-View-Intent . This model was recently introduced in Android. It works on the principles of one-way flow and cylindrical flow inspired by the Cycle.js framework.
Let’s see what the role each component of MVI is.
- Model : Unlike other patterns, In MVI Model represents the state of the user interface. for example, the UI can have different states like Loading data , Loaded , Changing UI with User Actions, Error, Current screen location status of the user . Each state is stored similarly to the object in the model.
- View : View in MVI is our Interface that can be implemented in Activities and fragments. It means there is a container that can accept different model states and display it as the user interface. They use observable intents (Note: This does not represent traditional Android Intents) in response to user actions.
- Intent : Although this is not an Intent as defined by Android. The results of the user actions are passed as input values to Intents. In return, we could say that we would send the models as input to the Intent that could load it through the View.
How does MVI work?
The user performing an action would be Intent → Intent which is the input state to the model → Model stores the state and sends the requested state to View → View Loads the state from Model → Visible to the user. If we observe, the data will always flow from the user and end up with the user through the intent. It can’t be the other way around, so it’s called One-dimensional architecture. If the user performs one more action then the same cycle is repeated, so it is Cyclic.

Advantages and disadvantages of MVI
Advantages of MVI
- Staying state is no longer a challenge with this architecture, as it is primarily focused on states.
- Since it is one-way, it is easy to monitor and predict Data Flow.
- It ensures thread safety because state objects are immutable.
- Easy to debug, As we know the state of the object when an error occurs.
- It is more fragmented as each of the actors fulfills their own responsibility.
- Application testing will also be easier because we can map the business logic for each state.
Disadvantages of MVI
- It leads to a lot of boilerplate code because we have to maintain state for each user action.
- As we know, it must create lots of objects for all states. This makes managing application memory too expensive.
- Handling the alert state can get stuck while we are dealing with configuration changes. For example, if internet is not available, we will show the snack bar, When changing the profile, it re-shows the quick bar as the status of the purpose. In terms of usability, this must be handled. With this background, let’s create a small application with MVI
Create a project with MVI architecture
Let’s start by setting up the Android project.
1 2 3 4 5 6 7 8 9 10 11 12 13 14 15 | <span class="token comment">// Added Dependencies</span> implementation <span class="token string">"androidx.recyclerview:recyclerview:1.1.0"</span> implementation <span class="token string">'android.arch.lifecycle:extensions:1.1.1'</span> implementation <span class="token string">'androidx.lifecycle:lifecycle-viewmodel-ktx:2.2.0'</span> implementation <span class="token string">'androidx.lifecycle:lifecycle-runtime-ktx:2.2.0'</span> implementation <span class="token string">'com.github.bumptech.glide:glide:4.11.0'</span> <span class="token comment">//retrofit</span> implementation <span class="token string">'com.squareup.retrofit2:retrofit:2.8.1'</span> implementation <span class="token string">"com.squareup.retrofit2:converter-moshi:2.6.2"</span> <span class="token comment">//Coroutine</span> implementation <span class="token string">"org.jetbrains.kotlinx:kotlinx-coroutines-android:1.3.6"</span> implementation <span class="token string">"org.jetbrains.kotlinx:kotlinx-coroutines-core:1.3.6"</span> |
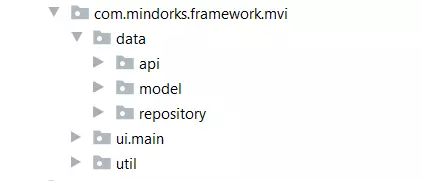
Project Structure
As for the project, We will follow each step of the project using MVI. Our package in the project will look like below.
Establishment of data layers
Now, in this section, we will set up the data layer. In the data package, we will have api, model and repository packages. We will create these packages and let’s focus on adding classes to the packages one by one.
Let’s add API support classes.
We need a model to which the response will be converted. Create the User.kt data class as shown below.
1 2 3 4 5 6 7 8 9 10 11 12 13 14 15 | <span class="token keyword">package</span> com <span class="token punctuation">.</span> mindorks <span class="token punctuation">.</span> framework <span class="token punctuation">.</span> mvi <span class="token punctuation">.</span> data <span class="token punctuation">.</span> model <span class="token keyword">import</span> com <span class="token punctuation">.</span> squareup <span class="token punctuation">.</span> moshi <span class="token punctuation">.</span> Json <span class="token keyword">data</span> <span class="token keyword">class</span> <span class="token function">User</span> <span class="token punctuation">(</span> <span class="token annotation builtin">@Json</span> <span class="token punctuation">(</span> name <span class="token operator">=</span> <span class="token string">"id"</span> <span class="token punctuation">)</span> <span class="token keyword">val</span> id <span class="token operator">:</span> Int <span class="token operator">=</span> <span class="token number">0</span> <span class="token punctuation">,</span> <span class="token annotation builtin">@Json</span> <span class="token punctuation">(</span> name <span class="token operator">=</span> <span class="token string">"name"</span> <span class="token punctuation">)</span> <span class="token keyword">val</span> name <span class="token operator">:</span> String <span class="token operator">=</span> <span class="token string">""</span> <span class="token punctuation">,</span> <span class="token annotation builtin">@Json</span> <span class="token punctuation">(</span> name <span class="token operator">=</span> <span class="token string">"email"</span> <span class="token punctuation">)</span> <span class="token keyword">val</span> email <span class="token operator">:</span> String <span class="token operator">=</span> <span class="token string">""</span> <span class="token punctuation">,</span> <span class="token annotation builtin">@Json</span> <span class="token punctuation">(</span> name <span class="token operator">=</span> <span class="token string">"avatar"</span> <span class="token punctuation">)</span> <span class="token keyword">val</span> avatar <span class="token operator">:</span> String <span class="token operator">=</span> <span class="token string">""</span> <span class="token punctuation">)</span> |
Create ApiHelper.kt interface
1 2 3 4 5 6 7 8 9 10 | <span class="token keyword">package</span> com <span class="token punctuation">.</span> mindorks <span class="token punctuation">.</span> framework <span class="token punctuation">.</span> mvi <span class="token punctuation">.</span> data <span class="token punctuation">.</span> api <span class="token keyword">import</span> com <span class="token punctuation">.</span> mindorks <span class="token punctuation">.</span> framework <span class="token punctuation">.</span> mvi <span class="token punctuation">.</span> data <span class="token punctuation">.</span> model <span class="token punctuation">.</span> User <span class="token keyword">interface</span> ApiHelper <span class="token punctuation">{</span> <span class="token keyword">suspend</span> <span class="token keyword">fun</span> <span class="token function">getUsers</span> <span class="token punctuation">(</span> <span class="token punctuation">)</span> <span class="token operator">:</span> List <span class="token operator"><</span> User <span class="token operator">></span> <span class="token punctuation">}</span> |
Note: We have used suspend keyword to support Coroutines so that we can call it from a Coroutine or another suspend function.
Create an ApiService.kt class where we will specify HTTP methods to communicate with the API.
1 2 3 4 5 6 7 8 9 10 11 | <span class="token keyword">package</span> com <span class="token punctuation">.</span> mindorks <span class="token punctuation">.</span> framework <span class="token punctuation">.</span> mvi <span class="token punctuation">.</span> data <span class="token punctuation">.</span> api <span class="token keyword">import</span> com <span class="token punctuation">.</span> mindorks <span class="token punctuation">.</span> framework <span class="token punctuation">.</span> mvi <span class="token punctuation">.</span> data <span class="token punctuation">.</span> model <span class="token punctuation">.</span> User <span class="token keyword">import</span> retrofit2 <span class="token punctuation">.</span> http <span class="token punctuation">.</span> GET <span class="token keyword">interface</span> ApiService <span class="token punctuation">{</span> <span class="token annotation builtin">@GET</span> <span class="token punctuation">(</span> <span class="token string">"users"</span> <span class="token punctuation">)</span> <span class="token keyword">suspend</span> <span class="token keyword">fun</span> <span class="token function">getUsers</span> <span class="token punctuation">(</span> <span class="token punctuation">)</span> <span class="token operator">:</span> List <span class="token operator"><</span> User <span class="token operator">></span> <span class="token punctuation">}</span> |
Now let’s add the retrofit builder to generate endpoint URLs and use REST services.
1 2 3 4 5 6 7 8 9 10 11 12 13 14 15 16 17 | <span class="token keyword">package</span> com <span class="token punctuation">.</span> mindorks <span class="token punctuation">.</span> framework <span class="token punctuation">.</span> mvi <span class="token punctuation">.</span> data <span class="token punctuation">.</span> api <span class="token keyword">import</span> retrofit2 <span class="token punctuation">.</span> Retrofit <span class="token keyword">import</span> retrofit2 <span class="token punctuation">.</span> converter <span class="token punctuation">.</span> moshi <span class="token punctuation">.</span> MoshiConverterFactory <span class="token keyword">object</span> RetrofitBuilder <span class="token punctuation">{</span> <span class="token keyword">private</span> <span class="token keyword">const</span> <span class="token keyword">val</span> BASE_URL <span class="token operator">=</span> <span class="token string">"https://5e510330f2c0d300147c034c.mockapi.io/"</span> <span class="token keyword">private</span> <span class="token keyword">fun</span> <span class="token function">getRetrofit</span> <span class="token punctuation">(</span> <span class="token punctuation">)</span> <span class="token operator">=</span> Retrofit <span class="token punctuation">.</span> <span class="token function">Builder</span> <span class="token punctuation">(</span> <span class="token punctuation">)</span> <span class="token punctuation">.</span> <span class="token function">baseUrl</span> <span class="token punctuation">(</span> BASE_URL <span class="token punctuation">)</span> <span class="token punctuation">.</span> <span class="token function">addConverterFactory</span> <span class="token punctuation">(</span> MoshiConverterFactory <span class="token punctuation">.</span> <span class="token function">create</span> <span class="token punctuation">(</span> <span class="token punctuation">)</span> <span class="token punctuation">)</span> <span class="token punctuation">.</span> <span class="token function">build</span> <span class="token punctuation">(</span> <span class="token punctuation">)</span> <span class="token keyword">val</span> apiService <span class="token operator">:</span> ApiService <span class="token operator">=</span> <span class="token function">getRetrofit</span> <span class="token punctuation">(</span> <span class="token punctuation">)</span> <span class="token punctuation">.</span> <span class="token function">create</span> <span class="token punctuation">(</span> ApiService <span class="token operator">::</span> <span class="token keyword">class</span> <span class="token punctuation">.</span> java <span class="token punctuation">)</span> <span class="token punctuation">}</span> |
We need to implement the interface to get List <Users>, create ApiHelperImpl.kt
1 2 3 4 5 6 7 8 9 10 | <span class="token keyword">package</span> com <span class="token punctuation">.</span> mindorks <span class="token punctuation">.</span> framework <span class="token punctuation">.</span> mvi <span class="token punctuation">.</span> data <span class="token punctuation">.</span> api <span class="token keyword">import</span> com <span class="token punctuation">.</span> mindorks <span class="token punctuation">.</span> framework <span class="token punctuation">.</span> mvi <span class="token punctuation">.</span> data <span class="token punctuation">.</span> model <span class="token punctuation">.</span> User <span class="token keyword">class</span> <span class="token function">ApiHelperImpl</span> <span class="token punctuation">(</span> <span class="token keyword">private</span> <span class="token keyword">val</span> apiService <span class="token operator">:</span> ApiService <span class="token punctuation">)</span> <span class="token operator">:</span> ApiHelper <span class="token punctuation">{</span> <span class="token keyword">override</span> <span class="token keyword">suspend</span> <span class="token keyword">fun</span> <span class="token function">getUsers</span> <span class="token punctuation">(</span> <span class="token punctuation">)</span> <span class="token operator">:</span> List <span class="token operator"><</span> User <span class="token operator">></span> <span class="token punctuation">{</span> <span class="token keyword">return</span> apiService <span class="token punctuation">.</span> <span class="token function">getUsers</span> <span class="token punctuation">(</span> <span class="token punctuation">)</span> <span class="token punctuation">}</span> <span class="token punctuation">}</span> |
We are now ready to communicate with the rest of the Services in our data layer.
We will need a repository to request data. In our case, we are calling the getUsers method from operation through the ViewModel to get the list of users. Create MainRepository.kt
1 2 3 4 5 6 7 8 9 | <span class="token keyword">package</span> com <span class="token punctuation">.</span> mindorks <span class="token punctuation">.</span> framework <span class="token punctuation">.</span> mvi <span class="token punctuation">.</span> data <span class="token punctuation">.</span> repository <span class="token keyword">import</span> com <span class="token punctuation">.</span> mindorks <span class="token punctuation">.</span> framework <span class="token punctuation">.</span> mvi <span class="token punctuation">.</span> data <span class="token punctuation">.</span> api <span class="token punctuation">.</span> ApiHelper <span class="token keyword">class</span> <span class="token function">MainRepository</span> <span class="token punctuation">(</span> <span class="token keyword">private</span> <span class="token keyword">val</span> apiHelper <span class="token operator">:</span> ApiHelper <span class="token punctuation">)</span> <span class="token punctuation">{</span> <span class="token keyword">suspend</span> <span class="token keyword">fun</span> <span class="token function">getUsers</span> <span class="token punctuation">(</span> <span class="token punctuation">)</span> <span class="token operator">=</span> apiHelper <span class="token punctuation">.</span> <span class="token function">getUsers</span> <span class="token punctuation">(</span> <span class="token punctuation">)</span> <span class="token punctuation">}</span> |
So our data layer is ready. Coming to UI, we need an adapter for recyclerview, Purpose to store user action, our main activity in view, MainViewModel in viewModel, View state where we specified defines the different states we need to load data into the view.
Create the MainAdapter in the adapter package
1 2 3 4 5 6 7 8 9 10 11 12 13 14 15 16 17 18 19 20 21 22 23 24 25 26 27 28 29 30 31 32 33 34 35 36 37 38 39 40 41 42 43 44 | <span class="token keyword">package</span> com <span class="token punctuation">.</span> mindorks <span class="token punctuation">.</span> framework <span class="token punctuation">.</span> mvi <span class="token punctuation">.</span> ui <span class="token punctuation">.</span> main <span class="token punctuation">.</span> adapter <span class="token keyword">import</span> android <span class="token punctuation">.</span> view <span class="token punctuation">.</span> LayoutInflater <span class="token keyword">import</span> android <span class="token punctuation">.</span> view <span class="token punctuation">.</span> View <span class="token keyword">import</span> android <span class="token punctuation">.</span> view <span class="token punctuation">.</span> ViewGroup <span class="token keyword">import</span> androidx <span class="token punctuation">.</span> recyclerview <span class="token punctuation">.</span> widget <span class="token punctuation">.</span> RecyclerView <span class="token keyword">import</span> com <span class="token punctuation">.</span> bumptech <span class="token punctuation">.</span> glide <span class="token punctuation">.</span> Glide <span class="token keyword">import</span> com <span class="token punctuation">.</span> mindorks <span class="token punctuation">.</span> framework <span class="token punctuation">.</span> mvi <span class="token punctuation">.</span> R <span class="token keyword">import</span> com <span class="token punctuation">.</span> mindorks <span class="token punctuation">.</span> framework <span class="token punctuation">.</span> mvi <span class="token punctuation">.</span> data <span class="token punctuation">.</span> model <span class="token punctuation">.</span> User <span class="token keyword">import</span> kotlinx <span class="token punctuation">.</span> android <span class="token punctuation">.</span> synthetic <span class="token punctuation">.</span> main <span class="token punctuation">.</span> item_layout <span class="token punctuation">.</span> view <span class="token punctuation">.</span> <span class="token operator">*</span> <span class="token keyword">class</span> <span class="token function">MainAdapter</span> <span class="token punctuation">(</span> <span class="token keyword">private</span> <span class="token keyword">val</span> users <span class="token operator">:</span> ArrayList <span class="token operator"><</span> User <span class="token operator">></span> <span class="token punctuation">)</span> <span class="token operator">:</span> RecyclerView <span class="token punctuation">.</span> Adapter <span class="token operator"><</span> MainAdapter <span class="token punctuation">.</span> DataViewHolder <span class="token operator">></span> <span class="token punctuation">(</span> <span class="token punctuation">)</span> <span class="token punctuation">{</span> <span class="token keyword">class</span> <span class="token function">DataViewHolder</span> <span class="token punctuation">(</span> itemView <span class="token operator">:</span> View <span class="token punctuation">)</span> <span class="token operator">:</span> RecyclerView <span class="token punctuation">.</span> <span class="token function">ViewHolder</span> <span class="token punctuation">(</span> itemView <span class="token punctuation">)</span> <span class="token punctuation">{</span> <span class="token keyword">fun</span> <span class="token function">bind</span> <span class="token punctuation">(</span> user <span class="token operator">:</span> User <span class="token punctuation">)</span> <span class="token punctuation">{</span> itemView <span class="token punctuation">.</span> textViewUserName <span class="token punctuation">.</span> text <span class="token operator">=</span> user <span class="token punctuation">.</span> name itemView <span class="token punctuation">.</span> textViewUserEmail <span class="token punctuation">.</span> text <span class="token operator">=</span> user <span class="token punctuation">.</span> email Glide <span class="token punctuation">.</span> <span class="token function">with</span> <span class="token punctuation">(</span> itemView <span class="token punctuation">.</span> imageViewAvatar <span class="token punctuation">.</span> context <span class="token punctuation">)</span> <span class="token punctuation">.</span> <span class="token function">load</span> <span class="token punctuation">(</span> user <span class="token punctuation">.</span> avatar <span class="token punctuation">)</span> <span class="token punctuation">.</span> <span class="token function">into</span> <span class="token punctuation">(</span> itemView <span class="token punctuation">.</span> imageViewAvatar <span class="token punctuation">)</span> <span class="token punctuation">}</span> <span class="token punctuation">}</span> <span class="token keyword">override</span> <span class="token keyword">fun</span> <span class="token function">onCreateViewHolder</span> <span class="token punctuation">(</span> parent <span class="token operator">:</span> ViewGroup <span class="token punctuation">,</span> viewType <span class="token operator">:</span> Int <span class="token punctuation">)</span> <span class="token operator">=</span> <span class="token function">DataViewHolder</span> <span class="token punctuation">(</span> LayoutInflater <span class="token punctuation">.</span> <span class="token function">from</span> <span class="token punctuation">(</span> parent <span class="token punctuation">.</span> context <span class="token punctuation">)</span> <span class="token punctuation">.</span> <span class="token function">inflate</span> <span class="token punctuation">(</span> R <span class="token punctuation">.</span> layout <span class="token punctuation">.</span> item_layout <span class="token punctuation">,</span> parent <span class="token punctuation">,</span> <span class="token boolean">false</span> <span class="token punctuation">)</span> <span class="token punctuation">)</span> <span class="token keyword">override</span> <span class="token keyword">fun</span> <span class="token function">getItemCount</span> <span class="token punctuation">(</span> <span class="token punctuation">)</span> <span class="token operator">:</span> Int <span class="token operator">=</span> users <span class="token punctuation">.</span> size <span class="token keyword">override</span> <span class="token keyword">fun</span> <span class="token function">onBindViewHolder</span> <span class="token punctuation">(</span> holder <span class="token operator">:</span> DataViewHolder <span class="token punctuation">,</span> position <span class="token operator">:</span> Int <span class="token punctuation">)</span> <span class="token operator">=</span> holder <span class="token punctuation">.</span> <span class="token function">bind</span> <span class="token punctuation">(</span> users <span class="token punctuation">[</span> position <span class="token punctuation">]</span> <span class="token punctuation">)</span> <span class="token keyword">fun</span> <span class="token function">addData</span> <span class="token punctuation">(</span> list <span class="token operator">:</span> List <span class="token operator"><</span> User <span class="token operator">></span> <span class="token punctuation">)</span> <span class="token punctuation">{</span> users <span class="token punctuation">.</span> <span class="token function">addAll</span> <span class="token punctuation">(</span> list <span class="token punctuation">)</span> <span class="token punctuation">}</span> <span class="token punctuation">}</span> |
Create MainIntent.kt in intent package
1 2 3 4 5 6 7 8 | <span class="token keyword">package</span> com <span class="token punctuation">.</span> mindorks <span class="token punctuation">.</span> framework <span class="token punctuation">.</span> mvi <span class="token punctuation">.</span> ui <span class="token punctuation">.</span> main <span class="token punctuation">.</span> intent <span class="token keyword">sealed</span> <span class="token keyword">class</span> MainIntent <span class="token punctuation">{</span> <span class="token keyword">object</span> FetchUser <span class="token operator">:</span> <span class="token function">MainIntent</span> <span class="token punctuation">(</span> <span class="token punctuation">)</span> <span class="token punctuation">}</span> |
Now add MainState.kt under package viewstate. This is the most important part of MVI. In this class, we are defining the Waiting, loading, user, error states. Each state can be loaded into the view according to the user’s intentions.
1 2 3 4 5 6 7 8 9 10 11 12 13 | <span class="token keyword">package</span> com <span class="token punctuation">.</span> mindorks <span class="token punctuation">.</span> framework <span class="token punctuation">.</span> mvi <span class="token punctuation">.</span> ui <span class="token punctuation">.</span> main <span class="token punctuation">.</span> viewstate <span class="token keyword">import</span> com <span class="token punctuation">.</span> mindorks <span class="token punctuation">.</span> framework <span class="token punctuation">.</span> mvi <span class="token punctuation">.</span> data <span class="token punctuation">.</span> model <span class="token punctuation">.</span> User <span class="token keyword">sealed</span> <span class="token keyword">class</span> MainState <span class="token punctuation">{</span> <span class="token keyword">object</span> Idle <span class="token operator">:</span> <span class="token function">MainState</span> <span class="token punctuation">(</span> <span class="token punctuation">)</span> <span class="token keyword">object</span> Loading <span class="token operator">:</span> <span class="token function">MainState</span> <span class="token punctuation">(</span> <span class="token punctuation">)</span> <span class="token keyword">data</span> <span class="token keyword">class</span> <span class="token function">Users</span> <span class="token punctuation">(</span> <span class="token keyword">val</span> user <span class="token operator">:</span> List <span class="token operator"><</span> User <span class="token operator">></span> <span class="token punctuation">)</span> <span class="token operator">:</span> <span class="token function">MainState</span> <span class="token punctuation">(</span> <span class="token punctuation">)</span> <span class="token keyword">data</span> <span class="token keyword">class</span> <span class="token function">Error</span> <span class="token punctuation">(</span> <span class="token keyword">val</span> error <span class="token operator">:</span> String <span class="token operator">?</span> <span class="token punctuation">)</span> <span class="token operator">:</span> <span class="token function">MainState</span> <span class="token punctuation">(</span> <span class="token punctuation">)</span> <span class="token punctuation">}</span> |
Create ViewModel class – MainViewModel
1 2 3 4 5 6 7 8 9 10 11 12 13 14 15 16 17 18 19 20 21 22 23 24 25 26 27 28 29 30 31 32 33 34 35 36 37 38 39 40 41 42 43 44 45 46 47 48 49 50 51 | <span class="token keyword">package</span> com <span class="token punctuation">.</span> mindorks <span class="token punctuation">.</span> framework <span class="token punctuation">.</span> mvi <span class="token punctuation">.</span> ui <span class="token punctuation">.</span> main <span class="token punctuation">.</span> viewmodel <span class="token keyword">import</span> androidx <span class="token punctuation">.</span> lifecycle <span class="token punctuation">.</span> ViewModel <span class="token keyword">import</span> androidx <span class="token punctuation">.</span> lifecycle <span class="token punctuation">.</span> viewModelScope <span class="token keyword">import</span> com <span class="token punctuation">.</span> mindorks <span class="token punctuation">.</span> framework <span class="token punctuation">.</span> mvi <span class="token punctuation">.</span> data <span class="token punctuation">.</span> repository <span class="token punctuation">.</span> MainRepository <span class="token keyword">import</span> com <span class="token punctuation">.</span> mindorks <span class="token punctuation">.</span> framework <span class="token punctuation">.</span> mvi <span class="token punctuation">.</span> ui <span class="token punctuation">.</span> main <span class="token punctuation">.</span> intent <span class="token punctuation">.</span> MainIntent <span class="token keyword">import</span> com <span class="token punctuation">.</span> mindorks <span class="token punctuation">.</span> framework <span class="token punctuation">.</span> mvi <span class="token punctuation">.</span> ui <span class="token punctuation">.</span> main <span class="token punctuation">.</span> viewstate <span class="token punctuation">.</span> MainState <span class="token keyword">import</span> kotlinx <span class="token punctuation">.</span> coroutines <span class="token punctuation">.</span> ExperimentalCoroutinesApi <span class="token keyword">import</span> kotlinx <span class="token punctuation">.</span> coroutines <span class="token punctuation">.</span> channels <span class="token punctuation">.</span> Channel <span class="token keyword">import</span> kotlinx <span class="token punctuation">.</span> coroutines <span class="token punctuation">.</span> flow <span class="token punctuation">.</span> MutableStateFlow <span class="token keyword">import</span> kotlinx <span class="token punctuation">.</span> coroutines <span class="token punctuation">.</span> flow <span class="token punctuation">.</span> StateFlow <span class="token keyword">import</span> kotlinx <span class="token punctuation">.</span> coroutines <span class="token punctuation">.</span> flow <span class="token punctuation">.</span> collect <span class="token keyword">import</span> kotlinx <span class="token punctuation">.</span> coroutines <span class="token punctuation">.</span> flow <span class="token punctuation">.</span> consumeAsFlow <span class="token keyword">import</span> kotlinx <span class="token punctuation">.</span> coroutines <span class="token punctuation">.</span> launch <span class="token annotation builtin">@ExperimentalCoroutinesApi</span> <span class="token keyword">class</span> <span class="token function">MainViewModel</span> <span class="token punctuation">(</span> <span class="token keyword">private</span> <span class="token keyword">val</span> repository <span class="token operator">:</span> MainRepository <span class="token punctuation">)</span> <span class="token operator">:</span> <span class="token function">ViewModel</span> <span class="token punctuation">(</span> <span class="token punctuation">)</span> <span class="token punctuation">{</span> <span class="token keyword">val</span> userIntent <span class="token operator">=</span> Channel <span class="token operator"><</span> MainIntent <span class="token operator">></span> <span class="token punctuation">(</span> Channel <span class="token punctuation">.</span> UNLIMITED <span class="token punctuation">)</span> <span class="token keyword">private</span> <span class="token keyword">val</span> _state <span class="token operator">=</span> MutableStateFlow <span class="token operator"><</span> MainState <span class="token operator">></span> <span class="token punctuation">(</span> MainState <span class="token punctuation">.</span> Idle <span class="token punctuation">)</span> <span class="token keyword">val</span> state <span class="token operator">:</span> StateFlow <span class="token operator"><</span> MainState <span class="token operator">></span> <span class="token keyword">get</span> <span class="token punctuation">(</span> <span class="token punctuation">)</span> <span class="token operator">=</span> _state <span class="token keyword">init</span> <span class="token punctuation">{</span> <span class="token function">handleIntent</span> <span class="token punctuation">(</span> <span class="token punctuation">)</span> <span class="token punctuation">}</span> <span class="token keyword">private</span> <span class="token keyword">fun</span> <span class="token function">handleIntent</span> <span class="token punctuation">(</span> <span class="token punctuation">)</span> <span class="token punctuation">{</span> viewModelScope <span class="token punctuation">.</span> <span class="token function">launch</span> <span class="token punctuation">{</span> userIntent <span class="token punctuation">.</span> <span class="token function">consumeAsFlow</span> <span class="token punctuation">(</span> <span class="token punctuation">)</span> <span class="token punctuation">.</span> <span class="token function">collect</span> <span class="token punctuation">{</span> <span class="token keyword">when</span> <span class="token punctuation">(</span> it <span class="token punctuation">)</span> <span class="token punctuation">{</span> <span class="token keyword">is</span> MainIntent <span class="token punctuation">.</span> FetchUser <span class="token operator">-></span> <span class="token function">fetchUser</span> <span class="token punctuation">(</span> <span class="token punctuation">)</span> <span class="token punctuation">}</span> <span class="token punctuation">}</span> <span class="token punctuation">}</span> <span class="token punctuation">}</span> <span class="token keyword">private</span> <span class="token keyword">fun</span> <span class="token function">fetchUser</span> <span class="token punctuation">(</span> <span class="token punctuation">)</span> <span class="token punctuation">{</span> viewModelScope <span class="token punctuation">.</span> <span class="token function">launch</span> <span class="token punctuation">{</span> _state <span class="token punctuation">.</span> value <span class="token operator">=</span> MainState <span class="token punctuation">.</span> Loading _state <span class="token punctuation">.</span> value <span class="token operator">=</span> <span class="token keyword">try</span> <span class="token punctuation">{</span> MainState <span class="token punctuation">.</span> <span class="token function">Users</span> <span class="token punctuation">(</span> repository <span class="token punctuation">.</span> <span class="token function">getUsers</span> <span class="token punctuation">(</span> <span class="token punctuation">)</span> <span class="token punctuation">)</span> <span class="token punctuation">}</span> <span class="token keyword">catch</span> <span class="token punctuation">(</span> e <span class="token operator">:</span> Exception <span class="token punctuation">)</span> <span class="token punctuation">{</span> MainState <span class="token punctuation">.</span> <span class="token function">Error</span> <span class="token punctuation">(</span> e <span class="token punctuation">.</span> localizedMessage <span class="token punctuation">)</span> <span class="token punctuation">}</span> <span class="token punctuation">}</span> <span class="token punctuation">}</span> <span class="token punctuation">}</span> |
Here in ViewModel, we observing userIntent to perform action on it.
And based on the response from the data class, we change the state inside the fetchUser method. And that state is being observed in MainActivity.
We set up ViewModelFactory according to the util package.
We are instantiating the viewModel in this class and we will return the version of ViewModel.
1 2 3 4 5 6 7 8 9 10 11 12 13 14 15 16 17 18 19 | <span class="token keyword">package</span> com <span class="token punctuation">.</span> mindorks <span class="token punctuation">.</span> framework <span class="token punctuation">.</span> mvi <span class="token punctuation">.</span> util <span class="token keyword">import</span> androidx <span class="token punctuation">.</span> lifecycle <span class="token punctuation">.</span> ViewModel <span class="token keyword">import</span> androidx <span class="token punctuation">.</span> lifecycle <span class="token punctuation">.</span> ViewModelProvider <span class="token keyword">import</span> com <span class="token punctuation">.</span> mindorks <span class="token punctuation">.</span> framework <span class="token punctuation">.</span> mvi <span class="token punctuation">.</span> data <span class="token punctuation">.</span> api <span class="token punctuation">.</span> ApiHelper <span class="token keyword">import</span> com <span class="token punctuation">.</span> mindorks <span class="token punctuation">.</span> framework <span class="token punctuation">.</span> mvi <span class="token punctuation">.</span> data <span class="token punctuation">.</span> repository <span class="token punctuation">.</span> MainRepository <span class="token keyword">import</span> com <span class="token punctuation">.</span> mindorks <span class="token punctuation">.</span> framework <span class="token punctuation">.</span> mvi <span class="token punctuation">.</span> ui <span class="token punctuation">.</span> main <span class="token punctuation">.</span> viewmodel <span class="token punctuation">.</span> MainViewModel <span class="token keyword">class</span> <span class="token function">ViewModelFactory</span> <span class="token punctuation">(</span> <span class="token keyword">private</span> <span class="token keyword">val</span> apiHelper <span class="token operator">:</span> ApiHelper <span class="token punctuation">)</span> <span class="token operator">:</span> ViewModelProvider <span class="token punctuation">.</span> <span class="token function">Factory</span> <span class="token punctuation">{</span> <span class="token keyword">override</span> <span class="token keyword">fun</span> <span class="token operator"><</span> T <span class="token operator">:</span> ViewModel <span class="token operator">?</span> <span class="token operator">></span> <span class="token function">create</span> <span class="token punctuation">(</span> modelClass <span class="token operator">:</span> Class <span class="token operator"><</span> T <span class="token operator">></span> <span class="token punctuation">)</span> <span class="token operator">:</span> T <span class="token punctuation">{</span> <span class="token keyword">if</span> <span class="token punctuation">(</span> modelClass <span class="token punctuation">.</span> <span class="token function">isAssignableFrom</span> <span class="token punctuation">(</span> MainViewModel <span class="token operator">::</span> <span class="token keyword">class</span> <span class="token punctuation">.</span> java <span class="token punctuation">)</span> <span class="token punctuation">)</span> <span class="token punctuation">{</span> <span class="token keyword">return</span> <span class="token function">MainViewModel</span> <span class="token punctuation">(</span> <span class="token function">MainRepository</span> <span class="token punctuation">(</span> apiHelper <span class="token punctuation">)</span> <span class="token punctuation">)</span> <span class="token keyword">as</span> T <span class="token punctuation">}</span> <span class="token keyword">throw</span> <span class="token function">IllegalArgumentException</span> <span class="token punctuation">(</span> <span class="token string">"Unknown class name"</span> <span class="token punctuation">)</span> <span class="token punctuation">}</span> <span class="token punctuation">}</span> |
Now let’s set up the XML layout.
update activity_main.xml:
1 2 3 4 5 6 7 8 9 10 11 12 13 14 15 16 17 18 19 20 21 22 23 24 25 26 27 28 29 30 31 32 33 34 35 36 | <span class="token operator"><</span> <span class="token operator">?</span> xml version <span class="token operator">=</span> <span class="token string">"1.0"</span> encoding <span class="token operator">=</span> <span class="token string">"utf-8"</span> <span class="token operator">?</span> <span class="token operator">></span> <span class="token operator"><</span> androidx <span class="token punctuation">.</span> constraintlayout <span class="token punctuation">.</span> widget <span class="token punctuation">.</span> ConstraintLayout xmlns <span class="token operator">:</span> android <span class="token operator">=</span> <span class="token string">"http://schemas.android.com/apk/res/android"</span> xmlns <span class="token operator">:</span> app <span class="token operator">=</span> <span class="token string">"http://schemas.android.com/apk/res-auto"</span> xmlns <span class="token operator">:</span> tools <span class="token operator">=</span> <span class="token string">"http://schemas.android.com/tools"</span> android <span class="token operator">:</span> layout_width <span class="token operator">=</span> <span class="token string">"match_parent"</span> android <span class="token operator">:</span> layout_height <span class="token operator">=</span> <span class="token string">"match_parent"</span> tools <span class="token operator">:</span> context <span class="token operator">=</span> <span class="token string">".ui.main.view.MainActivity"</span> <span class="token operator">></span> <span class="token operator"><</span> androidx <span class="token punctuation">.</span> recyclerview <span class="token punctuation">.</span> widget <span class="token punctuation">.</span> RecyclerView android <span class="token operator">:</span> id <span class="token operator">=</span> <span class="token string">"@+id/recyclerView"</span> android <span class="token operator">:</span> layout_width <span class="token operator">=</span> <span class="token string">"match_parent"</span> android <span class="token operator">:</span> layout_height <span class="token operator">=</span> <span class="token string">"match_parent"</span> android <span class="token operator">:</span> visibility <span class="token operator">=</span> <span class="token string">"gone"</span> <span class="token operator">/</span> <span class="token operator">></span> <span class="token operator"><</span> ProgressBar android <span class="token operator">:</span> id <span class="token operator">=</span> <span class="token string">"@+id/progressBar"</span> android <span class="token operator">:</span> layout_width <span class="token operator">=</span> <span class="token string">"wrap_content"</span> android <span class="token operator">:</span> layout_height <span class="token operator">=</span> <span class="token string">"wrap_content"</span> app <span class="token operator">:</span> layout_constraintBottom_toBottomOf <span class="token operator">=</span> <span class="token string">"parent"</span> app <span class="token operator">:</span> layout_constraintEnd_toEndOf <span class="token operator">=</span> <span class="token string">"parent"</span> android <span class="token operator">:</span> visibility <span class="token operator">=</span> <span class="token string">"gone"</span> app <span class="token operator">:</span> layout_constraintStart_toStartOf <span class="token operator">=</span> <span class="token string">"parent"</span> app <span class="token operator">:</span> layout_constraintTop_toTopOf <span class="token operator">=</span> <span class="token string">"parent"</span> <span class="token operator">/</span> <span class="token operator">></span> <span class="token operator"><</span> Button android <span class="token operator">:</span> id <span class="token operator">=</span> <span class="token string">"@+id/buttonFetchUser"</span> android <span class="token operator">:</span> layout_width <span class="token operator">=</span> <span class="token string">"wrap_content"</span> android <span class="token operator">:</span> layout_height <span class="token operator">=</span> <span class="token string">"wrap_content"</span> android <span class="token operator">:</span> text <span class="token operator">=</span> <span class="token string">"@string/fetch_user"</span> app <span class="token operator">:</span> layout_constraintBottom_toBottomOf <span class="token operator">=</span> <span class="token string">"parent"</span> app <span class="token operator">:</span> layout_constraintEnd_toEndOf <span class="token operator">=</span> <span class="token string">"parent"</span> app <span class="token operator">:</span> layout_constraintStart_toStartOf <span class="token operator">=</span> <span class="token string">"parent"</span> app <span class="token operator">:</span> layout_constraintTop_toTopOf <span class="token operator">=</span> <span class="token string">"parent"</span> <span class="token operator">/</span> <span class="token operator">></span> <span class="token operator"><</span> <span class="token operator">/</span> androidx <span class="token punctuation">.</span> constraintlayout <span class="token punctuation">.</span> widget <span class="token punctuation">.</span> ConstraintLayout <span class="token operator">></span> |
Add item_layout.xml:
1 2 3 4 5 6 7 8 9 10 11 12 13 14 15 16 17 18 19 20 21 22 23 24 25 26 27 28 29 30 31 32 33 34 35 36 37 38 39 40 | <span class="token operator"><</span> <span class="token operator">?</span> xml version <span class="token operator">=</span> <span class="token string">"1.0"</span> encoding <span class="token operator">=</span> <span class="token string">"utf-8"</span> <span class="token operator">?</span> <span class="token operator">></span> <span class="token operator"><</span> androidx <span class="token punctuation">.</span> constraintlayout <span class="token punctuation">.</span> widget <span class="token punctuation">.</span> ConstraintLayout xmlns <span class="token operator">:</span> android <span class="token operator">=</span> <span class="token string">"http://schemas.android.com/apk/res/android"</span> xmlns <span class="token operator">:</span> app <span class="token operator">=</span> <span class="token string">"http://schemas.android.com/apk/res-auto"</span> xmlns <span class="token operator">:</span> tools <span class="token operator">=</span> <span class="token string">"http://schemas.android.com/tools"</span> android <span class="token operator">:</span> id <span class="token operator">=</span> <span class="token string">"@+id/container"</span> android <span class="token operator">:</span> layout_width <span class="token operator">=</span> <span class="token string">"match_parent"</span> android <span class="token operator">:</span> layout_height <span class="token operator">=</span> <span class="token string">"60dp"</span> <span class="token operator">></span> <span class="token operator"><</span> ImageView android <span class="token operator">:</span> id <span class="token operator">=</span> <span class="token string">"@+id/imageViewAvatar"</span> android <span class="token operator">:</span> layout_width <span class="token operator">=</span> <span class="token string">"60dp"</span> android <span class="token operator">:</span> layout_height <span class="token operator">=</span> <span class="token string">"0dp"</span> android <span class="token operator">:</span> padding <span class="token operator">=</span> <span class="token string">"4dp"</span> app <span class="token operator">:</span> layout_constraintBottom_toBottomOf <span class="token operator">=</span> <span class="token string">"parent"</span> app <span class="token operator">:</span> layout_constraintStart_toStartOf <span class="token operator">=</span> <span class="token string">"parent"</span> app <span class="token operator">:</span> layout_constraintTop_toTopOf <span class="token operator">=</span> <span class="token string">"parent"</span> <span class="token operator">/</span> <span class="token operator">></span> <span class="token operator"><</span> androidx <span class="token punctuation">.</span> appcompat <span class="token punctuation">.</span> widget <span class="token punctuation">.</span> AppCompatTextView android <span class="token operator">:</span> id <span class="token operator">=</span> <span class="token string">"@+id/textViewUserName"</span> style <span class="token operator">=</span> <span class="token string">"@style/TextAppearance.AppCompat.Large"</span> android <span class="token operator">:</span> layout_width <span class="token operator">=</span> <span class="token string">"0dp"</span> android <span class="token operator">:</span> layout_height <span class="token operator">=</span> <span class="token string">"wrap_content"</span> android <span class="token operator">:</span> layout_marginStart <span class="token operator">=</span> <span class="token string">"8dp"</span> android <span class="token operator">:</span> layout_marginTop <span class="token operator">=</span> <span class="token string">"4dp"</span> app <span class="token operator">:</span> layout_constraintEnd_toEndOf <span class="token operator">=</span> <span class="token string">"parent"</span> app <span class="token operator">:</span> layout_constraintStart_toEndOf <span class="token operator">=</span> <span class="token string">"@+id/imageViewAvatar"</span> app <span class="token operator">:</span> layout_constraintTop_toTopOf <span class="token operator">=</span> <span class="token string">"parent"</span> tools <span class="token operator">:</span> text <span class="token operator">=</span> <span class="token string">"MindOrks"</span> <span class="token operator">/</span> <span class="token operator">></span> <span class="token operator"><</span> androidx <span class="token punctuation">.</span> appcompat <span class="token punctuation">.</span> widget <span class="token punctuation">.</span> AppCompatTextView android <span class="token operator">:</span> id <span class="token operator">=</span> <span class="token string">"@+id/textViewUserEmail"</span> android <span class="token operator">:</span> layout_width <span class="token operator">=</span> <span class="token string">"0dp"</span> android <span class="token operator">:</span> layout_height <span class="token operator">=</span> <span class="token string">"wrap_content"</span> app <span class="token operator">:</span> layout_constraintEnd_toEndOf <span class="token operator">=</span> <span class="token string">"parent"</span> app <span class="token operator">:</span> layout_constraintStart_toStartOf <span class="token operator">=</span> <span class="token string">"@+id/textViewUserName"</span> app <span class="token operator">:</span> layout_constraintTop_toBottomOf <span class="token operator">=</span> <span class="token string">"@+id/textViewUserName"</span> tools <span class="token operator">:</span> text <span class="token operator">=</span> <span class="token string">"MindOrks"</span> <span class="token operator">/</span> <span class="token operator">></span> <span class="token operator"><</span> <span class="token operator">/</span> androidx <span class="token punctuation">.</span> constraintlayout <span class="token punctuation">.</span> widget <span class="token punctuation">.</span> ConstraintLayout <span class="token operator">></span> |
And string is in strings.xml.
1 2 | <span class="token operator"><</span> string name <span class="token operator">=</span> <span class="token string">"fetch_user"</span> <span class="token operator">></span> Fetch User <span class="token operator"><</span> <span class="token operator">/</span> string <span class="token operator">></span> |
With class MainAcitvity.kt. We will add under view package. This is the user-oriented activity and takes input from the user, this MVI based on this checks the states mentioned in the viewModel and loads the specific state in the view.
Let’s see how MainActivity handles data requests, handles status
1 2 3 4 5 6 7 8 9 10 11 12 13 14 15 16 17 18 19 20 21 22 23 24 25 26 27 28 29 30 31 32 33 34 35 36 37 38 39 40 41 42 43 44 45 46 47 48 49 50 51 52 53 54 55 56 57 58 59 60 61 62 63 64 65 66 67 68 69 70 71 72 73 74 75 76 77 78 79 80 81 82 83 84 85 86 87 88 89 90 91 92 93 94 95 96 97 98 99 100 101 102 103 104 105 106 107 | <span class="token keyword">package</span> com <span class="token punctuation">.</span> mindorks <span class="token punctuation">.</span> framework <span class="token punctuation">.</span> mvi <span class="token punctuation">.</span> ui <span class="token punctuation">.</span> main <span class="token punctuation">.</span> view <span class="token keyword">import</span> android <span class="token punctuation">.</span> os <span class="token punctuation">.</span> Bundle <span class="token keyword">import</span> android <span class="token punctuation">.</span> view <span class="token punctuation">.</span> View <span class="token keyword">import</span> android <span class="token punctuation">.</span> widget <span class="token punctuation">.</span> Toast <span class="token keyword">import</span> androidx <span class="token punctuation">.</span> appcompat <span class="token punctuation">.</span> app <span class="token punctuation">.</span> AppCompatActivity <span class="token keyword">import</span> androidx <span class="token punctuation">.</span> lifecycle <span class="token punctuation">.</span> ViewModelProviders <span class="token keyword">import</span> androidx <span class="token punctuation">.</span> lifecycle <span class="token punctuation">.</span> lifecycleScope <span class="token keyword">import</span> androidx <span class="token punctuation">.</span> recyclerview <span class="token punctuation">.</span> widget <span class="token punctuation">.</span> DividerItemDecoration <span class="token keyword">import</span> androidx <span class="token punctuation">.</span> recyclerview <span class="token punctuation">.</span> widget <span class="token punctuation">.</span> LinearLayoutManager <span class="token keyword">import</span> com <span class="token punctuation">.</span> mindorks <span class="token punctuation">.</span> framework <span class="token punctuation">.</span> mvi <span class="token punctuation">.</span> R <span class="token keyword">import</span> com <span class="token punctuation">.</span> mindorks <span class="token punctuation">.</span> framework <span class="token punctuation">.</span> mvi <span class="token punctuation">.</span> data <span class="token punctuation">.</span> api <span class="token punctuation">.</span> ApiHelperImpl <span class="token keyword">import</span> com <span class="token punctuation">.</span> mindorks <span class="token punctuation">.</span> framework <span class="token punctuation">.</span> mvi <span class="token punctuation">.</span> data <span class="token punctuation">.</span> api <span class="token punctuation">.</span> RetrofitBuilder <span class="token keyword">import</span> com <span class="token punctuation">.</span> mindorks <span class="token punctuation">.</span> framework <span class="token punctuation">.</span> mvi <span class="token punctuation">.</span> data <span class="token punctuation">.</span> model <span class="token punctuation">.</span> User <span class="token keyword">import</span> com <span class="token punctuation">.</span> mindorks <span class="token punctuation">.</span> framework <span class="token punctuation">.</span> mvi <span class="token punctuation">.</span> util <span class="token punctuation">.</span> ViewModelFactory <span class="token keyword">import</span> com <span class="token punctuation">.</span> mindorks <span class="token punctuation">.</span> framework <span class="token punctuation">.</span> mvi <span class="token punctuation">.</span> ui <span class="token punctuation">.</span> main <span class="token punctuation">.</span> adapter <span class="token punctuation">.</span> MainAdapter <span class="token keyword">import</span> com <span class="token punctuation">.</span> mindorks <span class="token punctuation">.</span> framework <span class="token punctuation">.</span> mvi <span class="token punctuation">.</span> ui <span class="token punctuation">.</span> main <span class="token punctuation">.</span> intent <span class="token punctuation">.</span> MainIntent <span class="token keyword">import</span> com <span class="token punctuation">.</span> mindorks <span class="token punctuation">.</span> framework <span class="token punctuation">.</span> mvi <span class="token punctuation">.</span> ui <span class="token punctuation">.</span> main <span class="token punctuation">.</span> viewmodel <span class="token punctuation">.</span> MainViewModel <span class="token keyword">import</span> com <span class="token punctuation">.</span> mindorks <span class="token punctuation">.</span> framework <span class="token punctuation">.</span> mvi <span class="token punctuation">.</span> ui <span class="token punctuation">.</span> main <span class="token punctuation">.</span> viewstate <span class="token punctuation">.</span> MainState <span class="token keyword">import</span> kotlinx <span class="token punctuation">.</span> android <span class="token punctuation">.</span> synthetic <span class="token punctuation">.</span> main <span class="token punctuation">.</span> activity_main <span class="token punctuation">.</span> <span class="token operator">*</span> <span class="token keyword">import</span> kotlinx <span class="token punctuation">.</span> coroutines <span class="token punctuation">.</span> ExperimentalCoroutinesApi <span class="token keyword">import</span> kotlinx <span class="token punctuation">.</span> coroutines <span class="token punctuation">.</span> flow <span class="token punctuation">.</span> collect <span class="token keyword">import</span> kotlinx <span class="token punctuation">.</span> coroutines <span class="token punctuation">.</span> launch <span class="token annotation builtin">@ExperimentalCoroutinesApi</span> <span class="token keyword">class</span> MainActivity <span class="token operator">:</span> <span class="token function">AppCompatActivity</span> <span class="token punctuation">(</span> <span class="token punctuation">)</span> <span class="token punctuation">{</span> <span class="token keyword">private</span> <span class="token keyword">lateinit</span> <span class="token keyword">var</span> mainViewModel <span class="token operator">:</span> MainViewModel <span class="token keyword">private</span> <span class="token keyword">var</span> adapter <span class="token operator">=</span> <span class="token function">MainAdapter</span> <span class="token punctuation">(</span> <span class="token function">arrayListOf</span> <span class="token punctuation">(</span> <span class="token punctuation">)</span> <span class="token punctuation">)</span> <span class="token keyword">override</span> <span class="token keyword">fun</span> <span class="token function">onCreate</span> <span class="token punctuation">(</span> savedInstanceState <span class="token operator">:</span> Bundle <span class="token operator">?</span> <span class="token punctuation">)</span> <span class="token punctuation">{</span> <span class="token keyword">super</span> <span class="token punctuation">.</span> <span class="token function">onCreate</span> <span class="token punctuation">(</span> savedInstanceState <span class="token punctuation">)</span> <span class="token function">setContentView</span> <span class="token punctuation">(</span> R <span class="token punctuation">.</span> layout <span class="token punctuation">.</span> activity_main <span class="token punctuation">)</span> <span class="token function">setupUI</span> <span class="token punctuation">(</span> <span class="token punctuation">)</span> <span class="token function">setupViewModel</span> <span class="token punctuation">(</span> <span class="token punctuation">)</span> <span class="token function">observeViewModel</span> <span class="token punctuation">(</span> <span class="token punctuation">)</span> <span class="token function">setupClicks</span> <span class="token punctuation">(</span> <span class="token punctuation">)</span> <span class="token punctuation">}</span> <span class="token keyword">private</span> <span class="token keyword">fun</span> <span class="token function">setupClicks</span> <span class="token punctuation">(</span> <span class="token punctuation">)</span> <span class="token punctuation">{</span> buttonFetchUser <span class="token punctuation">.</span> <span class="token function">setOnClickListener</span> <span class="token punctuation">{</span> lifecycleScope <span class="token punctuation">.</span> <span class="token function">launch</span> <span class="token punctuation">{</span> mainViewModel <span class="token punctuation">.</span> userIntent <span class="token punctuation">.</span> <span class="token function">send</span> <span class="token punctuation">(</span> MainIntent <span class="token punctuation">.</span> FetchUser <span class="token punctuation">)</span> <span class="token punctuation">}</span> <span class="token punctuation">}</span> <span class="token punctuation">}</span> <span class="token keyword">private</span> <span class="token keyword">fun</span> <span class="token function">setupUI</span> <span class="token punctuation">(</span> <span class="token punctuation">)</span> <span class="token punctuation">{</span> recyclerView <span class="token punctuation">.</span> layoutManager <span class="token operator">=</span> <span class="token function">LinearLayoutManager</span> <span class="token punctuation">(</span> <span class="token keyword">this</span> <span class="token punctuation">)</span> recyclerView <span class="token punctuation">.</span> <span class="token function">run</span> <span class="token punctuation">{</span> <span class="token function">addItemDecoration</span> <span class="token punctuation">(</span> <span class="token function">DividerItemDecoration</span> <span class="token punctuation">(</span> recyclerView <span class="token punctuation">.</span> context <span class="token punctuation">,</span> <span class="token punctuation">(</span> recyclerView <span class="token punctuation">.</span> layoutManager <span class="token keyword">as</span> LinearLayoutManager <span class="token punctuation">)</span> <span class="token punctuation">.</span> orientation <span class="token punctuation">)</span> <span class="token punctuation">)</span> <span class="token punctuation">}</span> recyclerView <span class="token punctuation">.</span> adapter <span class="token operator">=</span> adapter <span class="token punctuation">}</span> <span class="token keyword">private</span> <span class="token keyword">fun</span> <span class="token function">setupViewModel</span> <span class="token punctuation">(</span> <span class="token punctuation">)</span> <span class="token punctuation">{</span> mainViewModel <span class="token operator">=</span> ViewModelProviders <span class="token punctuation">.</span> <span class="token function">of</span> <span class="token punctuation">(</span> <span class="token keyword">this</span> <span class="token punctuation">,</span> <span class="token function">ViewModelFactory</span> <span class="token punctuation">(</span> <span class="token function">ApiHelperImpl</span> <span class="token punctuation">(</span> RetrofitBuilder <span class="token punctuation">.</span> apiService <span class="token punctuation">)</span> <span class="token punctuation">)</span> <span class="token punctuation">)</span> <span class="token punctuation">.</span> <span class="token function">get</span> <span class="token punctuation">(</span> MainViewModel <span class="token operator">::</span> <span class="token keyword">class</span> <span class="token punctuation">.</span> java <span class="token punctuation">)</span> <span class="token punctuation">}</span> <span class="token keyword">private</span> <span class="token keyword">fun</span> <span class="token function">observeViewModel</span> <span class="token punctuation">(</span> <span class="token punctuation">)</span> <span class="token punctuation">{</span> lifecycleScope <span class="token punctuation">.</span> <span class="token function">launch</span> <span class="token punctuation">{</span> mainViewModel <span class="token punctuation">.</span> state <span class="token punctuation">.</span> <span class="token function">collect</span> <span class="token punctuation">{</span> <span class="token keyword">when</span> <span class="token punctuation">(</span> it <span class="token punctuation">)</span> <span class="token punctuation">{</span> <span class="token keyword">is</span> MainState <span class="token punctuation">.</span> Idle <span class="token operator">-></span> <span class="token punctuation">{</span> <span class="token punctuation">}</span> <span class="token keyword">is</span> MainState <span class="token punctuation">.</span> Loading <span class="token operator">-></span> <span class="token punctuation">{</span> buttonFetchUser <span class="token punctuation">.</span> visibility <span class="token operator">=</span> View <span class="token punctuation">.</span> GONE progressBar <span class="token punctuation">.</span> visibility <span class="token operator">=</span> View <span class="token punctuation">.</span> VISIBLE <span class="token punctuation">}</span> <span class="token keyword">is</span> MainState <span class="token punctuation">.</span> Users <span class="token operator">-></span> <span class="token punctuation">{</span> progressBar <span class="token punctuation">.</span> visibility <span class="token operator">=</span> View <span class="token punctuation">.</span> GONE buttonFetchUser <span class="token punctuation">.</span> visibility <span class="token operator">=</span> View <span class="token punctuation">.</span> GONE <span class="token function">renderList</span> <span class="token punctuation">(</span> it <span class="token punctuation">.</span> user <span class="token punctuation">)</span> <span class="token punctuation">}</span> <span class="token keyword">is</span> MainState <span class="token punctuation">.</span> Error <span class="token operator">-></span> <span class="token punctuation">{</span> progressBar <span class="token punctuation">.</span> visibility <span class="token operator">=</span> View <span class="token punctuation">.</span> GONE buttonFetchUser <span class="token punctuation">.</span> visibility <span class="token operator">=</span> View <span class="token punctuation">.</span> VISIBLE Toast <span class="token punctuation">.</span> <span class="token function">makeText</span> <span class="token punctuation">(</span> <span class="token keyword">this</span> <span class="token label symbol">@MainActivity</span> <span class="token punctuation">,</span> it <span class="token punctuation">.</span> error <span class="token punctuation">,</span> Toast <span class="token punctuation">.</span> LENGTH_LONG <span class="token punctuation">)</span> <span class="token punctuation">.</span> <span class="token function">show</span> <span class="token punctuation">(</span> <span class="token punctuation">)</span> <span class="token punctuation">}</span> <span class="token punctuation">}</span> <span class="token punctuation">}</span> <span class="token punctuation">}</span> <span class="token punctuation">}</span> <span class="token keyword">private</span> <span class="token keyword">fun</span> <span class="token function">renderList</span> <span class="token punctuation">(</span> users <span class="token operator">:</span> List <span class="token operator"><</span> User <span class="token operator">></span> <span class="token punctuation">)</span> <span class="token punctuation">{</span> recyclerView <span class="token punctuation">.</span> visibility <span class="token operator">=</span> View <span class="token punctuation">.</span> VISIBLE users <span class="token punctuation">.</span> <span class="token function">let</span> <span class="token punctuation">{</span> listOfUsers <span class="token operator">-></span> listOfUsers <span class="token punctuation">.</span> <span class="token function">let</span> <span class="token punctuation">{</span> adapter <span class="token punctuation">.</span> <span class="token function">addData</span> <span class="token punctuation">(</span> it <span class="token punctuation">)</span> <span class="token punctuation">}</span> <span class="token punctuation">}</span> adapter <span class="token punctuation">.</span> <span class="token function">notifyDataSetChanged</span> <span class="token punctuation">(</span> <span class="token punctuation">)</span> <span class="token punctuation">}</span> <span class="token punctuation">}</span> |
Here, we are submitting the data fetch intent when the (User Actions) button is clicked.
Also, we observing the ViewModel State for changes to state. And, using the “when” condition, we are comparing the response intent state and loading the corresponding states.
Finally, add Internet Access to your project. Add the following to AndroidManifest.xml:
1 2 | <span class="token operator"><</span> uses <span class="token operator">-</span> permission android <span class="token operator">:</span> name <span class="token operator">=</span> <span class="token string">"android.permission.INTERNET"</span> <span class="token operator">/</span> <span class="token operator">></span> |
Conclude
Since we did some of the simplification steps in this project for the Beginners level, so we can improve this project to Advanced level, some things we can improve like after:
Dependency Inject Framework – Dagger is deployed in the project. Create ApiService Singleton and reuse same version for all features. Create base classes like BaseActivity. Handling all API errors in one place in a better way. Create Interfaces for classes whenever needed. Take advantage of Android’s KTX – Kotlin extensions. Write Unit-Test and the like.
I hope you have a better understanding of MVI. and use the right models for your project
Have fun!