MotionLayout “Simple Way To UI Has Beautiful Motion Effect And More
- Tram Ho
To create the motion for the screen as above you will have to handle the animation for each view very complex, maybe at first you will be confused with CollapsingToolbarLayout in Android. When you look carefully, it will not be so. Satisfying this requirement you will have to create multiple files (xml animations in the anim folder) and then attach them to the child views, followed by the action of dragging and dropping the view group. Say so much to do!
Today, I will learn about MotionLayout with Google integrated into the ConstraintLayout library from version 2.0, although it is still quite new, but since the layout has been strongly supported for the Material Design interfaces and users. The interaction feels like it's "much better". So is there anything I don't start right away …?
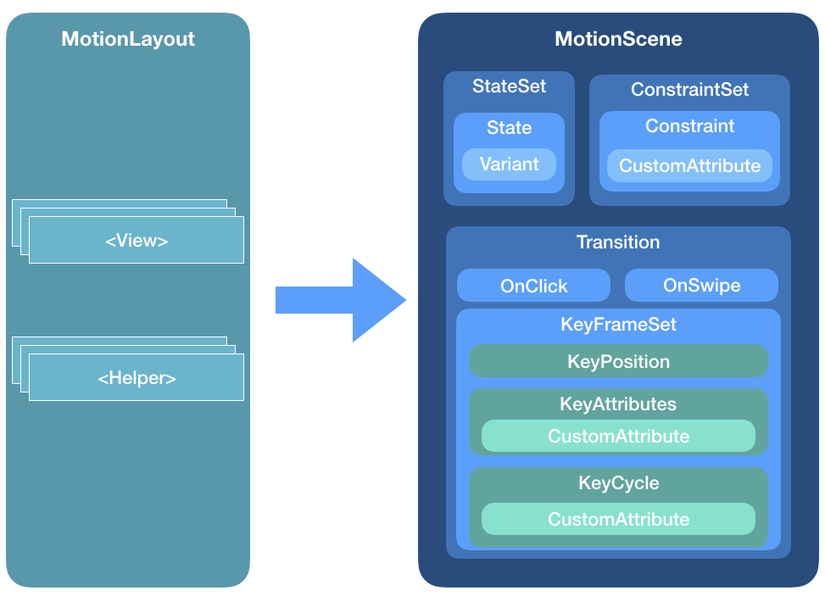
(The whole structure image of MotionLayout)
Basic ingredients and how to integrate
Integrate into the project only 3s, fast:
1 | <span class="token selector">dependencies</span> <span class="token punctuation">{</span> implementation <span class="token string">'com.android.support.constraint:constraint-layout:2.0.0-beta1'</span> <span class="token punctuation">}</span> |
Although MotionLayout has been from version 2.0, the latest version is "2.0.0-beta1" so I use this version
The reason for the structure of MotionLayout is so much so I talk about 2 main parts in it, I hope that the following article will update you more.
MotionScene
Unlike a normal layout that you use often, all layouts displayed with parameters will be created and saved in another res / xml determined by MotionScene (image). It contains all that is needed for animation.
Including components:
- ConstraintSets
- StateSet
- Transition
ConstraintSet
This is an important component in MotionScene, as you saw in part a. It is imperative: 1 MotionLayout must always have at least 2 start and end state, so it has at least 2 ConstrainSet
Ingredient:
- Constraint: where to adjust the properties of the view in MotionLayout such as: size, color, position … Just need to provide the child view id exactly, it will automatically execute for you.
- CustomAttribute: You can create individual properties for each View as follows:
customColorValue
customIntegerValue
customFloatValue
customStringValue
customDimension
customBoolean
Next I will say a part of Transition
Transition
Even that name indicates its function, perform the conversion of ConstraintSet from start to end according to the way you install. Of course it will need a user action to interact with that view. Here it supports 2 main actions:
- OnClick: Clicking on a view operation does a transition
- OnSwipe: Swipe from A >> B
After that, I will say more clearly in the example below because now I need to have actual code to see it quickly!
Deploying direct examples
With the original image, we will always take this example to feel a little different from the usual way! I will go from the step of creating the main view always and remove the import library step because it is very simple, everyone just copy my import line above is done.
The first step is to create motion_info_detail.xml where the view of the Information Detail screen is displayed as follows:
motion_info_detail.xml
1 | <span class="token operator"><</span> androidx <span class="token punctuation">.</span> constraintlayout <span class="token punctuation">.</span> motion <span class="token punctuation">.</span> widget <span class="token punctuation">.</span> MotionLayout xmlns <span class="token operator">:</span> android <span class="token operator">=</span> <span class="token string">"http://schemas.android.com/apk/res/android"</span> xmlns <span class="token operator">:</span> app <span class="token operator">=</span> <span class="token string">"http://schemas.android.com/apk/res-auto"</span> xmlns <span class="token operator">:</span> tools <span class="token operator">=</span> <span class="token string">"http://schemas.android.com/tools"</span> android <span class="token operator">:</span> id <span class="token operator">=</span> <span class="token string">"@+id/motionLayout"</span> android <span class="token operator">:</span> layout_width <span class="token operator">=</span> <span class="token string">"match_parent"</span> android <span class="token operator">:</span> layout_height <span class="token operator">=</span> <span class="token string">"match_parent"</span> app <span class="token operator">:</span> layoutDescription <span class="token operator">=</span> <span class="token string">"@xml/scene_20"</span> <span class="token operator">></span> <span class="token operator"><</span> ImageView android <span class="token operator">:</span> id <span class="token operator">=</span> <span class="token string">"@+id/img_detail"</span> android <span class="token operator">:</span> layout_width <span class="token operator">=</span> <span class="token string">"wrap_content"</span> android <span class="token operator">:</span> layout_height <span class="token operator">=</span> <span class="token string">"wrap_content"</span> android <span class="token operator">:</span> scaleType <span class="token operator">=</span> <span class="token string">"centerCrop"</span> android <span class="token operator">:</span> visibility <span class="token operator">=</span> <span class="token string">"invisible"</span> app <span class="token operator">:</span> srcCompat <span class="token operator">=</span> <span class="token string">"@drawable/sunset2"</span> tools <span class="token operator">:</span> layout_editor_absoluteX <span class="token operator">=</span> <span class="token string">"105dp"</span> tools <span class="token operator">:</span> layout_editor_absoluteY <span class="token operator">=</span> <span class="token string">"115dp"</span> <span class="token operator">/</span> <span class="token operator">></span> <span class="token operator"><</span> TextView android <span class="token operator">:</span> id <span class="token operator">=</span> <span class="token string">"@+id/tv_detail"</span> android <span class="token operator">:</span> layout_width <span class="token operator">=</span> <span class="token string">"wrap_content"</span> android <span class="token operator">:</span> layout_height <span class="token operator">=</span> <span class="token string">"wrap_content"</span> android <span class="token operator">:</span> text <span class="token operator">=</span> <span class="token string">"@string/lorem"</span> tools <span class="token operator">:</span> layout_editor_absoluteX <span class="token operator">=</span> <span class="token string">"88dp"</span> tools <span class="token operator">:</span> layout_editor_absoluteY <span class="token operator">=</span> <span class="token string">"510dp"</span> tools <span class="token operator">:</span> text <span class="token operator">=</span> <span class="token string">"@tools:sample/lorem/random"</span> <span class="token operator">/</span> <span class="token operator">></span> <span class="token operator"><</span> ImageButton android <span class="token operator">:</span> id <span class="token operator">=</span> <span class="token string">"@+id/ic_info"</span> android <span class="token operator">:</span> layout_width <span class="token operator">=</span> <span class="token string">"wrap_content"</span> android <span class="token operator">:</span> layout_height <span class="token operator">=</span> <span class="token string">"wrap_content"</span> android <span class="token operator">:</span> background <span class="token operator">=</span> <span class="token string">"@drawable/wcircle"</span> android <span class="token operator">:</span> tint <span class="token operator">=</span> <span class="token string">"#3d76df"</span> android <span class="token operator">:</span> onClick <span class="token operator">=</span> <span class="token string">"changeState"</span> app <span class="token operator">:</span> srcCompat <span class="token operator">=</span> <span class="token string">"@drawable/ic_info_black_24dp"</span> tools <span class="token operator">:</span> layout_editor_absoluteX <span class="token operator">=</span> <span class="token string">"167dp"</span> tools <span class="token operator">:</span> layout_editor_absoluteY <span class="token operator">=</span> <span class="token string">"434dp"</span> <span class="token operator">/</span> <span class="token operator">></span> <span class="token operator"><</span> TextView android <span class="token operator">:</span> id <span class="token operator">=</span> <span class="token string">"@+id/tv_title"</span> android <span class="token operator">:</span> layout_width <span class="token operator">=</span> <span class="token string">"wrap_content"</span> android <span class="token operator">:</span> layout_height <span class="token operator">=</span> <span class="token string">"wrap_content"</span> android <span class="token operator">:</span> text <span class="token operator">=</span> <span class="token string">"Informations"</span> android <span class="token operator">:</span> textSize <span class="token operator">=</span> <span class="token string">"24sp"</span> tools <span class="token operator">:</span> layout_editor_absoluteX <span class="token operator">=</span> <span class="token string">"8dp"</span> tools <span class="token operator">:</span> layout_editor_absoluteY <span class="token operator">=</span> <span class="token string">"465dp"</span> <span class="token operator">/</span> <span class="token operator">></span> <span class="token operator"><</span> ImageView android <span class="token operator">:</span> id <span class="token operator">=</span> <span class="token string">"@+id/ic_arrow"</span> android <span class="token operator">:</span> layout_width <span class="token operator">=</span> <span class="token string">"wrap_content"</span> android <span class="token operator">:</span> layout_height <span class="token operator">=</span> <span class="token string">"wrap_content"</span> android <span class="token operator">:</span> rotation <span class="token operator">=</span> <span class="token string">"0"</span> app <span class="token operator">:</span> srcCompat <span class="token operator">=</span> <span class="token string">"@drawable/ic_keyboard_arrow_right_black_24dp"</span> tools <span class="token operator">:</span> layout_editor_absoluteX <span class="token operator">=</span> <span class="token string">"264dp"</span> tools <span class="token operator">:</span> layout_editor_absoluteY <span class="token operator">=</span> <span class="token string">"586dp"</span> <span class="token operator">/</span> <span class="token operator">></span> <span class="token operator"><</span> com <span class="token punctuation">.</span> google <span class="token punctuation">.</span> androidstudio <span class="token punctuation">.</span> motionlayoutexample <span class="token punctuation">.</span> helpers <span class="token punctuation">.</span> ArrowFlyinBounceHelper android <span class="token operator">:</span> id <span class="token operator">=</span> <span class="token string">"@+id/helper"</span> android <span class="token operator">:</span> layout_width <span class="token operator">=</span> <span class="token string">"wrap_content"</span> android <span class="token operator">:</span> layout_height <span class="token operator">=</span> <span class="token string">"wrap_content"</span> app <span class="token operator">:</span> constraint_referenced_ids <span class="token operator">=</span> <span class="token string">"ic_arrow"</span> <span class="token operator">/</span> <span class="token operator">></span> <span class="token operator"><</span> <span class="token operator">/</span> androidx <span class="token punctuation">.</span> constraintlayout <span class="token punctuation">.</span> motion <span class="token punctuation">.</span> widget <span class="token punctuation">.</span> MotionLayout <span class="token operator">></span> |
Above I used custom animation extended from Constrain Helper, I named that class "ArrowFlyinBounceHelper" task of creating an effect to fly out at the beginning of the arrow. (You can see in the image file for example)
That class is as follows:
ArrowFlyinBounceHelper.kt
1 | <span class="token keyword">class</span> <span class="token class-name">ArrowFlyinBounceHelper</span> <span class="token punctuation">:</span> ConstraintHelper <span class="token punctuation">{</span> <span class="token keyword">protected</span> <span class="token keyword">var</span> mContainer <span class="token punctuation">:</span> ConstraintLayout <span class="token operator">?</span> <span class="token operator">=</span> <span class="token keyword">null</span> <span class="token function">constructor</span> <span class="token punctuation">(</span> context <span class="token punctuation">:</span> Context <span class="token punctuation">)</span> <span class="token punctuation">:</span> <span class="token keyword">super</span> <span class="token punctuation">(</span> context <span class="token punctuation">)</span> <span class="token punctuation">{</span> <span class="token punctuation">}</span> <span class="token function">constructor</span> <span class="token punctuation">(</span> context <span class="token punctuation">:</span> Context <span class="token punctuation">,</span> attrs <span class="token punctuation">:</span> AttributeSet <span class="token punctuation">)</span> <span class="token punctuation">:</span> <span class="token keyword">super</span> <span class="token punctuation">(</span> context <span class="token punctuation">,</span> attrs <span class="token punctuation">)</span> <span class="token punctuation">{</span> <span class="token punctuation">}</span> <span class="token function">constructor</span> <span class="token punctuation">(</span> context <span class="token punctuation">:</span> Context <span class="token punctuation">,</span> attrs <span class="token punctuation">:</span> AttributeSet <span class="token punctuation">,</span> defStyleAttr <span class="token punctuation">:</span> Int <span class="token punctuation">)</span> <span class="token punctuation">:</span> <span class="token keyword">super</span> <span class="token punctuation">(</span> context <span class="token punctuation">,</span> attrs <span class="token punctuation">,</span> defStyleAttr <span class="token punctuation">)</span> <span class="token punctuation">{</span> <span class="token punctuation">}</span> <span class="token comment">/** * @param container * @hide */</span> override fun <span class="token function">updatePreLayout</span> <span class="token punctuation">(</span> container <span class="token punctuation">:</span> ConstraintLayout <span class="token punctuation">)</span> <span class="token punctuation">{</span> <span class="token keyword">if</span> <span class="token punctuation">(</span> mContainer <span class="token operator">!==</span> container <span class="token punctuation">)</span> <span class="token punctuation">{</span> val views <span class="token operator">=</span> <span class="token function">getViews</span> <span class="token punctuation">(</span> container <span class="token punctuation">)</span> <span class="token keyword">for</span> <span class="token punctuation">(</span> i <span class="token keyword">in</span> <span class="token number">0</span> until mCount <span class="token punctuation">)</span> <span class="token punctuation">{</span> val view <span class="token operator">=</span> views <span class="token punctuation">[</span> i <span class="token punctuation">]</span> val animator <span class="token operator">=</span> ObjectAnimator <span class="token punctuation">.</span> <span class="token function">ofFloat</span> <span class="token punctuation">(</span> view <span class="token punctuation">,</span> <span class="token string">"translationX"</span> <span class="token punctuation">,</span> <span class="token operator">-</span> <span class="token number">2000</span> F <span class="token punctuation">,</span> <span class="token number">0</span> F <span class="token punctuation">)</span> <span class="token punctuation">.</span> <span class="token function">setDuration</span> <span class="token punctuation">(</span> <span class="token number">1000</span> <span class="token punctuation">)</span> animator <span class="token punctuation">.</span> <span class="token function">setInterpolator</span> <span class="token punctuation">(</span> <span class="token function">BounceInterpolator</span> <span class="token punctuation">(</span> <span class="token punctuation">)</span> <span class="token punctuation">)</span> animator <span class="token punctuation">.</span> <span class="token function">start</span> <span class="token punctuation">(</span> <span class="token punctuation">)</span> <span class="token punctuation">}</span> <span class="token punctuation">}</span> mContainer <span class="token operator">=</span> container <span class="token punctuation">}</span> <span class="token punctuation">}</span> |
You probably remember, for each xml file for MotionLayout you will have to create a Scene file for it specific to that file located in the folder: res / xml If you haven't already, create this folder.
scene_info_detail.xml
1 | <span class="token operator"><</span> MotionScene xmlns <span class="token operator">:</span> android <span class="token operator">=</span> <span class="token string">"http://schemas.android.com/apk/res/android"</span> xmlns <span class="token operator">:</span> motion <span class="token operator">=</span> <span class="token string">"http://schemas.android.com/apk/res-auto"</span> <span class="token operator">></span> <span class="token operator"><</span> ConstraintSet android <span class="token operator">:</span> id <span class="token operator">=</span> <span class="token string">"@+id/start"</span> <span class="token operator">></span> <span class="token operator"><</span> Constraint android <span class="token operator">:</span> id <span class="token operator">=</span> <span class="token string">"@id/img_detail"</span> android <span class="token operator">:</span> layout_width <span class="token operator">=</span> <span class="token string">"0dp"</span> android <span class="token operator">:</span> layout_height <span class="token operator">=</span> <span class="token string">"match_parent"</span> android <span class="token operator">:</span> layout_marginEnd <span class="token operator">=</span> <span class="token string">"0dp"</span> motion <span class="token operator">:</span> layout_constraintEnd_toEndOf <span class="token operator">=</span> <span class="token string">"parent"</span> motion <span class="token operator">:</span> layout_constraintStart_toStartOf <span class="token operator">=</span> <span class="token string">"parent"</span> motion <span class="token operator">:</span> layout_constraintTop_toTopOf <span class="token operator">=</span> <span class="token string">"parent"</span> motion <span class="token operator">:</span> layout_editor_absoluteX <span class="token operator">=</span> <span class="token string">"0dp"</span> motion <span class="token operator">:</span> layout_editor_absoluteY <span class="token operator">=</span> <span class="token string">"0dp"</span> <span class="token operator">/</span> <span class="token operator">></span> <span class="token operator"><</span> Constraint android <span class="token operator">:</span> id <span class="token operator">=</span> <span class="token string">"@id/tv_detail"</span> android <span class="token operator">:</span> layout_width <span class="token operator">=</span> <span class="token string">"0dp"</span> android <span class="token operator">:</span> layout_height <span class="token operator">=</span> <span class="token string">"wrap_content"</span> android <span class="token operator">:</span> layout_marginStart <span class="token operator">=</span> <span class="token string">"16dp"</span> android <span class="token operator">:</span> layout_marginLeft <span class="token operator">=</span> <span class="token string">"16dp"</span> android <span class="token operator">:</span> layout_marginTop <span class="token operator">=</span> <span class="token string">"16dp"</span> android <span class="token operator">:</span> layout_marginEnd <span class="token operator">=</span> <span class="token string">"16dp"</span> android <span class="token operator">:</span> layout_marginRight <span class="token operator">=</span> <span class="token string">"16dp"</span> android <span class="token operator">:</span> alpha <span class="token operator">=</span> <span class="token string">"0"</span> motion <span class="token operator">:</span> layout_constraintEnd_toEndOf <span class="token operator">=</span> <span class="token string">"parent"</span> motion <span class="token operator">:</span> layout_constraintStart_toStartOf <span class="token operator">=</span> <span class="token string">"parent"</span> motion <span class="token operator">:</span> layout_constraintTop_toBottomOf <span class="token operator">=</span> <span class="token string">"@+id/tv_title"</span> <span class="token operator">/</span> <span class="token operator">></span> <span class="token operator"><</span> Constraint android <span class="token operator">:</span> id <span class="token operator">=</span> <span class="token string">"@id/ic_info"</span> android <span class="token operator">:</span> layout_width <span class="token operator">=</span> <span class="token string">"48dp"</span> android <span class="token operator">:</span> layout_height <span class="token operator">=</span> <span class="token string">"48dp"</span> android <span class="token operator">:</span> layout_marginEnd <span class="token operator">=</span> <span class="token string">"16dp"</span> android <span class="token operator">:</span> layout_marginRight <span class="token operator">=</span> <span class="token string">"16dp"</span> android <span class="token operator">:</span> layout_marginBottom <span class="token operator">=</span> <span class="token string">"16dp"</span> motion <span class="token operator">:</span> layout_constraintBottom_toBottomOf <span class="token operator">=</span> <span class="token string">"parent"</span> motion <span class="token operator">:</span> layout_constraintEnd_toEndOf <span class="token operator">=</span> <span class="token string">"parent"</span> <span class="token operator">/</span> <span class="token operator">></span> <span class="token operator"><</span> Constraint android <span class="token operator">:</span> id <span class="token operator">=</span> <span class="token string">"@id/tv_title"</span> android <span class="token operator">:</span> layout_width <span class="token operator">=</span> <span class="token string">"wrap_content"</span> android <span class="token operator">:</span> layout_height <span class="token operator">=</span> <span class="token string">"wrap_content"</span> android <span class="token operator">:</span> layout_marginTop <span class="token operator">=</span> <span class="token string">"8dp"</span> android <span class="token operator">:</span> alpha <span class="token operator">=</span> <span class="token string">"0"</span> motion <span class="token operator">:</span> layout_constraintStart_toStartOf <span class="token operator">=</span> <span class="token string">"@+id/tv_detail"</span> motion <span class="token operator">:</span> layout_constraintTop_toBottomOf <span class="token operator">=</span> <span class="token string">"@+id/img_detail"</span> <span class="token operator">/</span> <span class="token operator">></span> <span class="token operator"><</span> Constraint android <span class="token operator">:</span> id <span class="token operator">=</span> <span class="token string">"@id/ic_arrow"</span> android <span class="token operator">:</span> layout_width <span class="token operator">=</span> <span class="token string">"wrap_content"</span> android <span class="token operator">:</span> layout_height <span class="token operator">=</span> <span class="token string">"wrap_content"</span> android <span class="token operator">:</span> layout_marginEnd <span class="token operator">=</span> <span class="token string">"0dp"</span> android <span class="token operator">:</span> layout_marginRight <span class="token operator">=</span> <span class="token string">"0dp"</span> android <span class="token operator">:</span> rotation <span class="token operator">=</span> <span class="token string">"0"</span> motion <span class="token operator">:</span> layout_constraintBottom_toBottomOf <span class="token operator">=</span> <span class="token string">"@+id/ic_info"</span> motion <span class="token operator">:</span> layout_constraintEnd_toStartOf <span class="token operator">=</span> <span class="token string">"@+id/ic_info"</span> motion <span class="token operator">:</span> layout_constraintTop_toTopOf <span class="token operator">=</span> <span class="token string">"@+id/ic_info"</span> <span class="token operator">/</span> <span class="token operator">></span> <span class="token operator"><</span> <span class="token operator">/</span> ConstraintSet <span class="token operator">></span> <span class="token operator"><</span> ConstraintSet android <span class="token operator">:</span> id <span class="token operator">=</span> <span class="token string">"@+id/end"</span> <span class="token operator">></span> <span class="token operator"><</span> Constraint android <span class="token operator">:</span> id <span class="token operator">=</span> <span class="token string">"@id/img_detail"</span> android <span class="token operator">:</span> layout_width <span class="token operator">=</span> <span class="token string">"0dp"</span> android <span class="token operator">:</span> layout_height <span class="token operator">=</span> <span class="token string">"426dp"</span> android <span class="token operator">:</span> layout_marginTop <span class="token operator">=</span> <span class="token string">"0dp"</span> android <span class="token operator">:</span> layout_marginBottom <span class="token operator">=</span> <span class="token string">"-1dp"</span> motion <span class="token operator">:</span> layout_constraintEnd_toEndOf <span class="token operator">=</span> <span class="token string">"parent"</span> motion <span class="token operator">:</span> layout_constraintTop_toTopOf <span class="token operator">=</span> <span class="token string">"parent"</span> <span class="token operator">/</span> <span class="token operator">></span> <span class="token operator"><</span> Constraint android <span class="token operator">:</span> id <span class="token operator">=</span> <span class="token string">"@id/tv_detail"</span> android <span class="token operator">:</span> layout_width <span class="token operator">=</span> <span class="token string">"0dp"</span> android <span class="token operator">:</span> layout_height <span class="token operator">=</span> <span class="token string">"0dp"</span> android <span class="token operator">:</span> layout_marginStart <span class="token operator">=</span> <span class="token string">"16dp"</span> android <span class="token operator">:</span> layout_marginLeft <span class="token operator">=</span> <span class="token string">"16dp"</span> android <span class="token operator">:</span> layout_marginTop <span class="token operator">=</span> <span class="token string">"16dp"</span> android <span class="token operator">:</span> layout_marginEnd <span class="token operator">=</span> <span class="token string">"16dp"</span> android <span class="token operator">:</span> layout_marginRight <span class="token operator">=</span> <span class="token string">"16dp"</span> android <span class="token operator">:</span> alpha <span class="token operator">=</span> <span class="token string">"1"</span> motion <span class="token operator">:</span> layout_constraintBottom_toBottomOf <span class="token operator">=</span> <span class="token string">"parent"</span> motion <span class="token operator">:</span> layout_constraintEnd_toEndOf <span class="token operator">=</span> <span class="token string">"parent"</span> motion <span class="token operator">:</span> layout_constraintStart_toStartOf <span class="token operator">=</span> <span class="token string">"parent"</span> motion <span class="token operator">:</span> layout_constraintTop_toBottomOf <span class="token operator">=</span> <span class="token string">"@+id/tv_title"</span> <span class="token operator">/</span> <span class="token operator">></span> <span class="token operator"><</span> Constraint android <span class="token operator">:</span> id <span class="token operator">=</span> <span class="token string">"@id/ic_info"</span> android <span class="token operator">:</span> layout_width <span class="token operator">=</span> <span class="token string">"64dp"</span> android <span class="token operator">:</span> layout_height <span class="token operator">=</span> <span class="token string">"64dp"</span> motion <span class="token operator">:</span> layout_constraintBottom_toBottomOf <span class="token operator">=</span> <span class="token string">"@+id/img_detail"</span> motion <span class="token operator">:</span> layout_constraintEnd_toEndOf <span class="token operator">=</span> <span class="token string">"parent"</span> motion <span class="token operator">:</span> layout_constraintStart_toStartOf <span class="token operator">=</span> <span class="token string">"parent"</span> motion <span class="token operator">:</span> layout_constraintTop_toBottomOf <span class="token operator">=</span> <span class="token string">"@+id/img_detail"</span> <span class="token operator">/</span> <span class="token operator">></span> <span class="token operator"><</span> Constraint android <span class="token operator">:</span> id <span class="token operator">=</span> <span class="token string">"@id/tv_title"</span> android <span class="token operator">:</span> layout_width <span class="token operator">=</span> <span class="token string">"wrap_content"</span> android <span class="token operator">:</span> layout_height <span class="token operator">=</span> <span class="token string">"wrap_content"</span> android <span class="token operator">:</span> layout_marginTop <span class="token operator">=</span> <span class="token string">"8dp"</span> android <span class="token operator">:</span> alpha <span class="token operator">=</span> <span class="token string">"1"</span> motion <span class="token operator">:</span> layout_constraintStart_toStartOf <span class="token operator">=</span> <span class="token string">"@+id/tv_detail"</span> motion <span class="token operator">:</span> layout_constraintTop_toBottomOf <span class="token operator">=</span> <span class="token string">"@+id/img_detail"</span> <span class="token operator">/</span> <span class="token operator">></span> <span class="token operator"><</span> Constraint android <span class="token operator">:</span> id <span class="token operator">=</span> <span class="token string">"@id/ic_arrow"</span> android <span class="token operator">:</span> layout_width <span class="token operator">=</span> <span class="token string">"wrap_content"</span> android <span class="token operator">:</span> layout_height <span class="token operator">=</span> <span class="token string">"wrap_content"</span> android <span class="token operator">:</span> layout_marginEnd <span class="token operator">=</span> <span class="token string">"8dp"</span> android <span class="token operator">:</span> layout_marginRight <span class="token operator">=</span> <span class="token string">"8dp"</span> android <span class="token operator">:</span> layout_marginBottom <span class="token operator">=</span> <span class="token string">"0dp"</span> android <span class="token operator">:</span> rotation <span class="token operator">=</span> <span class="token string">"90"</span> motion <span class="token operator">:</span> layout_constraintBottom_toBottomOf <span class="token operator">=</span> <span class="token string">"@+id/img_detail"</span> motion <span class="token operator">:</span> layout_constraintEnd_toEndOf <span class="token operator">=</span> <span class="token string">"parent"</span> <span class="token operator">/</span> <span class="token operator">></span> <span class="token operator"><</span> <span class="token operator">/</span> ConstraintSet <span class="token operator">></span> <span class="token operator"><</span> Transition motion <span class="token operator">:</span> constraintSetEnd <span class="token operator">=</span> <span class="token string">"@+id/end"</span> motion <span class="token operator">:</span> constraintSetStart <span class="token operator">=</span> <span class="token string">"@+id/start"</span> motion <span class="token operator">:</span> duration <span class="token operator">=</span> <span class="token string">"1000"</span> motion <span class="token operator">:</span> motionInterpolator <span class="token operator">=</span> <span class="token string">"linear"</span> <span class="token operator">></span> <span class="token operator"><</span> OnSwipe motion <span class="token operator">:</span> touchAnchorId <span class="token operator">=</span> <span class="token string">"@+id/img_detail"</span> motion <span class="token operator">:</span> touchAnchorSide <span class="token operator">=</span> <span class="token string">"bottom"</span> motion <span class="token operator">:</span> dragDirection <span class="token operator">=</span> <span class="token string">"dragUp"</span> <span class="token operator">/</span> <span class="token operator">></span> <span class="token generics function"><span class="token punctuation"><</span> KeyFrameSet <span class="token punctuation">></span></span> <span class="token operator"><</span> KeyAttribute android <span class="token operator">:</span> rotation <span class="token operator">=</span> <span class="token string">"0"</span> motion <span class="token operator">:</span> framePosition <span class="token operator">=</span> <span class="token string">"1"</span> motion <span class="token operator">:</span> motionTarget <span class="token operator">=</span> <span class="token string">"@id/ic_arrow"</span> <span class="token operator">/</span> <span class="token operator">></span> <span class="token operator"><</span> KeyPosition motion <span class="token operator">:</span> framePosition <span class="token operator">=</span> <span class="token string">"27"</span> motion <span class="token operator">:</span> percentX <span class="token operator">=</span> <span class="token string">"-0.2585034"</span> motion <span class="token operator">:</span> percentY <span class="token operator">=</span> <span class="token string">"0.50630915"</span> motion <span class="token operator">:</span> motionTarget <span class="token operator">=</span> <span class="token string">"@id/ic_arrow"</span> motion <span class="token operator">:</span> keyPositionType <span class="token operator">=</span> <span class="token string">"deltaRelative"</span> <span class="token operator">/</span> <span class="token operator">></span> <span class="token operator"><</span> <span class="token operator">/</span> KeyFrameSet <span class="token operator">></span> <span class="token operator"><</span> <span class="token operator">/</span> Transition <span class="token operator">></span> <span class="token operator"><</span> <span class="token operator">/</span> MotionScene <span class="token operator">></span> |
Apply to the above theory you saw immediately in this MotionScene I have 2 states (start and end), for example in start state:
1 | <span class="token operator"><</span> ConstraintSet android <span class="token operator">:</span> id <span class="token operator">=</span> <span class="token string">"@+id/start"</span> <span class="token operator">></span> <span class="token operator"><</span> Constraint android <span class="token operator">:</span> id <span class="token operator">=</span> <span class="token string">"@id/img_detail"</span> android <span class="token operator">:</span> layout_width <span class="token operator">=</span> <span class="token string">"0dp"</span> android <span class="token operator">:</span> layout_height <span class="token operator">=</span> <span class="token string">"match_parent"</span> android <span class="token operator">:</span> layout_marginEnd <span class="token operator">=</span> <span class="token string">"0dp"</span> motion <span class="token operator">:</span> layout_constraintEnd_toEndOf <span class="token operator">=</span> <span class="token string">"parent"</span> motion <span class="token operator">:</span> layout_constraintStart_toStartOf <span class="token operator">=</span> <span class="token string">"parent"</span> motion <span class="token operator">:</span> layout_constraintTop_toTopOf <span class="token operator">=</span> <span class="token string">"parent"</span> motion <span class="token operator">:</span> layout_editor_absoluteX <span class="token operator">=</span> <span class="token string">"0dp"</span> motion <span class="token operator">:</span> layout_editor_absoluteY <span class="token operator">=</span> <span class="token string">"0dp"</span> <span class="token operator">/</span> <span class="token operator">></span> <span class="token punctuation">.</span> <span class="token punctuation">.</span> <span class="token punctuation">.</span> <span class="token punctuation">.</span> <span class="token operator"><</span> <span class="token operator">/</span> ConstraintSet <span class="token operator">></span> |
When you first enter the screen you want the detail image to be fullscreen, point the id of img_detail to this Constraint and set the required attributes (remember to point the correct id set on the layout motion. Next when the end state is If you want any detail detail to be exactly "426dp", I changed the properties as follows: Looking at each code slowly, it is easy to see.
1 | <span class="token operator"><</span> ConstraintSet android <span class="token operator">:</span> id <span class="token operator">=</span> <span class="token string">"@+id/end"</span> <span class="token operator">></span> <span class="token operator"><</span> Constraint android <span class="token operator">:</span> id <span class="token operator">=</span> <span class="token string">"@id/img_detail"</span> android <span class="token operator">:</span> layout_width <span class="token operator">=</span> <span class="token string">"0dp"</span> android <span class="token operator">:</span> layout_height <span class="token operator">=</span> <span class="token string">"426dp"</span> android <span class="token operator">:</span> layout_marginTop <span class="token operator">=</span> <span class="token string">"0dp"</span> android <span class="token operator">:</span> layout_marginBottom <span class="token operator">=</span> <span class="token string">"-1dp"</span> motion <span class="token operator">:</span> layout_constraintEnd_toEndOf <span class="token operator">=</span> <span class="token string">"parent"</span> motion <span class="token operator">:</span> layout_constraintTop_toTopOf <span class="token operator">=</span> <span class="token string">"parent"</span> <span class="token operator">/</span> <span class="token operator">></span> <span class="token punctuation">.</span> <span class="token punctuation">.</span> <span class="token punctuation">.</span> <span class="token punctuation">.</span> <span class="token operator"><</span> <span class="token operator">/</span> ConstraintSet <span class="token operator">></span> |
So similar to the other child views, you only change the size and position. Next to the important part is Transition, we have installed some properties:
- motion: duration = "1000 ″: delay in 1s
- motion: motionInterpolator = "linear": action swipe is executed vertically
1 | <span class="token operator"><</span> OnSwipe motion <span class="token operator">:</span> touchAnchorId <span class="token operator">=</span> <span class="token string">"@+id/img_detail"</span> motion <span class="token operator">:</span> touchAnchorSide <span class="token operator">=</span> <span class="token string">"bottom"</span> motion <span class="token operator">:</span> dragDirection <span class="token operator">=</span> <span class="token string">"dragUp"</span> <span class="token operator">/</span> <span class="token operator">></span> |
The rest is "KeyFrameSet" I will say in the following article because the content of this section will be very long to understand this section.
summary
As you can see, designing a interface with our desired effect is much simpler, you just need to install the animation in xml without having to touch the logic code. All transitions like this have MotionScene worried, and the result is very smooth motion that feels like it "Keeping Hands". This is the biggest advantage when using MotionLayout, you can also perform more complex animations and directly explain to users what the Application function is.
Source : viblo.asia