Introduce
Shortening the registration process to increase the user experience is a common trend of today’s applications. The use of SNS platforms for authentication has become popular and supported by many platforms such as Facebook, Line, Twitter, Apple, …
In today’s article, I will guide the steps to add the LINE authentication feature in the iOS project
Configure LINE
Step 1: Access Link developers.line.biz and log in with your LINE account

You can use your personal LINE account or sign up for a LINE Business account for your app
Step 2: Create a Provider Provider that can be an individual, a company or an organization that provides translation through the LINE platform. Here I will create a provider named DemoLogin 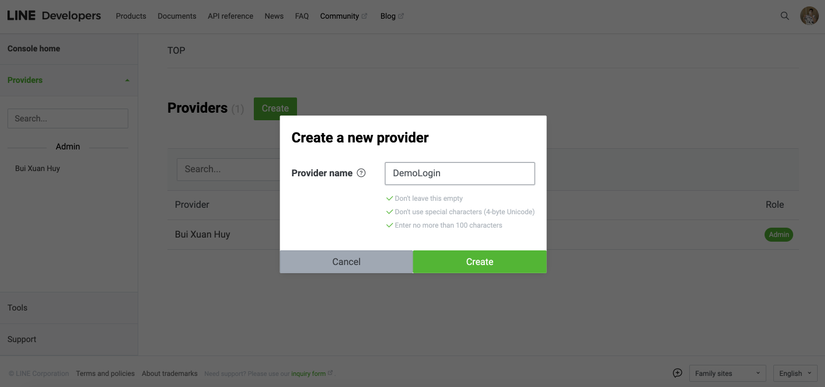
Interface after creating and choosing Provider
In the Provider there are some Settings, but for this example we will not need to pay attention
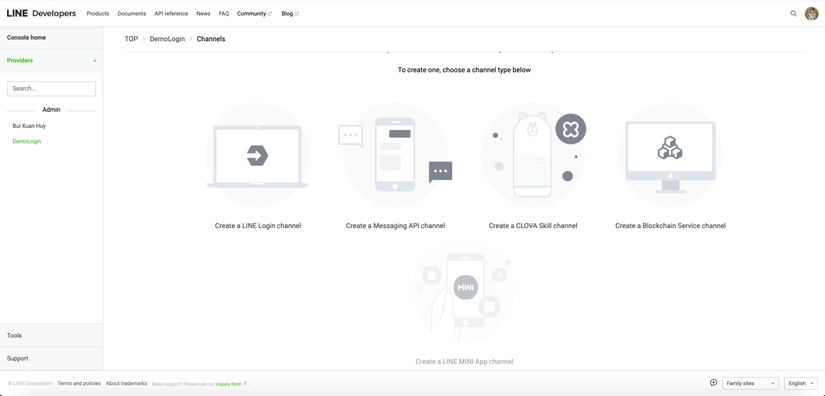
Step 3: Create and configure Channel Channel to be the communication channel between the methods provided by the LINE Platform and the Provider service.
Select “Create a LINE Login Channel”
I will create a Channel named DemoLoginApp, choose App types as “Mobile App” and add a description for the Channel (Required)
. 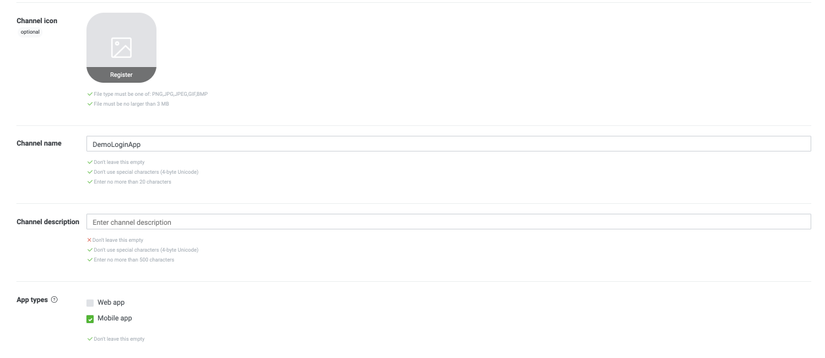
Note when creating a Channel name not include the word “LINE”
This is the interface after creating the Channel
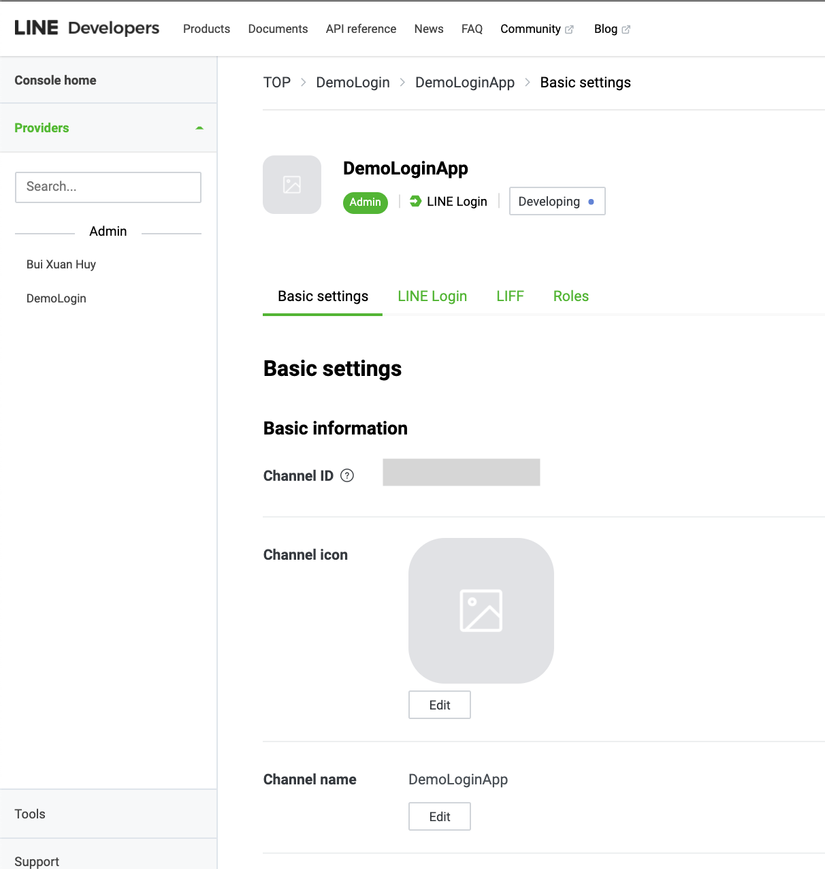
Here you need to pay attention to Channel ID. We will use this to configure the App
Switch to the LINE Login tab and enter BundleID of the App into the iOS bundle ID. BundleID of the App you can find in the General Settings of the project in XCode
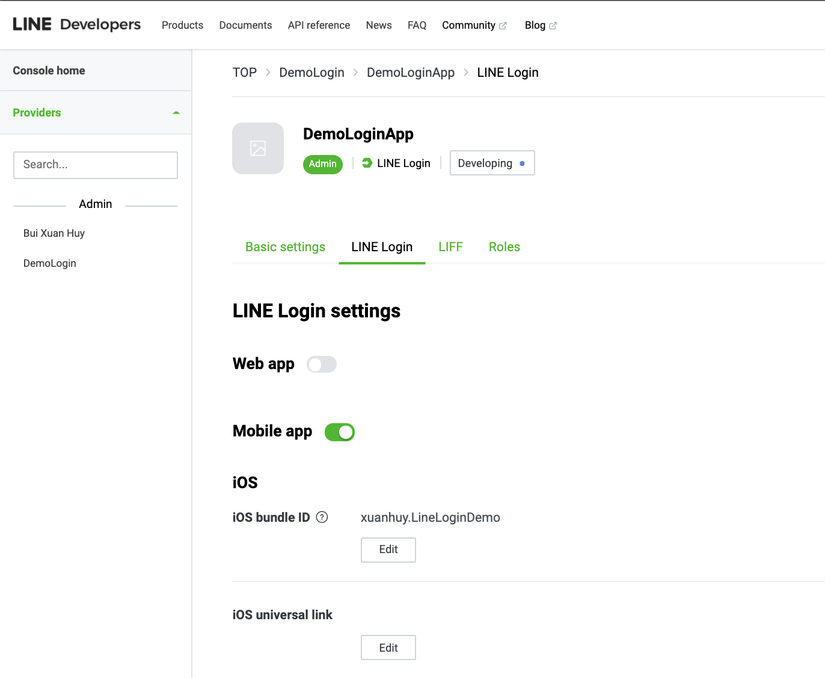
The iOS universal link field can be left blank as an optional. LINE encourages you to use Universal Link to increase the security of communication between LINE and the application. In this example, I will only use bundle ID to connect to the App
Configure application
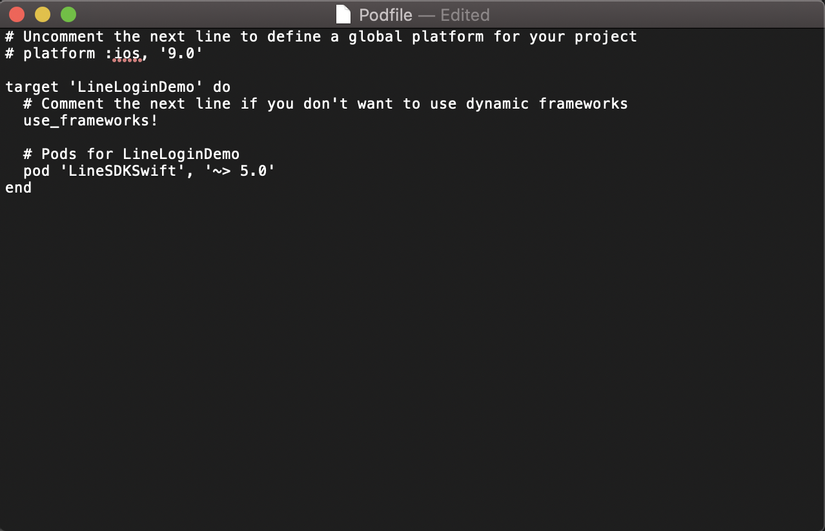
Step 1: Add LINE SDK into Project. I will use Cocoapods in this demo
In addition LINE also supports other methods to add SDK to Project. Everyone can refer to https://developers.line.biz/en/docs/ios-sdk/swift/setting-up-project/#installation
Step 2: Open the Info.plist file as Source Code and add this code before the final </dict> tag
1 2 3 4 5 6 7 8 9 10 11 12 13 14 15 16 17 18 | <span class="token operator"><</span> key <span class="token operator">></span> <span class="token builtin">CFBundleURLTypes</span> <span class="token operator"><</span> <span class="token operator">/</span> key <span class="token operator">></span> <span class="token operator"><</span> array <span class="token operator">></span> <span class="token operator"><</span> dict <span class="token operator">></span> <span class="token operator"><</span> key <span class="token operator">></span> <span class="token builtin">CFBundleTypeRole</span> <span class="token operator"><</span> <span class="token operator">/</span> key <span class="token operator">></span> <span class="token operator"><</span> string <span class="token operator">></span> <span class="token builtin">Editor</span> <span class="token operator"><</span> <span class="token operator">/</span> string <span class="token operator">></span> <span class="token operator"><</span> key <span class="token operator">></span> <span class="token builtin">CFBundleURLSchemes</span> <span class="token operator"><</span> <span class="token operator">/</span> key <span class="token operator">></span> <span class="token operator"><</span> array <span class="token operator">></span> <span class="token operator"><</span> <span class="token operator">!</span> <span class="token operator">--</span> <span class="token builtin">Specify</span> <span class="token constant">URL</span> scheme to use when returning from <span class="token constant">LINE</span> to your app <span class="token punctuation">.</span> <span class="token operator">--</span> <span class="token operator">></span> <span class="token operator"><</span> string <span class="token operator">></span> line3rdp <span class="token punctuation">.</span> $ <span class="token punctuation">(</span> <span class="token constant">PRODUCT_BUNDLE_IDENTIFIER</span> <span class="token punctuation">)</span> <span class="token operator"><</span> <span class="token operator">/</span> string <span class="token operator">></span> <span class="token operator"><</span> <span class="token operator">/</span> array <span class="token operator">></span> <span class="token operator"><</span> <span class="token operator">/</span> dict <span class="token operator">></span> <span class="token operator"><</span> <span class="token operator">/</span> array <span class="token operator">></span> <span class="token operator"><</span> key <span class="token operator">></span> <span class="token builtin">LSApplicationQueriesSchemes</span> <span class="token operator"><</span> <span class="token operator">/</span> key <span class="token operator">></span> <span class="token operator"><</span> array <span class="token operator">></span> <span class="token operator"><</span> <span class="token operator">!</span> <span class="token operator">--</span> <span class="token builtin">Specify</span> <span class="token constant">URL</span> scheme to use when launching <span class="token constant">LINE</span> from your app <span class="token punctuation">.</span> <span class="token operator">--</span> <span class="token operator">></span> <span class="token operator"><</span> string <span class="token operator">></span> lineauth2 <span class="token operator"><</span> <span class="token operator">/</span> string <span class="token operator">></span> <span class="token operator"><</span> <span class="token operator">/</span> array <span class="token operator">></span> |
Step 3: Configure LINE SDK in App Delegate and Scence Delegate In this step we will use the Channel ID we mentioned above.
import LineSDK and add the command as shown in the picture to set up, replace “YOUR_CHANNEL_ID” with the id of the Channel just created.
LINE encourages us to use the universal link to open the App after completing Login. This way is more secure than opening the App directly from a registered Bundle ID. Setting up universal link requires a server and domain as well as setup is quite complex, so in this example I will not use it. Therefore the universalLinkURL field will set nil
1 2 3 4 5 6 7 8 9 10 | <span class="token atrule">@UIApplicationMain</span> <span class="token keyword">class</span> <span class="token class-name">AppDelegate</span> <span class="token punctuation">:</span> <span class="token builtin">UIResponder</span> <span class="token punctuation">,</span> <span class="token builtin">UIApplicationDelegate</span> <span class="token punctuation">{</span> <span class="token keyword">func</span> <span class="token function">application</span> <span class="token punctuation">(</span> <span class="token number">_</span> application <span class="token punctuation">:</span> <span class="token builtin">UIApplication</span> <span class="token punctuation">,</span> didFinishLaunchingWithOptions launchOptions <span class="token punctuation">:</span> <span class="token punctuation">[</span> <span class="token builtin">UIApplication</span> <span class="token punctuation">.</span> <span class="token builtin">LaunchOptionsKey</span> <span class="token punctuation">:</span> <span class="token builtin">Any</span> <span class="token punctuation">]</span> <span class="token operator">?</span> <span class="token punctuation">)</span> <span class="token operator">-</span> <span class="token operator">></span> <span class="token builtin">Bool</span> <span class="token punctuation">{</span> <span class="token builtin">LoginManager</span> <span class="token punctuation">.</span> shared <span class="token punctuation">.</span> <span class="token function">setup</span> <span class="token punctuation">(</span> channelID <span class="token punctuation">:</span> <span class="token string">"YOUR_APP_ID"</span> <span class="token punctuation">,</span> universalLinkURL <span class="token punctuation">:</span> <span class="token constant">nil</span> <span class="token punctuation">)</span> <span class="token keyword">return</span> <span class="token boolean">true</span> <span class="token punctuation">}</span> <span class="token punctuation">}</span> |
To handle the response returned from LINE, we need to add the following method in AppDelegate
1 2 3 4 | <span class="token keyword">func</span> <span class="token function">application</span> <span class="token punctuation">(</span> <span class="token number">_</span> app <span class="token punctuation">:</span> <span class="token builtin">UIApplication</span> <span class="token punctuation">,</span> open url <span class="token punctuation">:</span> <span class="token constant">URL</span> <span class="token punctuation">,</span> options <span class="token punctuation">:</span> <span class="token punctuation">[</span> <span class="token builtin">UIApplication</span> <span class="token punctuation">.</span> <span class="token builtin">OpenURLOptionsKey</span> <span class="token punctuation">:</span> <span class="token builtin">Any</span> <span class="token punctuation">]</span> <span class="token operator">=</span> <span class="token punctuation">[</span> <span class="token punctuation">:</span> <span class="token punctuation">]</span> <span class="token punctuation">)</span> <span class="token operator">-</span> <span class="token operator">></span> <span class="token builtin">Bool</span> <span class="token punctuation">{</span> <span class="token keyword">return</span> <span class="token builtin">LoginManager</span> <span class="token punctuation">.</span> shared <span class="token punctuation">.</span> <span class="token function">application</span> <span class="token punctuation">(</span> app <span class="token punctuation">,</span> open <span class="token punctuation">:</span> url <span class="token punctuation">)</span> <span class="token punctuation">}</span> |
With iOS 13 and above, the return URL will be invoked by UISceneDelegate. Therefore we need to add the following code in Scene Delegate
1 2 3 4 5 | <span class="token comment">// SceneDelegate.swift</span> <span class="token keyword">func</span> <span class="token function">scene</span> <span class="token punctuation">(</span> <span class="token number">_</span> scene <span class="token punctuation">:</span> <span class="token builtin">UIScene</span> <span class="token punctuation">,</span> openURLContexts <span class="token builtin">URLContexts</span> <span class="token punctuation">:</span> <span class="token builtin">Set</span> <span class="token operator"><</span> <span class="token builtin">UIOpenURLContext</span> <span class="token operator">></span> <span class="token punctuation">)</span> <span class="token punctuation">{</span> <span class="token number">_</span> <span class="token operator">=</span> <span class="token builtin">LoginManager</span> <span class="token punctuation">.</span> shared <span class="token punctuation">.</span> <span class="token function">application</span> <span class="token punctuation">(</span> <span class="token punctuation">.</span> shared <span class="token punctuation">,</span> open <span class="token punctuation">:</span> <span class="token builtin">URLContexts</span> <span class="token punctuation">.</span> <span class="token builtin">first</span> <span class="token operator">?</span> <span class="token punctuation">.</span> url <span class="token punctuation">)</span> <span class="token punctuation">}</span> |
Step 4: Create an interface
My interface will create a Button. We can use the LINE object provided by LoginButton and implement LoginButtonDelegate for the controller to get the data reponse.
Alternatively we can create the button as usual and call the login function with code
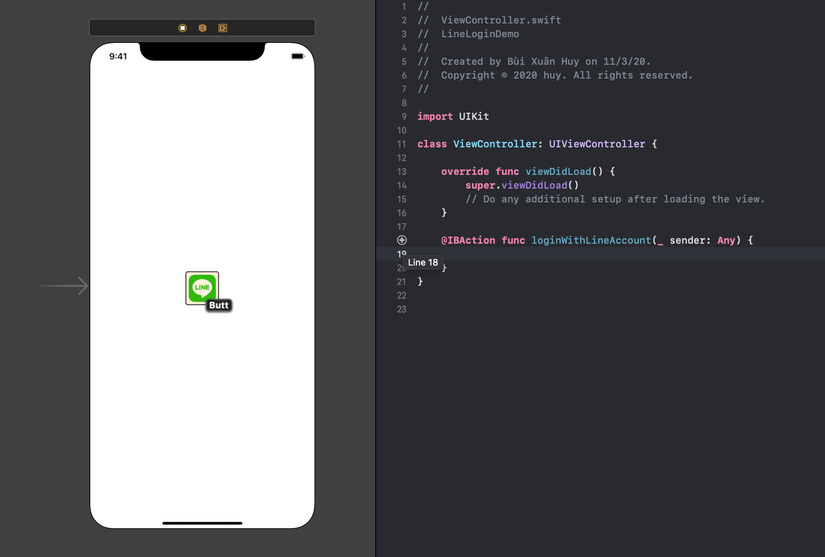
Add the following code
1 2 3 4 5 6 7 8 9 10 11 12 13 14 15 16 17 18 | <span class="token atrule">@IBAction</span> <span class="token keyword">func</span> <span class="token function">loginWithLineAccount</span> <span class="token punctuation">(</span> <span class="token number">_</span> sender <span class="token punctuation">:</span> <span class="token builtin">Any</span> <span class="token punctuation">)</span> <span class="token punctuation">{</span> <span class="token builtin">LoginManager</span> <span class="token punctuation">.</span> shared <span class="token punctuation">.</span> <span class="token function">login</span> <span class="token punctuation">(</span> permissions <span class="token punctuation">:</span> <span class="token punctuation">[</span> <span class="token punctuation">.</span> profile <span class="token punctuation">]</span> <span class="token punctuation">,</span> <span class="token keyword">in</span> <span class="token punctuation">:</span> <span class="token keyword">self</span> <span class="token punctuation">)</span> <span class="token punctuation">{</span> result <span class="token keyword">in</span> <span class="token keyword">switch</span> result <span class="token punctuation">{</span> <span class="token keyword">case</span> <span class="token punctuation">.</span> <span class="token function">success</span> <span class="token punctuation">(</span> <span class="token keyword">let</span> loginResult <span class="token punctuation">)</span> <span class="token punctuation">:</span> <span class="token function">print</span> <span class="token punctuation">(</span> loginResult <span class="token punctuation">.</span> accessToken <span class="token punctuation">.</span> value <span class="token punctuation">)</span> <span class="token keyword">if</span> <span class="token keyword">let</span> profile <span class="token operator">=</span> loginResult <span class="token punctuation">.</span> userProfile <span class="token punctuation">{</span> <span class="token function">print</span> <span class="token punctuation">(</span> <span class="token string">"User ID: <span class="token interpolation"><span class="token delimiter variable">(</span> profile <span class="token punctuation">.</span> userID <span class="token delimiter variable">)</span></span> "</span> <span class="token punctuation">)</span> <span class="token function">print</span> <span class="token punctuation">(</span> <span class="token string">"User Display Name: <span class="token interpolation"><span class="token delimiter variable">(</span> profile <span class="token punctuation">.</span> displayName <span class="token delimiter variable">)</span></span> "</span> <span class="token punctuation">)</span> <span class="token function">print</span> <span class="token punctuation">(</span> <span class="token string">"User Icon: <span class="token interpolation"><span class="token delimiter variable">(</span> <span class="token function">String</span> <span class="token punctuation">(</span> describing <span class="token punctuation">:</span> profile <span class="token punctuation">.</span> pictureURL <span class="token punctuation">)</span> <span class="token delimiter variable">)</span></span> "</span> <span class="token punctuation">)</span> <span class="token punctuation">}</span> <span class="token keyword">case</span> <span class="token punctuation">.</span> <span class="token function">failure</span> <span class="token punctuation">(</span> <span class="token keyword">let</span> error <span class="token punctuation">)</span> <span class="token punctuation">:</span> <span class="token function">print</span> <span class="token punctuation">(</span> error <span class="token punctuation">)</span> <span class="token punctuation">}</span> <span class="token punctuation">}</span> <span class="token punctuation">}</span> |
Run Project and we will get the results
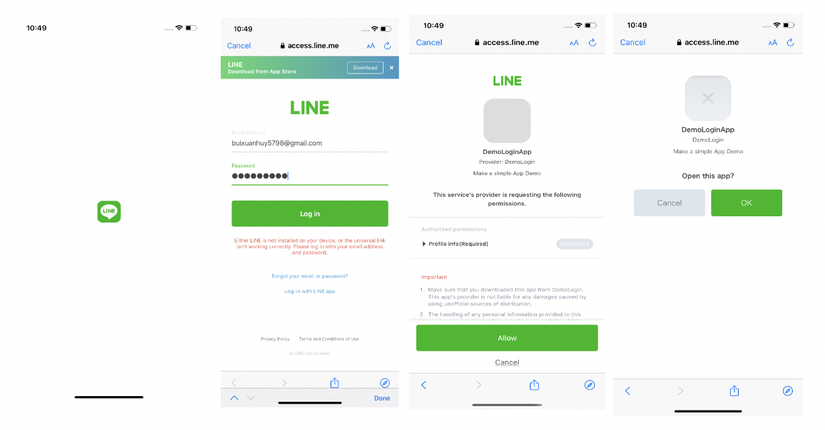
Response returned 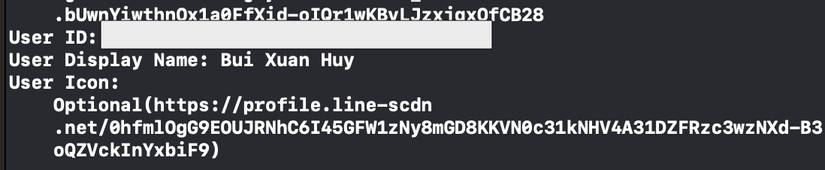
Refer
https://developers.line.biz/en/