This article I will guide the most basic way to be able to login to Google Oauth2 in Flask web application with request-oauthlib package for OAuth 2.0 and jar-sqlalchemy.
To begin, we must first create a project in Google Developers to get the client key and client secret.
1. Create a Google project
First, visit the Google Developers Console. Sign in with your Google credentials if you don’t already have one. There will be a list of projects (if you have created them before with any of your projects).
Create a new project.
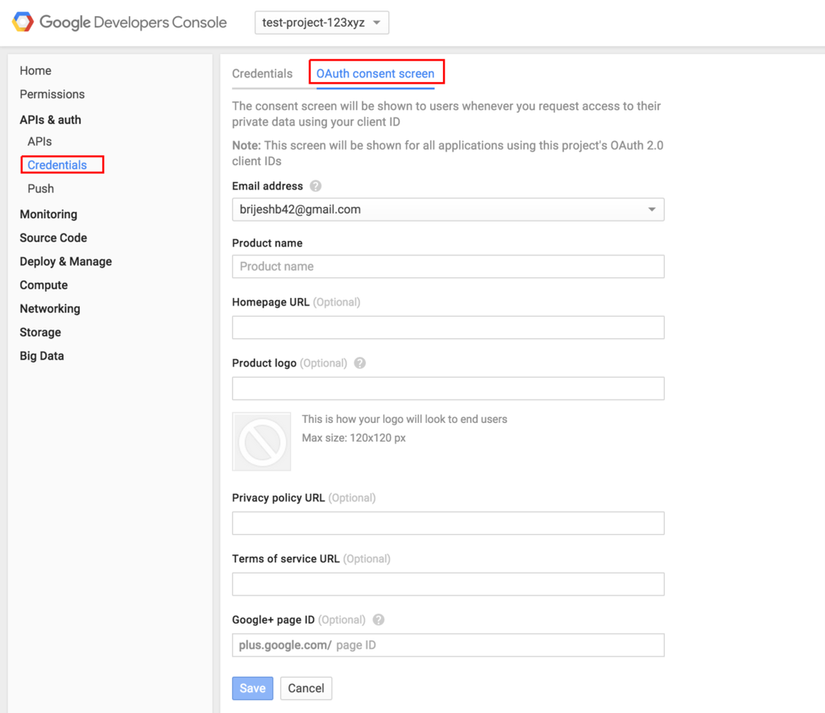
You enter the name you want to enter. 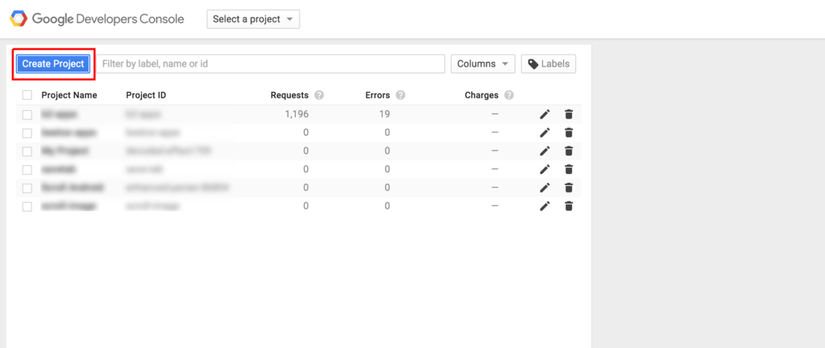 Now go to the project page. Click API and Auth -> Authentication information in the left bar.
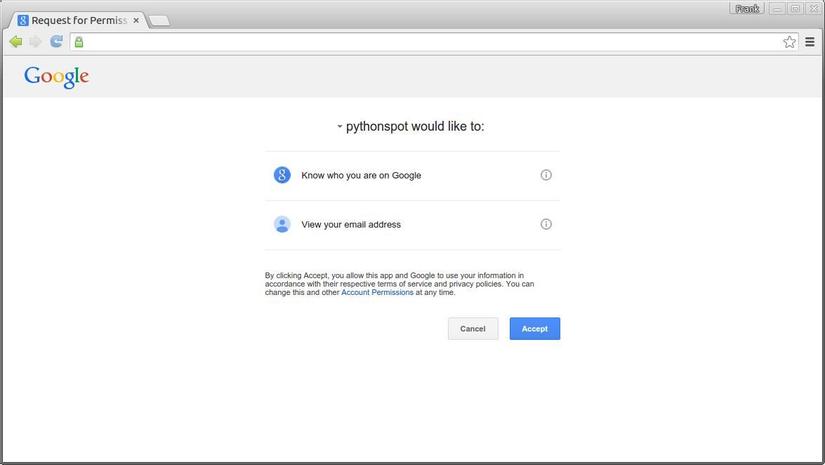
Then go to the OAuth consent screen. Provide Product Name (you may also provide other details but they are optional). Product names are what users see when they sign in to your application with Google.
Now click on the Authentication Information section. Then click on Add credentials and then select OAuth 2.0 customer ID.
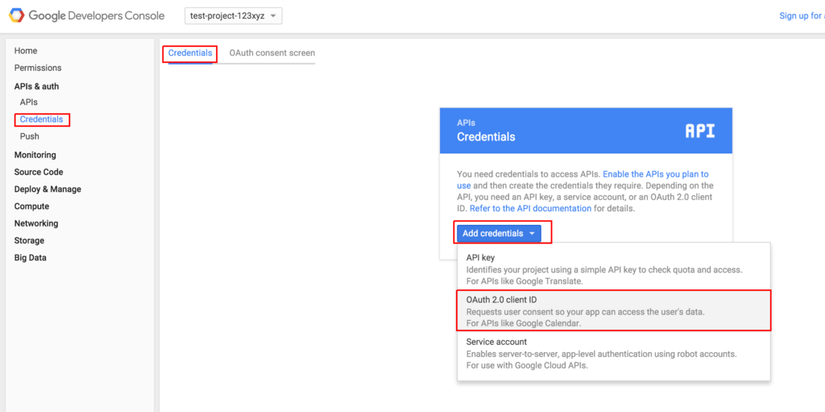
Select Web Application Application Type, Provide authorized Javascript name and origin, and authorized redirect URI and click Create. During development, we will use localhost as our URL. 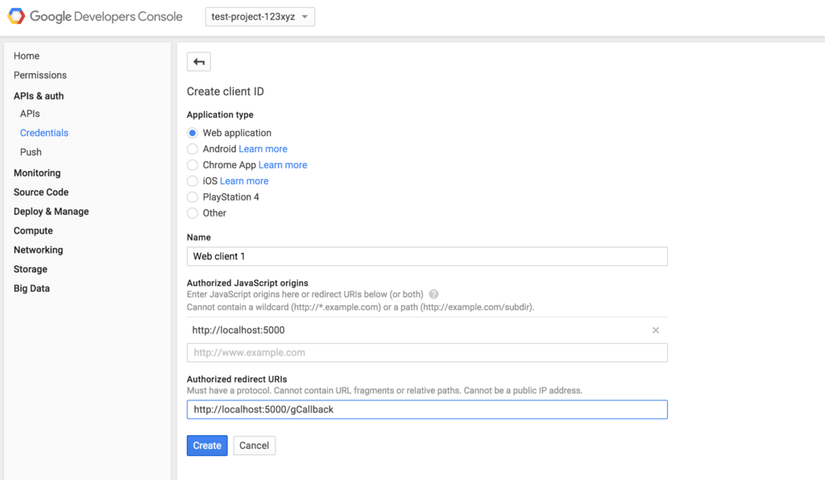
After the above step, you will see a dialog box with client ID and client secret. Copy both strings and save in a text file because we will need these strings. 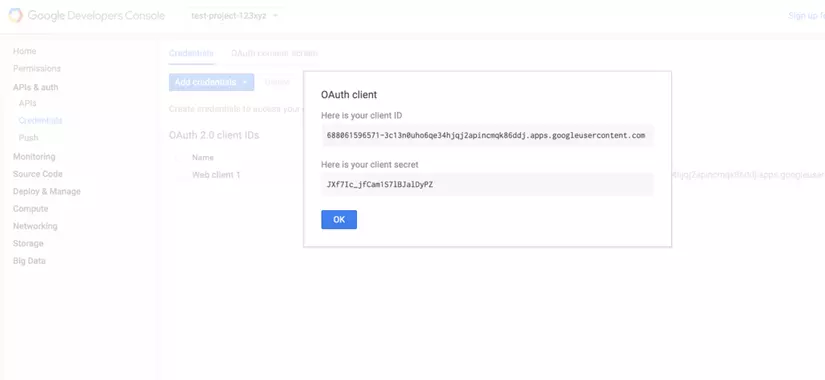
2. Create the User table in Database
We will use flask-sqlalchemy to handle DB operations.
1 2 3 4 5 6 7 8 9 10 | <span class="token keyword">class</span> <span class="token class-name">User</span> <span class="token punctuation">(</span> db <span class="token punctuation">.</span> Model <span class="token punctuation">)</span> <span class="token punctuation">:</span> __tablename__ <span class="token operator">=</span> <span class="token string">"users"</span> <span class="token builtin">id</span> <span class="token operator">=</span> db <span class="token punctuation">.</span> Column <span class="token punctuation">(</span> db <span class="token punctuation">.</span> Integer <span class="token punctuation">,</span> primary_key <span class="token operator">=</span> <span class="token boolean">True</span> <span class="token punctuation">)</span> email <span class="token operator">=</span> db <span class="token punctuation">.</span> Column <span class="token punctuation">(</span> db <span class="token punctuation">.</span> String <span class="token punctuation">(</span> <span class="token number">100</span> <span class="token punctuation">)</span> <span class="token punctuation">,</span> unique <span class="token operator">=</span> <span class="token boolean">True</span> <span class="token punctuation">,</span> nullable <span class="token operator">=</span> <span class="token boolean">False</span> <span class="token punctuation">)</span> name <span class="token operator">=</span> db <span class="token punctuation">.</span> Column <span class="token punctuation">(</span> db <span class="token punctuation">.</span> String <span class="token punctuation">(</span> <span class="token number">100</span> <span class="token punctuation">)</span> <span class="token punctuation">,</span> nullable <span class="token operator">=</span> <span class="token boolean">True</span> <span class="token punctuation">)</span> avatar <span class="token operator">=</span> db <span class="token punctuation">.</span> Column <span class="token punctuation">(</span> db <span class="token punctuation">.</span> String <span class="token punctuation">(</span> <span class="token number">200</span> <span class="token punctuation">)</span> <span class="token punctuation">)</span> active <span class="token operator">=</span> db <span class="token punctuation">.</span> Column <span class="token punctuation">(</span> db <span class="token punctuation">.</span> Boolean <span class="token punctuation">,</span> default <span class="token operator">=</span> <span class="token boolean">False</span> <span class="token punctuation">)</span> tokens <span class="token operator">=</span> db <span class="token punctuation">.</span> Column <span class="token punctuation">(</span> db <span class="token punctuation">.</span> Text <span class="token punctuation">)</span> created_at <span class="token operator">=</span> db <span class="token punctuation">.</span> Column <span class="token punctuation">(</span> db <span class="token punctuation">.</span> DateTime <span class="token punctuation">,</span> default <span class="token operator">=</span> datetime <span class="token punctuation">.</span> datetime <span class="token punctuation">.</span> utcnow <span class="token punctuation">(</span> <span class="token punctuation">)</span> <span class="token punctuation">)</span> |
3. Create config for the application.
If we use flask-login to manage user sessions, we can check if the user is logged in. If not logged in, we redirect the user to the login page containing the link to the Google login. Create a config.py file to configure the relevant parameters of Google OAuth.
1 2 3 4 5 6 7 8 9 10 11 12 13 14 15 16 17 18 19 20 21 22 23 24 | <span class="token keyword">import</span> os basedir <span class="token operator">=</span> os <span class="token punctuation">.</span> path <span class="token punctuation">.</span> abspath <span class="token punctuation">(</span> os <span class="token punctuation">.</span> path <span class="token punctuation">.</span> dirname <span class="token punctuation">(</span> __file__ <span class="token punctuation">)</span> <span class="token punctuation">)</span> <span class="token keyword">class</span> <span class="token class-name">Auth</span> <span class="token punctuation">:</span> CLIENT_ID <span class="token operator">=</span> <span class="token punctuation">(</span> <span class="token string">'688061596571-3c13n0uho6qe34hjqj2apincmqk86ddj'</span> <span class="token string">'.apps.googleusercontent.com'</span> <span class="token punctuation">)</span> CLIENT_SECRET <span class="token operator">=</span> <span class="token string">'JXf7Ic_jfCam1S7lBJalDyPZ'</span> REDIRECT_URI <span class="token operator">=</span> <span class="token string">'https://localhost:5000/gCallback'</span> AUTH_URI <span class="token operator">=</span> <span class="token string">'https://accounts.google.com/o/oauth2/auth'</span> TOKEN_URI <span class="token operator">=</span> <span class="token string">'https://accounts.google.com/o/oauth2/token'</span> USER_INFO <span class="token operator">=</span> <span class="token string">'https://www.googleapis.com/userinfo/v2/me'</span> <span class="token keyword">class</span> <span class="token class-name">Config</span> <span class="token punctuation">:</span> APP_NAME <span class="token operator">=</span> <span class="token string">"Test Google Login"</span> SECRET_KEY <span class="token operator">=</span> os <span class="token punctuation">.</span> environ <span class="token punctuation">.</span> get <span class="token punctuation">(</span> <span class="token string">"SECRET_KEY"</span> <span class="token punctuation">)</span> <span class="token operator">or</span> <span class="token string">"somethingsecret"</span> <span class="token keyword">class</span> <span class="token class-name">DevConfig</span> <span class="token punctuation">(</span> Config <span class="token punctuation">)</span> <span class="token punctuation">:</span> DEBUG <span class="token operator">=</span> <span class="token boolean">True</span> SQLALCHEMY_DATABASE_URI <span class="token operator">=</span> <span class="token string">'sqlite:///'</span> <span class="token operator">+</span> os <span class="token punctuation">.</span> path <span class="token punctuation">.</span> join <span class="token punctuation">(</span> basedir <span class="token punctuation">,</span> <span class="token string">"test.db"</span> <span class="token punctuation">)</span> <span class="token keyword">class</span> <span class="token class-name">ProdConfig</span> <span class="token punctuation">(</span> Config <span class="token punctuation">)</span> <span class="token punctuation">:</span> DEBUG <span class="token operator">=</span> <span class="token boolean">True</span> SQLALCHEMY_DATABASE_URI <span class="token operator">=</span> <span class="token string">'sqlite:///'</span> <span class="token operator">+</span> os <span class="token punctuation">.</span> path <span class="token punctuation">.</span> join <span class="token punctuation">(</span> basedir <span class="token punctuation">,</span> <span class="token string">"prod.db"</span> <span class="token punctuation">)</span> config <span class="token operator">=</span> <span class="token punctuation">{</span> <span class="token string">"dev"</span> <span class="token punctuation">:</span> DevConfig <span class="token punctuation">,</span> <span class="token string">"prod"</span> <span class="token punctuation">:</span> ProdConfig <span class="token punctuation">,</span> <span class="token string">"default"</span> <span class="token punctuation">:</span> DevConfig <span class="token punctuation">}</span> |
- REDIRECT_URI is what we Google Developers Console for Google developers
- AUTH_URI is where users are taken to sign in to Google
- TOKEN_URI is used to exchange temporary tokens for access_token
- USER_INFO is the URL used to retrieve user information such as name, email, etc. after successful authentication.
- SCOPE is the type of user information that we will access after the user authenticates the application. Google OAuth2 Playground has a list of scopes that can be added.
URL routes for login and callback
1 2 3 4 5 6 7 | app <span class="token operator">=</span> Flask <span class="token punctuation">(</span> __name__ <span class="token punctuation">)</span> app <span class="token punctuation">.</span> config <span class="token punctuation">.</span> from_object <span class="token punctuation">(</span> config <span class="token punctuation">[</span> <span class="token string">'dev'</span> <span class="token punctuation">]</span> <span class="token punctuation">)</span> db <span class="token operator">=</span> SQLAlchemy <span class="token punctuation">(</span> app <span class="token punctuation">)</span> login_manager <span class="token operator">=</span> LoginManager <span class="token punctuation">(</span> app <span class="token punctuation">)</span> login_manager <span class="token punctuation">.</span> login_view <span class="token operator">=</span> <span class="token string">"login"</span> login_manager <span class="token punctuation">.</span> session_protection <span class="token operator">=</span> <span class="token string">"strong"</span> |
requests_oauthlib.OAuth2Session helper
1 2 3 4 5 6 7 8 | <span class="token keyword">def</span> <span class="token function">get_google_auth</span> <span class="token punctuation">(</span> state <span class="token operator">=</span> <span class="token boolean">None</span> <span class="token punctuation">,</span> token <span class="token operator">=</span> <span class="token boolean">None</span> <span class="token punctuation">)</span> <span class="token punctuation">:</span> <span class="token keyword">if</span> token <span class="token punctuation">:</span> <span class="token keyword">return</span> OAuth2Session <span class="token punctuation">(</span> Auth <span class="token punctuation">.</span> CLIENT_ID <span class="token punctuation">,</span> token <span class="token operator">=</span> token <span class="token punctuation">)</span> <span class="token keyword">if</span> state <span class="token punctuation">:</span> <span class="token keyword">return</span> OAuth2Session <span class="token punctuation">(</span> Auth <span class="token punctuation">.</span> CLIENT_ID <span class="token punctuation">,</span> state <span class="token operator">=</span> state <span class="token punctuation">,</span> redirect_uri <span class="token operator">=</span> Auth <span class="token punctuation">.</span> REDIRECT_URI <span class="token punctuation">)</span> oauth <span class="token operator">=</span> OAuth2Session <span class="token punctuation">(</span> Auth <span class="token punctuation">.</span> CLIENT_ID <span class="token punctuation">,</span> redirect_uri <span class="token operator">=</span> Auth <span class="token punctuation">.</span> REDIRECT_URI <span class="token punctuation">,</span> scope <span class="token operator">=</span> Auth <span class="token punctuation">.</span> SCOPE <span class="token punctuation">)</span> <span class="token keyword">return</span> oauth |
Root URL:
1 2 3 4 5 | @app <span class="token punctuation">.</span> route <span class="token punctuation">(</span> <span class="token string">'/'</span> <span class="token punctuation">)</span> @login_required <span class="token keyword">def</span> <span class="token function">index</span> <span class="token punctuation">(</span> <span class="token punctuation">)</span> <span class="token punctuation">:</span> <span class="token keyword">return</span> render_template <span class="token punctuation">(</span> <span class="token string">'index.html'</span> <span class="token punctuation">)</span> |
Callback URL:
1 2 3 4 5 6 7 8 9 10 11 12 13 14 15 16 17 18 19 20 21 22 23 24 25 26 27 28 29 30 31 32 33 34 35 36 | @app <span class="token punctuation">.</span> route <span class="token punctuation">(</span> <span class="token string">'/gCallback'</span> <span class="token punctuation">)</span> <span class="token keyword">def</span> <span class="token function">callback</span> <span class="token punctuation">(</span> <span class="token punctuation">)</span> <span class="token punctuation">:</span> <span class="token comment"># Redirect user to home page if already logged in.</span> <span class="token keyword">if</span> current_user <span class="token keyword">is</span> <span class="token operator">not</span> <span class="token boolean">None</span> <span class="token operator">and</span> current_user <span class="token punctuation">.</span> is_authenticated <span class="token punctuation">(</span> <span class="token punctuation">)</span> <span class="token punctuation">:</span> <span class="token keyword">return</span> redirect <span class="token punctuation">(</span> url_for <span class="token punctuation">(</span> <span class="token string">'index'</span> <span class="token punctuation">)</span> <span class="token punctuation">)</span> <span class="token keyword">if</span> <span class="token string">'error'</span> <span class="token keyword">in</span> request <span class="token punctuation">.</span> args <span class="token punctuation">:</span> <span class="token keyword">if</span> request <span class="token punctuation">.</span> args <span class="token punctuation">.</span> get <span class="token punctuation">(</span> <span class="token string">'error'</span> <span class="token punctuation">)</span> <span class="token operator">==</span> <span class="token string">'access_denied'</span> <span class="token punctuation">:</span> <span class="token keyword">return</span> <span class="token string">'You denied access.'</span> <span class="token keyword">return</span> <span class="token string">'Error encountered.'</span> <span class="token keyword">if</span> <span class="token string">'code'</span> <span class="token operator">not</span> <span class="token keyword">in</span> request <span class="token punctuation">.</span> args <span class="token operator">and</span> <span class="token string">'state'</span> <span class="token operator">not</span> <span class="token keyword">in</span> request <span class="token punctuation">.</span> args <span class="token punctuation">:</span> <span class="token keyword">return</span> redirect <span class="token punctuation">(</span> url_for <span class="token punctuation">(</span> <span class="token string">'login'</span> <span class="token punctuation">)</span> <span class="token punctuation">)</span> <span class="token keyword">else</span> <span class="token punctuation">:</span> <span class="token comment"># Execution reaches here when user has successfully authenticated our app.</span> google <span class="token operator">=</span> get_google_auth <span class="token punctuation">(</span> state <span class="token operator">=</span> session <span class="token punctuation">[</span> <span class="token string">'oauth_state'</span> <span class="token punctuation">]</span> <span class="token punctuation">)</span> <span class="token keyword">try</span> <span class="token punctuation">:</span> token <span class="token operator">=</span> google <span class="token punctuation">.</span> fetch_token <span class="token punctuation">(</span> Auth <span class="token punctuation">.</span> TOKEN_URI <span class="token punctuation">,</span> client_secret <span class="token operator">=</span> Auth <span class="token punctuation">.</span> CLIENT_SECRET <span class="token punctuation">,</span> authorization_response <span class="token operator">=</span> request <span class="token punctuation">.</span> url <span class="token punctuation">)</span> <span class="token keyword">except</span> HTTPError <span class="token punctuation">:</span> <span class="token keyword">return</span> <span class="token string">'HTTPError occurred.'</span> google <span class="token operator">=</span> get_google_auth <span class="token punctuation">(</span> token <span class="token operator">=</span> token <span class="token punctuation">)</span> resp <span class="token operator">=</span> google <span class="token punctuation">.</span> get <span class="token punctuation">(</span> Auth <span class="token punctuation">.</span> USER_INFO <span class="token punctuation">)</span> <span class="token keyword">if</span> resp <span class="token punctuation">.</span> status_code <span class="token operator">==</span> <span class="token number">200</span> <span class="token punctuation">:</span> user_data <span class="token operator">=</span> resp <span class="token punctuation">.</span> json <span class="token punctuation">(</span> <span class="token punctuation">)</span> email <span class="token operator">=</span> user_data <span class="token punctuation">[</span> <span class="token string">'email'</span> <span class="token punctuation">]</span> user <span class="token operator">=</span> User <span class="token punctuation">.</span> query <span class="token punctuation">.</span> filter_by <span class="token punctuation">(</span> email <span class="token operator">=</span> email <span class="token punctuation">)</span> <span class="token punctuation">.</span> first <span class="token punctuation">(</span> <span class="token punctuation">)</span> <span class="token keyword">if</span> user <span class="token keyword">is</span> <span class="token boolean">None</span> <span class="token punctuation">:</span> user <span class="token operator">=</span> User <span class="token punctuation">(</span> <span class="token punctuation">)</span> user <span class="token punctuation">.</span> email <span class="token operator">=</span> email user <span class="token punctuation">.</span> name <span class="token operator">=</span> user_data <span class="token punctuation">[</span> <span class="token string">'name'</span> <span class="token punctuation">]</span> user <span class="token punctuation">.</span> tokens <span class="token operator">=</span> json <span class="token punctuation">.</span> dumps <span class="token punctuation">(</span> token <span class="token punctuation">)</span> user <span class="token punctuation">.</span> avatar <span class="token operator">=</span> user_data <span class="token punctuation">[</span> <span class="token string">'picture'</span> <span class="token punctuation">]</span> db <span class="token punctuation">.</span> session <span class="token punctuation">.</span> add <span class="token punctuation">(</span> user <span class="token punctuation">)</span> db <span class="token punctuation">.</span> session <span class="token punctuation">.</span> commit <span class="token punctuation">(</span> <span class="token punctuation">)</span> login_user <span class="token punctuation">(</span> user <span class="token punctuation">)</span> <span class="token keyword">return</span> redirect <span class="token punctuation">(</span> url_for <span class="token punctuation">(</span> <span class="token string">'index'</span> <span class="token punctuation">)</span> <span class="token punctuation">)</span> <span class="token keyword">return</span> <span class="token string">'Could not fetch your information.'</span> |
Run serve.py to test.