Preamble
When acquainted with Angular, perhaps the first concept that everyone learned was Component. An application written in Angular is assembled by components, we create each component and arrange them to create the application. So what is a Component !? In today’s article, we will learn about the basic concepts of Component!
Component Initialization
When creating an Angular application, the Angular CLI will help us to create a Component named App Component in the src / app directory:
1 2 3 4 5 6 7 8 9 10 11 12 13 14 | <span class="token keyword">import</span> <span class="token punctuation">{</span> Component <span class="token punctuation">}</span> <span class="token keyword">from</span> <span class="token string">'@angular/core'</span> <span class="token punctuation">;</span> @ <span class="token function">Component</span> <span class="token punctuation">(</span> <span class="token punctuation">{</span> <span class="token comment">// Khai báo selector cho component, có thể gọi đến selector này giống như thẻ html (<app-root></app-root>)</span> selector <span class="token operator">:</span> <span class="token string">'app-root'</span> <span class="token punctuation">,</span> <span class="token comment">// Khai báo file html mà component "đại diện" (hay còn gọi là view/template của Component)</span> templateUrl <span class="token operator">:</span> <span class="token string">'./app.component.html'</span> <span class="token punctuation">,</span> <span class="token comment">// Khai báo file style mà component này sẽ sử dụng</span> styleUrls <span class="token operator">:</span> <span class="token punctuation">[</span> <span class="token string">'./app.component.css'</span> <span class="token punctuation">]</span> <span class="token punctuation">}</span> <span class="token punctuation">)</span> <span class="token keyword">export</span> <span class="token keyword">class</span> <span class="token class-name">AppComponent</span> <span class="token punctuation">{</span> title <span class="token operator">=</span> <span class="token string">'app'</span> <span class="token punctuation">;</span> <span class="token punctuation">}</span> |
AppComponent is the parent of the application. All new components created later are sub-components of AppComponent .
To create a new component, use the Angular CLI command:
ng generate component <component-name>
or by shorter
ng gc <component-name>
For example, to create a component named login , we run the command: ng gc login
Note you can add:
- Option -t if you don’t want to create html file. Use the template right in the component
- –Inline-style option if you do not want to create a style file. Use styles right in the component
In addition, you can create a new Component by hand or copy an existing Component … edit it again. But remember that the component name cannot be duplicated, otherwise the Angular CLI will generate 2 identical selectors.
Component life cycle
The life cycle of an Angular component supports interfaces to create a sequential process. A component’s life cycle will have the following order: OnChanges, OnInit, DoCheck AfterContentInit, AfterContentChecked, AfterViewInit, AfterViewChecked, OnDestroy.
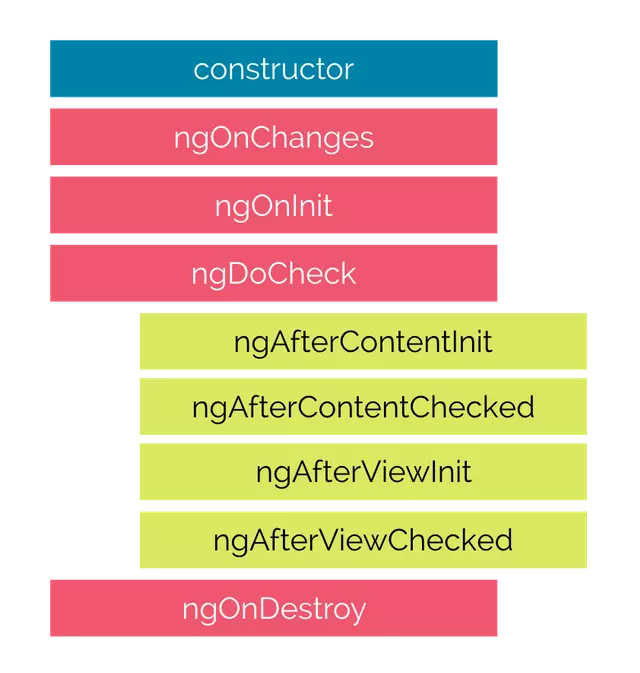
To better understand the component’s lifecycle and the time the method is activated, people can go to the Angular homepage, where they can talk quite clearly about the tasks and functions of each method.
How to add lifecycle into Component:
If you want to use any method, you just need to Implements it into the Class is okay, for example:
1 2 3 4 5 6 7 | <span class="token comment">// implement OnInit's `ngOnInit` method</span> <span class="token keyword">export</span> <span class="token keyword">class</span> <span class="token class-name">AppComponent</span> <span class="token keyword">implements</span> <span class="token class-name">OnInit</span> <span class="token punctuation">{</span> <span class="token function">constructor</span> <span class="token punctuation">(</span> <span class="token punctuation">)</span> <span class="token punctuation">{</span> <span class="token punctuation">}</span> <span class="token function">ngOnInit</span> <span class="token punctuation">(</span> <span class="token punctuation">)</span> <span class="token punctuation">{</span> console <span class="token punctuation">.</span> <span class="token function">log</span> <span class="token punctuation">(</span> <span class="token string">"OnInit"</span> <span class="token punctuation">)</span> <span class="token punctuation">;</span> <span class="token punctuation">}</span> <span class="token punctuation">}</span> |
Display data on the View
To display data on the screen, in the template file (ie the html file declared in the Component) we will use the syntax {{ }} , also known as Interpolation interpolation method.
For example, in Component we have the user property as an object as follows:
1 2 3 4 5 6 7 8 9 | <span class="token keyword">export</span> <span class="token keyword">class</span> <span class="token class-name">Component</span> <span class="token punctuation">{</span> user <span class="token operator">=</span> <span class="token punctuation">{</span> id <span class="token operator">:</span> <span class="token string">'id_1'</span> <span class="token punctuation">,</span> name <span class="token operator">:</span> <span class="token string">'Viblo'</span> <span class="token punctuation">,</span> age <span class="token operator">:</span> <span class="token number">22</span> <span class="token punctuation">,</span> <span class="token keyword">class</span> <span class="token operator">:</span> <span class="token string">'10A4'</span> <span class="token punctuation">,</span> <span class="token punctuation">}</span> <span class="token punctuation">;</span> <span class="token punctuation">}</span> |
then to display on View, in the html file we will be able to write the following:
1 2 3 4 5 6 7 | <span class="token operator"><</span> div <span class="token keyword">class</span> <span class="token operator">=</span> <span class="token string">"user-info"</span> <span class="token operator">></span> <span class="token operator"><</span> p <span class="token operator">></span> id <span class="token operator">:</span> <span class="token punctuation">{</span> <span class="token punctuation">{</span> user <span class="token punctuation">.</span> id <span class="token punctuation">}</span> <span class="token punctuation">}</span> <span class="token operator"><</span> <span class="token operator">/</span> p <span class="token operator">></span> <span class="token operator"><</span> p <span class="token operator">></span> name <span class="token operator">:</span> <span class="token punctuation">{</span> <span class="token punctuation">{</span> user <span class="token punctuation">.</span> name <span class="token punctuation">}</span> <span class="token punctuation">}</span> <span class="token operator"><</span> <span class="token operator">/</span> p <span class="token operator">></span> <span class="token operator"><</span> p <span class="token operator">></span> age <span class="token operator">:</span> <span class="token punctuation">{</span> <span class="token punctuation">{</span> user <span class="token punctuation">.</span> age <span class="token punctuation">}</span> <span class="token punctuation">}</span> <span class="token operator"><</span> <span class="token operator">/</span> p <span class="token operator">></span> <span class="token operator"><</span> p <span class="token operator">></span> classes <span class="token operator">:</span> <span class="token punctuation">{</span> <span class="token punctuation">{</span> user <span class="token punctuation">.</span> class <span class="token punctuation">}</span> <span class="token punctuation">}</span> <span class="token operator"><</span> <span class="token operator">/</span> p <span class="token operator">></span> <span class="token operator"><</span> <span class="token operator">/</span> div <span class="token operator">></span> |
Data transfer between components
Angular provides us with two decorators to transfer data between the Components: @ Input and @ Output .
Decorator is a special declarative syntax, never stand alone but always attached to a class, method, property or accessor declaration. People can see in every Component, the @ Component guy is also a decorator.
So what is the task of @ Input and @ Output :
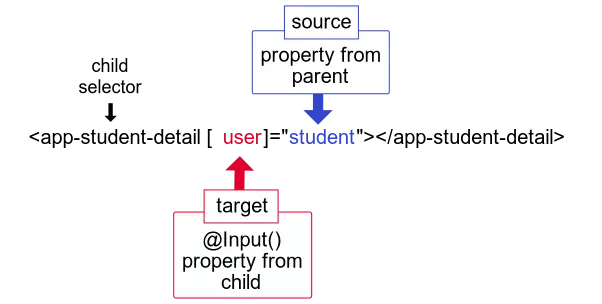
- @ Input : Get the value passed into the component. For example:
1 2 3 4 5 | <span class="token comment">// file template của component A</span> <span class="token comment">// app-menu là component B và lúc này ta sẽ truyền property `menus` của component A tới component B </span> <span class="token comment">// với giá trị là `menu`</span> <span class="token operator"><</span> app <span class="token operator">-</span> menu <span class="token punctuation">[</span> menu <span class="token punctuation">]</span> <span class="token operator">=</span> <span class="token string">"menus"</span> <span class="token operator">></span> <span class="token operator"><</span> <span class="token operator">/</span> app <span class="token operator">-</span> menu <span class="token operator">></span> |
1 2 3 4 5 6 7 | <span class="token comment">// file component của component B</span> <span class="token comment">// Do trong template component A có truyền vào component B 1 property là `menu`,</span> <span class="token comment">// cho nên ta cần phải khai báo decorator @Input ở phía trước `menu`</span> <span class="token keyword">export</span> Class MenuComonent <span class="token keyword">implements</span> <span class="token class-name">OnInit</span> <span class="token punctuation">{</span> @ <span class="token function">Input</span> <span class="token punctuation">(</span> <span class="token punctuation">)</span> menu <span class="token operator">:</span> Array <span class="token operator"><</span> any <span class="token operator">></span> <span class="token punctuation">;</span> <span class="token punctuation">}</span> |
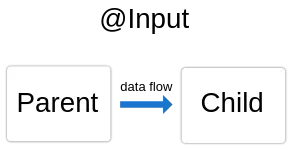
Flow of @ Input :
- @ Output : Getting event for eventEmitter to be passed into component. That is, whenever an event occurs on the View such as onClick, onChange, onMouseMove … the Output will shoot the event back to the parent component. For example:
1 2 3 4 5 | <span class="token comment">// file template của component A</span> <span class="token comment">// app-menu là component B và lúc này ta sẽ truyền function `handleOnClick` được định nghĩa</span> <span class="token comment">// trong component A tới component B với giá trị là `click`</span> <span class="token operator"><</span> app <span class="token operator">-</span> <span class="token function">menu</span> <span class="token punctuation">(</span> click <span class="token punctuation">)</span> <span class="token operator">=</span> <span class="token string">"onClick($event)"</span> <span class="token operator">></span> <span class="token operator"><</span> <span class="token operator">/</span> app <span class="token operator">-</span> menu <span class="token operator">></span> |
1 2 3 4 5 6 7 | <span class="token comment">// file Component của component B</span> <span class="token comment">// Do trong template component A có truyền vào component B 1 event là `click`,</span> <span class="token comment">// cho nên ta cần phải khai báo decorator @Output ở phía trước `click`</span> <span class="token keyword">export</span> Class MenuComonent <span class="token keyword">implements</span> <span class="token class-name">OnInit</span> <span class="token punctuation">{</span> @ <span class="token function">Output</span> <span class="token punctuation">(</span> <span class="token punctuation">)</span> click <span class="token operator">=</span> <span class="token keyword">new</span> <span class="token class-name">EventEmitter</span> <span class="token punctuation">(</span> <span class="token punctuation">)</span> <span class="token punctuation">;</span> <span class="token punctuation">}</span> |
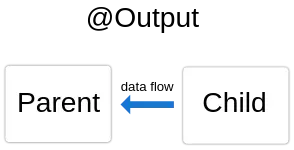
Flow of @ Output :
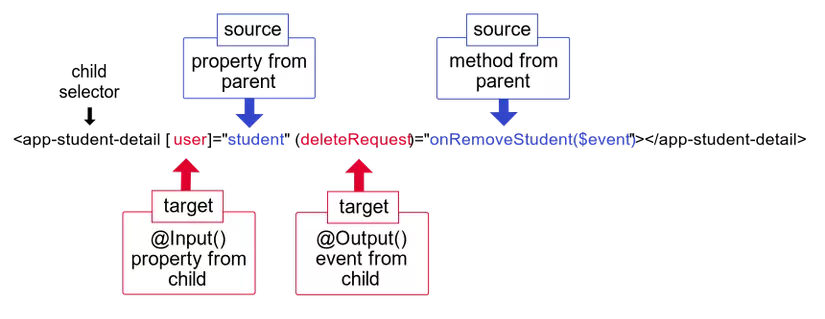
People note, when you want to pass to the child component with data as a property, we use square brackets [] , and if data is an event, it will be round brackets () .
In addition, there is one type of data transmission between non-parent components, we will use Shared Service . However, in the scope of the article I will not go into this way but I will introduce it in the upcoming articles. In fact, the service is essentially the place where we focus and manage the data, it is almost similar to Redux in React so probably probably not difficult.
Conclusion
Above are some basic knowledge in Component that I think is necessary to start getting acquainted with angular. In addition to the above knowledge, there are some other important issues in Component that I think you should learn such as: FromGroup, Two-way binding, logic processing methods (getter, setter …) , other decorators @ Host , @ ViewChild , @ ViewChildren …