1 What is Directives?
Directives is an object that makes it easy to modify another object and the application is very simple and flexible. Directives can be understood as the typescript (or javascript) code with HTML and when called, it is called as HTML. For example:
1 2 3 4 5 | <span class="token comment"><!-- Chỗ này là gọi directive *ngIf để kiểm tra điều kiện if ngay ở html --></span> <span class="token tag"><span class="token tag"><span class="token punctuation"><</span> div</span> <span class="token attr-name">*ngIf</span> <span class="token attr-value"><span class="token punctuation">=</span> <span class="token punctuation">"</span> time <span class="token punctuation">"</span></span> <span class="token punctuation">></span></span> Time: {{ time }} <span class="token tag"><span class="token tag"><span class="token punctuation"></</span> div</span> <span class="token punctuation">></span></span> |
2. Classification of directives
From Angular 2 onwards, directives are divided into the following categories:
- Components directives : There’s no doubt calling a component a directive, since it’s obvious that the component allows to define a selector and call it as an html tag ( <component-name> </component-name> )
- Structural directives : Structural directives are used to draw html, display data on an html interface, and change the DOM structure by adding or removing elements in the DOM. Structural directives often have an ‘ * ‘ in front of the directive. For example * ngFor , * ngIf
- Attribute directives : Change the look, interaction of objects or change other directives or add dynamic attributes to html element. for example * ngStyle
3. Components directives
Components directives are used very commonly, you can see Components directives here. Here, I will briefly describe this directives.
Components is a block of code in an Angular app. It is a combination of html template set (html framework) and embedded TypeScript (or Javascript) code. The components are independent of each other and independent of the system. It can be easily inserted or removed from the system. A component can be understood as a control on the display screen, including the html interface and the event handling logic associated with that control. A component can be as large as an entire monitor containing multiple controls or a group of monitors. That is, a component can also contain and call many other components connected. Thus, Angular is very flexible in breaking down code into components.
In Angular we declare a Component with the following structure:
1 2 3 4 5 6 7 8 | <span class="token keyword">import</span> <span class="token punctuation">{</span> Component <span class="token punctuation">}</span> <span class="token keyword">from</span> <span class="token string">'@angular/core'</span> <span class="token punctuation">;</span> @ <span class="token function">Component</span> <span class="token punctuation">(</span> <span class="token punctuation">{</span> selector <span class="token operator">:</span> <span class="token string">'app-hello-world'</span> <span class="token punctuation">,</span> template <span class="token operator">:</span> <span class="token template-string"><span class="token template-punctuation string">`</span> <span class="token string"><h1>Hello Angular world</h1></span> <span class="token template-punctuation string">`</span></span> <span class="token punctuation">}</span> <span class="token punctuation">)</span> <span class="token keyword">export</span> <span class="token keyword">class</span> <span class="token class-name">HelloWorld</span> <span class="token punctuation">{</span> <span class="token punctuation">}</span> |
As we can see the Component keyword helps define a html framework for it. And below is a class HelloWorld used to write logic code. In the html framework definition, we have the following properties to note:
- selector : The name given to call a component in html code. In the example just now, the keyword app-hello-world is named for this component. When we need to call this component in the parent html screen, we will call it with html tag <app-hello-world> </app-hello-world> . Calling so, the child component will be rendered to the parent component.
- template : Is a self-defined html frame for string-type components in this file. The example above just defines a simple html h1 tag. This method is for simple components only.
- templateUrl : Is the url to an external html file to load that file as the html frame for this component. This is a common way of coding because it allows separating the html frame from the logic code, the designer will edit the html file separately, independently of the coder.
- styles : is to write style css always into this component file. This method is for simple components only.
- styleUrls : The url to the independent style css file for this component. This way is recommended because the css file should be reserved for the designer to touch.
4. Structural directives
In the following, I will present some basic and common structural directives. Also you can refer and see details here Stuctural directives
4.1 Ng-if… else
Effect of checking conditions right in html. For example:
1 2 3 4 5 | <span class="token tag"><span class="token tag"><span class="token punctuation"><</span> div</span> <span class="token attr-name">*ngIf</span> <span class="token attr-value"><span class="token punctuation">=</span> <span class="token punctuation">"</span> time; else noTime <span class="token punctuation">"</span></span> <span class="token punctuation">></span></span> Time: {{time}} <span class="token tag"><span class="token tag"><span class="token punctuation"></</span> div</span> <span class="token punctuation">></span></span> <span class="token tag"><span class="token tag"><span class="token punctuation"><</span> ng-template</span> <span class="token attr-name">#noTime</span> <span class="token punctuation">></span></span> No time. <span class="token tag"><span class="token tag"><span class="token punctuation"></</span> ng-template</span> <span class="token punctuation">></span></span> |
The above code, when the variable time has a value, the string Time: [value] is displayed. And #noTime template is hidden, otherwise else condition is run and #noTime is displayed.
As we can see, using this ngIf else directive is very convenient when it is possible to hide html easily.
4.2 Ng-Template
It helps to gather the html to be hidden.
1 2 3 4 | <span class="token tag"><span class="token tag"><span class="token punctuation"><</span> div</span> <span class="token attr-name">*ngIf</span> <span class="token attr-value"><span class="token punctuation">=</span> <span class="token punctuation">"</span> isTrue; then tmplWhenTrue else tmplWhenFalse <span class="token punctuation">"</span></span> <span class="token punctuation">></span></span> <span class="token tag"><span class="token tag"><span class="token punctuation"></</span> div</span> <span class="token punctuation">></span></span> <span class="token tag"><span class="token tag"><span class="token punctuation"><</span> ng-template</span> <span class="token attr-name">#tmplWhenTrue</span> <span class="token punctuation">></span></span> I show-up when isTrue is true. <span class="token tag"><span class="token tag"><span class="token punctuation"></</span> ng-template</span> <span class="token punctuation">></span></span> <span class="token tag"><span class="token tag"><span class="token punctuation"><</span> ng-template</span> <span class="token attr-name">#tmplWhenFalse</span> <span class="token punctuation">></span></span> I show-up when isTrue is false <span class="token tag"><span class="token tag"><span class="token punctuation"></</span> ng-template</span> <span class="token punctuation">></span></span> |
This way of writing is more complete than 4.1 Ng-if… else
4.3 Ng-Container
Similar to Ng-Template used to gather html. But the strong point of Ng-Container is that this directive tag does not render the html <ng-container> tag as <ng-template>, but the tag will be hidden, making the css layout not broken if you gather html (No fear of jump from parent div to child div, html structure does not change when including <ng-container> </ng-container> tag)
Consider the following example:
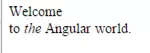
1 2 | Welcome <span class="token tag"><span class="token tag"><span class="token punctuation"><</span> div</span> <span class="token attr-name">*ngIf</span> <span class="token attr-value"><span class="token punctuation">=</span> <span class="token punctuation">"</span> title <span class="token punctuation">"</span></span> <span class="token punctuation">></span></span> to <span class="token tag"><span class="token tag"><span class="token punctuation"><</span> i</span> <span class="token punctuation">></span></span> the <span class="token tag"><span class="token tag"><span class="token punctuation"></</span> i</span> <span class="token punctuation">></span></span> {{title}} world. <span class="token tag"><span class="token tag"><span class="token punctuation"></</span> div</span> <span class="token punctuation">></span></span> |
It will be rendered as follows:
When looking at the html we will see:
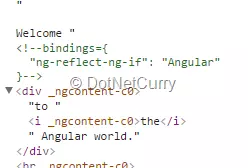
Suddenly the line div has ngIf it inserts an attribute _ngcontent-c0, resulting in the line being newline, wrong layout design.
Now rewrite the following:
1 2 | Welcome <span class="token tag"><span class="token tag"><span class="token punctuation"><</span> ng-container</span> <span class="token attr-name">*ngIf</span> <span class="token attr-value"><span class="token punctuation">=</span> <span class="token punctuation">"</span> title <span class="token punctuation">"</span></span> <span class="token punctuation">></span></span> to <span class="token tag"><span class="token tag"><span class="token punctuation"><</span> i</span> <span class="token punctuation">></span></span> the <span class="token tag"><span class="token tag"><span class="token punctuation"></</span> i</span> <span class="token punctuation">></span></span> {{title}} world. <span class="token tag"><span class="token tag"><span class="token punctuation"></</span> ng-container</span> <span class="token punctuation">></span></span> |
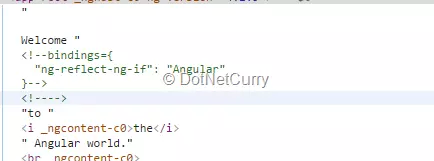
The results will be beautiful right away:

That’s because the html has been neatly cleaned:
4.4 NgSwitch and NgSwitchCase
We can absolutely use the conditional statement switch case in Angular just like switch case in Javascript.
1 2 3 4 5 6 | <span class="token tag"><span class="token tag"><span class="token punctuation"><</span> div</span> <span class="token attr-name">[ngSwitch]</span> <span class="token attr-value"><span class="token punctuation">=</span> <span class="token punctuation">"</span> isMetric <span class="token punctuation">"</span></span> <span class="token punctuation">></span></span> <span class="token tag"><span class="token tag"><span class="token punctuation"><</span> div</span> <span class="token attr-name">*ngSwitchCase</span> <span class="token attr-value"><span class="token punctuation">=</span> <span class="token punctuation">"</span> true <span class="token punctuation">"</span></span> <span class="token punctuation">></span></span> Degree Celsius <span class="token tag"><span class="token tag"><span class="token punctuation"></</span> div</span> <span class="token punctuation">></span></span> <span class="token tag"><span class="token tag"><span class="token punctuation"><</span> div</span> <span class="token attr-name">*ngSwitchCase</span> <span class="token attr-value"><span class="token punctuation">=</span> <span class="token punctuation">"</span> false <span class="token punctuation">"</span></span> <span class="token punctuation">></span></span> Fahrenheit <span class="token tag"><span class="token tag"><span class="token punctuation"></</span> div</span> <span class="token punctuation">></span></span> <span class="token tag"><span class="token tag"><span class="token punctuation"><</span> div</span> <span class="token attr-name">*ngSwitchDefault</span> <span class="token punctuation">></span></span> Default <span class="token tag"><span class="token tag"><span class="token punctuation"></</span> div</span> <span class="token punctuation">></span></span> <span class="token tag"><span class="token tag"><span class="token punctuation"></</span> div</span> <span class="token punctuation">></span></span> |
* ngSwitchDefault In case you want to use the switch case default (if all cases do not meet the screen, then go to default).
5. Attribute directive
Used as an object property, so when building, the directive and other common properties are built at the same time, leading to the directive’s changes to be concurrent when rendering that object.
5.1 Build a simple attributes directive.
Implement for directive. We can use the CLI command to create directive object.
1 2 | ng generate directive highlight |
CLI will generate src / app / highlight.directive.ts and declare it in AppModule Structure of file src / app / highlight.directive.ts
1 2 3 4 5 6 7 8 9 | <span class="token keyword">import</span> <span class="token punctuation">{</span> Directive <span class="token punctuation">}</span> <span class="token keyword">from</span> <span class="token string">'@angular/core'</span> <span class="token punctuation">;</span> @ <span class="token function">Directive</span> <span class="token punctuation">(</span> <span class="token punctuation">{</span> selector <span class="token operator">:</span> <span class="token string">'[appHighlight]'</span> <span class="token punctuation">}</span> <span class="token punctuation">)</span> <span class="token keyword">export</span> <span class="token keyword">class</span> <span class="token class-name">HighlightDirective</span> <span class="token punctuation">{</span> <span class="token keyword">constructor</span> <span class="token punctuation">(</span> <span class="token punctuation">)</span> <span class="token punctuation">{</span> <span class="token punctuation">}</span> <span class="token punctuation">}</span> |
A directive attribute needs to decorate the angular’s Directive object class by using Directive before the class. The example above is HighlightDirective which aims to change the background color of an object when the user hovers over it.
Import the Directive identifier to use it decorate the object in the angular. Calling Directive before the HighlightDirective class is to use decorate, when using we need to declare the selector name to use as an attribute, [appHighlight] a ([]) is how angular understands it as an attribute. Compile that sees which element has a property named appHighlight will be applied changed by the directive. (After using Directive , don’t forget to export the HighlightDirective class so you can import and use it.)
Now let’s implement for HighlightDirective to change the background color:
1 2 3 4 5 6 7 8 9 10 11 | <span class="token keyword">import</span> <span class="token punctuation">{</span> Directive <span class="token punctuation">,</span> ElementRef <span class="token punctuation">}</span> <span class="token keyword">from</span> <span class="token string">'@angular/core'</span> <span class="token punctuation">;</span> @ <span class="token function">Directive</span> <span class="token punctuation">(</span> <span class="token punctuation">{</span> selector <span class="token operator">:</span> <span class="token string">'[appHighlight]'</span> <span class="token punctuation">}</span> <span class="token punctuation">)</span> <span class="token keyword">export</span> <span class="token keyword">class</span> <span class="token class-name">HighlightDirective</span> <span class="token punctuation">{</span> <span class="token keyword">constructor</span> <span class="token punctuation">(</span> <span class="token parameter">el <span class="token operator">:</span> ElementRef</span> <span class="token punctuation">)</span> <span class="token punctuation">{</span> el <span class="token punctuation">.</span> nativeElement <span class="token punctuation">.</span> style <span class="token punctuation">.</span> backgroundColor <span class="token operator">=</span> <span class="token string">'yellow'</span> <span class="token punctuation">;</span> <span class="token punctuation">}</span> <span class="token punctuation">}</span> |
ElementRef is Class in angular’s library. We use ElementRef in the construct function to inject it references to DOM elements in the current component. Then just call the ElementRef property to get the DOM object to change the background style to yellow.
5.2 Apply the directive attribute
To use HighlightDirective, add the following tags:
1 2 | <span class="token tag"><span class="token tag"><span class="token punctuation"><</span> p</span> <span class="token attr-name">appHighlight</span> <span class="token punctuation">></span></span> Highlight me! <span class="token tag"><span class="token tag"><span class="token punctuation"></</span> p</span> <span class="token punctuation">></span></span> |
5.3 Directive interaction with users
Currently, appHighlight only sets a fixed color for the background, there is no flexibility and interaction. We will implement it to change the color for mouse events and user actions. First need to import HostListener.
1 2 | <span class="token keyword">import</span> <span class="token punctuation">{</span> Directive <span class="token punctuation">,</span> ElementRef <span class="token punctuation">,</span> HostListener <span class="token punctuation">}</span> <span class="token keyword">from</span> <span class="token string">'@angular/core'</span> <span class="token punctuation">;</span> |
Next is to add function handler when the event occurs using the Decorator HostListener.
1 2 3 4 5 6 7 8 9 10 11 12 | @ <span class="token function">HostListener</span> <span class="token punctuation">(</span> <span class="token string">'mouseenter'</span> <span class="token punctuation">)</span> <span class="token function">onMouseEnter</span> <span class="token punctuation">(</span> <span class="token punctuation">)</span> <span class="token punctuation">{</span> <span class="token keyword">this</span> <span class="token punctuation">.</span> <span class="token function">highlight</span> <span class="token punctuation">(</span> <span class="token string">'yellow'</span> <span class="token punctuation">)</span> <span class="token punctuation">;</span> <span class="token punctuation">}</span> @ <span class="token function">HostListener</span> <span class="token punctuation">(</span> <span class="token string">'mouseleave'</span> <span class="token punctuation">)</span> <span class="token function">onMouseLeave</span> <span class="token punctuation">(</span> <span class="token punctuation">)</span> <span class="token punctuation">{</span> <span class="token keyword">this</span> <span class="token punctuation">.</span> <span class="token function">highlight</span> <span class="token punctuation">(</span> <span class="token keyword">null</span> <span class="token punctuation">)</span> <span class="token punctuation">;</span> <span class="token punctuation">}</span> <span class="token keyword">private</span> <span class="token function">highlight</span> <span class="token punctuation">(</span> <span class="token parameter">color <span class="token operator">:</span> <span class="token builtin">string</span></span> <span class="token punctuation">)</span> <span class="token punctuation">{</span> <span class="token keyword">this</span> <span class="token punctuation">.</span> el <span class="token punctuation">.</span> nativeElement <span class="token punctuation">.</span> style <span class="token punctuation">.</span> backgroundColor <span class="token operator">=</span> color <span class="token punctuation">;</span> <span class="token punctuation">}</span> |
HostListener decorator will track and catch the events of the element in the DOM that use the appHighlight directive The highlight function will change the background color according to the color passed in the parameter, so in the handler functions just call highlight with the argument. number is the color to display. Run and check the results offline.
5.4 Passing data into directive via Input
Currently the colors for events are still fixed, where used, the colors remain the same. To create flexibility for the directive we will pass colors to it. First, we need to import Input:
1 2 | <span class="token keyword">import</span> <span class="token punctuation">{</span> Directive <span class="token punctuation">,</span> ElementRef <span class="token punctuation">,</span> HostListener <span class="token punctuation">,</span> Input <span class="token punctuation">}</span> <span class="token keyword">from</span> <span class="token string">'@angular/core'</span> <span class="token punctuation">;</span> |
Use the decorator for the highlightColor variable.
1 2 | @ <span class="token function">Input</span> <span class="token punctuation">(</span> <span class="token punctuation">)</span> highlightColor <span class="token operator">:</span> <span class="token builtin">string</span> <span class="token punctuation">;</span> |
Use appHighlight and input binding in combination for the object.
1 2 3 | <span class="token tag"><span class="token tag"><span class="token punctuation"><</span> p</span> <span class="token attr-name">appHighlight</span> <span class="token attr-name">highlightColor</span> <span class="token attr-value"><span class="token punctuation">=</span> <span class="token punctuation">"</span> yellow <span class="token punctuation">"</span></span> <span class="token punctuation">></span></span> Highlighted in yellow <span class="token tag"><span class="token tag"><span class="token punctuation"></</span> p</span> <span class="token punctuation">></span></span> <span class="token tag"><span class="token tag"><span class="token punctuation"><</span> p</span> <span class="token attr-name">appHighlight</span> <span class="token attr-name">[highlightColor]</span> <span class="token attr-value"><span class="token punctuation">=</span> <span class="token punctuation">"</span> <span class="token punctuation">'</span> orange' <span class="token punctuation">"</span></span> <span class="token punctuation">></span></span> Highlighted in orange <span class="token tag"><span class="token tag"><span class="token punctuation"></</span> p</span> <span class="token punctuation">></span></span> |
That’s the original usage, but the directive has been improved to shorten the code and is more convenient by using director as an attribute (this is why its selector has a []).
1 2 | <span class="token tag"><span class="token tag"><span class="token punctuation"><</span> p</span> <span class="token attr-name">[appHighlight]</span> <span class="token attr-value"><span class="token punctuation">=</span> <span class="token punctuation">"</span> color <span class="token punctuation">"</span></span> <span class="token punctuation">></span></span> Highlight me! <span class="token tag"><span class="token tag"><span class="token punctuation"></</span> p</span> <span class="token punctuation">></span></span> |
The [appHighlight] property is a combination of highlighting directive and set the variable appHighlight. We can also rename the variable if we don’t want to name the variable appHighlight according to the selector.
1 2 | @ <span class="token function">Input</span> <span class="token punctuation">(</span> <span class="token string">'appHighlight'</span> <span class="token punctuation">)</span> highlightColor <span class="token operator">:</span> <span class="token builtin">string</span> <span class="token punctuation">;</span> |
It is also possible to combine the above with regular input binding.
1 2 3 4 | <span class="token tag"><span class="token tag"><span class="token punctuation"><</span> p</span> <span class="token attr-name">[appHighlight]</span> <span class="token attr-value"><span class="token punctuation">=</span> <span class="token punctuation">"</span> color <span class="token punctuation">"</span></span> <span class="token attr-name">defaultColor</span> <span class="token attr-value"><span class="token punctuation">=</span> <span class="token punctuation">"</span> violet <span class="token punctuation">"</span></span> <span class="token punctuation">></span></span> Highlight me too! <span class="token tag"><span class="token tag"><span class="token punctuation"></</span> p</span> <span class="token punctuation">></span></span> |
1 2 | @ <span class="token function">Input</span> <span class="token punctuation">(</span> <span class="token punctuation">)</span> defaultColor <span class="token operator">:</span> <span class="token builtin">string</span> <span class="token punctuation">;</span> |
Angular will automatically understand you binding defaultColor to HighlightDirective because you have declared the Input decorator for it. binding adds a defaultColor through the input as the default color. in the handler for the mouse change event is as follows:
1 2 3 4 | @ <span class="token function">HostListener</span> <span class="token punctuation">(</span> <span class="token string">'mouseenter'</span> <span class="token punctuation">)</span> <span class="token function">onMouseEnter</span> <span class="token punctuation">(</span> <span class="token punctuation">)</span> <span class="token punctuation">{</span> <span class="token keyword">this</span> <span class="token punctuation">.</span> <span class="token function">highlight</span> <span class="token punctuation">(</span> <span class="token keyword">this</span> <span class="token punctuation">.</span> highlightColor <span class="token operator">||</span> <span class="token keyword">this</span> <span class="token punctuation">.</span> defaultColor <span class="token operator">||</span> <span class="token string">'red'</span> <span class="token punctuation">)</span> <span class="token punctuation">;</span> <span class="token punctuation">}</span> |
5.5 Complete this dummy application application.
Update the app.component.html file:
1 2 3 4 5 6 7 8 9 10 | <span class="token tag"><span class="token tag"><span class="token punctuation"><</span> h1</span> <span class="token punctuation">></span></span> My First Attribute Directive <span class="token tag"><span class="token tag"><span class="token punctuation"></</span> h1</span> <span class="token punctuation">></span></span> <span class="token tag"><span class="token tag"><span class="token punctuation"><</span> h4</span> <span class="token punctuation">></span></span> Pick a highlight color <span class="token tag"><span class="token tag"><span class="token punctuation"></</span> h4</span> <span class="token punctuation">></span></span> <span class="token tag"><span class="token tag"><span class="token punctuation"><</span> div</span> <span class="token punctuation">></span></span> <span class="token tag"><span class="token tag"><span class="token punctuation"><</span> input</span> <span class="token attr-name">type</span> <span class="token attr-value"><span class="token punctuation">=</span> <span class="token punctuation">"</span> radio <span class="token punctuation">"</span></span> <span class="token attr-name">name</span> <span class="token attr-value"><span class="token punctuation">=</span> <span class="token punctuation">"</span> colors <span class="token punctuation">"</span></span> <span class="token attr-name">(click)</span> <span class="token attr-value"><span class="token punctuation">=</span> <span class="token punctuation">"</span> color='lightgreen' <span class="token punctuation">"</span></span> <span class="token punctuation">></span></span> Green <span class="token tag"><span class="token tag"><span class="token punctuation"><</span> input</span> <span class="token attr-name">type</span> <span class="token attr-value"><span class="token punctuation">=</span> <span class="token punctuation">"</span> radio <span class="token punctuation">"</span></span> <span class="token attr-name">name</span> <span class="token attr-value"><span class="token punctuation">=</span> <span class="token punctuation">"</span> colors <span class="token punctuation">"</span></span> <span class="token attr-name">(click)</span> <span class="token attr-value"><span class="token punctuation">=</span> <span class="token punctuation">"</span> color='yellow' <span class="token punctuation">"</span></span> <span class="token punctuation">></span></span> Yellow <span class="token tag"><span class="token tag"><span class="token punctuation"><</span> input</span> <span class="token attr-name">type</span> <span class="token attr-value"><span class="token punctuation">=</span> <span class="token punctuation">"</span> radio <span class="token punctuation">"</span></span> <span class="token attr-name">name</span> <span class="token attr-value"><span class="token punctuation">=</span> <span class="token punctuation">"</span> colors <span class="token punctuation">"</span></span> <span class="token attr-name">(click)</span> <span class="token attr-value"><span class="token punctuation">=</span> <span class="token punctuation">"</span> color='cyan' <span class="token punctuation">"</span></span> <span class="token punctuation">></span></span> Cyan <span class="token tag"><span class="token tag"><span class="token punctuation"></</span> div</span> <span class="token punctuation">></span></span> <span class="token tag"><span class="token tag"><span class="token punctuation"><</span> p</span> <span class="token attr-name">[appHighlight]</span> <span class="token attr-value"><span class="token punctuation">=</span> <span class="token punctuation">"</span> color <span class="token punctuation">"</span></span> <span class="token punctuation">></span></span> Highlight me!</p |
The src / app / app.component.ts file:
1 2 3 4 5 6 7 8 9 10 11 12 13 14 15 16 17 18 19 20 21 22 23 24 25 | <span class="token keyword">import</span> <span class="token punctuation">{</span> Directive <span class="token punctuation">,</span> ElementRef <span class="token punctuation">,</span> HostListener <span class="token punctuation">,</span> Input <span class="token punctuation">}</span> <span class="token keyword">from</span> <span class="token string">'@angular/core'</span> <span class="token punctuation">;</span> @ <span class="token function">Directive</span> <span class="token punctuation">(</span> <span class="token punctuation">{</span> selector <span class="token operator">:</span> <span class="token string">'[appHighlight]'</span> <span class="token punctuation">}</span> <span class="token punctuation">)</span> <span class="token keyword">export</span> <span class="token keyword">class</span> <span class="token class-name">HighlightDirective</span> <span class="token punctuation">{</span> color <span class="token operator">:</span> <span class="token builtin">string</span> <span class="token punctuation">;</span> <span class="token keyword">constructor</span> <span class="token punctuation">(</span> <span class="token parameter"><span class="token keyword">private</span> el <span class="token operator">:</span> ElementRef</span> <span class="token punctuation">)</span> <span class="token punctuation">{</span> <span class="token punctuation">}</span> @ <span class="token function">Input</span> <span class="token punctuation">(</span> <span class="token string">'appHighlight'</span> <span class="token punctuation">)</span> highlightColor <span class="token operator">:</span> <span class="token builtin">string</span> <span class="token punctuation">;</span> @ <span class="token function">HostListener</span> <span class="token punctuation">(</span> <span class="token string">'mouseenter'</span> <span class="token punctuation">)</span> <span class="token function">onMouseEnter</span> <span class="token punctuation">(</span> <span class="token punctuation">)</span> <span class="token punctuation">{</span> <span class="token keyword">this</span> <span class="token punctuation">.</span> <span class="token function">highlight</span> <span class="token punctuation">(</span> <span class="token keyword">this</span> <span class="token punctuation">.</span> highlightColor <span class="token operator">||</span> <span class="token string">'red'</span> <span class="token punctuation">)</span> <span class="token punctuation">;</span> <span class="token punctuation">}</span> @ <span class="token function">HostListener</span> <span class="token punctuation">(</span> <span class="token string">'mouseleave'</span> <span class="token punctuation">)</span> <span class="token function">onMouseLeave</span> <span class="token punctuation">(</span> <span class="token punctuation">)</span> <span class="token punctuation">{</span> <span class="token keyword">this</span> <span class="token punctuation">.</span> <span class="token function">highlight</span> <span class="token punctuation">(</span> <span class="token keyword">null</span> <span class="token punctuation">)</span> <span class="token punctuation">;</span> <span class="token punctuation">}</span> <span class="token keyword">private</span> <span class="token function">highlight</span> <span class="token punctuation">(</span> <span class="token parameter">color <span class="token operator">:</span> <span class="token builtin">string</span></span> <span class="token punctuation">)</span> <span class="token punctuation">{</span> <span class="token keyword">this</span> <span class="token punctuation">.</span> el <span class="token punctuation">.</span> nativeElement <span class="token punctuation">.</span> style <span class="token punctuation">.</span> backgroundColor <span class="token operator">=</span> color <span class="token punctuation">;</span> <span class="token punctuation">}</span> <span class="token punctuation">}</span> |
Conclude
My study on Directives is here to end. Hope it will be somewhat helpful for you in learning and doing about Angular . The article is also hard to avoid mistakes, hope everyone sympathizes, and hopes for everyone’s comments to make the article more complete.