Introduce
Hey guys, I need to research something on my appointment)
Recently, I have been researching on flutter, I think this song is so good, so I took the opportunity to piggyback here and refer to Flutter with 500 ae. Hope to help you guys ^^. Enough chattering, let’s go!
Flutter is Google’s SDK, which helps create mobile apps for iOS and Android using a (almost) code base. It is a novice in cross-platform mobile application development and unlike other frameworks such as React Native, it does not use JavaScript as a Programming Language.
The language used in flutter is DART, similar to JavaScript, it also runs a threaded event queue. The biggest benefit of using Flutter is that it directly generates ARM binaries that will execute directly on the original platform to make it faster to run.
JavaScript based frameworks like “React Native” needs a bridge which converts the JavaScript code to Native Code which adds an additional layer of indirection.
The installation instructions HERE . Both Android Studio and IntelliJ IDEA can be used to develop flutter applications.
Reference source: https://proandroiddev.com/flutter-from-zero-to-comfortable-6b1d6b2d20e
Create Flutter application – The hierarchical widget
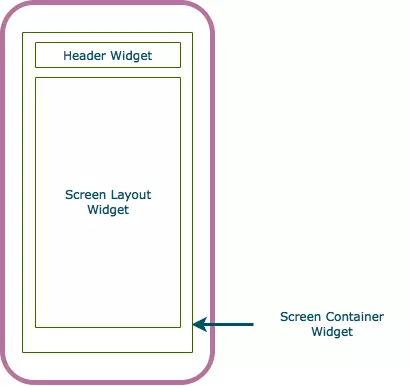
Everything in a Flutter app is a Widget in Flutter, from simple tests like Text or Button to Screen Layouts .
These widgets in hierarchical order will be displayed on the screen. Widgets that may contain widgets within it are called Container Widgets . Most layout widgets are container widgets except widgets that perform a minimal task like the Text Widget.
A minimal arrangement of widgets will look like
Hello Flutter: The first Flutter Code
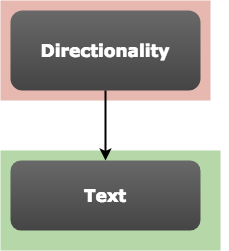
For our first lines of code, I will show “Hello Flutter” on mobile. We will use the Widget Container named Directionality and the Text Widget called Text to display the text on the screen. Here is the code.
1 2 3 4 5 6 7 8 9 10 11 12 | <span class="token keyword">import</span> <span class="token string">'package:flutter/material.dart'</span> <span class="token punctuation">;</span> void <span class="token function">main</span> <span class="token punctuation">(</span> <span class="token punctuation">)</span> <span class="token operator">=</span> <span class="token operator">></span> <span class="token function">runApp</span> <span class="token punctuation">(</span> new <span class="token function">MyApp</span> <span class="token punctuation">(</span> <span class="token punctuation">)</span> <span class="token punctuation">)</span> <span class="token punctuation">;</span> <span class="token keyword">class</span> MyApp extends StatelessWidget <span class="token punctuation">{</span> @ <span class="token keyword">override</span> Widget <span class="token function">build</span> <span class="token punctuation">(</span> BuildContext ctxt <span class="token punctuation">)</span> <span class="token punctuation">{</span> <span class="token keyword">return</span> new <span class="token function">Directionality</span> <span class="token punctuation">(</span> textDirection <span class="token operator">:</span> TextDirection <span class="token punctuation">.</span> ltr <span class="token punctuation">,</span> child <span class="token operator">:</span> new <span class="token function">Text</span> <span class="token punctuation">(</span> <span class="token string">"Hello Flutter"</span> <span class="token punctuation">)</span> <span class="token punctuation">)</span> <span class="token punctuation">;</span> <span class="token punctuation">}</span> <span class="token punctuation">}</span> |
Like many other programming languages, the main () function is where execution begins. In the above Hello Flutter code, MyApp is a widget created to build screen layouts.
Every custom widget has a build function which returns a Widget
In the above code, I created a “Container Widget” called “Directionality” , will have a widget widget called Text , which will display the text in Hello Flutter. The widget hierarchy for this looks like
The text will be displayed at the top of the screen, however, we can move the text to the middle of the screen using a widget called Center , changing the hierarchy as follows.
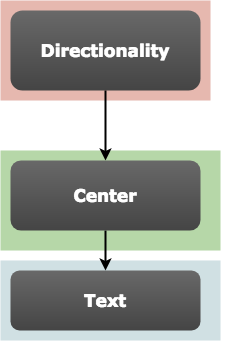
And the code now looks like
1 2 3 4 5 6 7 8 9 10 11 12 | <span class="token keyword">class</span> MyApp extends StatelessWidget <span class="token punctuation">{</span> @ <span class="token keyword">override</span> Widget <span class="token function">build</span> <span class="token punctuation">(</span> BuildContext ctxt <span class="token punctuation">)</span> <span class="token punctuation">{</span> <span class="token keyword">return</span> new <span class="token function">Directionality</span> <span class="token punctuation">(</span> textDirection <span class="token operator">:</span> TextDirection <span class="token punctuation">.</span> ltr <span class="token punctuation">,</span> child <span class="token operator">:</span> new <span class="token function">Center</span> <span class="token punctuation">(</span> <span class="token comment">// Changed Line</span> child <span class="token operator">:</span> new <span class="token function">Text</span> <span class="token punctuation">(</span> <span class="token string">"Hello Flutter"</span> <span class="token punctuation">)</span> <span class="token punctuation">,</span> <span class="token comment">// Changed Line</span> <span class="token punctuation">)</span> <span class="token punctuation">)</span> <span class="token punctuation">;</span> <span class="token punctuation">}</span> <span class="token punctuation">}</span> |
Create Material Designs
None of the applications we create for the real world will have only plain text displayed on the screen, instead an application will at a minimum include Application Bar , Body , and Navigational Functionality. .
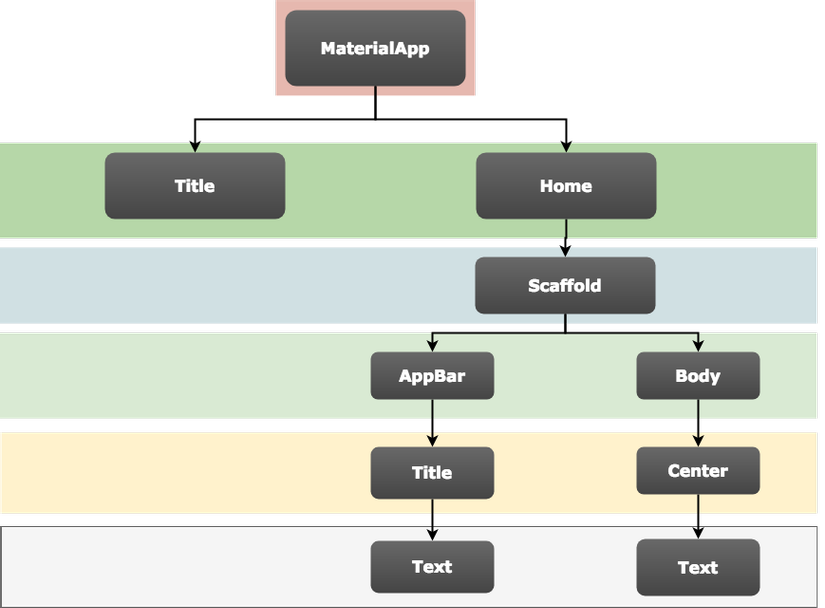
In Flutter, we often use MaterialApp to create material design that allows us to use Scaffold , which will be used to create the Application Bar & Body . This is how we create a minimal screen with MaterialApp and Body.
1 2 3 4 5 6 7 8 9 10 11 12 13 14 15 16 17 | <span class="token keyword">class</span> MyApp extends StatelessWidget <span class="token punctuation">{</span> @ <span class="token keyword">override</span> Widget <span class="token function">build</span> <span class="token punctuation">(</span> BuildContext ctxt <span class="token punctuation">)</span> <span class="token punctuation">{</span> <span class="token keyword">return</span> new <span class="token function">MaterialApp</span> <span class="token punctuation">(</span> title <span class="token operator">:</span> <span class="token string">"MySampleApplication"</span> <span class="token punctuation">,</span> home <span class="token operator">:</span> new <span class="token function">Scaffold</span> <span class="token punctuation">(</span> appBar <span class="token operator">:</span> new <span class="token function">AppBar</span> <span class="token punctuation">(</span> title <span class="token operator">:</span> new <span class="token function">Text</span> <span class="token punctuation">(</span> <span class="token string">"Hello Flutter App"</span> <span class="token punctuation">)</span> <span class="token punctuation">,</span> <span class="token punctuation">)</span> <span class="token punctuation">,</span> body <span class="token operator">:</span> new <span class="token function">Center</span> <span class="token punctuation">(</span> child <span class="token operator">:</span> new <span class="token function">Text</span> <span class="token punctuation">(</span> <span class="token string">"Hello Flutter"</span> <span class="token punctuation">)</span> <span class="token punctuation">,</span> <span class="token punctuation">)</span> <span class="token punctuation">,</span> <span class="token punctuation">)</span> <span class="token punctuation">,</span> <span class="token punctuation">)</span> <span class="token punctuation">;</span> <span class="token punctuation">}</span> <span class="token punctuation">}</span> |
And the widget hierarchy for the above will be like
Expand Material Designs
In Material Design, the body can only contain a child widget that is not what we want. Generally, the screen consists of many widgets.
To achieve the same thing, we need to use a widget like a child, which can contain a bunch of other widgets. There are many widgets in Flutter that can contain a series of sub widgets, Row / Column is one of them. In the above code, we can add Row / Column to display multiple widgets that change the widget hierarchy as follows
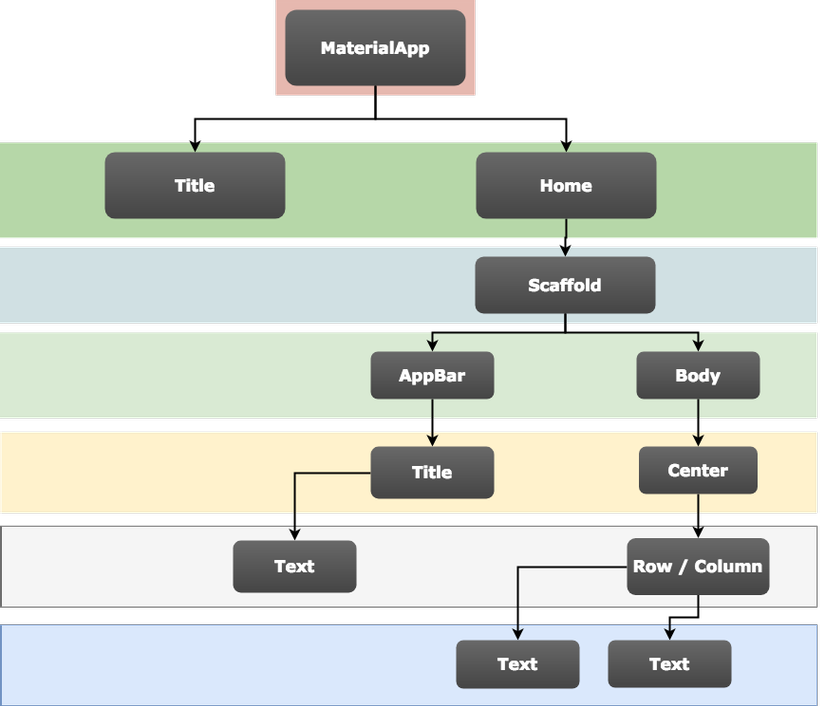
And the code now will be as follows
1 2 3 4 5 6 7 8 9 10 11 12 13 14 15 16 17 18 19 20 21 22 | <span class="token keyword">class</span> MyApp extends StatelessWidget <span class="token punctuation">{</span> @ <span class="token keyword">override</span> Widget <span class="token function">build</span> <span class="token punctuation">(</span> BuildContext ctxt <span class="token punctuation">)</span> <span class="token punctuation">{</span> <span class="token keyword">return</span> new <span class="token function">MaterialApp</span> <span class="token punctuation">(</span> title <span class="token operator">:</span> <span class="token string">"MySampleApplication"</span> <span class="token punctuation">,</span> home <span class="token operator">:</span> new <span class="token function">Scaffold</span> <span class="token punctuation">(</span> appBar <span class="token operator">:</span> new <span class="token function">AppBar</span> <span class="token punctuation">(</span> title <span class="token operator">:</span> new <span class="token function">Text</span> <span class="token punctuation">(</span> <span class="token string">"Hello Flutter App"</span> <span class="token punctuation">)</span> <span class="token punctuation">,</span> <span class="token punctuation">)</span> <span class="token punctuation">,</span> body <span class="token operator">:</span> new <span class="token function">Center</span> <span class="token punctuation">(</span> child <span class="token operator">:</span> new <span class="token function">Row</span> <span class="token punctuation">(</span> children <span class="token operator">:</span> <span class="token operator"><</span> Widget <span class="token operator">></span> <span class="token punctuation">[</span> new <span class="token function">Text</span> <span class="token punctuation">(</span> <span class="token string">"Hello Flutter"</span> <span class="token punctuation">)</span> <span class="token punctuation">,</span> new <span class="token function">Text</span> <span class="token punctuation">(</span> <span class="token string">"Hello Flutter - "</span> <span class="token punctuation">)</span> <span class="token punctuation">,</span> <span class="token punctuation">]</span> <span class="token punctuation">,</span> <span class="token punctuation">)</span> <span class="token punctuation">,</span> <span class="token punctuation">)</span> <span class="token punctuation">,</span> <span class="token punctuation">)</span> <span class="token punctuation">)</span> <span class="token punctuation">;</span> <span class="token punctuation">}</span> <span class="token punctuation">}</span> |
Pass custom parameters to Widgets
MyApp class is also a widget created by application. Just like any other built-in Widgets, we can also pass parameters to our widget. This is done when providing constructors on the MyApp class.
It’s a non mandatory, but a common practice to declare the parameters provided inside the constructor as final.
In the code below, my MyApp widget will wait for a widget as input where we will provide TextWidget as input.
1 2 3 4 5 6 7 8 9 10 11 12 13 14 15 16 17 18 19 20 21 22 23 24 25 26 | void <span class="token function">main</span> <span class="token punctuation">(</span> <span class="token punctuation">)</span> <span class="token operator">=</span> <span class="token operator">></span> <span class="token function">runApp</span> <span class="token punctuation">(</span> new <span class="token function">MyApp</span> <span class="token punctuation">(</span> TextInput <span class="token operator">:</span> new <span class="token function">Text</span> <span class="token punctuation">(</span> <span class="token string">"Provided By Main"</span> <span class="token punctuation">)</span> <span class="token punctuation">,</span> <span class="token punctuation">)</span> <span class="token punctuation">)</span> <span class="token punctuation">;</span> <span class="token keyword">class</span> MyApp extends StatelessWidget <span class="token punctuation">{</span> <span class="token function">MyApp</span> <span class="token punctuation">(</span> <span class="token punctuation">{</span> <span class="token keyword">this</span> <span class="token punctuation">.</span> TextInput <span class="token punctuation">}</span> <span class="token punctuation">)</span> <span class="token punctuation">;</span> <span class="token keyword">final</span> Widget TextInput <span class="token punctuation">;</span> @ <span class="token keyword">override</span> Widget <span class="token function">build</span> <span class="token punctuation">(</span> BuildContext ctxt <span class="token punctuation">)</span> <span class="token punctuation">{</span> <span class="token keyword">return</span> new <span class="token function">MaterialApp</span> <span class="token punctuation">(</span> title <span class="token operator">:</span> <span class="token string">"MySampleApplication"</span> <span class="token punctuation">,</span> home <span class="token operator">:</span> new <span class="token function">Scaffold</span> <span class="token punctuation">(</span> appBar <span class="token operator">:</span> new <span class="token function">AppBar</span> <span class="token punctuation">(</span> title <span class="token operator">:</span> new <span class="token function">Text</span> <span class="token punctuation">(</span> <span class="token string">"Hello Flutter App"</span> <span class="token punctuation">)</span> <span class="token punctuation">,</span> <span class="token punctuation">)</span> <span class="token punctuation">,</span> body <span class="token operator">:</span> new <span class="token function">Center</span> <span class="token punctuation">(</span> child <span class="token operator">:</span> new <span class="token function">Column</span> <span class="token punctuation">(</span> children <span class="token operator">:</span> <span class="token operator"><</span> Widget <span class="token operator">></span> <span class="token punctuation">[</span> TextInput <span class="token punctuation">]</span> <span class="token punctuation">,</span> <span class="token punctuation">)</span> <span class="token punctuation">,</span> <span class="token punctuation">)</span> <span class="token punctuation">)</span> <span class="token punctuation">,</span> <span class="token punctuation">)</span> <span class="token punctuation">;</span> <span class="token punctuation">}</span> <span class="token punctuation">}</span> |
Stateless and Stateful Widgets
There are two types of widgets we can create in flutter: Stateless and Stateful . All the widgets we’ve created so far are stateless widgets .
Stateless Widgets and its limitations
A Stateless widget can only be drawn once once the Widget is loaded, which means we can redraw the Widget based on any user events or actions.
We can see this behavior by having Widget Checkbox . The Checkbox widget is a flutter Widget that handles the clicking on the Checkbox, however, to display the clicked checkbox, we need to redraw the widget using a hot reload or reload widget.
This is not to say that Stateless Widgets are not useful, they have their own use for displaying static content or pages that need to be reloaded multiple times in an Application.
This is how the Stateless widget with a checkbox will look like
1 2 3 4 5 6 7 8 9 10 11 12 13 14 15 16 17 18 19 20 21 22 23 24 25 26 27 28 29 30 | <span class="token keyword">class</span> MyApp extends StatelessWidget <span class="token punctuation">{</span> <span class="token function">MyApp</span> <span class="token punctuation">(</span> <span class="token punctuation">{</span> <span class="token keyword">this</span> <span class="token punctuation">.</span> TextInput <span class="token punctuation">}</span> <span class="token punctuation">)</span> <span class="token punctuation">;</span> <span class="token keyword">final</span> Widget TextInput <span class="token punctuation">;</span> bool checkBoxValue <span class="token operator">=</span> <span class="token boolean">false</span> <span class="token punctuation">;</span> @ <span class="token keyword">override</span> Widget <span class="token function">build</span> <span class="token punctuation">(</span> BuildContext ctxt <span class="token punctuation">)</span> <span class="token punctuation">{</span> <span class="token keyword">return</span> new <span class="token function">MaterialApp</span> <span class="token punctuation">(</span> title <span class="token operator">:</span> <span class="token string">"MySampleApplication"</span> <span class="token punctuation">,</span> home <span class="token operator">:</span> new <span class="token function">Scaffold</span> <span class="token punctuation">(</span> appBar <span class="token operator">:</span> new <span class="token function">AppBar</span> <span class="token punctuation">(</span> title <span class="token operator">:</span> new <span class="token function">Text</span> <span class="token punctuation">(</span> <span class="token string">"Hello Flutter App"</span> <span class="token punctuation">)</span> <span class="token punctuation">,</span> <span class="token punctuation">)</span> <span class="token punctuation">,</span> body <span class="token operator">:</span> new <span class="token function">Center</span> <span class="token punctuation">(</span> child <span class="token operator">:</span> new <span class="token function">Column</span> <span class="token punctuation">(</span> children <span class="token operator">:</span> <span class="token operator"><</span> Widget <span class="token operator">></span> <span class="token punctuation">[</span> TextInput <span class="token punctuation">,</span> new <span class="token function">Checkbox</span> <span class="token punctuation">(</span> value <span class="token operator">:</span> checkBoxValue <span class="token punctuation">,</span> onChanged <span class="token operator">:</span> <span class="token punctuation">(</span> bool newValue <span class="token punctuation">)</span> <span class="token punctuation">{</span> checkBoxValue <span class="token operator">=</span> newValue <span class="token punctuation">;</span> <span class="token punctuation">}</span> <span class="token punctuation">)</span> <span class="token punctuation">]</span> <span class="token punctuation">,</span> <span class="token punctuation">)</span> <span class="token punctuation">,</span> <span class="token punctuation">)</span> <span class="token punctuation">)</span> <span class="token punctuation">,</span> <span class="token punctuation">)</span> <span class="token punctuation">;</span> <span class="token punctuation">}</span> <span class="token punctuation">}</span> |
As you can see while running this code, nothing happens when we click the checkbox unless we reload the widget.
Stateful Widgets
Stateful Widgets address the reloading shortcomings of Stateless Widgets . A Stateful Widget can be downloaded multiple times by calling setState () . This will trigger the build(BuildContext ctxt) be called back.
Creating Stateful Widgets is different from creating Stateless Widgets because we need to create two classes, one from Stateful Widget and the other from Generic State <> .
In every Stateful Widget , we override the createdState (…) function to create an instance of our stateful. This is how the Stateful Widget code looks like
1 2 3 4 5 6 7 8 9 10 11 12 13 14 15 16 17 18 19 20 21 22 23 24 25 26 27 28 29 30 31 32 33 34 35 | <span class="token keyword">class</span> MyApp extends StatefulWidget <span class="token punctuation">{</span> <span class="token function">MyApp</span> <span class="token punctuation">(</span> <span class="token punctuation">{</span> <span class="token keyword">this</span> <span class="token punctuation">.</span> TextInput <span class="token punctuation">}</span> <span class="token punctuation">)</span> <span class="token punctuation">;</span> <span class="token keyword">final</span> Widget TextInput <span class="token punctuation">;</span> MyAppState <span class="token function">createState</span> <span class="token punctuation">(</span> <span class="token punctuation">)</span> <span class="token operator">=</span> <span class="token operator">></span> new <span class="token function">MyAppState</span> <span class="token punctuation">(</span> <span class="token punctuation">)</span> <span class="token punctuation">;</span> <span class="token punctuation">}</span> <span class="token keyword">class</span> MyAppState extends State <span class="token operator"><</span> MyApp <span class="token operator">></span> <span class="token punctuation">{</span> bool checkBoxValue <span class="token operator">=</span> <span class="token boolean">false</span> <span class="token punctuation">;</span> @ <span class="token keyword">override</span> Widget <span class="token function">build</span> <span class="token punctuation">(</span> BuildContext ctxt <span class="token punctuation">)</span> <span class="token punctuation">{</span> <span class="token keyword">return</span> new <span class="token function">MaterialApp</span> <span class="token punctuation">(</span> title <span class="token operator">:</span> <span class="token string">"MySampleApplication"</span> <span class="token punctuation">,</span> home <span class="token operator">:</span> new <span class="token function">Scaffold</span> <span class="token punctuation">(</span> appBar <span class="token operator">:</span> new <span class="token function">AppBar</span> <span class="token punctuation">(</span> title <span class="token operator">:</span> new <span class="token function">Text</span> <span class="token punctuation">(</span> <span class="token string">"Hello Flutter App"</span> <span class="token punctuation">)</span> <span class="token punctuation">,</span> <span class="token punctuation">)</span> <span class="token punctuation">,</span> body <span class="token operator">:</span> new <span class="token function">Center</span> <span class="token punctuation">(</span> child <span class="token operator">:</span> new <span class="token function">Column</span> <span class="token punctuation">(</span> children <span class="token operator">:</span> <span class="token operator"><</span> Widget <span class="token operator">></span> <span class="token punctuation">[</span> widget <span class="token punctuation">.</span> TextInput <span class="token punctuation">,</span> new <span class="token function">Checkbox</span> <span class="token punctuation">(</span> value <span class="token operator">:</span> checkBoxValue <span class="token punctuation">,</span> onChanged <span class="token operator">:</span> <span class="token punctuation">(</span> bool newValue <span class="token punctuation">)</span> <span class="token punctuation">{</span> <span class="token function">setState</span> <span class="token punctuation">(</span> <span class="token punctuation">(</span> <span class="token punctuation">)</span> <span class="token punctuation">{</span> checkBoxValue <span class="token operator">=</span> newValue <span class="token punctuation">;</span> <span class="token punctuation">}</span> <span class="token punctuation">)</span> <span class="token punctuation">;</span> <span class="token punctuation">}</span> <span class="token punctuation">)</span> <span class="token punctuation">]</span> <span class="token punctuation">,</span> <span class="token punctuation">)</span> <span class="token punctuation">,</span> <span class="token punctuation">)</span> <span class="token punctuation">)</span> <span class="token punctuation">,</span> <span class="token punctuation">)</span> <span class="token punctuation">;</span> <span class="token punctuation">}</span> <span class="token punctuation">}</span> |
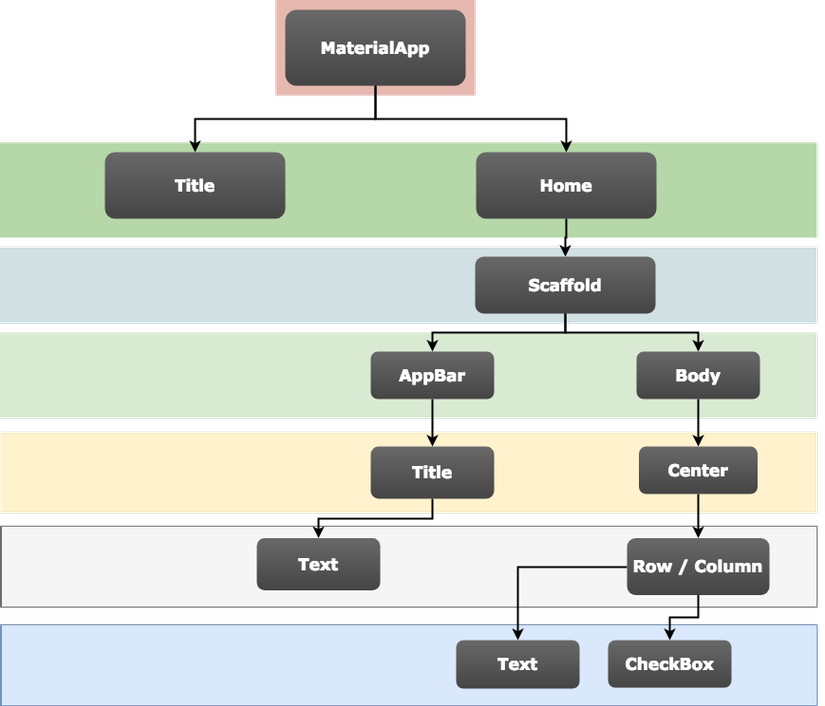
And what is the overall arrangement of the widgets hierarchy like?
Add AppBar Actions
No application is complete without providing some AppBar action, sometimes including a dot in the top right corner.
The AppBar build provides and options to add actions to create actionable items. Like Row / Column , it needs a Widgets array that allows creating multiple manipulative items. For example, I added a few IconButton in the code below
1 2 3 4 5 6 7 8 9 10 11 12 13 14 15 16 17 18 19 20 21 22 23 24 25 26 27 28 29 30 31 32 33 34 35 36 37 38 39 40 41 42 43 44 45 46 47 48 49 50 51 52 53 54 55 | <span class="token keyword">class</span> MyApp extends StatefulWidget <span class="token punctuation">{</span> <span class="token function">MyApp</span> <span class="token punctuation">(</span> <span class="token punctuation">{</span> <span class="token keyword">this</span> <span class="token punctuation">.</span> TextInput <span class="token punctuation">}</span> <span class="token punctuation">)</span> <span class="token punctuation">;</span> <span class="token keyword">final</span> Widget TextInput <span class="token punctuation">;</span> MyAppState <span class="token function">createState</span> <span class="token punctuation">(</span> <span class="token punctuation">)</span> <span class="token operator">=</span> <span class="token operator">></span> new <span class="token function">MyAppState</span> <span class="token punctuation">(</span> <span class="token punctuation">)</span> <span class="token punctuation">;</span> <span class="token punctuation">}</span> <span class="token keyword">class</span> MyAppState extends State <span class="token operator"><</span> MyApp <span class="token operator">></span> <span class="token punctuation">{</span> bool checkBoxValue <span class="token operator">=</span> <span class="token boolean">false</span> <span class="token punctuation">;</span> String actionText <span class="token operator">=</span> <span class="token string">"Default"</span> <span class="token punctuation">;</span> @ <span class="token keyword">override</span> Widget <span class="token function">build</span> <span class="token punctuation">(</span> BuildContext ctxt <span class="token punctuation">)</span> <span class="token punctuation">{</span> <span class="token keyword">return</span> new <span class="token function">MaterialApp</span> <span class="token punctuation">(</span> title <span class="token operator">:</span> <span class="token string">"MySampleApplication"</span> <span class="token punctuation">,</span> home <span class="token operator">:</span> new <span class="token function">Scaffold</span> <span class="token punctuation">(</span> appBar <span class="token operator">:</span> new <span class="token function">AppBar</span> <span class="token punctuation">(</span> title <span class="token operator">:</span> new <span class="token function">Text</span> <span class="token punctuation">(</span> <span class="token string">"Hello Flutter App"</span> <span class="token punctuation">)</span> <span class="token punctuation">,</span> actions <span class="token operator">:</span> <span class="token operator"><</span> Widget <span class="token operator">></span> <span class="token punctuation">[</span> new <span class="token function">IconButton</span> <span class="token punctuation">(</span> icon <span class="token operator">:</span> new <span class="token function">Icon</span> <span class="token punctuation">(</span> Icons <span class="token punctuation">.</span> add_comment <span class="token punctuation">)</span> <span class="token punctuation">,</span> onPressed <span class="token operator">:</span> <span class="token punctuation">(</span> <span class="token punctuation">)</span> <span class="token punctuation">{</span> <span class="token function">setState</span> <span class="token punctuation">(</span> <span class="token punctuation">(</span> <span class="token punctuation">)</span> <span class="token punctuation">{</span> actionText <span class="token operator">=</span> <span class="token string">"New Text"</span> <span class="token punctuation">;</span> <span class="token punctuation">}</span> <span class="token punctuation">)</span> <span class="token punctuation">;</span> <span class="token punctuation">}</span> <span class="token punctuation">)</span> <span class="token punctuation">,</span> new <span class="token function">IconButton</span> <span class="token punctuation">(</span> icon <span class="token operator">:</span> new <span class="token function">Icon</span> <span class="token punctuation">(</span> Icons <span class="token punctuation">.</span> remove <span class="token punctuation">)</span> <span class="token punctuation">,</span> onPressed <span class="token operator">:</span> <span class="token punctuation">(</span> <span class="token punctuation">)</span> <span class="token punctuation">{</span> <span class="token function">setState</span> <span class="token punctuation">(</span> <span class="token punctuation">(</span> <span class="token punctuation">)</span> <span class="token punctuation">{</span> actionText <span class="token operator">=</span> <span class="token string">"Default"</span> <span class="token punctuation">;</span> <span class="token punctuation">}</span> <span class="token punctuation">)</span> <span class="token punctuation">;</span> <span class="token punctuation">}</span> <span class="token punctuation">)</span> <span class="token punctuation">,</span> <span class="token punctuation">]</span> <span class="token punctuation">)</span> <span class="token punctuation">,</span> body <span class="token operator">:</span> new <span class="token function">Center</span> <span class="token punctuation">(</span> child <span class="token operator">:</span> new <span class="token function">Column</span> <span class="token punctuation">(</span> children <span class="token operator">:</span> <span class="token operator"><</span> Widget <span class="token operator">></span> <span class="token punctuation">[</span> widget <span class="token punctuation">.</span> TextInput <span class="token punctuation">,</span> new <span class="token function">Text</span> <span class="token punctuation">(</span> actionText <span class="token punctuation">)</span> <span class="token punctuation">,</span> new <span class="token function">Checkbox</span> <span class="token punctuation">(</span> value <span class="token operator">:</span> checkBoxValue <span class="token punctuation">,</span> onChanged <span class="token operator">:</span> <span class="token punctuation">(</span> bool newValue <span class="token punctuation">)</span> <span class="token punctuation">{</span> <span class="token function">setState</span> <span class="token punctuation">(</span> <span class="token punctuation">(</span> <span class="token punctuation">)</span> <span class="token punctuation">{</span> checkBoxValue <span class="token operator">=</span> newValue <span class="token punctuation">;</span> <span class="token punctuation">}</span> <span class="token punctuation">)</span> <span class="token punctuation">;</span> <span class="token punctuation">}</span> <span class="token punctuation">)</span> <span class="token punctuation">]</span> <span class="token punctuation">,</span> <span class="token punctuation">)</span> <span class="token punctuation">,</span> <span class="token punctuation">)</span> <span class="token punctuation">)</span> <span class="token punctuation">,</span> <span class="token punctuation">)</span> <span class="token punctuation">;</span> <span class="token punctuation">}</span> <span class="token punctuation">}</span> |
The overall Widget hierarchy will look like described in the image below. As before, any call to setState (…) will redraw the entire MaterialApp, so it manages to print the updated text when pressing IconButtons. 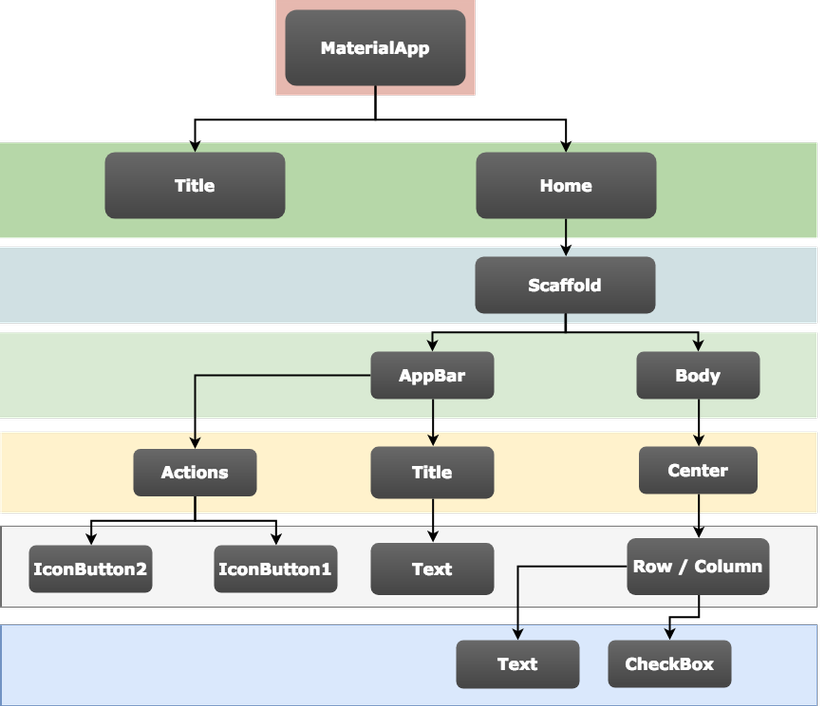
Conclude
I have covered enough in this section using a simple flutter app. We will explore the advanced functions later .
Thank you for reading here !! Have a nice day.