When you create a new project in Xcode 11, you may notice something that you’ve never seen before. Instead of just creating a file AppDelegate.swift , a ViewController.swift , a Storyboard and some other files, now from Xcode 11 will create a new file for you SceneDelegate.swift . If you’ve never seen this file before, it can be quite confusing to understand what it is and how you should use it in your app.
Example of new Xcode project template
Whenever you create a new Xcode project, you have the option to choose whether you want to use SwiftUI or Storyboards . Whatever your choice here, Xcode will generate a new type of project template for you to use. We will take a closer look at the SceneDelegate.swift and AppDelegate.swift files in the next section, it is important now that you understand that Xcode created these files for you.
Beyond these two files, Xcode does something a little different. Take a close look at your Info.plist file. You will see a new key named Application Scene Manifest with content similar to the following image: 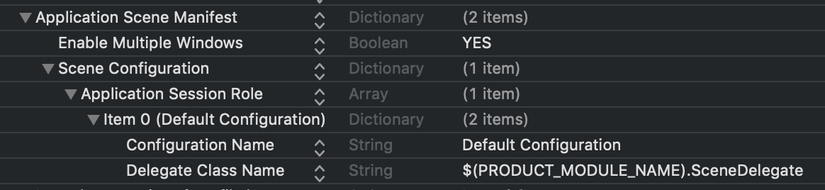
This SceneDelegate.swift file specifies the name and class representing your Scene. Note that these properties belong to an array ( Application Session Role ), suggesting that you might have more than one configurations in your Info.plist. A much more important key that you may have spotted in the screenshot above is Enable Multiple Windows . This property is set to NO by default. Setting this property to YES allows users to open multiple windows of your app on iPadOS (or even macOS). Being able to run multiple windows side-by-side of an iOS app is a huge difference from the single-window environment we’ve been working with so far, and the ability to have multiple windows is the whole reason for the app lifecycle. we are now being maintained in two places rather than one.
Let’s take a closer look at AppDelegate and SceneDelegate to better understand how these two representations work together to support multiple windows.
Understand the role of AppDelegate and SceneDelegate
If you’ve ever built an app before iOS 13, you probably know AppDelegate is the place to do pretty much everything related to launching your app, foregrounding, backgrounding, … In iOS 13, Apple has moved on a number of tasks. AppDelegate to SceneDelegate . Let’s take a look at each of these files.
AppDelegate’s responsibilities
AppDelegate is still the main access point for an app in iOS 13. Apple calls the AppDelegate methods for some events for the app lifecycle. In Apple’s default template, you’ll find three methods that Apple considers important for you to use:
func application(_:didFinishLaunchingWithOptions:) -> Boolfunc application(_:configurationForConnecting:options:) -> UISceneConfigurationfunc application(_:didDiscardSceneSessions:)These methods have some comments describing how it works and enough information to understand. But we just go through it all the time.
Once your app has just been launched, func (_: didFinishLaunchingWithOptions 🙂 -> Bool is called. This method is used to perform application setup. In iOS 12 and below, you may have used this method to create and configure a UIWindow object and assign a UIViewController to the window so it appears.
If your app is using Scenes , then your AppDelegate no longer responsible for doing so. Since your application can currently have multiple windows or active UISceneSessions , managing a window object in AppDelegate no sense.
func (_: configurationForConnecting: options 🙂 -> UISceneConfiguration is called whenever your app is scheduled to provide a new scene or window for iOS to show up. Note that this method is not called when your application is initially launched, it is only called to get and create new scenes.
The last method in the AppDelegate file is func (_: didDiscardSceneSessions 🙂 . This method is called whenever the user removes a scene, for example by swiping it away in the multitasking window. If your app doesn’t run when the user does this, this method will be called for every scene that is removed immediately after the func (_: didFinishLaunchingWithOptions 🙂 -> Bool is called.
In addition to these default methods, your AppDelegate can still be used to open URLs, catch memory warnings, detect when your app ends, detect when a signed up user receives remote notifications, etc
It’s important to note that if you are currently using AppDelegate to manage the status bar of your app, you may have to make some changes in iOS 13. Some methods related to the status bar are gone. used in iOS 13.
SceneDelegate’s responsibilities
When you consider AppDelegate be the object responsible for your app lifecycle, SceneDelegate is responsible for what appears on the screen; scenes or window. Before moving on, let’s set up some scene-related vocabulary as not all terms are as meaningful as you might think.
When you process the scenes, what looks like a window to your user is called UIScene is managed by UISceneSession . So when we mention the window, we are actually referring to the UISceneSession objects.
Take a look at the SceneDelegate.swift file that Xcode created when creating our project.
There are several methods in the SceneDelegate.swift file by default:
scene(_:willConnectTo:options:)sceneDidDisconnect(_:)sceneDidBecomeActive(_:)sceneWillResignActive(_:)sceneWillEnterForeground(_:)sceneDidEnterBackground(_:)These methods will be very familiar to you if you are familiar withAppDelegatethat existed before iOS 13. Take a look atscene(_: willConnectTo: options 🙂, this method might look less familiar. to you and that is the first method called in the life cycle of aUISceneSession.
Default implementation of scene(_: willConnectTo: options 🙂 creates a ContentView ( ContentView if you are using SwiftUI ), creates a new UIWindow , set window’s rootViewController and makes this window a key window. You can think of this window as the window that your users see. Unfortunately, windows existed before iOS 13 and they represent the viewport in which your application works. So UISceneSession controls the display window that the user sees, the UIWindow you create is the container view for your application.
In addition to initializing the original views, you can use scene(_: willConnectTo: options 🙂 to restore your scene UI in case your scene has been disconnected in the past. For example, since it was sent to the background. You can also read the connectionOptions object to see if your scene was created due to the HandOff request or maybe to open a URL.
Once your scene is connected, the next method in your scene lifecycle is sceneWillEnterForeground (_ 🙂 . This method is called when your scene is going to stage. This could be when your app goes from background to foreground or if a new app works for the first time. Next, sceneDidBecomeActive (_ 🙂 is called. This is the point where your scene is set up, displayed and ready for use.
When your app switches to background mode, sceneWillResignActive (_ 🙂 and sceneDidEnterBackground (_ : sceneWillResignActive (_ 🙂 are called. We won’t go into these methods right now because their purposes are different for every application, and the comments in the Xcode template do a pretty good job of explaining when these methods are called. In fact, you can certainly find it yourself when these methods were called.
A more interesting method is sceneDidDisconnect (_ 🙂 . Whenever your scene is sent to the background, iOS may decide to disconnect and delete your scene to free up resources. This doesn’t mean your app has been killed or stopped running, it just means that the scene passed to this method no longer works and will disconnect from its session.
Note that the session itself is not necessarily discarded, iOS may decide to reconnect a scene to a scene session at any time, such as when a user submits a particular scene to the foreground once. again.
The most important thing to do in sceneDidDisconnect (_ 🙂 is to remove any resources that you don’t need to keep. This can be data easily loaded from a disk or network, or other data that you can recreate easily. It’s also important to make sure you keep any data that can’t be easily recreated, such as any user-supplied input in a scene they expect is still there when they return it. .
Consider a word-processing application that supports multiple scenes. If a user is working in a scebe, then going to the background to find something in Safari, they fully expect all their work to still exist in a word processing app, even though iOS may have been. Disconnects the app’s word processing scene for a while. To achieve this, the application must retain the necessary data, and it must encode the current application state in an NSUserActivity object that can be read later in the scene(_: willConnectTo: options 🙂 when the scene is reconnect.
Since these scenes of connecting, disconnecting, and reconnecting these scenes will separate good apps from the great one, let’s take a look at how you can implement state recovery in your app.
Performing additional scene setup
There are several reasons for you to do perform additional setup when a scene is set up. You might have to open a URL, process a Handoff request, or restore the status. In this section, I will focus primarily on restoring state as that is possibly the most complex situation you may have to deal with.
The state restore begins when your scene is disconnected and sceneDidDisconnect (_ 🙂 is called. At this point, it’s important that your application is set to recoverable. The best way to do this is to use NSUserActivit y in your application. If you’re using NSUserActivity to support Handoff, Siri Shortcuts, Spotlight indexing and more, you don’t have much to do. If you haven’t used NSUserActivity , don’t worry. A simple user operation might look like this:
1 2 3 | <span class="token keyword">let</span> activity <span class="token operator">=</span> <span class="token function">NSUserActivity</span> <span class="token punctuation">(</span> activityType <span class="token punctuation">:</span> <span class="token string">"com.donnywals.DocumentEdit"</span> <span class="token punctuation">)</span> activity <span class="token punctuation">.</span> userInfo <span class="token operator">=</span> <span class="token punctuation">[</span> <span class="token string">"documentId"</span> <span class="token punctuation">:</span> document <span class="token punctuation">.</span> id <span class="token punctuation">]</span> |
Note that this user activity is not structured as Apple suggests, it’s a very simple example to illustrate restoring state. For a complete guide to NSUserActivity , I recommend looking at the Apple documentation on this topic.
When you provide a later user action that can be restored, the system calls stateRestorationActivity (for 🙂 on your SceneDelegate . Note that this method is not part of the default template.
1 2 3 4 | <span class="token keyword">func</span> <span class="token function">stateRestorationActivity</span> <span class="token punctuation">(</span> <span class="token keyword">for</span> scene <span class="token punctuation">:</span> <span class="token builtin">UIScene</span> <span class="token punctuation">)</span> <span class="token operator">-</span> <span class="token operator">></span> <span class="token builtin">NSUserActivity</span> <span class="token operator">?</span> <span class="token punctuation">{</span> <span class="token keyword">return</span> scene <span class="token punctuation">.</span> userActivity <span class="token punctuation">}</span> |
This associates the user’s currently active activity for a scene with the scene session. Remember that whenever a scene is disconnected, the UISceneSession that owns the UIScene will not be canceled to allow the session to reconnect to a scene. When this happens, scene(_: willConnectTo: options 🙂 is called again. In this method, you have access to the UISceneSession that owns the UIScene so you can read the session’s stateRestorationActivity and restore the application state if needed:
1 2 3 4 5 6 7 8 | <span class="token keyword">if</span> <span class="token keyword">let</span> activity <span class="token operator">=</span> session <span class="token punctuation">.</span> stateRestorationActivity <span class="token punctuation">,</span> activity <span class="token punctuation">.</span> activityType <span class="token operator">==</span> <span class="token string">"com.donnywals.DocumentEdit"</span> <span class="token punctuation">,</span> <span class="token keyword">let</span> documentId <span class="token operator">=</span> activity <span class="token punctuation">.</span> userInfo <span class="token punctuation">[</span> <span class="token string">"documentId"</span> <span class="token punctuation">]</span> <span class="token keyword">as</span> <span class="token operator">?</span> <span class="token builtin">String</span> <span class="token punctuation">{</span> <span class="token comment">// find document by ID</span> <span class="token comment">// create document viewcontroller and present it</span> <span class="token punctuation">}</span> |
Of course, the details of this code will vary based on your application, but the general idea is the same.
If UISceneSession of you expected to handle a URL, you can check urlContexts of objects connectOptions to find the URL that your scene will open and information on how your app to do this:
1 2 3 4 5 6 7 | <span class="token keyword">for</span> urlContext <span class="token keyword">in</span> connectionOptions <span class="token punctuation">.</span> urlContexts <span class="token punctuation">{</span> <span class="token keyword">let</span> url <span class="token operator">=</span> urlContext <span class="token punctuation">.</span> url <span class="token keyword">let</span> options <span class="token operator">=</span> urlContext <span class="token punctuation">.</span> options <span class="token comment">// handle url and options as needed</span> <span class="token punctuation">}</span> |
The options object will contain information about whether your scene should open the on-premises URL, which application requested this URL, and other metadata requested.
The basics of restoring state in iOS 13 with SceneDelegate are surprisingly simple, especially since it’s built on NSUserActivity , which means that many apps won’t have to do too much to catch. the top assists in restoring their scenes.
Remember that if you want to support multiple scenes for your app on iPadOS, scene recovery is especially important as iOS can disconnect and reconnect your scenes as they transition from foreground to background. and come back again. Especially if your app allows users to create or manipulate objects in a scene, users wouldn’t expect their work to go away if they switched a scene to the background for a moment.
summary
In this article, you have learned a lot. You already know the AppDelegate and SceneDelegate in iOS 13 and what their lifecycle looks like. Now you know that AppDelegate is responsible for reacting to application-level events, such as application launch. SceneDelegate is responsible for the events related to the scene’s life cycle. Example: create scene, destroy and restore state of a UISceneSession . In other words, the main reason Apple added UISceneDelegate to iOS 13 was to create a good entry point for multi-window apps.
After learning the basics of UISceneDelegate , you’ve seen a very simple example of what restoring state looks like in iOS 13 with UISceneSession and UIScene . Of course, there’s more to learn about how your app behaves when users create multiple UISceneSessions and how these scenes may have to synchronize or share data.
Thank you for reading!
Source: https://www.donnywals.com/understanding-the-ios-13-scene-delegate/