1. What is Chromecast.
This section of this article is intended for writing articles related to Video, Audio and multimedia related applications.
Chromecast was first introduced in 2013 in the US. Right from the first version, Google designed ChromeCast to be compatible with the 3rd party application, the original purpose was that you can stream and share anything on your TV devices. but more and more the successor and the final version, it was designed in favor of multimedia applications.
You should first understand what cast technology is and how it works before you dig deeper into its implementation.
It’s important to understand that the Chromecast apps don’t read the information directly from your app. It communicates with your application through a Socket . That Socket is opened when your application requests to set up a bridge to transmit information to specific Android TVs or Chromecast devices.
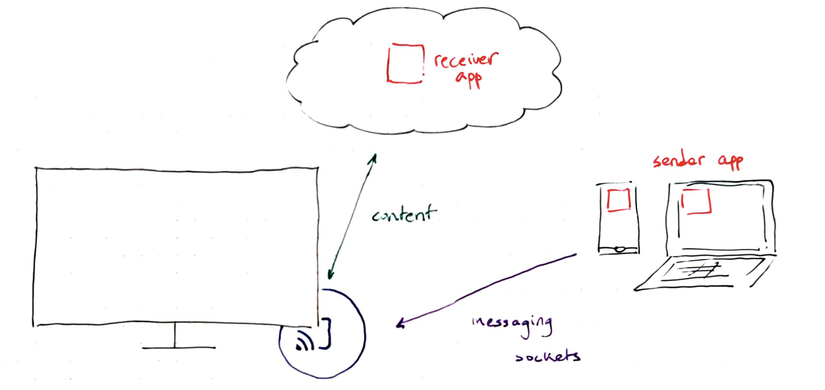
When you need to “Cast on …” from a sending application (here I call it a sender app), you are actually telling the cast device open a static web page, and that static web application is called a receiver app . This receiver app set is stored online and it will be downloaded upon receipt of a request to connect from the sender app device.
Google recommends that you are the best apps that connect to the receiver app when both of them use the same Wifi network. Because Sokcet will Sokcet open and transmit data through a so-called Wi-Fi Direct , a definition of a peer-to-peer transmission protocol between devices sharing the same Wi-Fi Direct network connection.
Oke paused on the theory for a bit, now we will start bit by bit to learn how to create a ChromeCast application and how to share information through that ChromeCast application. To do that, you need to do the jobs in the following order.
- Sign up for Cast Develop with Google
- Create a ChromeCast link to your Cast Develop account.
- Declare the receiver app app
- Setting up and configuring the receiver app
- Set up and configure the sender app
“The above steps are based on the experience I synthesized, but it is not certain that an application needs to go through all the above steps.”
Now we will go to learn step by step to be able to create an application with complete application of ChromeCast technology.
2. Register a dev account
To complete this step, you need 2 things first.
1 2 3 | - A Google Account - A credit card ? |
Unlike other Google services that are usually free for Deverlop but Chromecast service will need $ 5 to sign up, which is why even if you’re just a Deverlop for “even if it’s experimental” development then you still need a credit card with a minimum of $ 5 in it.
First, you will need to access the link to be able to register for a development account , after registration is complete, you will be forwarded to the Google Cast SDK Developer Console
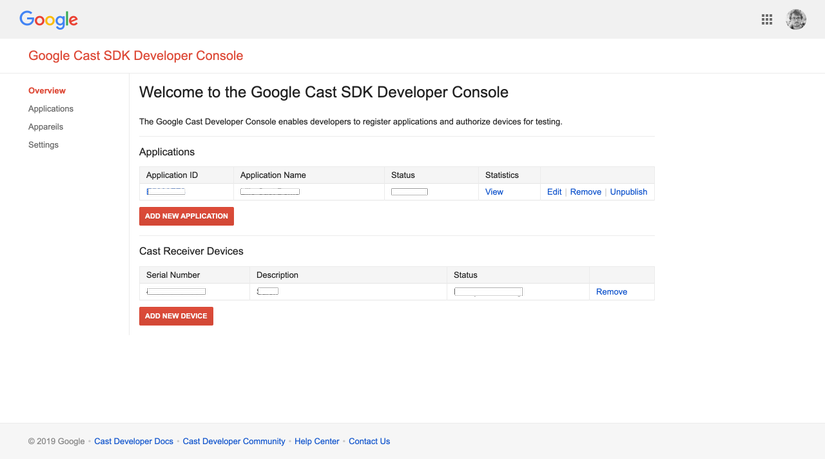
Here you will need to set up the information about the sender app in the Applications and the receiver app in the Cast Receiver Devices section “Actually, I find this Cast Receiver Devices has more effects for debugging than providing products. products to future users ”
3. Link your ChromeCast device to the Develop account
Click on ADD NEW DEVICE here you need to enter the Serial Number on the back of the device ChromeCast , this is mainly declared so that you can run the receiver app under Debug mode on the device being declared.
With a large development team, you can add 3 to 4 ChromeCast devices here to serve the development work more smoothly.
4. Declare the Receiver App app
Click on ADD NEW APPLICATION . Here you need to declare some of the following important information.
- Application ID, South of Android app or IOS sender app
- Link Custom Receiver , where you design a web site to receive data from the sender app
After completing the above steps, you will get a string named receiver_id and this receiver_id will be configured in your sender app .
Let’s all pay attention to the so-called Custom Receiver for a bit. It is a static web page that receives data shared from the sender app and is displayed to the viewers on ChromeCast devices. This website will be written by you and it needs to be hosted on a certain hosting.
You need to understand roughly like this. When the ChromeCast device receives the request to share information from the sender app with 1 receiver_id , the device will use the link you configured in the Custom Receiver to load the web page on the device and display it on the terminal.
Those are the complete steps needed to set up on the Dev Account page, at this point you can turn off this website, but remember the sequence of characters is called receiver_id .
5. Set up and configure the Receiver App
You can find out the very simple receiver at the CAF SDK link . According to the definition of Google, the Receiver App will take on the following tasks.
- Provides
interfaceto display the content on the terminal. - Processing messages from the sender app to display content to viewers on the receiving device
- Process the user actions on the receiving device and send the information back to the sender app
It basically processes all the information displayed on the screen of the receiving device. Here are 1 basic apps of Receiver App
1 2 3 4 5 6 7 8 9 10 11 12 13 14 15 16 17 18 19 20 21 22 23 24 25 26 27 28 29 30 31 32 33 34 35 36 37 38 39 40 41 42 43 44 45 46 47 48 49 50 51 52 53 54 55 56 57 58 | <span class="token doctype"><!doctype html></span> <span class="token tag"><span class="token tag"><span class="token punctuation"><</span> html</span> <span class="token punctuation">></span></span> <span class="token tag"><span class="token tag"><span class="token punctuation"><</span> head</span> <span class="token punctuation">></span></span> <span class="token tag"><span class="token tag"><span class="token punctuation"><</span> title</span> <span class="token punctuation">></span></span> Estimate It <span class="token tag"><span class="token tag"><span class="token punctuation"></</span> title</span> <span class="token punctuation">></span></span> <span class="token tag"><span class="token tag"><span class="token punctuation"><</span> link</span> <span class="token attr-name">href</span> <span class="token attr-value"><span class="token punctuation">=</span> <span class="token punctuation">'</span> https://fonts.googleapis.com/css?family=Roboto <span class="token punctuation">'</span></span> <span class="token attr-name">rel</span> <span class="token attr-value"><span class="token punctuation">=</span> <span class="token punctuation">'</span> stylesheet <span class="token punctuation">'</span></span> <span class="token attr-name">type</span> <span class="token attr-value"><span class="token punctuation">=</span> <span class="token punctuation">'</span> text/css <span class="token punctuation">'</span></span> <span class="token punctuation">></span></span> <span class="token tag"><span class="token tag"><span class="token punctuation"><</span> style</span> <span class="token punctuation">></span></span><span class="token style"><span class="token language-css"> <span class="token selector">body</span> <span class="token punctuation">{</span> <span class="token property">background</span> <span class="token punctuation">:</span> white <span class="token punctuation">;</span> <span class="token property">color</span> <span class="token punctuation">:</span> black <span class="token punctuation">;</span> <span class="token punctuation">}</span> <span class="token selector">#container</span> <span class="token punctuation">{</span> <span class="token property">width</span> <span class="token punctuation">:</span> 100vw <span class="token punctuation">;</span> <span class="token property">height</span> <span class="token punctuation">:</span> 100vh <span class="token punctuation">;</span> <span class="token property">display</span> <span class="token punctuation">:</span> flex <span class="token punctuation">;</span> <span class="token property">justify-content</span> <span class="token punctuation">:</span> center <span class="token punctuation">;</span> <span class="token property">align-items</span> <span class="token punctuation">:</span> center <span class="token punctuation">;</span> <span class="token punctuation">}</span> <span class="token selector">#content</span> <span class="token punctuation">{</span> <span class="token property">font-family</span> <span class="token punctuation">:</span> <span class="token string">'Roboto'</span> <span class="token punctuation">,</span> sans-serif <span class="token punctuation">;</span> <span class="token property">font-size</span> <span class="token punctuation">:</span> 6em <span class="token punctuation">;</span> <span class="token punctuation">}</span> </span></span><span class="token tag"><span class="token tag"><span class="token punctuation"></</span> style</span> <span class="token punctuation">></span></span> <span class="token tag"><span class="token tag"><span class="token punctuation"></</span> head</span> <span class="token punctuation">></span></span> <span class="token tag"><span class="token tag"><span class="token punctuation"><</span> body</span> <span class="token punctuation">></span></span> <span class="token tag"><span class="token tag"><span class="token punctuation"><</span> div</span> <span class="token attr-name">id</span> <span class="token attr-value"><span class="token punctuation">=</span> <span class="token punctuation">"</span> container <span class="token punctuation">"</span></span> <span class="token punctuation">></span></span> <span class="token tag"><span class="token tag"><span class="token punctuation"><</span> span</span> <span class="token attr-name">id</span> <span class="token attr-value"><span class="token punctuation">=</span> <span class="token punctuation">"</span> content <span class="token punctuation">"</span></span> <span class="token punctuation">></span></span> Waiting... <span class="token tag"><span class="token tag"><span class="token punctuation"></</span> span</span> <span class="token punctuation">></span></span> <span class="token tag"><span class="token tag"><span class="token punctuation"></</span> div</span> <span class="token punctuation">></span></span> <span class="token tag"><span class="token tag"><span class="token punctuation"><</span> script</span> <span class="token attr-name">src</span> <span class="token attr-value"><span class="token punctuation">=</span> <span class="token punctuation">"</span> //www.gstatic.com/cast/sdk/libs/caf_receiver/v3/cast_receiver_framework.js <span class="token punctuation">"</span></span> <span class="token punctuation">></span></span> <span class="token tag"><span class="token tag"><span class="token punctuation"></</span> script</span> <span class="token punctuation">></span></span> <span class="token tag"><span class="token tag"><span class="token punctuation"><</span> script</span> <span class="token attr-name">type</span> <span class="token attr-value"><span class="token punctuation">=</span> <span class="token punctuation">"</span> text/javascript <span class="token punctuation">"</span></span> <span class="token punctuation">></span></span><span class="token script"><span class="token language-javascript"> window <span class="token punctuation">.</span> <span class="token function-variable function">onload</span> <span class="token operator">=</span> <span class="token keyword">function</span> <span class="token punctuation">(</span> <span class="token punctuation">)</span> <span class="token punctuation">{</span> <span class="token keyword">var</span> ctx <span class="token operator">=</span> cast <span class="token punctuation">.</span> framework <span class="token punctuation">.</span> CastReceiverContext <span class="token punctuation">.</span> <span class="token function">getInstance</span> <span class="token punctuation">(</span> <span class="token punctuation">)</span> <span class="token punctuation">;</span> <span class="token keyword">var</span> options <span class="token operator">=</span> <span class="token keyword">new</span> <span class="token class-name">cast <span class="token punctuation">.</span> framework <span class="token punctuation">.</span> CastReceiverOptions</span> <span class="token punctuation">(</span> <span class="token punctuation">)</span> <span class="token punctuation">;</span> <span class="token keyword">var</span> <span class="token constant">CHANNEL</span> <span class="token operator">=</span> <span class="token string">'urn:x-cast:com.github.quentin7b.estimateit'</span> <span class="token punctuation">;</span> options <span class="token punctuation">.</span> customNamespaces <span class="token operator">=</span> Object <span class="token punctuation">.</span> <span class="token function">assign</span> <span class="token punctuation">(</span> <span class="token punctuation">{</span> <span class="token punctuation">}</span> <span class="token punctuation">)</span> <span class="token punctuation">;</span> options <span class="token punctuation">.</span> customNamespaces <span class="token punctuation">[</span> <span class="token constant">CHANNEL</span> <span class="token punctuation">]</span> <span class="token operator">=</span> cast <span class="token punctuation">.</span> framework <span class="token punctuation">.</span> system <span class="token punctuation">.</span> MessageType <span class="token punctuation">.</span> <span class="token constant">JSON</span> <span class="token punctuation">;</span> ctx <span class="token punctuation">.</span> <span class="token function">addCustomMessageListener</span> <span class="token punctuation">(</span> <span class="token constant">CHANNEL</span> <span class="token punctuation">,</span> <span class="token keyword">function</span> <span class="token punctuation">(</span> <span class="token parameter">customEvent</span> <span class="token punctuation">)</span> <span class="token punctuation">{</span> <span class="token keyword">var</span> message <span class="token operator">=</span> customEvent <span class="token punctuation">.</span> data console <span class="token punctuation">.</span> <span class="token function">log</span> <span class="token punctuation">(</span> <span class="token string">"Message received from "</span> <span class="token operator">+</span> <span class="token string">"["</span> <span class="token operator">+</span> customEvent <span class="token punctuation">.</span> senderId <span class="token operator">+</span> <span class="token string">"] "</span> <span class="token operator">+</span> <span class="token string">": "</span> <span class="token operator">+</span> message <span class="token punctuation">)</span> <span class="token punctuation">;</span> document <span class="token punctuation">.</span> <span class="token function">getElementById</span> <span class="token punctuation">(</span> <span class="token string">"content"</span> <span class="token punctuation">)</span> <span class="token punctuation">.</span> innerHTML <span class="token operator">=</span> message <span class="token punctuation">;</span> <span class="token punctuation">}</span> <span class="token punctuation">)</span> <span class="token punctuation">;</span> ctx <span class="token punctuation">.</span> <span class="token function">start</span> <span class="token punctuation">(</span> options <span class="token punctuation">)</span> <span class="token punctuation">;</span> <span class="token punctuation">}</span> </span></span><span class="token tag"><span class="token tag"><span class="token punctuation"></</span> script</span> <span class="token punctuation">></span></span> <span class="token tag"><span class="token tag"><span class="token punctuation"></</span> body</span> <span class="token punctuation">></span></span> <span class="token tag"><span class="token tag"><span class="token punctuation"></</span> html</span> <span class="token punctuation">></span></span> |
This design part I also refer, because I am an Android programmer or more succinctly, I am a programmer for the sender app. This section will give you more expertise in HTML, CSS and JS.
6. Setting up and configuring the Sender App
Full detailed instructions from Google can be found here
First you need to declare in build.gradle the libraries needed to use Sender App
1 2 3 4 | implementation <span class="token string">'androidx.appcompat:appcompat:1.1.0'</span> implementation <span class="token string">'androidx.mediarouter:mediarouter:1.1.0'</span> implementation <span class="token string">'com.google.android.gms:play-services-cast-framework:17.1.0'</span> |
In the Sender App you need to know the following 2 important parts
- The OptionsProvider is a Class that allows the framework to connect to the Receiver App
- Activity or Fragment class will manage communication and action related to Receiver App
6.1 OptionsProvider
Initialize the CastOptionsProvider class inheriting from the system’s OptionsProvider . Below is the most basic CastOptionsProvider configuration
1 2 3 4 5 6 7 8 9 10 11 12 13 | <span class="token keyword">class</span> CastOptionsProvider <span class="token operator">:</span> OptionsProvider <span class="token punctuation">{</span> <span class="token keyword">override</span> <span class="token keyword">fun</span> <span class="token function">getCastOptions</span> <span class="token punctuation">(</span> ctx <span class="token operator">:</span> Context <span class="token punctuation">)</span> <span class="token operator">:</span> CastOptions <span class="token punctuation">{</span> <span class="token keyword">return</span> CastOptions <span class="token punctuation">.</span> <span class="token function">Builder</span> <span class="token punctuation">(</span> <span class="token punctuation">)</span> <span class="token punctuation">.</span> <span class="token function">setReceiverApplicationId</span> <span class="token punctuation">(</span> ctx <span class="token punctuation">.</span> <span class="token function">getString</span> <span class="token punctuation">(</span> R <span class="token punctuation">.</span> string <span class="token punctuation">.</span> receiver_id <span class="token punctuation">)</span> <span class="token punctuation">)</span> <span class="token punctuation">.</span> <span class="token function">build</span> <span class="token punctuation">(</span> <span class="token punctuation">)</span> <span class="token punctuation">}</span> <span class="token keyword">override</span> <span class="token keyword">fun</span> <span class="token function">getAdditionalSessionProviders</span> <span class="token punctuation">(</span> ctx <span class="token operator">:</span> Context <span class="token punctuation">)</span> <span class="token operator">=</span> <span class="token keyword">null</span> <span class="token punctuation">}</span> |
And the CastOptionsProvider class will need to be declared in the manifest file
1 2 3 4 5 6 7 8 9 10 11 12 13 14 | <span class="token tag"><span class="token tag"><span class="token punctuation"><</span> manifest</span> <span class="token attr-name"><span class="token namespace">xmlns:</span> android</span> <span class="token attr-value"><span class="token punctuation">=</span> <span class="token punctuation">"</span> http://schemas.android.com/apk/res/android <span class="token punctuation">"</span></span> <span class="token attr-name">package</span> <span class="token attr-value"><span class="token punctuation">=</span> <span class="token punctuation">"</span> x.x.x <span class="token punctuation">"</span></span> <span class="token punctuation">></span></span> <span class="token tag"><span class="token tag"><span class="token punctuation"><</span> application</span> <span class="token attr-name"><span class="token namespace">android:</span> icon</span> <span class="token attr-value"><span class="token punctuation">=</span> <span class="token punctuation">"</span> @mipmap/ic_launcher <span class="token punctuation">"</span></span> <span class="token attr-name"><span class="token namespace">android:</span> label</span> <span class="token attr-value"><span class="token punctuation">=</span> <span class="token punctuation">"</span> @string/app_name <span class="token punctuation">"</span></span> <span class="token punctuation">></span></span> <span class="token tag"><span class="token tag"><span class="token punctuation"><</span> meta-data</span> <span class="token attr-name"><span class="token namespace">android:</span> name</span> <span class="token attr-value"><span class="token punctuation">=</span> <span class="token punctuation">"</span> com.google.android.gms.cast.framework.OPTIONS_PROVIDER_CLASS_NAME <span class="token punctuation">"</span></span> <span class="token attr-name"><span class="token namespace">android:</span> value</span> <span class="token attr-value"><span class="token punctuation">=</span> <span class="token punctuation">"</span> x.x.x.CastOptionsProvider <span class="token punctuation">"</span></span> <span class="token punctuation">/></span></span> <span class="token tag"><span class="token tag"><span class="token punctuation"></</span> application</span> <span class="token punctuation">></span></span> <span class="token tag"><span class="token tag"><span class="token punctuation"></</span> manifest</span> <span class="token punctuation">></span></span> |
Once done, create an Activity with 2 basic events as follows.
- Displays the Cast button and connects to a Cast device.
- Send a
messageto a Cast device
6.2 Display Button Cast
Displayed on the System Menu
1 2 3 4 5 6 7 8 9 10 11 12 13 14 15 16 17 18 19 20 21 | <span class="token keyword">override</span> <span class="token keyword">fun</span> <span class="token function">onCreateOptionsMenu</span> <span class="token punctuation">(</span> menu <span class="token operator">:</span> Menu <span class="token operator">?</span> <span class="token punctuation">)</span> <span class="token operator">:</span> Boolean <span class="token punctuation">{</span> <span class="token keyword">super</span> <span class="token punctuation">.</span> <span class="token function">onCreateOptionsMenu</span> <span class="token punctuation">(</span> menu <span class="token punctuation">)</span> Log <span class="token punctuation">.</span> <span class="token function">i</span> <span class="token punctuation">(</span> <span class="token string">"MainActivity"</span> <span class="token punctuation">,</span> <span class="token string">"onCreateOptionsMenu"</span> <span class="token punctuation">)</span> <span class="token comment">/* <?xml version="1.0" encoding="utf-8"?> <menu xmlns:android="http://schemas.android.com/apk/res/android" xmlns:app="http://schemas.android.com/apk/res-auto"> <item android:id="@+id/media_route_menu_item" android:title="@string/cast" app:actionProviderClass="androidx.mediarouter.app.MediaRouteActionProvider" app:showAsAction="always" /> </menu> */</span> menuInflater <span class="token punctuation">.</span> <span class="token function">inflate</span> <span class="token punctuation">(</span> R <span class="token punctuation">.</span> menu <span class="token punctuation">.</span> estimate <span class="token punctuation">,</span> menu <span class="token punctuation">)</span> CastButtonFactory <span class="token punctuation">.</span> <span class="token function">setUpMediaRouteButton</span> <span class="token punctuation">(</span> <span class="token function">getApplicationContext</span> <span class="token punctuation">(</span> <span class="token punctuation">)</span> <span class="token punctuation">,</span> menu <span class="token punctuation">,</span> R <span class="token punctuation">.</span> id <span class="token punctuation">.</span> media_route_menu_item <span class="token punctuation">)</span> <span class="token keyword">return</span> <span class="token boolean">true</span> <span class="token punctuation">}</span> |
Or display it on the layout of the application
1 2 3 4 5 6 7 8 9 10 11 12 13 14 15 16 17 | // activity_layout.xml <span class="token tag"><span class="token tag"><span class="token punctuation"><</span> LinearLayout</span> <span class="token attr-name"><span class="token namespace">xmlns:</span> android</span> <span class="token attr-value"><span class="token punctuation">=</span> <span class="token punctuation">"</span> http://schemas.android.com/apk/res/android <span class="token punctuation">"</span></span> <span class="token attr-name"><span class="token namespace">android:</span> layout_width</span> <span class="token attr-value"><span class="token punctuation">=</span> <span class="token punctuation">"</span> match_parent <span class="token punctuation">"</span></span> <span class="token attr-name"><span class="token namespace">android:</span> layout_height</span> <span class="token attr-value"><span class="token punctuation">=</span> <span class="token punctuation">"</span> wrap_content <span class="token punctuation">"</span></span> <span class="token attr-name"><span class="token namespace">android:</span> gravity</span> <span class="token attr-value"><span class="token punctuation">=</span> <span class="token punctuation">"</span> center_vertical <span class="token punctuation">"</span></span> <span class="token attr-name"><span class="token namespace">android:</span> orientation</span> <span class="token attr-value"><span class="token punctuation">=</span> <span class="token punctuation">"</span> horizontal <span class="token punctuation">"</span></span> <span class="token punctuation">></span></span> <span class="token tag"><span class="token tag"><span class="token punctuation"><</span> android.support.v7.app.MediaRouteButton</span> <span class="token attr-name"><span class="token namespace">android:</span> id</span> <span class="token attr-value"><span class="token punctuation">=</span> <span class="token punctuation">"</span> @+id/media_route_button <span class="token punctuation">"</span></span> <span class="token attr-name"><span class="token namespace">android:</span> layout_width</span> <span class="token attr-value"><span class="token punctuation">=</span> <span class="token punctuation">"</span> wrap_content <span class="token punctuation">"</span></span> <span class="token attr-name"><span class="token namespace">android:</span> layout_height</span> <span class="token attr-value"><span class="token punctuation">=</span> <span class="token punctuation">"</span> wrap_content <span class="token punctuation">"</span></span> <span class="token attr-name"><span class="token namespace">android:</span> layout_weight</span> <span class="token attr-value"><span class="token punctuation">=</span> <span class="token punctuation">"</span> 1 <span class="token punctuation">"</span></span> <span class="token attr-name"><span class="token namespace">android:</span> mediaRouteTypes</span> <span class="token attr-value"><span class="token punctuation">=</span> <span class="token punctuation">"</span> user <span class="token punctuation">"</span></span> <span class="token attr-name"><span class="token namespace">android:</span> visibility</span> <span class="token attr-value"><span class="token punctuation">=</span> <span class="token punctuation">"</span> gone <span class="token punctuation">"</span></span> <span class="token punctuation">/></span></span> <span class="token tag"><span class="token tag"><span class="token punctuation"></</span> LinearLayout</span> <span class="token punctuation">></span></span> |
1 2 3 4 5 6 7 8 9 10 11 12 | <span class="token comment">// MyActivity.java</span> <span class="token annotation builtin">@Override</span> <span class="token keyword">protected</span> void <span class="token function">onCreate</span> <span class="token punctuation">(</span> Bundle savedInstanceState <span class="token punctuation">)</span> <span class="token punctuation">{</span> <span class="token keyword">super</span> <span class="token punctuation">.</span> <span class="token function">onCreate</span> <span class="token punctuation">(</span> savedInstanceState <span class="token punctuation">)</span> <span class="token function">setContentView</span> <span class="token punctuation">(</span> R <span class="token punctuation">.</span> layout <span class="token punctuation">.</span> activity_layout <span class="token punctuation">)</span> <span class="token keyword">val</span> mediaRouteButton <span class="token operator">=</span> findViewById <span class="token operator"><</span> MediaRouteButton <span class="token operator">></span> <span class="token punctuation">(</span> R <span class="token punctuation">.</span> id <span class="token punctuation">.</span> media_route_button <span class="token punctuation">)</span> <span class="token punctuation">;</span> CastButtonFactory <span class="token punctuation">.</span> <span class="token function">setUpMediaRouteButton</span> <span class="token punctuation">(</span> <span class="token function">getApplicationContext</span> <span class="token punctuation">(</span> <span class="token punctuation">)</span> <span class="token punctuation">,</span> mediaRouteButton <span class="token punctuation">)</span> mCastContext <span class="token operator">=</span> CastContext <span class="token punctuation">.</span> <span class="token function">getSharedInstance</span> <span class="token punctuation">(</span> <span class="token keyword">this</span> <span class="token punctuation">)</span> <span class="token punctuation">;</span> <span class="token punctuation">}</span> |
You can learn more about Cast Button here
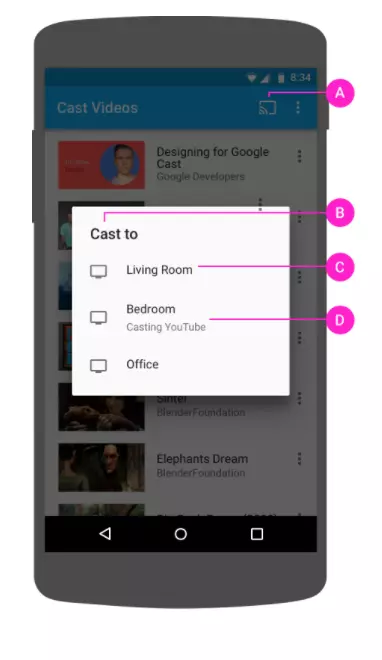
This Cast Button Click event has been predefined by Google within the Framework. When you click on the cast button, there will be a dialog showing a list of ChromeCast devices that share the same Wifi network with your phone.
6.3 Send a message to a ChromeCast device
1 2 3 4 5 6 7 8 9 10 11 12 13 14 15 16 17 18 19 20 21 22 23 24 25 26 27 28 29 30 31 32 33 34 35 36 37 38 39 40 41 42 43 44 45 46 47 48 49 50 51 52 53 54 55 56 57 58 59 60 61 62 63 64 65 66 67 68 69 70 71 72 73 74 75 76 77 78 79 80 81 82 83 84 85 86 87 88 89 90 91 92 | <span class="token keyword">class</span> MainActivity <span class="token operator">:</span> <span class="token function">AppCompatActivity</span> <span class="token punctuation">(</span> <span class="token punctuation">)</span> <span class="token punctuation">{</span> <span class="token keyword">private</span> <span class="token keyword">var</span> castSession <span class="token operator">:</span> CastSession <span class="token operator">?</span> <span class="token operator">=</span> <span class="token keyword">null</span> <span class="token keyword">private</span> <span class="token keyword">val</span> castContext <span class="token keyword">by</span> lazy <span class="token punctuation">{</span> CastContext <span class="token punctuation">.</span> <span class="token function">getSharedInstance</span> <span class="token punctuation">(</span> baseContext <span class="token punctuation">)</span> <span class="token punctuation">}</span> <span class="token keyword">private</span> <span class="token keyword">val</span> nameSpace <span class="token keyword">by</span> lazy <span class="token punctuation">{</span> baseContext <span class="token punctuation">.</span> <span class="token function">getString</span> <span class="token punctuation">(</span> R <span class="token punctuation">.</span> string <span class="token punctuation">.</span> namespace <span class="token punctuation">)</span> <span class="token punctuation">}</span> <span class="token keyword">private</span> <span class="token keyword">var</span> mediaSelector <span class="token operator">:</span> MediaRouteSelector <span class="token operator">?</span> <span class="token operator">=</span> <span class="token keyword">null</span> <span class="token keyword">private</span> <span class="token keyword">val</span> sessionManagerListener <span class="token operator">=</span> <span class="token keyword">object</span> <span class="token operator">:</span> SessionManagerListener <span class="token operator"><</span> CastSession <span class="token operator">></span> <span class="token punctuation">{</span> <span class="token keyword">override</span> <span class="token keyword">fun</span> <span class="token function">onSessionStarting</span> <span class="token punctuation">(</span> p0 <span class="token operator">:</span> CastSession <span class="token operator">?</span> <span class="token punctuation">)</span> <span class="token punctuation">{</span> <span class="token punctuation">}</span> <span class="token keyword">override</span> <span class="token keyword">fun</span> <span class="token function">onSessionStarted</span> <span class="token punctuation">(</span> p0 <span class="token operator">:</span> CastSession <span class="token operator">?</span> <span class="token punctuation">,</span> p1 <span class="token operator">:</span> String <span class="token operator">?</span> <span class="token punctuation">)</span> <span class="token punctuation">{</span> castSession <span class="token operator">=</span> p0 <span class="token function">invalidateOptionsMenu</span> <span class="token punctuation">(</span> <span class="token punctuation">)</span> <span class="token punctuation">}</span> <span class="token keyword">override</span> <span class="token keyword">fun</span> <span class="token function">onSessionStartFailed</span> <span class="token punctuation">(</span> p0 <span class="token operator">:</span> CastSession <span class="token operator">?</span> <span class="token punctuation">,</span> p1 <span class="token operator">:</span> Int <span class="token punctuation">)</span> <span class="token punctuation">{</span> <span class="token punctuation">}</span> <span class="token keyword">override</span> <span class="token keyword">fun</span> <span class="token function">onSessionEnding</span> <span class="token punctuation">(</span> p0 <span class="token operator">:</span> CastSession <span class="token operator">?</span> <span class="token punctuation">)</span> <span class="token punctuation">{</span> <span class="token punctuation">}</span> <span class="token keyword">override</span> <span class="token keyword">fun</span> <span class="token function">onSessionEnded</span> <span class="token punctuation">(</span> p0 <span class="token operator">:</span> CastSession <span class="token operator">?</span> <span class="token punctuation">,</span> p1 <span class="token operator">:</span> Int <span class="token punctuation">)</span> <span class="token punctuation">{</span> <span class="token keyword">if</span> <span class="token punctuation">(</span> pCastSession <span class="token operator">==</span> castSession <span class="token punctuation">)</span> <span class="token punctuation">{</span> <span class="token function">cleanup</span> <span class="token punctuation">(</span> <span class="token punctuation">)</span> <span class="token punctuation">}</span> <span class="token function">invalidateOptionsMenu</span> <span class="token punctuation">(</span> <span class="token punctuation">)</span> <span class="token punctuation">}</span> <span class="token keyword">override</span> <span class="token keyword">fun</span> <span class="token function">onSessionResuming</span> <span class="token punctuation">(</span> p0 <span class="token operator">:</span> CastSession <span class="token operator">?</span> <span class="token punctuation">,</span> p1 <span class="token operator">:</span> String <span class="token operator">?</span> <span class="token punctuation">)</span> <span class="token punctuation">{</span> <span class="token punctuation">}</span> <span class="token keyword">override</span> <span class="token keyword">fun</span> <span class="token function">onSessionResumed</span> <span class="token punctuation">(</span> p0 <span class="token operator">:</span> CastSession <span class="token operator">?</span> <span class="token punctuation">,</span> p1 <span class="token operator">:</span> Boolean <span class="token punctuation">)</span> <span class="token punctuation">{</span> castSession <span class="token operator">=</span> p0 <span class="token function">invalidateOptionsMenu</span> <span class="token punctuation">(</span> <span class="token punctuation">)</span> <span class="token punctuation">}</span> <span class="token keyword">override</span> <span class="token keyword">fun</span> <span class="token function">onSessionResumeFailed</span> <span class="token punctuation">(</span> p0 <span class="token operator">:</span> CastSession <span class="token operator">?</span> <span class="token punctuation">,</span> p1 <span class="token operator">:</span> Int <span class="token punctuation">)</span> <span class="token punctuation">{</span> <span class="token punctuation">}</span> <span class="token keyword">override</span> <span class="token keyword">fun</span> <span class="token function">onSessionSuspended</span> <span class="token punctuation">(</span> p0 <span class="token operator">:</span> CastSession <span class="token operator">?</span> <span class="token punctuation">,</span> p1 <span class="token operator">:</span> Int <span class="token punctuation">)</span> <span class="token punctuation">{</span> <span class="token punctuation">}</span> <span class="token punctuation">}</span> <span class="token keyword">override</span> <span class="token keyword">fun</span> <span class="token function">onCreate</span> <span class="token punctuation">(</span> savedInstanceState <span class="token operator">:</span> Bundle <span class="token operator">?</span> <span class="token punctuation">)</span> <span class="token punctuation">{</span> <span class="token keyword">super</span> <span class="token punctuation">.</span> <span class="token function">onCreate</span> <span class="token punctuation">(</span> savedInstanceState <span class="token punctuation">)</span> Log <span class="token punctuation">.</span> <span class="token function">i</span> <span class="token punctuation">(</span> <span class="token string">"MainActivity"</span> <span class="token punctuation">,</span> <span class="token string">"onCreate"</span> <span class="token punctuation">)</span> <span class="token function">setContentView</span> <span class="token punctuation">(</span> R <span class="token punctuation">.</span> layout <span class="token punctuation">.</span> activity_estimate <span class="token punctuation">)</span> btn_send_message <span class="token punctuation">.</span> <span class="token function">setOnClickListener</span> <span class="token punctuation">{</span> castSession <span class="token operator">?</span> <span class="token punctuation">.</span> <span class="token function">sendMessage</span> <span class="token punctuation">(</span> nameSpace <span class="token punctuation">,</span> <span class="token function">Random</span> <span class="token punctuation">(</span> <span class="token punctuation">)</span> <span class="token punctuation">.</span> <span class="token function">nextInt</span> <span class="token punctuation">(</span> <span class="token number">5</span> <span class="token punctuation">)</span> <span class="token punctuation">.</span> <span class="token function">toString</span> <span class="token punctuation">(</span> <span class="token punctuation">)</span> <span class="token punctuation">)</span> <span class="token punctuation">}</span> mediaSelector <span class="token operator">=</span> MediaRouteSelector <span class="token punctuation">.</span> <span class="token function">Builder</span> <span class="token punctuation">(</span> <span class="token punctuation">)</span> <span class="token comment">// On ajoute les intents auxquels on va répondre, ici c'est uniquement systemr</span> <span class="token punctuation">.</span> <span class="token function">addControlCategory</span> <span class="token punctuation">(</span> MediaControlIntent <span class="token punctuation">.</span> CATEGORY_REMOTE_PLAYBACK <span class="token punctuation">)</span> <span class="token comment">// On spécifie notre app id</span> <span class="token punctuation">.</span> <span class="token function">addControlCategory</span> <span class="token punctuation">(</span> CastMediaControlIntent <span class="token punctuation">.</span> <span class="token function">categoryForCast</span> <span class="token punctuation">(</span> baseContext <span class="token punctuation">.</span> <span class="token function">getString</span> <span class="token punctuation">(</span> R <span class="token punctuation">.</span> string <span class="token punctuation">.</span> receiver_id <span class="token punctuation">)</span> <span class="token punctuation">)</span> <span class="token punctuation">)</span> <span class="token punctuation">.</span> <span class="token function">build</span> <span class="token punctuation">(</span> <span class="token punctuation">)</span> <span class="token punctuation">}</span> <span class="token keyword">override</span> <span class="token keyword">fun</span> <span class="token function">onResume</span> <span class="token punctuation">(</span> <span class="token punctuation">)</span> <span class="token punctuation">{</span> <span class="token keyword">super</span> <span class="token punctuation">.</span> <span class="token function">onResume</span> <span class="token punctuation">(</span> <span class="token punctuation">)</span> Log <span class="token punctuation">.</span> <span class="token function">i</span> <span class="token punctuation">(</span> <span class="token string">"MainActivity"</span> <span class="token punctuation">,</span> <span class="token string">"onResume"</span> <span class="token punctuation">)</span> castContext <span class="token punctuation">.</span> sessionManager <span class="token punctuation">.</span> <span class="token function">addSessionManagerListener</span> <span class="token punctuation">(</span> sessionManagerListener <span class="token punctuation">,</span> CastSession <span class="token operator">::</span> <span class="token keyword">class</span> <span class="token punctuation">.</span> java <span class="token punctuation">)</span> <span class="token keyword">if</span> <span class="token punctuation">(</span> castSession <span class="token operator">==</span> <span class="token keyword">null</span> <span class="token punctuation">)</span> <span class="token punctuation">{</span> castSession <span class="token operator">=</span> castContext <span class="token punctuation">.</span> sessionManager <span class="token punctuation">.</span> currentCastSession <span class="token punctuation">}</span> <span class="token punctuation">}</span> <span class="token keyword">override</span> <span class="token keyword">fun</span> <span class="token function">onPause</span> <span class="token punctuation">(</span> <span class="token punctuation">)</span> <span class="token punctuation">{</span> Log <span class="token punctuation">.</span> <span class="token function">i</span> <span class="token punctuation">(</span> <span class="token string">"MainActivity"</span> <span class="token punctuation">,</span> <span class="token string">"onPause"</span> <span class="token punctuation">)</span> castContext <span class="token punctuation">.</span> sessionManager <span class="token punctuation">.</span> <span class="token function">removeSessionManagerListener</span> <span class="token punctuation">(</span> sessionManagerListener <span class="token punctuation">,</span> CastSession <span class="token operator">::</span> <span class="token keyword">class</span> <span class="token punctuation">.</span> java <span class="token punctuation">)</span> <span class="token keyword">super</span> <span class="token punctuation">.</span> <span class="token function">onPause</span> <span class="token punctuation">(</span> <span class="token punctuation">)</span> <span class="token punctuation">}</span> <span class="token keyword">override</span> <span class="token keyword">fun</span> <span class="token function">onStop</span> <span class="token punctuation">(</span> <span class="token punctuation">)</span> <span class="token punctuation">{</span> <span class="token function">cleanup</span> <span class="token punctuation">(</span> <span class="token punctuation">)</span> <span class="token keyword">super</span> <span class="token punctuation">.</span> <span class="token function">onStop</span> <span class="token punctuation">(</span> <span class="token punctuation">)</span> <span class="token punctuation">}</span> <span class="token keyword">private</span> <span class="token keyword">fun</span> <span class="token function">cleanup</span> <span class="token punctuation">(</span> <span class="token punctuation">)</span> <span class="token punctuation">{</span> castSession <span class="token operator">=</span> <span class="token keyword">null</span> <span class="token punctuation">}</span> <span class="token punctuation">}</span> |
Let’s go step by step first.
1 2 | <span class="token keyword">private</span> <span class="token keyword">val</span> castContext <span class="token keyword">by</span> lazy <span class="token punctuation">{</span> CastContext <span class="token punctuation">.</span> <span class="token function">getSharedInstance</span> <span class="token punctuation">(</span> baseContext <span class="token punctuation">)</span> <span class="token punctuation">}</span> |
When you declare your application uses the ChromeCast framework, the Framework will create an Instance to use for the whole system. That is, other applications in your phone that also have ChromeCast feature will also use the same CastContext Instance .
CastContext will contain the CastSession each 1 Session will display 1 link from your device to 1 ChromeCast device in the same Wifi network.
When you link your mobile device to a ChromeCast device, CastContext will create a separate CastSession for that link, and you can get that Session via command.
1 2 | castSession <span class="token operator">=</span> castContext <span class="token punctuation">.</span> sessionManager <span class="token punctuation">.</span> currentCastSession |
When a link is established, they also have the life cycle of Activity or Fragment. We’ll be based on the CastSession lifecycle to know when our device starts to link and share information with the ChromeCast device.
1 2 3 | <span class="token comment">// write code in onResume()</span> castContext <span class="token punctuation">.</span> sessionManager <span class="token punctuation">.</span> <span class="token function">addSessionManagerListener</span> <span class="token punctuation">(</span> sessionManagerListener <span class="token punctuation">,</span> CastSession <span class="token operator">::</span> <span class="token keyword">class</span> <span class="token punctuation">.</span> java <span class="token punctuation">)</span> |
and when Fragment or Activity call onPause() , please remove that Session.
1 2 3 | <span class="token comment">// write code in onPause()</span> castContext <span class="token punctuation">.</span> sessionManager <span class="token punctuation">.</span> <span class="token function">removeSessionManagerListener</span> <span class="token punctuation">(</span> sessionManagerListener <span class="token punctuation">,</span> CastSession <span class="token operator">::</span> <span class="token keyword">class</span> <span class="token punctuation">.</span> java <span class="token punctuation">)</span> |
You pay attention to the line of code
1 2 3 4 | btn_send_message <span class="token punctuation">.</span> <span class="token function">setOnClickListener</span> <span class="token punctuation">{</span> castSession <span class="token operator">?</span> <span class="token punctuation">.</span> <span class="token function">sendMessage</span> <span class="token punctuation">(</span> nameSpace <span class="token punctuation">,</span> <span class="token function">Random</span> <span class="token punctuation">(</span> <span class="token punctuation">)</span> <span class="token punctuation">.</span> <span class="token function">nextInt</span> <span class="token punctuation">(</span> <span class="token number">5</span> <span class="token punctuation">)</span> <span class="token punctuation">.</span> <span class="token function">toString</span> <span class="token punctuation">(</span> <span class="token punctuation">)</span> <span class="token punctuation">)</span> <span class="token punctuation">}</span> |
Here catch the event when Click a button and send a message to the device ChromeCast
- nameSpace is defined as “The namespace for the message” and should be prefixed with “urn: x-cast:” and this
nameSpacewill also be defined on the Receiver App. - Random () .nextInt (5) .toString () This is the content of information that the message sends to the Receiver App to display on the terminal.
At this point, I also guess that quite a few of you can not use the working mechanism between Sender App and Receiver App .
You can understand simply like this.
- When the user clicks on CastButton , the
Frameworkwill display a list of ChromeCast devices that share the same Wifi network. The user will then select the device they want to connect and share information with. - When the user clicks on a device to connect, the
Frameworkwill automatically connect to that device and return the information to the Sender App through sessionManagerListener and our programmer’s job is to capture events in sessionManagerListener. there to handle. - All the information that the Sender App wants to share with the Receiver App is through castSession . As in the above example, I just sent a fairly simple information from the phone app to the Receiver App for the Receiver App to display to the viewer.
The above article has introduced you to the most basic definitions of ChromeCast and how to deploy a basic application with ChromeCast functionality. In the following, I will guide you in more detail about an application to share videos from your phone to your TV device through the ChromeCast Framework.