Hi everyone, it’s me again. Today we will learn a few concepts about Kubernetes and how to create a complete Kubernetes cluster locally with VirtualBox, Vagrant and Kubectl (go).
overview
What is Kubernetes
Kubernetes (or k8s) is an open source platform, used to automate the management, scaling and deployment of applications in the form of containers, also known as the Container orchestration engine. Kubernetes helps us to greatly eliminate the manual processes involved in the deployment and expansion of containerized applications.
Kubernetes can be abbreviated as k8s – that is, it starts with the letter “k”, the middle is 8 characters and the end is the letter “s”)
Kubernetes orchestration allows us to build extensive application services with multiple containers. It schedules those containers on a cluster, expands containers, and manages the condition of the containers over time.
Kubernetes is a powerful tool developed by Google, before going public, Google used it to manage its billions of containers.
Some definitions
Clusters
A Kubernetes cluster is a set of physical or virtual machines used by Kubernetes to run applications. These virtual machines or physical machines are nodes, including master node and worker nodes. These nodes need to install docker and Kubernetes.
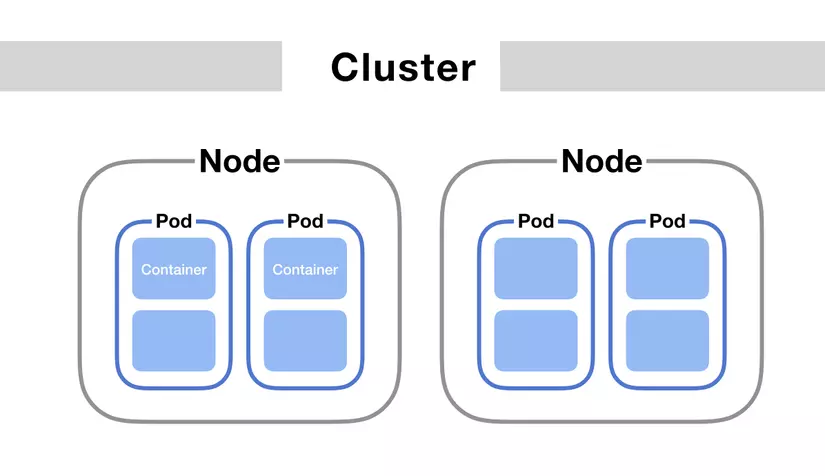
Nodes
Kubernetes nodes are virtual machines or physical machines running kubernetes. These nodes need to run Kubernetes and docker, and each of these machines is a docker host.
Node is the smallest unit of computer hardware in Kubernetes. It is representative of a single machine in the Kubernetes cluster. In most Kubernetes systems, a node can be an actual physical machine or the virtual machine of a cloud platform like the Google Cloud Platform or AWS, or simply a virtual machine created by VirtualBox on a single machine.
We can simply treat each node as a collection of CPU and RAM resources that can be used. In this way, any machine can replace any other machine in the Kubernetes cluster.
Pods
When an application is packaged, that application will be able to run on a standalone container, although we can run the standalone container just like we would launch a monolythic application, Kubernetes will not run that way, Kubernetes use the pod concept to group containers together. A pod is a group of containers that share resources and the network, and containers in a pod can maintain communication with each other as if on a server but retain the necessary independence.
With Kubernetes, the unit when scaling an application is to scale pods, so pods are usually a group of containers that have the same purpose, for example a pod set of 4 containers running nginx + backend, and a pod set. combine 2 containers running frontend + nginx .vv
Some setup needed
In the scope of this article, I will demonstrate how to initialize a Kubernetes cluster on a single physical machine, using virtual machines running on VirtualBox. The settings are on Ubuntu 16.04
Install VirtualBox
The tool to manage virtual machines is quite familiar, supports many popular operating systems such as Windows, Ubuntu, MacOs .. etc.
1 2 3 4 5 6 7 8 | <span class="token function">sudo</span> <span class="token function">apt-get</span> update <span class="token function">sudo</span> <span class="token function">apt-get</span> upgrade <span class="token function">wget</span> -q https://www.virtualbox.org/download/oracle_vbox_2016.asc -O- <span class="token operator">|</span> <span class="token function">sudo</span> apt-key <span class="token function">add</span> - <span class="token function">wget</span> -q https://www.virtualbox.org/download/oracle_vbox.asc -O- <span class="token operator">|</span> <span class="token function">sudo</span> apt-key <span class="token function">add</span> - <span class="token function">sudo</span> add-apt-repository <span class="token string">"deb http://download.virtualbox.org/virtualbox/debian xenial contrib"</span> <span class="token function">sudo</span> <span class="token function">apt-get</span> update <span class="token function">sudo</span> <span class="token function">apt-get</span> <span class="token function">install</span> virtualbox |
Install Minikube
A Kubernetes cluster can be built on physical computers or virtual machines. To start development for Kubernetes, you can use Minikube. Minikube is a Kubernetes installer by creating a virtual machine on your computer and deploying a simple cluster inside that virtual machine that includes only one Node.
1 2 3 4 5 | <span class="token function">curl</span> -Lo minikube https://storage.googleapis.com/minikube/releases/latest/minikube-linux-amd64 <span class="token operator">&&</span> <span class="token function">chmod</span> +x minikube <span class="token function">sudo</span> <span class="token function">mkdir</span> -p /usr/local/bin/ <span class="token function">sudo</span> <span class="token function">install</span> minikube /usr/local/bin/ |
Please install the minikube to use for the context switch at the end of the article
Install kubectl
The kubectl tool helps us to control Kubernetes clusters. kubectl uses the configuration in
$HOME/.kube
1 2 3 4 5 | <span class="token function">curl</span> -LO https://storage.googleapis.com/kubernetes-release/release/ <span class="token variable"><span class="token variable">`</span> <span class="token function">curl</span> -s https://storage.googleapis.com/kubernetes-release/release/stable.txt <span class="token variable">`</span></span> /bin/linux/amd64/kubectl <span class="token function">chmod</span> +x ./kubectl <span class="token function">sudo</span> <span class="token function">mv</span> ./kubectl /usr/local/bin/kubectl kubectl version |
Install Vagrant
Vagrant is an open source software product for building and maintaining mobile virtual software development environments. It helps us to simplify virtualization software configuration management, helping to create virtualized environments quickly and efficiently.
1 2 | <span class="token function">sudo</span> <span class="token function">apt-get</span> <span class="token function">install</span> vagrant |
You can learn more about what vagrant can do, basically it supports us to create a virtual machine through only one file called Vagrantfile , the configuration and parameters of the virtual machine are in. This file and we initialize the virtual machine through a single command called vagrant up
Let’s get started!
There are many ways to initialize a Kubernetes cluster, for the scope of this article I will run at the level of localhost – on my PC
Initialize the virtual machine through vagrant
To create a complete cluster we need virtual machines, in this demo I will initialize 3 virtual machines including 1 master + 2 workers
1 2 3 4 | <span class="token function">mkdir</span> -p vagrant/master <span class="token function">mkdir</span> -p vagrant/worker1 <span class="token function">mkdir</span> -p vagrant/worker2 |
nano vagrant/master/Vagrantfile Paste the following text:
1 2 3 4 5 6 7 8 9 10 11 12 13 14 15 16 17 18 19 20 21 22 23 24 25 26 27 28 29 30 31 32 | # -*- mode: ruby -*- # vi: set ft=ruby : # Install virtual box centos/7, IP address and hostname, ram + cpus Vagrant.configure("2") do |config| config.vm.box = "centos/7" config.vm.network "private_network", ip: "172.16.10.100" config.vm.hostname = "master" config.vm.provider "virtualbox" do |vb| vb.name = "master" vb.cpus = 2 vb.memory = "2048" end # Install docker + kubernetes in machine config.vm.provision "shell", path: "../install-docker-kube.sh" config.vm.provision "shell", inline: <<-SHELL # Setup password and enable ssh echo "123" | passwd --stdin root sed -i 's/^PasswordAuthentication no/PasswordAuthentication yes/' /etc/ssh/sshd_config systemctl reload sshd # Add host in cluster to /etc/hosts cat >>/etc/hosts<<EOF 172.16.10.100 master 172.16.10.101 worker1 172.16.10.102 worker2 EOF SHELL end |
Similar to machine workers, only host name and ip differ as well as configuration options
File vagrant/worker1/Vagrantfile
1 2 3 4 5 6 7 8 9 10 11 12 13 14 15 16 17 18 19 20 21 22 23 24 25 26 27 28 29 30 31 32 | # -*- mode: ruby -*- # vi: set ft=ruby : # Install virtual box centos/7, IP address and hostname, ram + cpus Vagrant.configure("2") do |config| config.vm.box = "centos/7" config.vm.network "private_network", ip: "172.16.10.101" config.vm.hostname = "worker1" config.vm.provider "virtualbox" do |vb| vb.name = "worker1" vb.cpus = 1 vb.memory = "1024" end # Install docker + kubernetes in machine config.vm.provision "shell", path: "../install-docker-kube.sh" config.vm.provision "shell", inline: <<-SHELL # Setup password and enable ssh echo "123" | passwd --stdin root sed -i 's/^PasswordAuthentication no/PasswordAuthentication yes/' /etc/ssh/sshd_config systemctl reload sshd # Add host in cluster to /etc/hosts cat >>/etc/hosts<<EOF 172.16.10.100 master 172.16.10.101 worker1 172.16.10.102 worker2 EOF SHELL end |
File vagrant/worker2/Vagrantfile
1 2 3 4 5 6 7 8 9 10 11 12 13 14 15 16 17 18 19 20 21 22 23 24 25 26 27 28 29 30 31 32 | # -*- mode: ruby -*- # vi: set ft=ruby : # Install virtual box centos/7, IP address and hostname, ram + cpus Vagrant.configure("2") do |config| config.vm.box = "centos/7" config.vm.network "private_network", ip: "172.16.10.102" config.vm.hostname = "worker2" config.vm.provider "virtualbox" do |vb| vb.name = "worker2" vb.cpus = 1 vb.memory = "1024" end # Install docker + kubernetes in machine config.vm.provision "shell", path: "../install-docker-kube.sh" config.vm.provision "shell", inline: <<-SHELL # Setup password and enable ssh echo "123" | passwd --stdin root sed -i 's/^PasswordAuthentication no/PasswordAuthentication yes/' /etc/ssh/sshd_config systemctl reload sshd # Add host in cluster to /etc/hosts cat >>/etc/hosts<<EOF 172.16.10.100 master 172.16.10.101 worker1 172.16.10.102 worker2 EOF SHELL end |
The docker & kubernetes installation file for the centos virtual machine above, includes docker + kubernetes installation, and other settings.
File vagrant/install-docker-kube.sh
1 2 3 4 5 6 7 8 9 10 11 12 13 14 15 16 17 18 19 20 21 22 23 24 25 26 27 28 29 30 31 32 33 34 35 36 37 38 39 40 41 42 43 44 45 46 47 48 49 50 51 52 53 54 55 56 57 58 59 60 61 62 63 64 65 66 67 68 69 70 71 72 73 74 | #!/bin/bash # Install Docker yum install -y yum-utils device-mapper-persistent-data lvm2 yum-config-manager --add-repo https://download.docker.com/linux/centos/docker-ce.repo yum update -y && yum install docker-ce-18.06.2.ce -y usermod -aG docker $(whoami) ## Create /etc/docker directory. mkdir /etc/docker # Setup daemon. cat > /etc/docker/daemon.json <<EOF { "exec-opts": ["native.cgroupdriver=systemd"], "log-driver": "json-file", "log-opts": { "max-size": "100m" }, "storage-driver": "overlay2", "storage-opts": [ "overlay2.override_kernel_check=true" ] } EOF mkdir -p /etc/systemd/system/docker.service.d # Restart Docker systemctl enable docker.service systemctl daemon-reload systemctl restart docker # Disable SELinux setenforce 0 sed -i --follow-symlinks 's/^SELINUX=enforcing/SELINUX=disabled/' /etc/sysconfig/selinux # Disable Firewall systemctl disable firewalld >/dev/null 2>&1 systemctl stop firewalld # sysctl cat >>/etc/sysctl.d/kubernetes.conf<<EOF net.bridge.bridge-nf-call-ip6tables = 1 net.bridge.bridge-nf-call-iptables = 1 EOF sysctl --system >/dev/null 2>&1 # Turn off swap sed -i '/swap/d' /etc/fstab swapoff -a # Add yum repo file for Kubernetes cat >>/etc/yum.repos.d/kubernetes.repo<<EOF [kubernetes] name=Kubernetes baseurl=https://packages.cloud.google.com/yum/repos/kubernetes-el7-x86_64 enabled=1 gpgcheck=1 repo_gpgcheck=1 gpgkey=https://packages.cloud.google.com/yum/doc/yum-key.gpg https://packages.cloud.google.com/yum/doc/rpm-package-key.gpg EOF yum install -y -q kubeadm kubelet kubectl systemctl enable kubelet systemctl start kubelet # Configure NetworkManager before attempting to use Calico networking. cat >>/etc/NetworkManager/conf.d/calico.conf<<EOF [keyfile] unmanaged-devices=interface-name:cali*;interface-name:tunl* EOF |
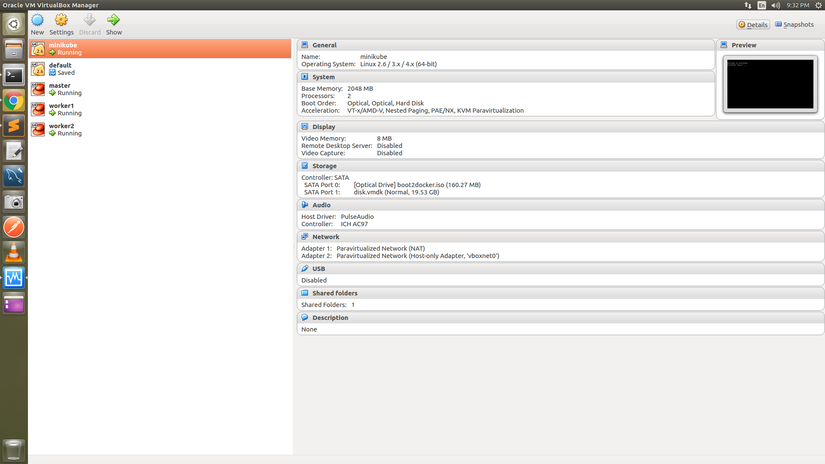
Start the virtual machines master, worker1 and worker2, respectively
1 2 3 4 5 6 7 | <span class="token builtin class-name">cd</span> ~/vagrant/master vagrant up <span class="token builtin class-name">cd</span> ~/vagrant/worker1 vagrant up <span class="token builtin class-name">cd</span> ~/vagrant/worker2 vagrant up |
Then we can check on the VirtualBox interface whether the virtual machines master, workers have been created or not:
Cluster initialization
To fully initialize the cluster we need ssh into the virtual machines and initialize via kubeadm
On the master computer, at ssh, enter the password in the vagrant config file that we configured earlier, here our password is 123
Initialize the node on the cluster’s master machine
1 2 3 | <span class="token function">ssh</span> <a class="__cf_email__" href="/cdn-cgi/l/email-protection">[email protected]</a> kubeadm init --apiserver-advertise-address <span class="token operator">=</span> <span class="token number">172.16</span> .10.100 --pod-network-cidr <span class="token operator">=</span> <span class="token number">192.168</span> .0.0/16 |
After successful initialization, kubeadm requires us to run the following commands to be able to copy the configuration so that the machine can connect to the cluster: 
So, run the following commands on the master machine:
1 2 3 4 | <span class="token function">mkdir</span> -p <span class="token environment constant">$HOME</span> /.kube <span class="token function">sudo</span> <span class="token function">cp</span> -i /etc/kubernetes/admin.conf <span class="token environment constant">$HOME</span> /.kube/config <span class="token function">sudo</span> <span class="token function">chown</span> <span class="token variable"><span class="token variable">$(</span> <span class="token function">id</span> -u <span class="token variable">)</span></span> <span class="token builtin class-name">:</span> <span class="token variable"><span class="token variable">$(</span> <span class="token function">id</span> -g <span class="token variable">)</span></span> <span class="token environment constant">$HOME</span> /.kube/config |
As well as needing to install a network plugin, open the link to select an addon
1 2 3 4 | You should now deploy a pod network to the cluster. Run <span class="token string">"kubectl apply -f [podnetwork].yaml"</span> with one of the options listed at: https://kubernetes.io/docs/concepts/cluster-administration/addons/ |
Here I will use the calico addon
1 2 | kubectl apply -f https://docs.projectcalico.org/v3.10/manifests/calico.yaml |
After the above steps, we have successfully initialized a cluster, but this cluster has only one node as master.
1 2 3 4 5 6 7 8 9 | <span class="token punctuation">[</span> <a class="__cf_email__" href="/cdn-cgi/l/email-protection">[email protected]</a> ~ <span class="token punctuation">]</span> <span class="token comment"># kubectl cluster-info</span> Kubernetes master is running at https://172.16.10.100:6443 KubeDNS is running at https://172.16.10.100:6443/api/v1/namespaces/kube-system/services/kube-dns:dns/proxy To further debug and diagnose cluster problems, use <span class="token string">'kubectl cluster-info dump'</span> <span class="token builtin class-name">.</span> <span class="token punctuation">[</span> <a class="__cf_email__" href="/cdn-cgi/l/email-protection">[email protected]</a> ~ <span class="token punctuation">]</span> <span class="token comment"># kubectl get nodes</span> NAME STATUS ROLES AGE VERSION master Ready master 9m29s v1.18.8 |
Next, we will proceed to join the cluster on the machine workers
In the master machine:
1 2 3 4 | <span class="token punctuation">[</span> <a class="__cf_email__" href="/cdn-cgi/l/email-protection">[email protected]</a> ~ <span class="token punctuation">]</span> <span class="token comment"># kubeadm token create --print-join-command</span> W0822 <span class="token number">14</span> :53:04.652936 <span class="token number">22591</span> configset.go:202 <span class="token punctuation">]</span> WARNING: kubeadm cannot validate component configs <span class="token keyword">for</span> API <span class="token function">groups</span> <span class="token punctuation">[</span> kubelet.config.k8s.io kubeproxy.config.k8s.io <span class="token punctuation">]</span> kubeadm <span class="token function">join</span> <span class="token number">172.16</span> .10.100:6443 --token 2tugxy.fq0dmyt2mpeqll1c --discovery-token-ca-cert-hash sha256:a27b63db02ce8d1db21a02041189bd9ff83e608f115867d5c94faee8955216db |
Turn ssh into the worker machines and use this genetically modified command to join the cluster
1 2 3 | <span class="token function">ssh</span> <a class="__cf_email__" href="/cdn-cgi/l/email-protection">[email protected]</a> kubeadm <span class="token function">join</span> <span class="token number">172.16</span> .10.100:6443 --token 2tugxy.fq0dmyt2mpeqll1c --discovery-token-ca-cert-hash sha256:a27b63db02ce8d1db21a02041189bd9ff83e608f115867d5c94faee8955216db |
Then wait a few minutes and check at the master machine, this list means the worker machines have successfully joined the cluster!
1 2 3 4 5 6 | [ <a class="__cf_email__" href="/cdn-cgi/l/email-protection">[email protected]</a> ~]# kubectl get nodes NAME STATUS ROLES AGE VERSION master Ready master 15m v1.18.8 worker1 Ready <none> 92s v1.18.8 worker2 Ready <none> 69s v1.18.8 |
So, we have successfully created a complete cluster with 3 nodes using virtual machines of VIrtualBox.
Use kubectl with context
Use contexts in kubectl
After the above demo, we have started a complete cluster, we can create another cluster with minikube
This is a tool to create a cluster locally, now I will start minikube to create a cluster, and we can switch between minikube and [email protected] as follows.
1 2 | minikube start |
The configuration for kubectl driver is read at $HOME/.kube/config .
To change the context, we can change the environment variable KUBECONFIG to convert the context to another use.
Assuming we have the configuration of a cluster cluster1 in the file /home/chicken/.kube/config-cluster1 , in the cmd window export this environment variable to change the configuration for kubectl export KUBECONFIG=/home/chicken/.kube/config-cluster1
At localhost, check the context of what kubectl is like
1 2 3 4 | <a class="__cf_email__" href="/cdn-cgi/l/email-protection">[email protected]</a> ~ $ kubectl config get-contexts CURRENT NAME CLUSTER AUTHINFO NAMESPACE * minikube minikube minikube |
This minikube is the cluster created after I started minikube on my localhost, and kubectl only controls this minikube cluster. To change the context, every time we open the terminal we have to export the environment variable as above, which will be quite inconvenient
Now let’s add a context so that kubectl can switch to the cluster we initialized earlier:
Copy the cluster configuration at the master node to localhost, remember to change the appropriate path
1 2 3 4 5 | scp <a class="__cf_email__" href="/cdn-cgi/l/email-protection">[email protected]</a> :/etc/kubernetes/admin.conf /home/chicken/.kube/config-cluster1 export KUBECONFIG=~/.kube/config:~/.kube/config-cluster1 kubectl config view --flatten > ~/.kube/config_temp mv ~/.kube/config_temp ~/.kube/config |
Check the context, now at localhost we have 2 contexts of kubernetes that we can switch.
1 2 3 4 5 | <a class="__cf_email__" href="/cdn-cgi/l/email-protection">[email protected]</a> ~/vagrant/worker1 $ kubectl config get-contexts CURRENT NAME CLUSTER AUTHINFO NAMESPACE <a class="__cf_email__" href="/cdn-cgi/l/email-protection">[email protected]</a> kubernetes kubernetes-admin * minikube minikube minikube |
To be able to switch the context, we run
1 2 3 4 5 6 7 8 | <a class="__cf_email__" href="/cdn-cgi/l/email-protection">[email protected]</a> ~ $ kubectl config use-context <a class="__cf_email__" href="/cdn-cgi/l/email-protection">[email protected]</a> Switched to context <span class="token string">" <a class="__cf_email__" href="/cdn-cgi/l/email-protection">[email protected]</a> "</span> <span class="token builtin class-name">.</span> <a class="__cf_email__" href="/cdn-cgi/l/email-protection">[email protected]</a> ~ $ kubectl get nodes NAME STATUS ROLES AGE VERSION master Ready master 55m v1.18.8 worker1 Ready <span class="token operator"><</span> none <span class="token operator">></span> 40m v1.18.8 worker2 Ready <span class="token operator"><</span> none <span class="token operator">></span> 40m v1.18.8 |
My localhost machine can use kubectl to control the cluster [email protected] already.
So, I just presented the basic concepts of Kubernetes and how to initialize a complete Kubernetes cluster. Hope the article will be useful to those who are learning about k8s Thank you everyone for following the article!
Refer: