Hello everyone, after a long time of absence, I have come back. On the occasion that I am working on a project at the school and including the email function, in this article I will guide you to create the email sending function using the Laravel application.
 My idea is to create a mini project with basic functions. For each function we will email the user with information about that action.
1. Create a Laravel project
To perform the basic function, it is imperative for us to have a laravel project, right? =)) Here I use the laravel command to create the project.
1 2 | laravel new send_email |
2. Migration
After successfully initializing the project, we will create a tasks table in the database (Database) using migration
1 2 | php artisan make:migration create_tasks_table |
After creating the migration, we will get a migration file like this. Our job now is to add the columns we want to add to the function up() as shown below:
1 2 3 4 5 6 7 8 9 10 11 12 13 14 15 16 17 18 19 20 21 22 23 24 25 26 27 28 29 30 31 32 33 | <span class="token php language-php"><span class="token delimiter important"><?php</span> <span class="token keyword">use</span> <span class="token package">Illuminate Database Migrations Migration</span> <span class="token punctuation">;</span> <span class="token keyword">use</span> <span class="token package">Illuminate Database Schema Blueprint</span> <span class="token punctuation">;</span> <span class="token keyword">use</span> <span class="token package">Illuminate Support Facades Schema</span> <span class="token punctuation">;</span> <span class="token keyword">class</span> <span class="token class-name">CreateTasksTable</span> <span class="token keyword">extends</span> <span class="token class-name">Migration</span> <span class="token punctuation">{</span> <span class="token comment">/** * Run the migrations. * * @return void */</span> <span class="token keyword">public</span> <span class="token keyword">function</span> <span class="token function">up</span> <span class="token punctuation">(</span> <span class="token punctuation">)</span> <span class="token punctuation">{</span> Schema <span class="token punctuation">:</span> <span class="token punctuation">:</span> <span class="token function">create</span> <span class="token punctuation">(</span> <span class="token single-quoted-string string">'tasks'</span> <span class="token punctuation">,</span> <span class="token keyword">function</span> <span class="token punctuation">(</span> Blueprint <span class="token variable">$table</span> <span class="token punctuation">)</span> <span class="token punctuation">{</span> <span class="token variable">$table</span> <span class="token operator">-</span> <span class="token operator">></span> <span class="token function">bigIncrements</span> <span class="token punctuation">(</span> <span class="token single-quoted-string string">'id'</span> <span class="token punctuation">)</span> <span class="token punctuation">;</span> <span class="token variable">$table</span> <span class="token operator">-</span> <span class="token operator">></span> <span class="token function">string</span> <span class="token punctuation">(</span> <span class="token single-quoted-string string">'name'</span> <span class="token punctuation">)</span> <span class="token punctuation">;</span> <span class="token variable">$table</span> <span class="token operator">-</span> <span class="token operator">></span> <span class="token function">timestamps</span> <span class="token punctuation">(</span> <span class="token punctuation">)</span> <span class="token punctuation">;</span> <span class="token punctuation">}</span> <span class="token punctuation">)</span> <span class="token punctuation">;</span> <span class="token punctuation">}</span> <span class="token comment">/** * Reverse the migrations. * * @return void */</span> <span class="token keyword">public</span> <span class="token keyword">function</span> <span class="token function">down</span> <span class="token punctuation">(</span> <span class="token punctuation">)</span> <span class="token punctuation">{</span> Schema <span class="token punctuation">:</span> <span class="token punctuation">:</span> <span class="token function">dropIfExists</span> <span class="token punctuation">(</span> <span class="token single-quoted-string string">'tasks'</span> <span class="token punctuation">)</span> <span class="token punctuation">;</span> <span class="token punctuation">}</span> <span class="token punctuation">}</span> </span> |
Here, I just need the id and name columns for this table.
3. Model
1 2 | php artisan make <span class="token punctuation">:</span> model Task |
Similar to the model, after running the above command, the file will appear as below.
1 2 3 4 5 6 7 8 9 10 11 12 13 | <span class="token php language-php"><span class="token delimiter important"><?php</span> <span class="token keyword">namespace</span> <span class="token package">App</span> <span class="token punctuation">;</span> <span class="token keyword">use</span> <span class="token package">Illuminate Database Eloquent Model</span> <span class="token punctuation">;</span> <span class="token keyword">class</span> <span class="token class-name">Task</span> <span class="token keyword">extends</span> <span class="token class-name">Model</span> <span class="token punctuation">{</span> <span class="token keyword">protected</span> <span class="token variable">$fillable</span> <span class="token operator">=</span> <span class="token punctuation">[</span> <span class="token single-quoted-string string">'name'</span> <span class="token punctuation">,</span> <span class="token punctuation">]</span> <span class="token punctuation">;</span> <span class="token punctuation">}</span> </span> |
Unnecessary attributes, I will not write in because in this case for me, just fillable is enough 
4. Routing
Before creating the route, we have to create the controller first.
1 2 | php artisan make <span class="token punctuation">:</span> controller TaskController |
Once we have the controller, our next task is to initialize the route 
1 2 3 4 | Route <span class="token punctuation">:</span> <span class="token punctuation">:</span> <span class="token function">get</span> <span class="token punctuation">(</span> <span class="token single-quoted-string string">'/'</span> <span class="token punctuation">,</span> <span class="token single-quoted-string string">' <a class="__cf_email__" href="/cdn-cgi/l/email-protection">[email protected]</a> '</span> <span class="token punctuation">)</span> <span class="token operator">-</span> <span class="token operator">></span> <span class="token function">name</span> <span class="token punctuation">(</span> <span class="token single-quoted-string string">'index'</span> <span class="token punctuation">)</span> <span class="token punctuation">;</span> Route <span class="token punctuation">:</span> <span class="token punctuation">:</span> <span class="token function">post</span> <span class="token punctuation">(</span> <span class="token single-quoted-string string">'/task'</span> <span class="token punctuation">,</span> <span class="token single-quoted-string string">' <a class="__cf_email__" href="/cdn-cgi/l/email-protection">[email protected]</a> '</span> <span class="token punctuation">)</span> <span class="token operator">-</span> <span class="token operator">></span> <span class="token function">name</span> <span class="token punctuation">(</span> <span class="token single-quoted-string string">'store.task'</span> <span class="token punctuation">)</span> <span class="token punctuation">;</span> Route <span class="token punctuation">:</span> <span class="token punctuation">:</span> <span class="token function">delete</span> <span class="token punctuation">(</span> <span class="token single-quoted-string string">'/task/{task}'</span> <span class="token punctuation">,</span> <span class="token single-quoted-string string">' <a class="__cf_email__" href="/cdn-cgi/l/email-protection">[email protected]</a> '</span> <span class="token punctuation">)</span> <span class="token operator">-</span> <span class="token operator">></span> <span class="token function">name</span> <span class="token punctuation">(</span> <span class="token single-quoted-string string">'delete.task'</span> <span class="token punctuation">)</span> <span class="token punctuation">;</span> |
5. Create a CRUD function
At this stage, I will divide it into 2 parts:
- Creating Functions
- Create Views
Functions
We have a TaskController consisting of the following functions:
1 2 3 4 5 6 7 8 9 10 11 12 13 14 15 16 17 18 19 20 21 22 23 24 25 26 27 28 29 30 31 32 33 34 | <span class="token php language-php"><span class="token delimiter important"><?php</span> <span class="token keyword">namespace</span> <span class="token package">App Http Controllers</span> <span class="token punctuation">;</span> <span class="token keyword">use</span> <span class="token package">App Task</span> <span class="token punctuation">;</span> <span class="token keyword">use</span> <span class="token package">Illuminate Http Request</span> <span class="token punctuation">;</span> <span class="token keyword">class</span> <span class="token class-name">TaskController</span> <span class="token keyword">extends</span> <span class="token class-name">Controller</span> <span class="token punctuation">{</span> <span class="token keyword">public</span> <span class="token keyword">function</span> <span class="token function">index</span> <span class="token punctuation">(</span> <span class="token punctuation">)</span> <span class="token punctuation">{</span> <span class="token variable">$tasks</span> <span class="token operator">=</span> Task <span class="token punctuation">:</span> <span class="token punctuation">:</span> <span class="token function">all</span> <span class="token punctuation">(</span> <span class="token punctuation">)</span> <span class="token punctuation">;</span> <span class="token keyword">return</span> <span class="token function">view</span> <span class="token punctuation">(</span> <span class="token single-quoted-string string">'index'</span> <span class="token punctuation">,</span> <span class="token function">compact</span> <span class="token punctuation">(</span> <span class="token variable">$tasks</span> <span class="token punctuation">)</span> <span class="token punctuation">)</span> <span class="token punctuation">;</span> <span class="token punctuation">}</span> <span class="token keyword">public</span> <span class="token keyword">function</span> <span class="token function">store</span> <span class="token punctuation">(</span> Request <span class="token variable">$request</span> <span class="token punctuation">)</span> <span class="token punctuation">{</span> <span class="token variable">$task</span> <span class="token operator">=</span> <span class="token keyword">new</span> <span class="token class-name">Task</span> <span class="token punctuation">(</span> <span class="token punctuation">)</span> <span class="token punctuation">;</span> <span class="token variable">$task</span> <span class="token operator">-</span> <span class="token operator">></span> <span class="token property">name</span> <span class="token operator">=</span> <span class="token variable">$request</span> <span class="token operator">-</span> <span class="token operator">></span> <span class="token property">name</span> <span class="token punctuation">;</span> <span class="token variable">$task</span> <span class="token operator">-</span> <span class="token operator">></span> <span class="token function">save</span> <span class="token punctuation">(</span> <span class="token punctuation">)</span> <span class="token punctuation">;</span> <span class="token keyword">return</span> <span class="token function">redirect</span> <span class="token punctuation">(</span> <span class="token punctuation">)</span> <span class="token operator">-</span> <span class="token operator">></span> <span class="token function">back</span> <span class="token punctuation">(</span> <span class="token punctuation">)</span> <span class="token punctuation">;</span> <span class="token punctuation">}</span> <span class="token keyword">public</span> <span class="token keyword">function</span> <span class="token function">delete</span> <span class="token punctuation">(</span> <span class="token variable">$id</span> <span class="token punctuation">)</span> <span class="token punctuation">{</span> <span class="token variable">$task</span> <span class="token operator">=</span> Task <span class="token punctuation">:</span> <span class="token punctuation">:</span> <span class="token function">find</span> <span class="token punctuation">(</span> <span class="token variable">$id</span> <span class="token punctuation">)</span> <span class="token punctuation">;</span> <span class="token variable">$task</span> <span class="token operator">-</span> <span class="token operator">></span> <span class="token function">delete</span> <span class="token punctuation">(</span> <span class="token punctuation">)</span> <span class="token punctuation">;</span> <span class="token keyword">return</span> <span class="token function">redirect</span> <span class="token punctuation">(</span> <span class="token punctuation">)</span> <span class="token operator">-</span> <span class="token operator">></span> <span class="token function">back</span> <span class="token punctuation">(</span> <span class="token punctuation">)</span> <span class="token punctuation">;</span> <span class="token punctuation">}</span> <span class="token punctuation">}</span> </span> |
View
We will create 2 views. It is app.blade.php to contain the layout of the interface and tasks.blade.php containing the new data table and form.
1 2 3 4 5 6 7 8 9 10 11 12 13 14 15 16 17 18 19 20 21 22 23 24 25 26 27 28 29 | ~~ resources/views/layouts/app.blade.php ~~ <span class="token doctype"><!DOCTYPE html></span> <span class="token tag"><span class="token tag"><span class="token punctuation"><</span> html</span> <span class="token attr-name">lang</span> <span class="token attr-value"><span class="token punctuation">=</span> <span class="token punctuation">"</span> en <span class="token punctuation">"</span></span> <span class="token punctuation">></span></span> <span class="token tag"><span class="token tag"><span class="token punctuation"><</span> head</span> <span class="token punctuation">></span></span> <span class="token tag"><span class="token tag"><span class="token punctuation"><</span> title</span> <span class="token punctuation">></span></span> Sending Email with Laravel Mailer <span class="token tag"><span class="token tag"><span class="token punctuation"></</span> title</span> <span class="token punctuation">></span></span> <span class="token tag"><span class="token tag"><span class="token punctuation"><</span> meta</span> <span class="token attr-name">charset</span> <span class="token attr-value"><span class="token punctuation">=</span> <span class="token punctuation">"</span> utf-8 <span class="token punctuation">"</span></span> <span class="token punctuation">></span></span> <span class="token tag"><span class="token tag"><span class="token punctuation"><</span> meta</span> <span class="token attr-name">name</span> <span class="token attr-value"><span class="token punctuation">=</span> <span class="token punctuation">"</span> viewport <span class="token punctuation">"</span></span> <span class="token attr-name">content</span> <span class="token attr-value"><span class="token punctuation">=</span> <span class="token punctuation">"</span> width=device-width, initial-scale=1 <span class="token punctuation">"</span></span> <span class="token punctuation">></span></span> <span class="token tag"><span class="token tag"><span class="token punctuation"><</span> link</span> <span class="token attr-name">rel</span> <span class="token attr-value"><span class="token punctuation">=</span> <span class="token punctuation">"</span> stylesheet <span class="token punctuation">"</span></span> <span class="token attr-name">href</span> <span class="token attr-value"><span class="token punctuation">=</span> <span class="token punctuation">"</span> https://maxcdn.bootstrapcdn.com/bootstrap/4.3.1/css/bootstrap.min.css <span class="token punctuation">"</span></span> <span class="token punctuation">></span></span> <span class="token tag"><span class="token tag"><span class="token punctuation"><</span> script</span> <span class="token attr-name">src</span> <span class="token attr-value"><span class="token punctuation">=</span> <span class="token punctuation">"</span> https://maxcdn.bootstrapcdn.com/bootstrap/4.3.1/js/bootstrap.min.js <span class="token punctuation">"</span></span> <span class="token punctuation">></span></span> <span class="token tag"><span class="token tag"><span class="token punctuation"></</span> script</span> <span class="token punctuation">></span></span> <span class="token tag"><span class="token tag"><span class="token punctuation"><</span> script</span> <span class="token attr-name">src</span> <span class="token attr-value"><span class="token punctuation">=</span> <span class="token punctuation">"</span> https://kit.fontawesome.com/f714ee491f.js <span class="token punctuation">"</span></span> <span class="token attr-name">crossorigin</span> <span class="token attr-value"><span class="token punctuation">=</span> <span class="token punctuation">"</span> anonymous <span class="token punctuation">"</span></span> <span class="token punctuation">></span></span> <span class="token tag"><span class="token tag"><span class="token punctuation"></</span> script</span> <span class="token punctuation">></span></span> <span class="token tag"><span class="token tag"><span class="token punctuation"></</span> head</span> <span class="token punctuation">></span></span> <span class="token tag"><span class="token tag"><span class="token punctuation"><</span> body</span> <span class="token punctuation">></span></span> <span class="token tag"><span class="token tag"><span class="token punctuation"><</span> div</span> <span class="token attr-name">class</span> <span class="token attr-value"><span class="token punctuation">=</span> <span class="token punctuation">"</span> container <span class="token punctuation">"</span></span> <span class="token punctuation">></span></span> <span class="token tag"><span class="token tag"><span class="token punctuation"><</span> nav</span> <span class="token attr-name">class</span> <span class="token attr-value"><span class="token punctuation">=</span> <span class="token punctuation">"</span> navbar navbar-expand-md bg-light navbar-light <span class="token punctuation">"</span></span> <span class="token punctuation">></span></span> <span class="token tag"><span class="token tag"><span class="token punctuation"><</span> a</span> <span class="token attr-name">class</span> <span class="token attr-value"><span class="token punctuation">=</span> <span class="token punctuation">"</span> navbar-brand <span class="token punctuation">"</span></span> <span class="token attr-name">href</span> <span class="token attr-value"><span class="token punctuation">=</span> <span class="token punctuation">"</span> # <span class="token punctuation">"</span></span> <span class="token punctuation">></span></span> Tasks <span class="token tag"><span class="token tag"><span class="token punctuation"></</span> a</span> <span class="token punctuation">></span></span> <span class="token tag"><span class="token tag"><span class="token punctuation"><</span> button</span> <span class="token attr-name">class</span> <span class="token attr-value"><span class="token punctuation">=</span> <span class="token punctuation">"</span> navbar-toggler <span class="token punctuation">"</span></span> <span class="token attr-name">type</span> <span class="token attr-value"><span class="token punctuation">=</span> <span class="token punctuation">"</span> button <span class="token punctuation">"</span></span> <span class="token attr-name">data-toggle</span> <span class="token attr-value"><span class="token punctuation">=</span> <span class="token punctuation">"</span> collapse <span class="token punctuation">"</span></span> <span class="token attr-name">data-target</span> <span class="token attr-value"><span class="token punctuation">=</span> <span class="token punctuation">"</span> #collapsibleNavbar <span class="token punctuation">"</span></span> <span class="token punctuation">></span></span> <span class="token tag"><span class="token tag"><span class="token punctuation"><</span> span</span> <span class="token attr-name">class</span> <span class="token attr-value"><span class="token punctuation">=</span> <span class="token punctuation">"</span> navbar-toggler-icon <span class="token punctuation">"</span></span> <span class="token punctuation">></span></span> <span class="token tag"><span class="token tag"><span class="token punctuation"></</span> span</span> <span class="token punctuation">></span></span> <span class="token tag"><span class="token tag"><span class="token punctuation"></</span> button</span> <span class="token punctuation">></span></span> <span class="token tag"><span class="token tag"><span class="token punctuation"><</span> div</span> <span class="token attr-name">class</span> <span class="token attr-value"><span class="token punctuation">=</span> <span class="token punctuation">"</span> collapse navbar-collapse <span class="token punctuation">"</span></span> <span class="token attr-name">id</span> <span class="token attr-value"><span class="token punctuation">=</span> <span class="token punctuation">"</span> collapsibleNavbar <span class="token punctuation">"</span></span> <span class="token punctuation">></span></span> <span class="token tag"><span class="token tag"><span class="token punctuation"></</span> div</span> <span class="token punctuation">></span></span> <span class="token tag"><span class="token tag"><span class="token punctuation"></</span> nav</span> <span class="token punctuation">></span></span> <span class="token tag"><span class="token tag"><span class="token punctuation"><</span> br</span> <span class="token punctuation">></span></span> @yield('content') <span class="token tag"><span class="token tag"><span class="token punctuation"></</span> div</span> <span class="token punctuation">></span></span> <span class="token tag"><span class="token tag"><span class="token punctuation"></</span> body</span> <span class="token punctuation">></span></span> <span class="token tag"><span class="token tag"><span class="token punctuation"></</span> html</span> <span class="token punctuation">></span></span> |
1 2 3 4 5 6 7 8 9 10 11 12 13 14 15 16 17 18 19 20 21 22 23 24 25 26 27 28 29 30 31 32 33 34 35 36 37 38 39 40 41 42 43 44 45 46 47 48 49 50 51 52 53 54 55 56 57 58 59 60 61 62 63 64 65 66 67 68 | ~~ resources/views/tasks.blade.php ~~ @extends('layouts.app') @section('content') <span class="token tag"><span class="token tag"><span class="token punctuation"><</span> div</span> <span class="token attr-name">class</span> <span class="token attr-value"><span class="token punctuation">=</span> <span class="token punctuation">"</span> panel-body <span class="token punctuation">"</span></span> <span class="token style-attr language-css"><span class="token attr-name"> <span class="token attr-name">style</span></span> <span class="token punctuation">="</span> <span class="token attr-value"><span class="token property">margin-bottom</span> <span class="token punctuation">:</span> 30px</span> <span class="token punctuation">"</span></span> <span class="token punctuation">></span></span> <span class="token tag"><span class="token tag"><span class="token punctuation"><</span> form</span> <span class="token attr-name">action</span> <span class="token attr-value"><span class="token punctuation">=</span> <span class="token punctuation">"</span> {{ route( <span class="token punctuation">'</span> store.task <span class="token punctuation">'</span> ) }} <span class="token punctuation">"</span></span> <span class="token attr-name">method</span> <span class="token attr-value"><span class="token punctuation">=</span> <span class="token punctuation">"</span> POST <span class="token punctuation">"</span></span> <span class="token attr-name">class</span> <span class="token attr-value"><span class="token punctuation">=</span> <span class="token punctuation">"</span> form-horizontal <span class="token punctuation">"</span></span> <span class="token punctuation">></span></span> @csrf <span class="token tag"><span class="token tag"><span class="token punctuation"><</span> div</span> <span class="token attr-name">class</span> <span class="token attr-value"><span class="token punctuation">=</span> <span class="token punctuation">"</span> card <span class="token punctuation">"</span></span> <span class="token punctuation">></span></span> <span class="token tag"><span class="token tag"><span class="token punctuation"><</span> h5</span> <span class="token attr-name">class</span> <span class="token attr-value"><span class="token punctuation">=</span> <span class="token punctuation">"</span> card-header <span class="token punctuation">"</span></span> <span class="token punctuation">></span></span> New Task <span class="token tag"><span class="token tag"><span class="token punctuation"></</span> h5</span> <span class="token punctuation">></span></span> <span class="token tag"><span class="token tag"><span class="token punctuation"><</span> div</span> <span class="token attr-name">class</span> <span class="token attr-value"><span class="token punctuation">=</span> <span class="token punctuation">"</span> card-body row <span class="token punctuation">"</span></span> <span class="token punctuation">></span></span> <span class="token tag"><span class="token tag"><span class="token punctuation"><</span> label</span> <span class="token attr-name">class</span> <span class="token attr-value"><span class="token punctuation">=</span> <span class="token punctuation">"</span> col-sm-2 <span class="token punctuation">"</span></span> <span class="token attr-name">for</span> <span class="token attr-value"><span class="token punctuation">=</span> <span class="token punctuation">"</span> task-name <span class="token punctuation">"</span></span> <span class="token punctuation">></span></span> <span class="token tag"><span class="token tag"><span class="token punctuation"><</span> b</span> <span class="token punctuation">></span></span> Task <span class="token tag"><span class="token tag"><span class="token punctuation"></</span> b</span> <span class="token punctuation">></span></span> <span class="token tag"><span class="token tag"><span class="token punctuation"></</span> label</span> <span class="token punctuation">></span></span> <span class="token tag"><span class="token tag"><span class="token punctuation"><</span> div</span> <span class="token attr-name">class</span> <span class="token attr-value"><span class="token punctuation">=</span> <span class="token punctuation">"</span> col-sm-8 <span class="token punctuation">"</span></span> <span class="token punctuation">></span></span> <span class="token tag"><span class="token tag"><span class="token punctuation"><</span> input</span> <span class="token attr-name">type</span> <span class="token attr-value"><span class="token punctuation">=</span> <span class="token punctuation">"</span> text <span class="token punctuation">"</span></span> <span class="token attr-name">class</span> <span class="token attr-value"><span class="token punctuation">=</span> <span class="token punctuation">"</span> form-control <span class="token punctuation">"</span></span> <span class="token attr-name">placeholder</span> <span class="token attr-value"><span class="token punctuation">=</span> <span class="token punctuation">"</span> Enter task... <span class="token punctuation">"</span></span> <span class="token attr-name">name</span> <span class="token attr-value"><span class="token punctuation">=</span> <span class="token punctuation">"</span> name <span class="token punctuation">"</span></span> <span class="token punctuation">></span></span> <span class="token tag"><span class="token tag"><span class="token punctuation"></</span> div</span> <span class="token punctuation">></span></span> <span class="token comment"><!-- Add Task Button --></span> <span class="token tag"><span class="token tag"><span class="token punctuation"><</span> div</span> <span class="token attr-name">class</span> <span class="token attr-value"><span class="token punctuation">=</span> <span class="token punctuation">"</span> col-sm-2 <span class="token punctuation">"</span></span> <span class="token punctuation">></span></span> <span class="token tag"><span class="token tag"><span class="token punctuation"><</span> button</span> <span class="token attr-name">type</span> <span class="token attr-value"><span class="token punctuation">=</span> <span class="token punctuation">"</span> submit <span class="token punctuation">"</span></span> <span class="token attr-name">class</span> <span class="token attr-value"><span class="token punctuation">=</span> <span class="token punctuation">"</span> btn btn-success <span class="token punctuation">"</span></span> <span class="token punctuation">></span></span> <span class="token tag"><span class="token tag"><span class="token punctuation"><</span> i</span> <span class="token attr-name">class</span> <span class="token attr-value"><span class="token punctuation">=</span> <span class="token punctuation">"</span> fas fa-plus <span class="token punctuation">"</span></span> <span class="token punctuation">></span></span> <span class="token tag"><span class="token tag"><span class="token punctuation"></</span> i</span> <span class="token punctuation">></span></span> Add Task <span class="token tag"><span class="token tag"><span class="token punctuation"></</span> button</span> <span class="token punctuation">></span></span> <span class="token tag"><span class="token tag"><span class="token punctuation"></</span> div</span> <span class="token punctuation">></span></span> <span class="token tag"><span class="token tag"><span class="token punctuation"></</span> div</span> <span class="token punctuation">></span></span> <span class="token tag"><span class="token tag"><span class="token punctuation"></</span> div</span> <span class="token punctuation">></span></span> <span class="token tag"><span class="token tag"><span class="token punctuation"></</span> form</span> <span class="token punctuation">></span></span> <span class="token tag"><span class="token tag"><span class="token punctuation"></</span> div</span> <span class="token punctuation">></span></span> @if (count($tasks) > 0) <span class="token tag"><span class="token tag"><span class="token punctuation"><</span> div</span> <span class="token attr-name">class</span> <span class="token attr-value"><span class="token punctuation">=</span> <span class="token punctuation">"</span> card <span class="token punctuation">"</span></span> <span class="token punctuation">></span></span> <span class="token tag"><span class="token tag"><span class="token punctuation"><</span> h5</span> <span class="token attr-name">class</span> <span class="token attr-value"><span class="token punctuation">=</span> <span class="token punctuation">"</span> card-header <span class="token punctuation">"</span></span> <span class="token punctuation">></span></span> Current Tasks <span class="token tag"><span class="token tag"><span class="token punctuation"></</span> h5</span> <span class="token punctuation">></span></span> <span class="token tag"><span class="token tag"><span class="token punctuation"><</span> div</span> <span class="token attr-name">class</span> <span class="token attr-value"><span class="token punctuation">=</span> <span class="token punctuation">"</span> card-body <span class="token punctuation">"</span></span> <span class="token punctuation">></span></span> <span class="token tag"><span class="token tag"><span class="token punctuation"><</span> div</span> <span class="token attr-name">class</span> <span class="token attr-value"><span class="token punctuation">=</span> <span class="token punctuation">"</span> panel panel-default <span class="token punctuation">"</span></span> <span class="token punctuation">></span></span> <span class="token tag"><span class="token tag"><span class="token punctuation"><</span> div</span> <span class="token attr-name">class</span> <span class="token attr-value"><span class="token punctuation">=</span> <span class="token punctuation">"</span> panel-body <span class="token punctuation">"</span></span> <span class="token punctuation">></span></span> <span class="token tag"><span class="token tag"><span class="token punctuation"><</span> table</span> <span class="token attr-name">class</span> <span class="token attr-value"><span class="token punctuation">=</span> <span class="token punctuation">"</span> table table-striped task-table <span class="token punctuation">"</span></span> <span class="token punctuation">></span></span> <span class="token comment"><!-- Table Headings --></span> <span class="token tag"><span class="token tag"><span class="token punctuation"><</span> thead</span> <span class="token punctuation">></span></span> <span class="token tag"><span class="token tag"><span class="token punctuation"><</span> th</span> <span class="token punctuation">></span></span> Task <span class="token tag"><span class="token tag"><span class="token punctuation"></</span> th</span> <span class="token punctuation">></span></span> <span class="token tag"><span class="token tag"><span class="token punctuation"><</span> th</span> <span class="token punctuation">></span></span> Action <span class="token tag"><span class="token tag"><span class="token punctuation"></</span> th</span> <span class="token punctuation">></span></span> <span class="token tag"><span class="token tag"><span class="token punctuation"></</span> thead</span> <span class="token punctuation">></span></span> <span class="token tag"><span class="token tag"><span class="token punctuation"><</span> tbody</span> <span class="token punctuation">></span></span> @foreach ($tasks as $task) <span class="token tag"><span class="token tag"><span class="token punctuation"><</span> tr</span> <span class="token punctuation">></span></span> <span class="token tag"><span class="token tag"><span class="token punctuation"><</span> td</span> <span class="token attr-name">class</span> <span class="token attr-value"><span class="token punctuation">=</span> <span class="token punctuation">"</span> table-text <span class="token punctuation">"</span></span> <span class="token punctuation">></span></span> <span class="token tag"><span class="token tag"><span class="token punctuation"><</span> div</span> <span class="token punctuation">></span></span> {{ $task->name }} <span class="token tag"><span class="token tag"><span class="token punctuation"></</span> div</span> <span class="token punctuation">></span></span> <span class="token tag"><span class="token tag"><span class="token punctuation"></</span> td</span> <span class="token punctuation">></span></span> <span class="token tag"><span class="token tag"><span class="token punctuation"><</span> td</span> <span class="token punctuation">></span></span> <span class="token tag"><span class="token tag"><span class="token punctuation"><</span> form</span> <span class="token attr-name">action</span> <span class="token attr-value"><span class="token punctuation">=</span> <span class="token punctuation">"</span> {{ url( <span class="token punctuation">'</span> task/ <span class="token punctuation">'</span> .$task->id) }} <span class="token punctuation">"</span></span> <span class="token attr-name">method</span> <span class="token attr-value"><span class="token punctuation">=</span> <span class="token punctuation">"</span> POST <span class="token punctuation">"</span></span> <span class="token punctuation">></span></span> {{ csrf_field() }} {{ method_field('DELETE') }} <span class="token tag"><span class="token tag"><span class="token punctuation"><</span> button</span> <span class="token attr-name">type</span> <span class="token attr-value"><span class="token punctuation">=</span> <span class="token punctuation">"</span> submit <span class="token punctuation">"</span></span> <span class="token attr-name">class</span> <span class="token attr-value"><span class="token punctuation">=</span> <span class="token punctuation">"</span> btn btn-danger <span class="token punctuation">"</span></span> <span class="token punctuation">></span></span> <span class="token tag"><span class="token tag"><span class="token punctuation"><</span> i</span> <span class="token attr-name">class</span> <span class="token attr-value"><span class="token punctuation">=</span> <span class="token punctuation">"</span> fa fa-trash <span class="token punctuation">"</span></span> <span class="token punctuation">></span></span> <span class="token tag"><span class="token tag"><span class="token punctuation"></</span> i</span> <span class="token punctuation">></span></span> Delete <span class="token tag"><span class="token tag"><span class="token punctuation"></</span> button</span> <span class="token punctuation">></span></span> <span class="token tag"><span class="token tag"><span class="token punctuation"></</span> form</span> <span class="token punctuation">></span></span> <span class="token tag"><span class="token tag"><span class="token punctuation"></</span> td</span> <span class="token punctuation">></span></span> <span class="token tag"><span class="token tag"><span class="token punctuation"></</span> tr</span> <span class="token punctuation">></span></span> @endforeach <span class="token tag"><span class="token tag"><span class="token punctuation"></</span> tbody</span> <span class="token punctuation">></span></span> <span class="token tag"><span class="token tag"><span class="token punctuation"></</span> table</span> <span class="token punctuation">></span></span> <span class="token tag"><span class="token tag"><span class="token punctuation"></</span> div</span> <span class="token punctuation">></span></span> <span class="token tag"><span class="token tag"><span class="token punctuation"></</span> div</span> <span class="token punctuation">></span></span> <span class="token tag"><span class="token tag"><span class="token punctuation"></</span> div</span> <span class="token punctuation">></span></span> <span class="token tag"><span class="token tag"><span class="token punctuation"></</span> div</span> <span class="token punctuation">></span></span> @endif @endsection |
Then, the complete interface we get will be: 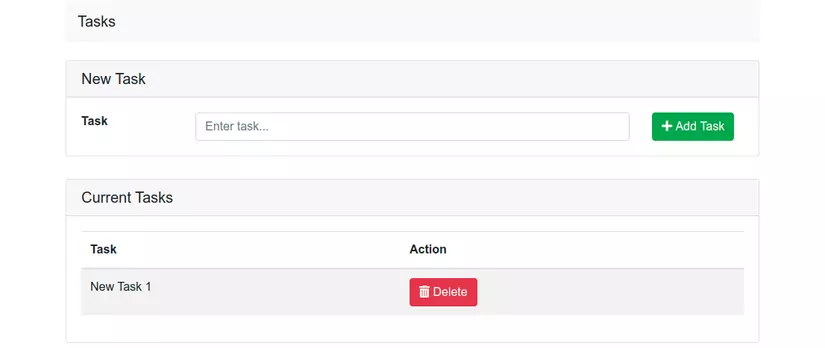
The interface is a bit stupid, please ignore it =)
6. Send Email
Now comes our main function of emailing.
B1. Config file .env
Because I use Gmail to send, I’ll configure it according to Gmail. You find the content and correct as below:
1 2 3 4 5 6 7 | <span class="token constant">MAIL_DRIVER</span> <span class="token operator">=</span> smtp <span class="token constant">MAIL_HOST</span> <span class="token operator">=</span> smtp <span class="token punctuation">.</span> gmail <span class="token punctuation">.</span> com <span class="token constant">MAIL_PORT</span> <span class="token operator">=</span> <span class="token number">587</span> <span class="token constant">MAIL_USERNAME</span> <span class="token operator">=</span> <a class="__cf_email__" href="/cdn-cgi/l/email-protection">[email protected]</a> mail <span class="token punctuation">.</span> com <span class="token constant">MAIL_PASSWORD</span> <span class="token operator">=</span> your_password <span class="token constant">MAIL_ENCRYPTION</span> <span class="token operator">=</span> tls |
When using Gmail:
- MAIL_DRIVER (mail delivery method) is smtp.
- MAIL_HOST (host) of Gmail is smtp.gmail.com .
- MAIL_PORT (port connected to Gmail) is 587.
- MAIL_USERNAME is your own gmail.
- MAIL_PASSWORD is your gmail password.
When using a password, you need to pay attention to a few things:
If your Gmail has two-factor Authentication turned on, then you need to create a one-time gmail application password to be able to use it, if you enter the gmail password, it cannot be used in the field. this match. I don’t encourage you to drop this advanced security layer. (At the end of this article, I will show you how to get an application password of gmail)
So, the config steps have been completed.
B2. Treatment
I will email you when I create or delete a task.
B2.1. Create a job
First I will create a job to use to get the job every time the controller prepares to return to the result. Here is the job email:
1 2 | php artisan make <span class="token punctuation">:</span> job SendEmail |
After running the above command, I will have a file that is app/Jobs/SendEmail.php
1 2 3 4 5 6 7 8 9 10 11 12 13 14 15 16 17 18 19 20 21 22 23 24 25 26 27 28 29 30 31 32 33 34 35 36 37 38 39 40 41 42 43 | <span class="token php language-php"><span class="token delimiter important"><?php</span> <span class="token keyword">namespace</span> <span class="token package">App Jobs</span> <span class="token punctuation">;</span> <span class="token keyword">use</span> <span class="token package">Mail</span> <span class="token punctuation">;</span> <span class="token keyword">use</span> <span class="token package">App Mail MailNotify</span> <span class="token punctuation">;</span> <span class="token keyword">use</span> <span class="token package">Illuminate Bus Queueable</span> <span class="token punctuation">;</span> <span class="token keyword">use</span> <span class="token package">Illuminate Contracts Queue ShouldQueue</span> <span class="token punctuation">;</span> <span class="token keyword">use</span> <span class="token package">Illuminate Foundation Bus Dispatchable</span> <span class="token punctuation">;</span> <span class="token keyword">use</span> <span class="token package">Illuminate Queue InteractsWithQueue</span> <span class="token punctuation">;</span> <span class="token keyword">use</span> <span class="token package">Illuminate Queue SerializesModels</span> <span class="token punctuation">;</span> <span class="token keyword">class</span> <span class="token class-name">SendEmail</span> <span class="token keyword">implements</span> <span class="token class-name">ShouldQueue</span> <span class="token punctuation">{</span> <span class="token keyword">use</span> <span class="token package">Dispatchable</span> <span class="token punctuation">,</span> InteractsWithQueue <span class="token punctuation">,</span> Queueable <span class="token punctuation">,</span> SerializesModels <span class="token punctuation">;</span> <span class="token keyword">protected</span> <span class="token variable">$data</span> <span class="token punctuation">;</span> <span class="token keyword">protected</span> <span class="token variable">$users</span> <span class="token punctuation">;</span> <span class="token comment">/** * Create a new job instance. * * @param $data */</span> <span class="token keyword">public</span> <span class="token keyword">function</span> <span class="token function">__construct</span> <span class="token punctuation">(</span> <span class="token variable">$data</span> <span class="token punctuation">,</span> <span class="token variable">$users</span> <span class="token punctuation">)</span> <span class="token punctuation">{</span> <span class="token variable">$this</span> <span class="token operator">-</span> <span class="token operator">></span> <span class="token property">data</span> <span class="token operator">=</span> <span class="token variable">$data</span> <span class="token punctuation">;</span> <span class="token variable">$this</span> <span class="token operator">-</span> <span class="token operator">></span> <span class="token property">users</span> <span class="token operator">=</span> <span class="token variable">$users</span> <span class="token punctuation">;</span> <span class="token punctuation">}</span> <span class="token comment">/** * Execute the job. * * @return void */</span> <span class="token keyword">public</span> <span class="token keyword">function</span> <span class="token function">handle</span> <span class="token punctuation">(</span> <span class="token punctuation">)</span> <span class="token punctuation">{</span> <span class="token keyword">foreach</span> <span class="token punctuation">(</span> <span class="token variable">$this</span> <span class="token operator">-</span> <span class="token operator">></span> <span class="token property">users</span> <span class="token keyword">as</span> <span class="token variable">$user</span> <span class="token punctuation">)</span> <span class="token punctuation">{</span> Mail <span class="token punctuation">:</span> <span class="token punctuation">:</span> <span class="token function">to</span> <span class="token punctuation">(</span> <span class="token variable">$user</span> <span class="token operator">-</span> <span class="token operator">></span> <span class="token property">email</span> <span class="token punctuation">)</span> <span class="token operator">-</span> <span class="token operator">></span> <span class="token function">send</span> <span class="token punctuation">(</span> <span class="token keyword">new</span> <span class="token class-name">MailNotify</span> <span class="token punctuation">(</span> <span class="token variable">$this</span> <span class="token operator">-</span> <span class="token operator">></span> <span class="token property">data</span> <span class="token punctuation">)</span> <span class="token punctuation">)</span> <span class="token punctuation">;</span> <span class="token punctuation">}</span> <span class="token punctuation">}</span> <span class="token punctuation">}</span> </span> |
Inside this file will be tasked with receiving information including $message và $users where $message is the message and $users is the range of users that will send from the controller. Next is to perform the job of sending email to users with the content of the email will be received again when calling Notification .
B2.2. Create Mailable
1 2 | php artisan make:mail MailNotify |
1 2 3 4 5 6 7 8 9 10 11 12 13 14 15 16 17 18 19 20 21 22 23 24 25 26 27 28 29 30 31 32 33 34 35 36 37 38 | <span class="token php language-php"><span class="token delimiter important"><?php</span> <span class="token keyword">namespace</span> <span class="token package">App Mail</span> <span class="token punctuation">;</span> <span class="token keyword">use</span> <span class="token package">Illuminate Bus Queueable</span> <span class="token punctuation">;</span> <span class="token keyword">use</span> <span class="token package">Illuminate Contracts Queue ShouldQueue</span> <span class="token punctuation">;</span> <span class="token keyword">use</span> <span class="token package">Illuminate Mail Mailable</span> <span class="token punctuation">;</span> <span class="token keyword">use</span> <span class="token package">Illuminate Queue SerializesModels</span> <span class="token punctuation">;</span> <span class="token keyword">class</span> <span class="token class-name">MailNotify</span> <span class="token keyword">extends</span> <span class="token class-name">Mailable</span> <span class="token punctuation">{</span> <span class="token keyword">use</span> <span class="token package">Queueable</span> <span class="token punctuation">,</span> SerializesModels <span class="token punctuation">;</span> <span class="token keyword">public</span> <span class="token variable">$data</span> <span class="token punctuation">;</span> <span class="token comment">/** * Create a new data instance. * * @return void */</span> <span class="token keyword">public</span> <span class="token keyword">function</span> <span class="token function">__construct</span> <span class="token punctuation">(</span> <span class="token variable">$data</span> <span class="token punctuation">)</span> <span class="token punctuation">{</span> <span class="token variable">$this</span> <span class="token operator">-</span> <span class="token operator">></span> <span class="token property">data</span> <span class="token operator">=</span> <span class="token variable">$data</span> <span class="token punctuation">;</span> <span class="token punctuation">}</span> <span class="token comment">/** * Build the message. * * @return $this */</span> <span class="token keyword">public</span> <span class="token keyword">function</span> <span class="token function">build</span> <span class="token punctuation">(</span> <span class="token punctuation">)</span> <span class="token punctuation">{</span> <span class="token keyword">return</span> <span class="token variable">$this</span> <span class="token operator">-</span> <span class="token operator">></span> <span class="token function">from</span> <span class="token punctuation">(</span> <span class="token single-quoted-string string">' <a class="__cf_email__" href="/cdn-cgi/l/email-protection">[email protected]</a> '</span> <span class="token punctuation">)</span> <span class="token operator">-</span> <span class="token operator">></span> <span class="token function">view</span> <span class="token punctuation">(</span> <span class="token single-quoted-string string">'mails.mail-notify'</span> <span class="token punctuation">)</span> <span class="token operator">-</span> <span class="token operator">></span> <span class="token function">subject</span> <span class="token punctuation">(</span> <span class="token single-quoted-string string">'Notification email'</span> <span class="token punctuation">)</span> <span class="token punctuation">;</span> <span class="token punctuation">}</span> <span class="token punctuation">}</span> </span> |
B2.3. Create template for mail
I will use a blade.php file to create the interface for the email I will send
1 2 3 4 5 6 | ~~ resources/views/mails/mail-notify ~~ <span class="token tag"><span class="token tag"><span class="token punctuation"><</span> div</span> <span class="token punctuation">></span></span> <span class="token tag"><span class="token tag"><span class="token punctuation"><</span> h2</span> <span class="token punctuation">></span></span> {{ $data['type'] }} <span class="token tag"><span class="token tag"><span class="token punctuation"></</span> h2</span> <span class="token punctuation">></span></span> <span class="token tag"><span class="token tag"><span class="token punctuation"><</span> p</span> <span class="token punctuation">></span></span> <span class="token tag"><span class="token tag"><span class="token punctuation"><</span> b</span> <span class="token punctuation">></span></span> {{ $data['task'] }} <span class="token tag"><span class="token tag"><span class="token punctuation"></</span> b</span> <span class="token punctuation">></span></span> {{ $data['content'] }} <span class="token tag"><span class="token tag"><span class="token punctuation"></</span> p</span> <span class="token punctuation">></span></span> <span class="token tag"><span class="token tag"><span class="token punctuation"></</span> div</span> <span class="token punctuation">></span></span> |
You can customize this template yourself or you can use it as it is here =)))
B2.4. Get data from the Controller
In function store() of Controller, I will fix as follows:
1 2 3 4 5 6 7 8 9 10 11 12 13 14 15 16 17 | <span class="token keyword">public</span> <span class="token keyword">function</span> <span class="token function">store</span> <span class="token punctuation">(</span> Request <span class="token variable">$request</span> <span class="token punctuation">)</span> <span class="token punctuation">{</span> <span class="token variable">$task</span> <span class="token operator">=</span> <span class="token keyword">new</span> <span class="token class-name">Task</span> <span class="token punctuation">(</span> <span class="token punctuation">)</span> <span class="token punctuation">;</span> <span class="token variable">$task</span> <span class="token operator">-</span> <span class="token operator">></span> <span class="token property">name</span> <span class="token operator">=</span> <span class="token variable">$request</span> <span class="token operator">-</span> <span class="token operator">></span> <span class="token property">name</span> <span class="token punctuation">;</span> <span class="token variable">$task</span> <span class="token operator">-</span> <span class="token operator">></span> <span class="token function">save</span> <span class="token punctuation">(</span> <span class="token punctuation">)</span> <span class="token punctuation">;</span> <span class="token variable">$users</span> <span class="token operator">=</span> User <span class="token punctuation">:</span> <span class="token punctuation">:</span> <span class="token function">all</span> <span class="token punctuation">(</span> <span class="token punctuation">)</span> <span class="token punctuation">;</span> <span class="token variable">$message</span> <span class="token operator">=</span> <span class="token punctuation">[</span> <span class="token single-quoted-string string">'type'</span> <span class="token operator">=</span> <span class="token operator">></span> <span class="token single-quoted-string string">'Create task'</span> <span class="token punctuation">,</span> <span class="token single-quoted-string string">'task'</span> <span class="token operator">=</span> <span class="token operator">></span> <span class="token variable">$task</span> <span class="token operator">-</span> <span class="token operator">></span> <span class="token property">name</span> <span class="token punctuation">,</span> <span class="token single-quoted-string string">'content'</span> <span class="token operator">=</span> <span class="token operator">></span> <span class="token single-quoted-string string">'has been created!'</span> <span class="token punctuation">,</span> <span class="token punctuation">]</span> <span class="token punctuation">;</span> SendEmail <span class="token punctuation">:</span> <span class="token punctuation">:</span> <span class="token function">dispatch</span> <span class="token punctuation">(</span> <span class="token variable">$message</span> <span class="token punctuation">,</span> <span class="token variable">$users</span> <span class="token punctuation">)</span> <span class="token operator">-</span> <span class="token operator">></span> <span class="token function">delay</span> <span class="token punctuation">(</span> <span class="token function">now</span> <span class="token punctuation">(</span> <span class="token punctuation">)</span> <span class="token operator">-</span> <span class="token operator">></span> <span class="token function">addMinute</span> <span class="token punctuation">(</span> <span class="token number">1</span> <span class="token punctuation">)</span> <span class="token punctuation">)</span> <span class="token punctuation">;</span> <span class="token keyword">return</span> <span class="token function">redirect</span> <span class="token punctuation">(</span> <span class="token punctuation">)</span> <span class="token operator">-</span> <span class="token operator">></span> <span class="token function">back</span> <span class="token punctuation">(</span> <span class="token punctuation">)</span> <span class="token punctuation">;</span> <span class="token punctuation">}</span> |
Here I add two variables, $users and $message to retrieve all users in the database and create messages for actions, and then send both into the SendEmail job to send mail. The same goes for function delete()
1 2 3 4 5 6 7 8 9 10 11 12 13 14 15 16 | <span class="token keyword">public</span> <span class="token keyword">function</span> <span class="token function">delete</span> <span class="token punctuation">(</span> <span class="token variable">$id</span> <span class="token punctuation">)</span> <span class="token punctuation">{</span> <span class="token variable">$task</span> <span class="token operator">=</span> Task <span class="token punctuation">:</span> <span class="token punctuation">:</span> <span class="token function">find</span> <span class="token punctuation">(</span> <span class="token variable">$id</span> <span class="token punctuation">)</span> <span class="token punctuation">;</span> <span class="token variable">$task</span> <span class="token operator">-</span> <span class="token operator">></span> <span class="token function">delete</span> <span class="token punctuation">(</span> <span class="token punctuation">)</span> <span class="token punctuation">;</span> <span class="token variable">$users</span> <span class="token operator">=</span> User <span class="token punctuation">:</span> <span class="token punctuation">:</span> <span class="token function">all</span> <span class="token punctuation">(</span> <span class="token punctuation">)</span> <span class="token punctuation">;</span> <span class="token variable">$message</span> <span class="token operator">=</span> <span class="token punctuation">[</span> <span class="token single-quoted-string string">'type'</span> <span class="token operator">=</span> <span class="token operator">></span> <span class="token single-quoted-string string">'Delete task'</span> <span class="token punctuation">,</span> <span class="token single-quoted-string string">'task'</span> <span class="token operator">=</span> <span class="token operator">></span> <span class="token variable">$task</span> <span class="token operator">-</span> <span class="token operator">></span> <span class="token property">name</span> <span class="token punctuation">,</span> <span class="token single-quoted-string string">'content'</span> <span class="token operator">=</span> <span class="token operator">></span> <span class="token single-quoted-string string">'has been deleted!'</span> <span class="token punctuation">,</span> <span class="token punctuation">]</span> <span class="token punctuation">;</span> SendEmail <span class="token punctuation">:</span> <span class="token punctuation">:</span> <span class="token function">dispatch</span> <span class="token punctuation">(</span> <span class="token variable">$message</span> <span class="token punctuation">,</span> <span class="token variable">$users</span> <span class="token punctuation">)</span> <span class="token operator">-</span> <span class="token operator">></span> <span class="token function">delay</span> <span class="token punctuation">(</span> <span class="token function">now</span> <span class="token punctuation">(</span> <span class="token punctuation">)</span> <span class="token operator">-</span> <span class="token operator">></span> <span class="token function">addMinute</span> <span class="token punctuation">(</span> <span class="token number">1</span> <span class="token punctuation">)</span> <span class="token punctuation">)</span> <span class="token punctuation">;</span> <span class="token keyword">return</span> <span class="token function">redirect</span> <span class="token punctuation">(</span> <span class="token punctuation">)</span> <span class="token operator">-</span> <span class="token operator">></span> <span class="token function">back</span> <span class="token punctuation">(</span> <span class="token punctuation">)</span> <span class="token punctuation">;</span> <span class="token punctuation">}</span> |
B3. Run the project
The work is done and now let’s run the program together 1 time. 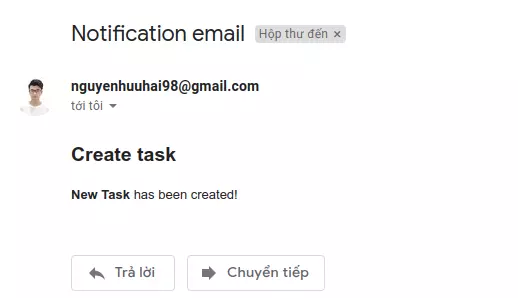 And this is my accomplishment.
Instructions for obtaining Gmail application passwords
As I said above, if you use Gmail’s 2-layer security, you need to have an application password to use this emailing function. So here I will guide you to get the password of gmail application.
First, you access the Google account management page here . After accessing and logging in, you will see the following screen: 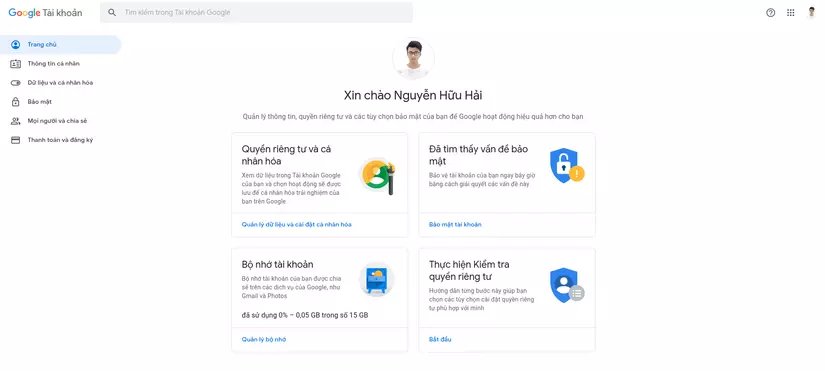
In the left column, select Security . 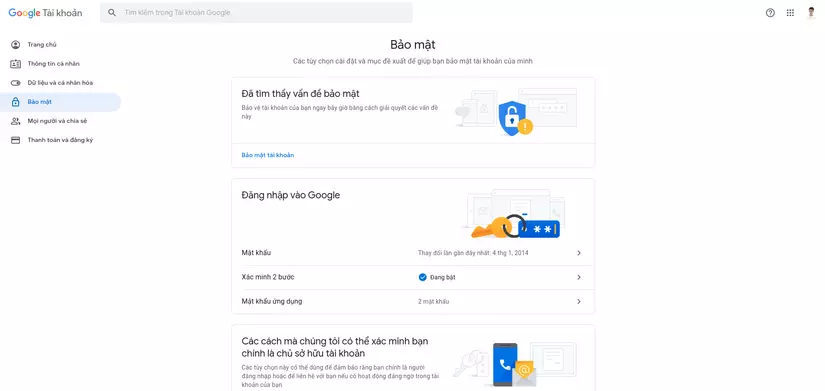
Here, you can see the Sign in to Google section with 2-Step Verification turned on, which means your account is protected with advanced security.
Next you choose the Application Password , this time Google will ask you to enter the password again. After entering the password again, you will see this screen. 
You will now select Apps and Devices , then click Create . 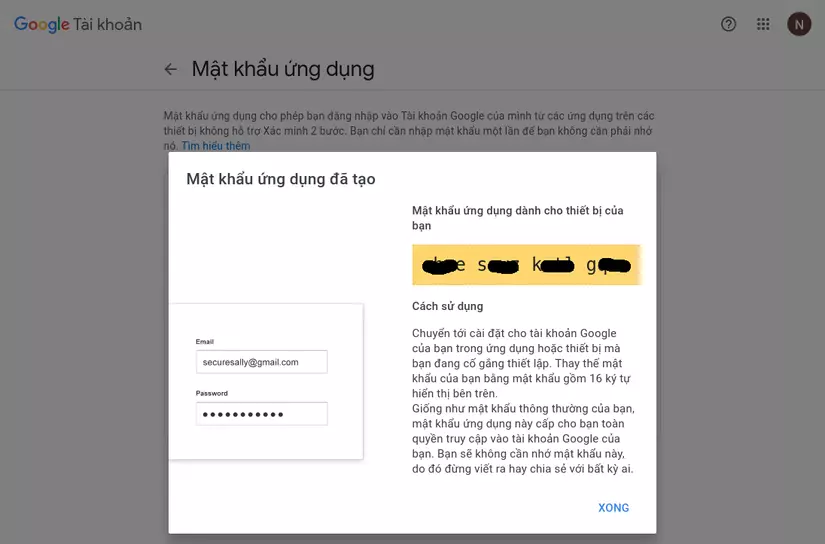
After Generating, you will receive a string of 16 characters, which is your application password . You use this password to paste in the MAIL_PASSWORD section of the project above.
summary
That’s it, I have just guided you through the function of sending email through using Job, Mailable of Laravel with a small project. I still got a little bit skewed, so I hope you guys ignore it. =))) If you succeed, do not regret giving me an upvote (kamsamita)
Reference: https://laravel.com/docs/6.x/mail