HTML5 Canvas
Hello everyone, I have just learned a bit about HTML5 canvas so today I will guide you to create a romantic snowy sky. 
So what is HTML5 Canvas?
1. What is a canvas?
Canvas is an element of HTML5 that allows graphical rendering of two-dimensional objects on web pages. Canvas occupies an area of a webpage with a predefined width and height. Then use Javascript that can access this area to draw through a set of graphical functions similar to other 2D APIs. 
2. How to create snowfall with canvas and javascript
- Initialize and resizing canvas
First, create an html <canvas /> tag in your index.html file
index.html
1 2 3 4 5 6 7 8 9 10 11 | <span class="token operator"><</span> <span class="token operator">!</span> <span class="token constant">DOCTYPE</span> html <span class="token operator">></span> <span class="token operator"><</span> html <span class="token operator">></span> <span class="token operator"><</span> head <span class="token operator">></span> <span class="token operator"><</span> meta charset <span class="token operator">=</span> <span class="token string">"UTF-8"</span> <span class="token operator">></span> <span class="token operator"><</span> title <span class="token operator">></span> Canvas <span class="token constant">HTML5</span> <span class="token operator"><</span> <span class="token operator">/</span> title <span class="token operator">></span> <span class="token operator"><</span> <span class="token operator">/</span> head <span class="token operator">></span> <span class="token operator"><</span> body <span class="token operator">></span> <span class="token operator"><</span> canvas id <span class="token operator">=</span> <span class="token string">"canvas"</span> <span class="token operator">/</span> <span class="token operator">></span> <span class="token operator"><</span> <span class="token operator">/</span> body <span class="token operator">></span> <span class="token operator"><</span> <span class="token operator">/</span> html <span class="token operator">></span> |
Give your <canvas> an id , and here I give it an id="canvas"
Now we will proceed to initialize the canvas in the javascript file, remember to link this script file to your index.html file.
index.js
1 2 3 4 5 6 7 | <span class="token keyword">const</span> canvas <span class="token operator">=</span> document <span class="token punctuation">.</span> <span class="token function">getElementById</span> <span class="token punctuation">(</span> <span class="token string">'canvas'</span> <span class="token punctuation">)</span> <span class="token punctuation">;</span> <span class="token keyword">const</span> c <span class="token operator">=</span> canvas <span class="token punctuation">.</span> <span class="token function">getContext</span> <span class="token punctuation">(</span> <span class="token string">'2d'</span> <span class="token punctuation">)</span> <span class="token punctuation">;</span> canvas <span class="token punctuation">.</span> width <span class="token operator">=</span> window <span class="token punctuation">.</span> innerWidth <span class="token punctuation">;</span> canvas <span class="token punctuation">.</span> height <span class="token operator">=</span> window <span class="token punctuation">.</span> innerHeight <span class="token punctuation">;</span> |
getContext('2d') is a method that returns an Object providing methods and properties that we can draw on the canvas. Default <canvas> will be a rectangle, we set the length, width for it to equal the length and width of the window (depending on the problem to set the size for it). In order for the size of the canvas to be dynamic according to the size of the window , we will listen for the window resize event to resize the canvas.
index.js
1 2 3 4 5 | window <span class="token punctuation">.</span> <span class="token function">addEventListener</span> <span class="token punctuation">(</span> <span class="token string">'resize'</span> <span class="token punctuation">,</span> <span class="token keyword">function</span> <span class="token punctuation">(</span> <span class="token punctuation">)</span> <span class="token punctuation">{</span> canvas <span class="token punctuation">.</span> width <span class="token operator">=</span> window <span class="token punctuation">.</span> innerWidth <span class="token punctuation">;</span> canvas <span class="token punctuation">.</span> height <span class="token operator">=</span> window <span class="token punctuation">.</span> innerHeight <span class="token punctuation">;</span> <span class="token punctuation">}</span> <span class="token punctuation">)</span> |
- Draw element in canvas
Now draw elements or shapes in the canvas, in this demo we will draw a snowflake (circle).
1 2 3 4 5 6 7 8 | c <span class="token punctuation">.</span> <span class="token function">beginPath</span> <span class="token punctuation">(</span> <span class="token punctuation">)</span> <span class="token punctuation">;</span> c <span class="token punctuation">.</span> <span class="token function">arc</span> <span class="token punctuation">(</span> <span class="token number">100</span> <span class="token punctuation">,</span> <span class="token number">100</span> <span class="token punctuation">,</span> <span class="token number">7</span> <span class="token punctuation">,</span> <span class="token number">0</span> <span class="token punctuation">,</span> Math <span class="token punctuation">.</span> <span class="token constant">PI</span> <span class="token operator">*</span> <span class="token number">2</span> <span class="token punctuation">)</span> <span class="token punctuation">;</span> c <span class="token punctuation">.</span> shadowColor <span class="token operator">=</span> <span class="token string">'#fff'</span> <span class="token punctuation">;</span> c <span class="token punctuation">.</span> shadowBlur <span class="token operator">=</span> <span class="token number">5</span> <span class="token punctuation">;</span> c <span class="token punctuation">.</span> fillStyle <span class="token operator">=</span> <span class="token string">'#fff'</span> <span class="token punctuation">;</span> c <span class="token punctuation">.</span> <span class="token function">fill</span> <span class="token punctuation">(</span> <span class="token punctuation">)</span> <span class="token punctuation">;</span> c <span class="token punctuation">.</span> <span class="token function">closePath</span> <span class="token punctuation">(</span> <span class="token punctuation">)</span> <span class="token punctuation">;</span> |
arc(x, y, radius, 0, 2PI) is a method for drawing a circle.
Inside:
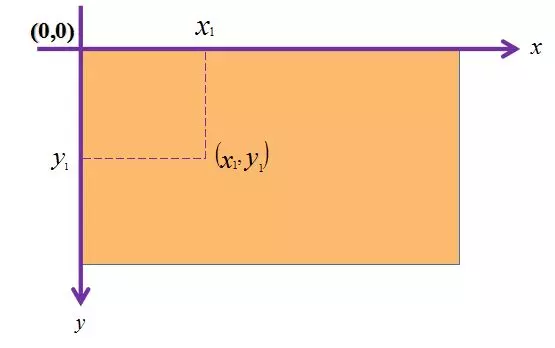
- x, y: is the position of the circle compared to the canvas.
- radius: the radius of the circle.
- 0, PI * 2: 1 round of the circle
To learn more about the different shapes and volume of the c you learn more in here, please:
https://www.w3schools.com/html/html5_canvas.asp
And this is the result
You can style the background for the canvas as a demo.
- Animating element in canvas
We can see that to animate the position of the ‘snowflake’ will change meaning that the coordinates (x, y) of the ‘snowflake’ will change continuously. To continue, I will build ‘snowflakes’ as an object with the attributes x, y, radius and color.
1 2 3 4 5 6 7 8 9 10 11 12 13 14 15 16 17 | <span class="token keyword">function</span> <span class="token function">snow</span> <span class="token punctuation">(</span> <span class="token punctuation">)</span> <span class="token punctuation">{</span> <span class="token keyword">this</span> <span class="token punctuation">.</span> radius <span class="token operator">=</span> Math <span class="token punctuation">.</span> <span class="token function">random</span> <span class="token punctuation">(</span> <span class="token punctuation">)</span> <span class="token operator">*</span> <span class="token number">5</span> <span class="token punctuation">;</span> <span class="token keyword">this</span> <span class="token punctuation">.</span> x <span class="token operator">=</span> Math <span class="token punctuation">.</span> <span class="token function">floor</span> <span class="token punctuation">(</span> Math <span class="token punctuation">.</span> <span class="token function">random</span> <span class="token punctuation">(</span> <span class="token punctuation">)</span> <span class="token operator">*</span> canvas <span class="token punctuation">.</span> width <span class="token punctuation">)</span> <span class="token punctuation">;</span> <span class="token keyword">this</span> <span class="token punctuation">.</span> y <span class="token operator">=</span> <span class="token number">100</span> <span class="token punctuation">;</span> <span class="token keyword">this</span> <span class="token punctuation">.</span> color <span class="token operator">=</span> <span class="token string">'#FFF'</span> <span class="token punctuation">;</span> <span class="token punctuation">}</span> snow <span class="token punctuation">.</span> prototype <span class="token punctuation">.</span> <span class="token function-variable function">draw</span> <span class="token operator">=</span> <span class="token keyword">function</span> <span class="token punctuation">(</span> <span class="token punctuation">)</span> <span class="token punctuation">{</span> c <span class="token punctuation">.</span> <span class="token function">beginPath</span> <span class="token punctuation">(</span> <span class="token punctuation">)</span> <span class="token punctuation">;</span> c <span class="token punctuation">.</span> <span class="token function">arc</span> <span class="token punctuation">(</span> <span class="token keyword">this</span> <span class="token punctuation">.</span> x <span class="token punctuation">,</span> <span class="token keyword">this</span> <span class="token punctuation">.</span> y <span class="token punctuation">,</span> <span class="token keyword">this</span> <span class="token punctuation">.</span> radius <span class="token punctuation">,</span> <span class="token number">0</span> <span class="token punctuation">,</span> Math <span class="token punctuation">.</span> <span class="token constant">PI</span> <span class="token operator">*</span> <span class="token number">2</span> <span class="token punctuation">)</span> <span class="token punctuation">;</span> c <span class="token punctuation">.</span> shadowColor <span class="token operator">=</span> <span class="token keyword">this</span> <span class="token punctuation">.</span> color <span class="token punctuation">;</span> c <span class="token punctuation">.</span> shadowBlur <span class="token operator">=</span> <span class="token number">5</span> <span class="token punctuation">;</span> c <span class="token punctuation">.</span> fillStyle <span class="token operator">=</span> <span class="token keyword">this</span> <span class="token punctuation">.</span> color <span class="token punctuation">;</span> c <span class="token punctuation">.</span> <span class="token function">fill</span> <span class="token punctuation">(</span> <span class="token punctuation">)</span> <span class="token punctuation">;</span> c <span class="token punctuation">.</span> <span class="token function">closePath</span> <span class="token punctuation">(</span> <span class="token punctuation">)</span> <span class="token punctuation">;</span> <span class="token punctuation">}</span> |
this.x will be random from 0 to the width of the canvas.
this.y = - this.radius creates a ‘snowflake’ effect that always falls from the top.
Now we are going to change x and y, we have a ‘snowflake falling. 
1 2 3 4 5 6 7 8 9 10 11 12 13 14 15 16 17 18 | <span class="token keyword">function</span> <span class="token function">snow</span> <span class="token punctuation">(</span> <span class="token punctuation">)</span> <span class="token punctuation">{</span> <span class="token operator">...</span> <span class="token keyword">this</span> <span class="token punctuation">.</span> speed <span class="token operator">=</span> <span class="token punctuation">{</span> x <span class="token punctuation">:</span> Math <span class="token punctuation">.</span> <span class="token function">random</span> <span class="token punctuation">(</span> <span class="token punctuation">)</span> <span class="token operator">*</span> <span class="token number">4</span> <span class="token operator">-</span> <span class="token number">2</span> <span class="token punctuation">,</span> y <span class="token punctuation">:</span> Math <span class="token punctuation">.</span> <span class="token function">random</span> <span class="token punctuation">(</span> <span class="token punctuation">)</span> <span class="token operator">*</span> <span class="token number">3</span> <span class="token operator">+</span> <span class="token number">2</span> <span class="token punctuation">,</span> <span class="token punctuation">}</span> <span class="token punctuation">}</span> snow <span class="token punctuation">.</span> prototype <span class="token punctuation">.</span> <span class="token function-variable function">update</span> <span class="token operator">=</span> <span class="token keyword">function</span> <span class="token punctuation">(</span> <span class="token punctuation">)</span> <span class="token punctuation">{</span> <span class="token keyword">this</span> <span class="token punctuation">.</span> x <span class="token operator">+=</span> <span class="token keyword">this</span> <span class="token punctuation">.</span> speed <span class="token punctuation">.</span> x <span class="token punctuation">;</span> <span class="token keyword">this</span> <span class="token punctuation">.</span> y <span class="token operator">+=</span> <span class="token keyword">this</span> <span class="token punctuation">.</span> speed <span class="token punctuation">.</span> y <span class="token punctuation">;</span> <span class="token keyword">if</span> <span class="token punctuation">(</span> <span class="token keyword">this</span> <span class="token punctuation">.</span> y <span class="token operator">>=</span> canvas <span class="token punctuation">.</span> height <span class="token punctuation">)</span> <span class="token keyword">this</span> <span class="token punctuation">.</span> speed <span class="token punctuation">.</span> y <span class="token operator">=</span> <span class="token number">0</span> <span class="token punctuation">;</span> <span class="token keyword">this</span> <span class="token punctuation">.</span> <span class="token function">draw</span> <span class="token punctuation">(</span> <span class="token punctuation">)</span> <span class="token punctuation">;</span> <span class="token punctuation">}</span> |
I will add a speed attribute for the snow to show its falling speed. To be able to retain my snow below the canvas, I added the condition this.y > canvas.height
And the most important thing now is that we need to handle the x and y changes continuously. Don’t worry window.requestAnimationFrame will help you do that.
When we want to make a time loop in JavaScript we immediately think of setInterval() . However, my goal is to do animation, to make an animation smooth, we need 60 frames / 1s like this
setInterval(function() { // chay animation ở đây }, 1000/60);
However we have a better way than the above, using window.requestAnimationFrame() . To learn more about it, you can refer here:
https://developer.mozilla.org/en-US/docs/Web/API/window/requestAnimationFrame
Continue with our demo
1 2 3 4 5 6 7 8 | <span class="token keyword">function</span> <span class="token function">animate</span> <span class="token punctuation">(</span> <span class="token punctuation">)</span> <span class="token punctuation">{</span> c <span class="token punctuation">.</span> <span class="token function">clearRect</span> <span class="token punctuation">(</span> <span class="token number">0</span> <span class="token punctuation">,</span> <span class="token number">0</span> <span class="token punctuation">,</span> canvas <span class="token punctuation">.</span> width <span class="token punctuation">,</span> canvas <span class="token punctuation">.</span> height <span class="token punctuation">)</span> <span class="token punctuation">;</span> a <span class="token punctuation">.</span> <span class="token function">update</span> <span class="token punctuation">(</span> <span class="token punctuation">)</span> <span class="token punctuation">;</span> window <span class="token punctuation">.</span> <span class="token function">requestAnimationFrame</span> <span class="token punctuation">(</span> animate <span class="token punctuation">)</span> <span class="token punctuation">;</span> <span class="token punctuation">}</span> <span class="token function">animate</span> <span class="token punctuation">(</span> <span class="token punctuation">)</span> <span class="token punctuation">;</span> |
clearReact helps us remove old animation after animate is called.
Result
And finally, just a snowflake is not winter, there must be a lot of new snow is not true
The rest is easy
1 2 3 4 5 6 7 8 9 10 11 12 13 14 15 16 17 18 19 20 | <span class="token keyword">const</span> arr <span class="token operator">=</span> <span class="token punctuation">[</span> <span class="token punctuation">]</span> <span class="token punctuation">;</span> <span class="token keyword">function</span> <span class="token function">init</span> <span class="token punctuation">(</span> <span class="token punctuation">)</span> <span class="token punctuation">{</span> arr <span class="token punctuation">.</span> <span class="token function">push</span> <span class="token punctuation">(</span> <span class="token keyword">new</span> <span class="token class-name">snow</span> <span class="token punctuation">(</span> <span class="token punctuation">)</span> <span class="token punctuation">)</span> <span class="token punctuation">;</span> <span class="token punctuation">}</span> <span class="token keyword">function</span> <span class="token function">animate</span> <span class="token punctuation">(</span> <span class="token punctuation">)</span> <span class="token punctuation">{</span> c <span class="token punctuation">.</span> <span class="token function">clearRect</span> <span class="token punctuation">(</span> <span class="token number">0</span> <span class="token punctuation">,</span> <span class="token number">0</span> <span class="token punctuation">,</span> canvas <span class="token punctuation">.</span> width <span class="token punctuation">,</span> canvas <span class="token punctuation">.</span> height <span class="token punctuation">)</span> <span class="token punctuation">;</span> arr <span class="token punctuation">.</span> <span class="token function">forEach</span> <span class="token punctuation">(</span> <span class="token keyword">function</span> <span class="token punctuation">(</span> item <span class="token punctuation">)</span> <span class="token punctuation">{</span> item <span class="token punctuation">.</span> <span class="token function">update</span> <span class="token punctuation">(</span> <span class="token punctuation">)</span> <span class="token punctuation">;</span> <span class="token punctuation">}</span> <span class="token punctuation">)</span> <span class="token keyword">if</span> <span class="token punctuation">(</span> arr <span class="token punctuation">.</span> length <span class="token operator">></span> <span class="token number">1000</span> <span class="token punctuation">)</span> <span class="token punctuation">{</span> arr <span class="token punctuation">.</span> <span class="token function">splice</span> <span class="token punctuation">(</span> <span class="token number">0</span> <span class="token punctuation">,</span> <span class="token number">1</span> <span class="token punctuation">)</span> <span class="token punctuation">;</span> <span class="token punctuation">}</span> <span class="token function">init</span> <span class="token punctuation">(</span> <span class="token punctuation">)</span> <span class="token punctuation">;</span> window <span class="token punctuation">.</span> <span class="token function">requestAnimationFrame</span> <span class="token punctuation">(</span> animate <span class="token punctuation">)</span> <span class="token punctuation">;</span> <span class="token punctuation">}</span> <span class="token function">animate</span> <span class="token punctuation">(</span> <span class="token punctuation">)</span> <span class="token punctuation">;</span> |
Result
In Canvas, there will still be interactions with elements, but I will relax in the article with the following demos.
3. Conclusion
Above are the instructions to create a snowy scene with Canvas HTML5, through which hope to help you somewhat understand how to create and operate the canvas. The article still has many shortcomings, hope everyone will give me suggestions to supplement and improve these articles later. Thanks for watching.