A software project is often developed by a team instead of an individual, unifying coding conventions among members is an important task to increase the quality of the code and help unify the code according to a standard that makes it convenient for Read as well as improve future changes. Probably, programmers often get annoyed when reading code written by others without following a uniform standard  . For that reason, every programming language often has linter sets that help to check and set up coding conventions. Programmers often use these linter toolset to check as well as adhere to proposed coding conventions. However, how can one ensure that the programmer has tested his code carefully before the code is integrated, is there a possibility of forgetting or confusion? One way to solve this problem is to use a
 pre-commit check . In this article we learn about the pre-commit check and how to set it up in a React project.
What is a pre-commit check?
Pre-commit check is the process of checking after staging changes the code changes to get ready to make a new commit. If this process succeeds a new commit will be created, otherwise if a pre-commit check fails the commit will not be created and display an error message to the developer. Pre-commit checks are often used for checking coding styles and coding conventions automatically before code changes are integrated.
Apply the pre-commit check to the React project
First we create a demo project using create-react-app .
Set up EsLint
Install Eslint and some plugins I often use:
1 2 | npm install --save-dev eslint babel-eslint eslint-config-prettier eslint-config-airbnb-base eslint-plugin-react eslint-plugin-prettier |
Create .eslinrc and config file for Eslint:
1 2 3 4 5 6 7 8 9 10 11 12 13 14 15 16 17 18 19 | <span class="token punctuation">{</span> <span class="token string">"env"</span> <span class="token punctuation">:</span> <span class="token punctuation">{</span> <span class="token string">"es6"</span> <span class="token punctuation">:</span> <span class="token boolean">true</span> <span class="token punctuation">,</span> <span class="token string">"browser"</span> <span class="token punctuation">:</span> <span class="token boolean">true</span> <span class="token punctuation">}</span> <span class="token punctuation">,</span> <span class="token string">"extends"</span> <span class="token punctuation">:</span> <span class="token punctuation">[</span> <span class="token string">"airbnb-base"</span> <span class="token punctuation">]</span> <span class="token punctuation">,</span> <span class="token string">"parser"</span> <span class="token punctuation">:</span> <span class="token string">"babel-eslint"</span> <span class="token punctuation">,</span> <span class="token string">"parserOptions"</span> <span class="token punctuation">:</span> <span class="token punctuation">{</span> <span class="token string">"ecmaVersion"</span> <span class="token punctuation">:</span> <span class="token number">2018</span> <span class="token punctuation">,</span> <span class="token string">"sourceType"</span> <span class="token punctuation">:</span> <span class="token string">"module"</span> <span class="token punctuation">,</span> <span class="token string">"ecmaFeatures"</span> <span class="token punctuation">:</span> <span class="token punctuation">{</span> <span class="token string">"impliedStrict"</span> <span class="token punctuation">:</span> <span class="token boolean">true</span> <span class="token punctuation">,</span> <span class="token string">"jsx"</span> <span class="token punctuation">:</span> <span class="token boolean">true</span> <span class="token punctuation">}</span> <span class="token punctuation">}</span> <span class="token punctuation">}</span> |
In this article I do not focus on Eslint. You can learn more to be able to have the configuration that best suits your project Now we change a file that doesn’t follow Eslint standards. After running eslint we see some errors occur.
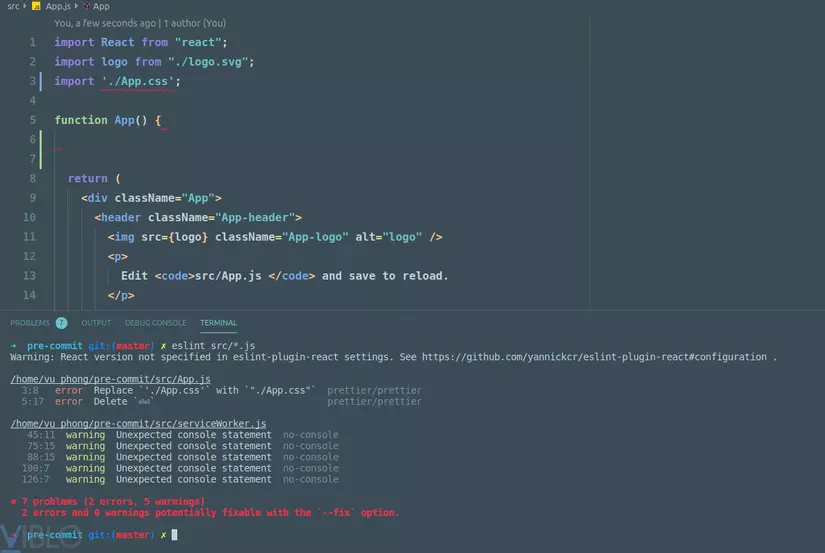
Eslint has CLI support so it can fix basic errors quickly by adding the --fix flag. However, we do not use this method, but in accordance with the topic of the article, we will use the pre-commit check .
Set up husky and lint-staged
The husky is a library that allows us to use git hooks while lint-staged allows us to run lint on staged files. This is a perfect duo for us to set up pre-commit check . In the packages.json file we declare some scripts and config for husky and lint-staged as follows:
1 2 3 4 5 6 7 8 9 10 11 12 13 14 15 16 17 | <span class="token property">"scripts"</span> <span class="token operator">:</span> <span class="token punctuation">{</span> <span class="token property">"start"</span> <span class="token operator">:</span> <span class="token string">"react-scripts start"</span> <span class="token punctuation">,</span> <span class="token property">"lint:fix"</span> <span class="token operator">:</span> <span class="token string">"eslint src/*.js --fix"</span> <span class="token punctuation">,</span> <span class="token property">"lint"</span> <span class="token operator">:</span> <span class="token string">"eslint src/*.js"</span> <span class="token punctuation">,</span> <span class="token punctuation">}</span> <span class="token punctuation">,</span> <span class="token property">"husky"</span> <span class="token operator">:</span> <span class="token punctuation">{</span> <span class="token property">"hooks"</span> <span class="token operator">:</span> <span class="token punctuation">{</span> <span class="token property">"pre-commit"</span> <span class="token operator">:</span> <span class="token string">"lint-staged"</span> <span class="token punctuation">}</span> <span class="token punctuation">}</span> <span class="token punctuation">,</span> <span class="token property">"lint-staged"</span> <span class="token operator">:</span> <span class="token punctuation">{</span> <span class="token property">".js"</span> <span class="token operator">:</span> <span class="token punctuation">[</span> <span class="token string">"npm run lint:fix"</span> <span class="token punctuation">,</span> <span class="token string">"npm run lint"</span> <span class="token punctuation">]</span> <span class="token punctuation">}</span> <span class="token punctuation">,</span> |
Now when we commit a new commit with the command git commit . The Git hook pre-commit will be triggered and called lint-staged . lint-staged will run two commands npm run lint:fix and npm run lint for .js files in the staged state. The result is a commit that has been checked through Eslint. For errors that cannot be automatically fixed, Eslint will display an error message and the commit creation process will be stopped until the developer corrects the errors and commits again. You can also skip the pre-commit check by using the --no-verify flag in git commit .
Bonus
We can install more so that when the commit code is automatically formatted using prettier and add some config in packages.json .
1 2 3 4 5 6 7 8 9 10 11 | <span class="token property">"lint-staged"</span> <span class="token operator">:</span> <span class="token punctuation">{</span> <span class="token property">"*.(js|css)"</span> <span class="token operator">:</span> <span class="token punctuation">[</span> <span class="token string">"prettier --write"</span> <span class="token punctuation">,</span> <span class="token string">"git add"</span> <span class="token punctuation">]</span> <span class="token punctuation">,</span> <span class="token property">".js"</span> <span class="token operator">:</span> <span class="token punctuation">[</span> <span class="token string">"npm run lint:fix"</span> <span class="token punctuation">,</span> <span class="token string">"npm run lint"</span> <span class="token punctuation">]</span> <span class="token punctuation">}</span> <span class="token punctuation">,</span> |
So before committing .js and .css files will be formatted with prettier . It is awesome, isn’t it.
Conclude
The article briefly introduces how to set up an automated tool for pre-commit check using the husky and lint-staged library. There are many things you can set up to suit your own projects, husky supports a lot of git hooks you can find out and create some cool things with them (Example: Run the test before push with pre-push , …). Hope the article will be helpful to everyone.