Preface
At the beginning of the spring of the new year, I had an idea of sending a happy new year mail to my acquaintances, and at the same time I realized that my Laravel project did not mention the extremely important function. this. So I decided to write about a function that makes sure every website needs.
- When registering an account on a website, the first thing is you will have to go to the email to activate the account.
- When customers place an order on your website, you need to send a confirmation mail to the customer.
- When websites have promotions, advertising by mail is an extremely simple and useful method.
- …
So you have seen the practicality of the function to send mail yet? And in this article I will go into two main content, which is:
- How can you build a mailing function?
- How to test if the sending function is working correctly?
Now let’s get down to business!
content
Built in mailing function
- As a first step , to send email, you will need to install Guzzle HTTP library via composer:12composer require guzzlehttp/guzzle
- Then, we’ll create a command to call the mailing function with the command:12php artisan make:command SendMail
We will get theappConsoleCommandsSendMailwith the following structure:123456789101112131415161718192021222324252627282930313233343536373839404142434445464748<span class="token php language-php"><span class="token delimiter important"><?php</span><span class="token keyword">namespace</span> <span class="token package">App Console Commands</span> <span class="token punctuation">;</span><span class="token keyword">use</span> <span class="token package">App Models User</span> <span class="token punctuation">;</span><span class="token keyword">use</span> <span class="token package">App DripEmailer</span> <span class="token punctuation">;</span><span class="token keyword">use</span> <span class="token package">App Mail NewYearMail</span> <span class="token punctuation">;</span><span class="token keyword">use</span> <span class="token package">Illuminate Support Facades Mail</span> <span class="token punctuation">;</span><span class="token keyword">use</span> <span class="token package">Illuminate Console Command</span> <span class="token punctuation">;</span><span class="token keyword">class</span> <span class="token class-name">SendMail</span> <span class="token keyword">extends</span> <span class="token class-name">Command</span><span class="token punctuation">{</span><span class="token comment">/*** The name and signature of the console command.** @var string*/</span><span class="token keyword">protected</span> <span class="token variable">$signature</span> <span class="token operator">=</span> <span class="token single-quoted-string string">'email:newyear {user}'</span> <span class="token punctuation">;</span><span class="token comment">/*** The console command description.** @var string*/</span><span class="token keyword">protected</span> <span class="token variable">$description</span> <span class="token operator">=</span> <span class="token single-quoted-string string">'Send Email for user'</span> <span class="token punctuation">;</span><span class="token comment">/*** Create a new command instance.** @return void*/</span><span class="token keyword">public</span> <span class="token keyword">function</span> <span class="token function">__construct</span> <span class="token punctuation">(</span> <span class="token punctuation">)</span><span class="token punctuation">{</span><span class="token keyword">parent</span> <span class="token punctuation">:</span> <span class="token punctuation">:</span> <span class="token function">__construct</span> <span class="token punctuation">(</span> <span class="token punctuation">)</span> <span class="token punctuation">;</span><span class="token punctuation">}</span><span class="token comment">/*** Execute the console command.** @return mixed*/</span><span class="token keyword">public</span> <span class="token keyword">function</span> <span class="token function">handle</span> <span class="token punctuation">(</span> <span class="token punctuation">)</span><span class="token punctuation">{</span><span class="token variable">$user</span> <span class="token operator">=</span> User <span class="token punctuation">:</span> <span class="token punctuation">:</span> <span class="token function">find</span> <span class="token punctuation">(</span> <span class="token variable">$this</span> <span class="token operator">-</span> <span class="token operator">></span> <span class="token function">argument</span> <span class="token punctuation">(</span> <span class="token single-quoted-string string">'user'</span> <span class="token punctuation">)</span> <span class="token punctuation">)</span> <span class="token punctuation">;</span>Mail <span class="token punctuation">:</span> <span class="token punctuation">:</span> <span class="token function">to</span> <span class="token punctuation">(</span> <span class="token variable">$user</span> <span class="token punctuation">)</span> <span class="token operator">-</span> <span class="token operator">></span> <span class="token function">send</span> <span class="token punctuation">(</span> <span class="token keyword">new</span> <span class="token class-name">NewYearMail</span> <span class="token punctuation">(</span> <span class="token punctuation">)</span> <span class="token punctuation">)</span> <span class="token punctuation">;</span><span class="token punctuation">}</span><span class="token punctuation">}</span></span> - Step 2 , we use the
php artisan make:mail NewYearMailto create the NewYearMail class:1234567891011121314151617181920212223242526272829303132333435<span class="token php language-php"><span class="token delimiter important"><?php</span><span class="token keyword">namespace</span> <span class="token package">App Mail</span> <span class="token punctuation">;</span><span class="token keyword">use</span> <span class="token package">Illuminate Bus Queueable</span> <span class="token punctuation">;</span><span class="token keyword">use</span> <span class="token package">Illuminate Mail Mailable</span> <span class="token punctuation">;</span><span class="token keyword">use</span> <span class="token package">Illuminate Queue SerializesModels</span> <span class="token punctuation">;</span><span class="token keyword">use</span> <span class="token package">Illuminate Contracts Queue ShouldQueue</span> <span class="token punctuation">;</span><span class="token keyword">class</span> <span class="token class-name">NewYearMail</span> <span class="token keyword">extends</span> <span class="token class-name">Mailable</span><span class="token punctuation">{</span><span class="token keyword">use</span> <span class="token package">Queueable</span> <span class="token punctuation">,</span> SerializesModels <span class="token punctuation">;</span><span class="token comment">/*** Create a new message instance.** @return void*/</span><span class="token keyword">public</span> <span class="token keyword">function</span> <span class="token function">__construct</span> <span class="token punctuation">(</span> <span class="token punctuation">)</span><span class="token punctuation">{</span><span class="token comment">//</span><span class="token punctuation">}</span><span class="token comment">/*** Build the message.** @return $this*/</span><span class="token keyword">public</span> <span class="token keyword">function</span> <span class="token function">build</span> <span class="token punctuation">(</span> <span class="token punctuation">)</span><span class="token punctuation">{</span><span class="token keyword">return</span> <span class="token variable">$this</span> <span class="token operator">-</span> <span class="token operator">></span> <span class="token function">view</span> <span class="token punctuation">(</span> <span class="token single-quoted-string string">'mail.newyear'</span> <span class="token punctuation">)</span><span class="token operator">-</span> <span class="token operator">></span> <span class="token function">attach</span> <span class="token punctuation">(</span> <span class="token single-quoted-string string">'/public/images/2020-new-year.png'</span> <span class="token punctuation">)</span> <span class="token punctuation">;</span> <span class="token comment">//đính kèm ảnh cùng với email</span><span class="token punctuation">}</span><span class="token punctuation">}</span></span> - Step 3 , we will create a blade for the content of the email:12345678910111213141516171819@ <span class="token function">section</span> <span class="token punctuation">(</span> <span class="token single-quoted-string string">'styles'</span> <span class="token punctuation">)</span><span class="token punctuation">.</span> md <span class="token operator">-</span> contents <span class="token punctuation">{</span>font <span class="token operator">-</span> size <span class="token punctuation">:</span> <span class="token number">1</span> rem <span class="token punctuation">;</span><span class="token punctuation">}</span>@endsection@ <span class="token function">section</span> <span class="token punctuation">(</span> <span class="token single-quoted-string string">'content'</span> <span class="token punctuation">)</span><span class="token operator"><</span> div <span class="token keyword">class</span> <span class="token operator">=</span> <span class="token double-quoted-string string">"md-contents"</span> <span class="token operator">></span><span class="token operator"><</span> p <span class="token operator">></span>Xin chào những người anh em thiện lành <span class="token punctuation">,</span><span class="token operator"><</span> <span class="token operator">/</span> p <span class="token operator">></span><span class="token operator"><</span> p <span class="token operator">></span>Nhân dịp năm mới Canh Tý <span class="token number">2020</span> <span class="token punctuation">,</span> xin chúc anh chị và gia đình sức khoẻ dồi dào <span class="token punctuation">,</span>làm ăn phát đạt <span class="token punctuation">,</span> cuộc sống hạnh phúc <span class="token operator">!</span><span class="token operator"><</span> <span class="token operator">/</span> p <span class="token operator">></span><span class="token operator"><</span> <span class="token operator">/</span> div <span class="token operator">></span>@endsection
Test your mailing function with Mailtrap
- Firstly, let’s briefly talk about how mailtrap works:
- Normally, to check the content of mail, you must send an email to see it. But in order to test the function, you will have to repair it and test it, resulting in spam mailbox.
- And Mailtrap solves that problem by YES creating mail, YES sending but will BE STAY midway and stored in the mailtrap mailbox, no longer reach the recipient. So you will avoid spamming the mailbox or using bogus mail and still be able to check the content of outgoing emails.
- After you register your mailtrap account successfully, access to the mailbox will appear configuration information as shown below. And in the Integration section, you choose the corresponding language / framework. As I am here, I will choose
Laravel
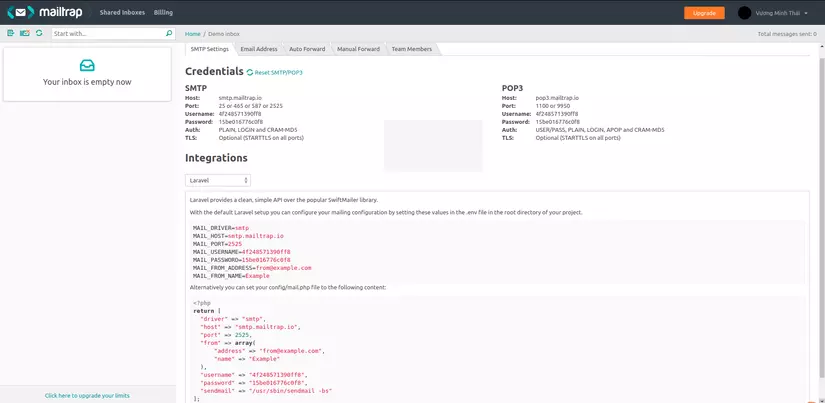
Then copy the configuration information below (do 1 of 2 things) into:
- Configuration in .env:12345678<span class="token constant">MAIL_DRIVER</span> <span class="token operator">=</span> smtp<span class="token constant">MAIL_HOST</span> <span class="token operator">=</span> smtp <span class="token punctuation">.</span> mailtrap <span class="token punctuation">.</span> io<span class="token constant">MAIL_PORT</span> <span class="token operator">=</span> <span class="token number">2525</span><span class="token constant">MAIL_USERNAME</span> <span class="token operator">=</span> <span class="token number">4</span> f248571390ff8<span class="token constant">MAIL_PASSWORD</span> <span class="token operator">=</span> <span class="token number">15</span> be016776c0f8<span class="token constant">MAIL_FROM_ADDRESS</span> <span class="token operator">=</span> <a class="__cf_email__" href="/cdn-cgi/l/email-protection">[email protected]</a> <span class="token punctuation">.</span> com<span class="token constant">MAIL_FROM_NAME</span> <span class="token operator">=</span> Example
- OR in config / mail.php1234567891011121314<span class="token php language-php"><span class="token delimiter important"><?php</span><span class="token keyword">return</span> <span class="token punctuation">[</span><span class="token double-quoted-string string">"driver"</span> <span class="token operator">=</span> <span class="token operator">></span> <span class="token double-quoted-string string">"smtp"</span> <span class="token punctuation">,</span><span class="token double-quoted-string string">"host"</span> <span class="token operator">=</span> <span class="token operator">></span> <span class="token double-quoted-string string">"smtp.mailtrap.io"</span> <span class="token punctuation">,</span><span class="token double-quoted-string string">"port"</span> <span class="token operator">=</span> <span class="token operator">></span> <span class="token number">2525</span> <span class="token punctuation">,</span><span class="token double-quoted-string string">"from"</span> <span class="token operator">=</span> <span class="token operator">></span> <span class="token keyword">array</span> <span class="token punctuation">(</span><span class="token double-quoted-string string">"address"</span> <span class="token operator">=</span> <span class="token operator">></span> <span class="token double-quoted-string string">" <a class="__cf_email__" href="/cdn-cgi/l/email-protection">[email protected]</a> "</span> <span class="token punctuation">,</span><span class="token double-quoted-string string">"name"</span> <span class="token operator">=</span> <span class="token operator">></span> <span class="token double-quoted-string string">"Example"</span><span class="token punctuation">)</span> <span class="token punctuation">,</span><span class="token double-quoted-string string">"username"</span> <span class="token operator">=</span> <span class="token operator">></span> <span class="token double-quoted-string string">"4f248571390ff8"</span> <span class="token punctuation">,</span><span class="token double-quoted-string string">"password"</span> <span class="token operator">=</span> <span class="token operator">></span> <span class="token double-quoted-string string">"15be016776c0f8"</span> <span class="token punctuation">,</span><span class="token double-quoted-string string">"sendmail"</span> <span class="token operator">=</span> <span class="token operator">></span> <span class="token double-quoted-string string">"/usr/sbin/sendmail -bs"</span><span class="token punctuation">]</span> <span class="token punctuation">;</span></span>
Installing mailtrap is as simple as that, now let’s test it to see if it works!
Now we will run the command php artisan email:newyear 1 to send email to the user with id = 1 and here is the result I obtained: 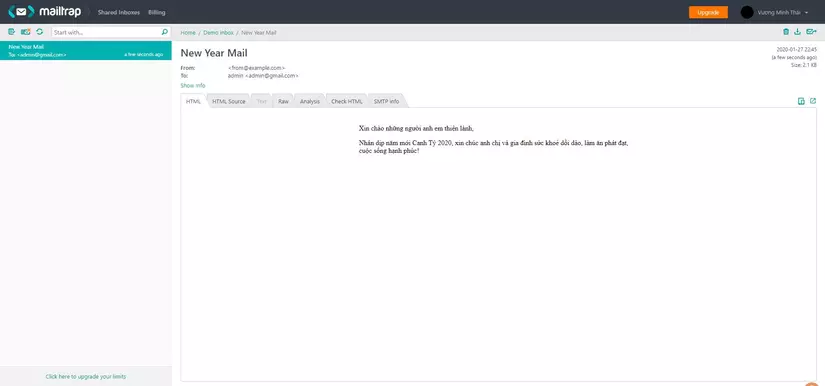
summary
After this article, hope you have been able to build up the function of sending email according to your website product. If there are any difficulties during the implementation, you can comment below or post a question on viblo for everyone to support!
Thank you for watching and please support me in the next article!
References
- Homepage: https://mailtrap.io/
- Laracast: https://laracasts.com
- Send Laravel mail: https://blog.mailtrap.io/send-email-in-laravel/
- Mailtrap and Testing: https://viblo.asia/p/mailtrap-va-testing-xQMGJmgNvam