
1. Introduction
ICON is a Blockchain 2.0 platform (which has many similarities with Ethereum). ICON runs smart contracts with a Delegated Proof-of-Stake (BFT-DPoS) consensus protocol, a cryptocurrency on the ICON network called ICX .
The goal of the ICON development team in the future is to connect blockchain networks with each other, making them easy to exchange assets as well as data. There is an example that the ICON development team gave to compare the interconnection of blockchain networks, like the advent of the TCP / IP protocol suite that connects private networks to each other into the Internet. Global. ICON wants them to be the TCP / IP of Blockchain
About the world is an introduction video about ICON from the developer team
2. Some basic concepts
Account
Like Ethereum, ICON also has 2 types of accounts:
- Externally Owned Accounts: Starting with hx , 20 hex bytes in length
- Smart contract accounts: Start with cx , 20 hex bytes in length. No private key available.
Deal
Types of transactions on ICON
- Transfer ICX
- Save data to blockchain
- Deploy or update SCORE
- Change the state of SCORE
Note : Smart contract on ICON is called SCORE
The parameters when executing a transaction:
from: Address to create transactionto: Transaction receiving address (When deploying, the receiving address iscx0000000000000000000000000000000000000000)value: The amount of ICX sentstepLimit: Maximum number of steps a transaction can take (similar to gasLimit in Ethereum)time stamp: The time to create a transactionnonce: Transaction number of sending account (similar to nonce in Ethereum)nid: Network ID (Distinguishing between mainnet, testnet)data type: Helps distinguish transaction types. Includes 3 valuescall,deployandmessage. With a normal ICX transfer, the data type is ignored.data: Transaction content (can be the parameters passed to call the function in the contract)signature: The digital signature of the sender of the transactiontransaction hash: The hash value that identifies the transaction
Transaction fee
Step is the unit of measurement for calculating transaction fees on the ICON network. The number of steps a transaction takes depends on the amount of compute resources it takes to execute the transaction. Initial Rate, 1 ICX = 100,000,000 Step . This rate can be changed if the ICX price rises too high or is dropped very low.
Formula for calculating step
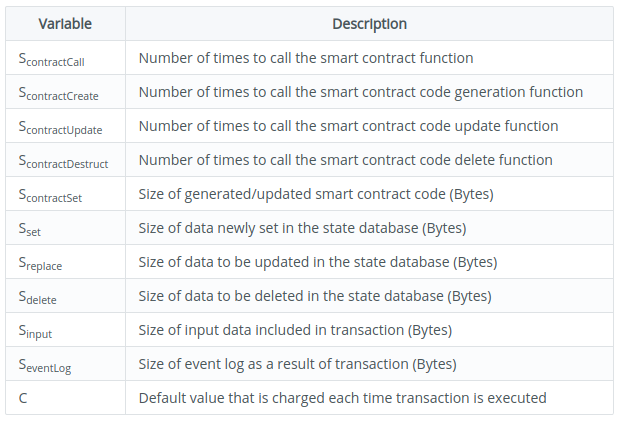
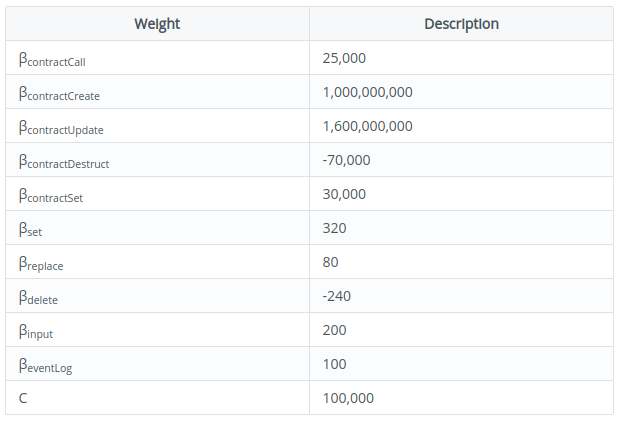
Step = max (∑ βiSi + C, C)
Note : The maximum number of steps a transaction can consume is 2.5 billion steps
With:
- Si is the number of times a particular call comes to the smart contract.
- βi is the number of steps that will be consumed with each specific call.
- C is the minimum number of steps a transaction needs to pay (Constant with a value of 100,000)
Below are 2 tables that describe the possible values of Si and the step values consumed with each corresponding call to the contract.
Policy support transaction fees for users
Normally, when making a transaction, the user will bear the full cost. With ICON, the development team designed a feature that allows contract owners to support part or all of the transaction costs when users call their contracts.
Percentage of support fees ranges from 0 – 100% (meaning fees may not be subsidized). If the contract developer wants to support fees for users, they must send an amount of ICX in advance to the contract so that when the user calls, this amount of ICX will be deducted from the user’s transaction fee depending on the rate.
Virtual Step
Virtual Step is the new fee system of the ICON network for contract owners. It is created monthly corresponding to the number of ICX sent to the contract and the period of time ICX is deposited into that contract. In addition to supporting fees for users using ICX , SCORE owners can pay fees in Virtual Step . This helps contract owners reduce part of the cost burden as well as encourage the higher percentage of support fees for users.
Some features:
- Virtual Step and Step have a 1: 1 ratio
- Virtual Step is created every 1,296,000 blocks (1 month). At that time, unused Virtual Steps will expire.
- Virtual Step cannot be moved anywhere.
- Support fee for users will spend Virtual Step first, if the Virtual Step runs out, then ICX will be spent
Calculating the Virtual Step
- When sending ICX into the contract, it is necessary to set the deposit amount and the deposit period.
- Delivery times can be set from a minimum of 1 month to a maximum of 24 months.
- Minimum deposit amount is from 5,000 ICX up to maximum 100,000 ICX.
Depending on the short or long deposit period, the number of viral steps received after each month will vary:
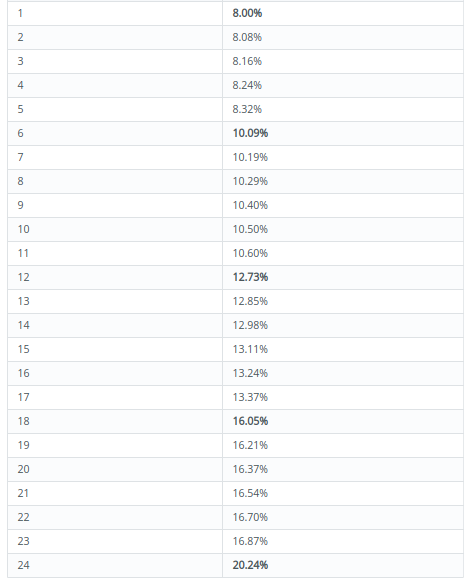
For example:
- Send 10,000 ICX in with a period of 1 month. Each month receiving 80,000,000,000 Virtual Step, equivalent to 8% of the 10,000 deposit amount, is 800 ICX.
- Send 10,000 ICX in with a 24-month period. Each month receives 202,400,000,000 Virtual Step, equivalent to 20.24% of the deposit amount of 10,000 ICX.
Note : Contract holders will be subject to a penalty if they withdraw their deposited ICX before the end of the predetermined period. The fine is the total number of Virtual Steps used in the previous period.
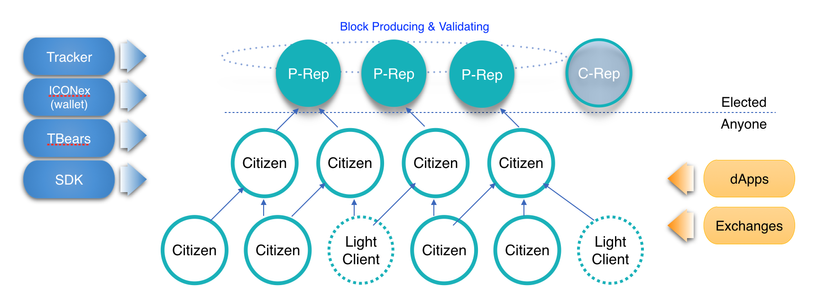
ICON nodes
ICON nodes have 3 types
- Peer: can participate in consensus protocol, can create new block on the network.
- Citizen: Blockchain data synchronization and transaction forwarding to Peer.
- Light: Save the block header of the network, perform the task of transaction verification.
3. Write smart contract
SCORE on ICON is written in Python language.
First, you need to install the tbears tool, tbears is a tool to initiate, deploy and interact with smart contracts on the ICON network (similar to the truffle on Ethereum). The tbears settings can be found here
Hello world
We’ll start with the simplest smart contract
Step 1 : Initialization
1 2 3 | <span class="token comment"># tbears init [project_name] [main_class_name]</span> tbears init hello HelloWorld |
In the newly created folder hello , we will see 3 files
__init.py__: Initially empty, this file helps the Python interpreter to recognize this folder as a package.hello.py: The main FIle, which contains the logic of the contractpackage.json: This file contains the basic information of the contract such as version, name, …
1 2 3 4 5 6 7 | <span class="token comment">// package.json</span> <span class="token punctuation">{</span> <span class="token string">"version"</span> <span class="token operator">:</span> <span class="token string">"0.0.1"</span> <span class="token punctuation">,</span> <span class="token string">"main_module"</span> <span class="token operator">:</span> <span class="token string">"hello_world"</span> <span class="token punctuation">,</span> <span class="token string">"main_score"</span> <span class="token operator">:</span> <span class="token string">"HelloWorld"</span> <span class="token punctuation">}</span> |
1 2 3 4 5 6 7 8 9 10 11 12 13 14 15 16 17 18 19 20 21 22 23 24 25 26 | <span class="token comment"># hello-world.py</span> <span class="token keyword">from</span> iconservice <span class="token keyword">import</span> <span class="token operator">*</span> TAG <span class="token operator">=</span> <span class="token string">'HelloWorld'</span> <span class="token comment"># class HelloWorld kế thừa class IconScoreBase của thư viện iconservice</span> <span class="token keyword">class</span> <span class="token class-name">HelloWorld</span> <span class="token punctuation">(</span> IconScoreBase <span class="token punctuation">)</span> <span class="token punctuation">:</span> <span class="token comment"># Hàm __init__ là hàm constructor của class, được gọi khi nào contract được deploy mới </span> <span class="token keyword">def</span> <span class="token function">__init__</span> <span class="token punctuation">(</span> self <span class="token punctuation">,</span> db <span class="token punctuation">:</span> IconScoreDatabase <span class="token punctuation">)</span> <span class="token operator">-</span> <span class="token operator">></span> <span class="token boolean">None</span> <span class="token punctuation">:</span> <span class="token builtin">super</span> <span class="token punctuation">(</span> <span class="token punctuation">)</span> <span class="token punctuation">.</span> __init__ <span class="token punctuation">(</span> db <span class="token punctuation">)</span> <span class="token comment"># Hàm on_install chỉ được gọi 1 lần khi deploy contract lần đầu</span> <span class="token comment"># Khi contract được update thì nó không được gọi lại nữa</span> <span class="token keyword">def</span> <span class="token function">on_install</span> <span class="token punctuation">(</span> self <span class="token punctuation">)</span> <span class="token operator">-</span> <span class="token operator">></span> <span class="token boolean">None</span> <span class="token punctuation">:</span> <span class="token builtin">super</span> <span class="token punctuation">(</span> <span class="token punctuation">)</span> <span class="token punctuation">.</span> on_install <span class="token punctuation">(</span> <span class="token punctuation">)</span> <span class="token comment"># Hàm on_update được gọi khi contract được update </span> <span class="token keyword">def</span> <span class="token function">on_update</span> <span class="token punctuation">(</span> self <span class="token punctuation">)</span> <span class="token operator">-</span> <span class="token operator">></span> <span class="token boolean">None</span> <span class="token punctuation">:</span> <span class="token builtin">super</span> <span class="token punctuation">(</span> <span class="token punctuation">)</span> <span class="token punctuation">.</span> on_update <span class="token punctuation">(</span> <span class="token punctuation">)</span> <span class="token comment"># Hàm hello sẽ trả về thông điệp "Hello" bất cứ khi nào được gọi</span> <span class="token decorator annotation punctuation">@external</span> <span class="token punctuation">(</span> readonly <span class="token operator">=</span> <span class="token boolean">True</span> <span class="token punctuation">)</span> <span class="token keyword">def</span> <span class="token function">hello</span> <span class="token punctuation">(</span> self <span class="token punctuation">)</span> <span class="token operator">-</span> <span class="token operator">></span> <span class="token builtin">str</span> <span class="token punctuation">:</span> Logger <span class="token punctuation">.</span> debug <span class="token punctuation">(</span> f <span class="token string">'Hello, world!'</span> <span class="token punctuation">,</span> TAG <span class="token punctuation">)</span> <span class="token keyword">return</span> <span class="token string">"Hello"</span> |
Implement Token
ICON supports implementation of many different token standards (with reference to the ERC standards of Ethereum), ICON ‘s token standards are defined here.
In this example, we will try implementing the standard IRC-2 token, which is the Fungibles Token form (IRC-2 is a reference to the ERC-20 and ERC-223 standard of Ethereum). The definition of the IRC-2 standard can be found here
1 2 3 4 5 6 7 8 9 10 11 12 13 14 15 16 17 18 19 20 21 22 23 24 25 26 27 28 29 30 31 32 33 34 35 36 37 38 39 40 41 42 43 44 45 46 47 48 49 50 51 52 53 54 55 56 57 58 59 60 61 62 63 64 65 66 67 68 69 70 71 72 73 74 75 76 77 78 79 80 81 82 83 84 85 86 87 88 89 90 91 92 93 94 95 96 97 98 99 100 101 102 103 104 105 106 107 108 109 110 111 112 113 114 115 116 117 118 119 120 121 122 123 124 125 126 127 128 129 130 131 132 133 134 135 136 | tbears init sample-token SampleToken ` <span class="token variable"><span class="token variable">`</span> <span class="token variable">`</span></span> ` <span class="token variable"><span class="token variable">`</span> py <span class="token comment"># sample_token.py</span> from iconservice <span class="token function">import</span> * TAG <span class="token operator">=</span> <span class="token string">'SampleToken'</span> <span class="token comment">## Định nghĩa interface theo chuẩn IRC-2</span> class TokenStandard: @abstractmethod def name <span class="token punctuation">(</span> self <span class="token punctuation">)</span> - <span class="token operator">></span> str: pass @abstractmethod def symbol <span class="token punctuation">(</span> self <span class="token punctuation">)</span> - <span class="token operator">></span> str: pass @abstractmethod def decimals <span class="token punctuation">(</span> self <span class="token punctuation">)</span> - <span class="token operator">></span> int: pass @abstractmethod def totalSupply <span class="token punctuation">(</span> self <span class="token punctuation">)</span> - <span class="token operator">></span> int: pass @abstractmethod def balanceOf <span class="token punctuation">(</span> self, _owner: Address <span class="token punctuation">)</span> - <span class="token operator">></span> int: pass @abstractmethod def transfer <span class="token punctuation">(</span> self, _to: Address, _value: int, _data: bytes <span class="token operator">=</span> None <span class="token punctuation">)</span> : pass <span class="token comment"># Định nghĩa Interface TokenFallbackInterface</span> <span class="token comment"># Hàm tokenFallback được gọi khi có 1 lượng token được gửi vào địa chỉ contract (tương tự như fallback function xử lý việc nhận ICX)</span> class TokenFallbackInterface <span class="token punctuation">(</span> InterfaceScore <span class="token punctuation">)</span> : @interface def tokenFallback <span class="token punctuation">(</span> self, _from: Address, _value: int, _data: bytes <span class="token punctuation">)</span> : pass <span class="token comment"># Implement</span> class SampleToken <span class="token punctuation">(</span> IconScoreBase, TokenStandard <span class="token punctuation">)</span> : _BALANCES <span class="token operator">=</span> <span class="token string">'balances'</span> _TOTAL_SUPPLY <span class="token operator">=</span> <span class="token string">'total_supply'</span> _DECIMALS <span class="token operator">=</span> <span class="token string">'decimals'</span> <span class="token comment"># Event được emit khi hàm _transfer được gọi</span> @eventlog <span class="token punctuation">(</span> indexed <span class="token operator">=</span> <span class="token number">3</span> <span class="token punctuation">)</span> def Transfer <span class="token punctuation">(</span> self, _from: Address, _to: Address, _value: int, _data: bytes <span class="token punctuation">)</span> : pass <span class="token comment"># Định nghĩa các biến cần lưu trữ trong contract</span> <span class="token comment"># </span> <span class="token variable">`</span></span> _total_supply <span class="token variable"><span class="token variable">`</span> dạng int <span class="token punctuation">(</span> Tổng số token được tạo ra <span class="token punctuation">)</span> <span class="token comment"># </span> <span class="token variable">`</span></span> _decimals <span class="token variable"><span class="token variable">`</span> dạng int, dùng để tính toán ra <span class="token variable">`</span></span> _total_supply <span class="token variable"><span class="token variable">`</span> <span class="token comment"># </span> <span class="token variable">`</span></span> _balances <span class="token variable"><span class="token variable">`</span> dạng <span class="token punctuation">(</span> key <span class="token operator">=</span> <span class="token operator">></span> value <span class="token punctuation">)</span> lưu số dư token của các tài khoản def __init__ <span class="token punctuation">(</span> self, db: IconScoreDatabase <span class="token punctuation">)</span> - <span class="token operator">></span> None: super <span class="token punctuation">(</span> <span class="token punctuation">)</span> .__init__ <span class="token punctuation">(</span> db <span class="token punctuation">)</span> self._total_supply <span class="token operator">=</span> VarDB <span class="token punctuation">(</span> self._TOTAL_SUPPLY, db, <span class="token assign-left variable">value_type</span> <span class="token operator">=</span> int <span class="token punctuation">)</span> self._decimals <span class="token operator">=</span> VarDB <span class="token punctuation">(</span> self._DECIMALS, db, <span class="token assign-left variable">value_type</span> <span class="token operator">=</span> int <span class="token punctuation">)</span> self._balances <span class="token operator">=</span> DictDB <span class="token punctuation">(</span> self._BALANCES, db, <span class="token assign-left variable">value_type</span> <span class="token operator">=</span> int <span class="token punctuation">)</span> <span class="token comment"># Tính toán số lượng token phát hành</span> <span class="token comment"># Tất cả lượng token ban đầu được nắm giữ bởi địa chỉ deploy contract</span> def on_install <span class="token punctuation">(</span> self, _initialSupply: int, _decimals: int <span class="token punctuation">)</span> - <span class="token operator">></span> None: super <span class="token punctuation">(</span> <span class="token punctuation">)</span> .on_install <span class="token punctuation">(</span> <span class="token punctuation">)</span> <span class="token keyword">if</span> _initialSupply <span class="token operator"><</span> <span class="token number">0</span> : revert <span class="token punctuation">(</span> <span class="token string">"Initial supply cannot be less than zero"</span> <span class="token punctuation">)</span> <span class="token keyword">if</span> _decimals <span class="token operator"><</span> <span class="token number">0</span> : revert <span class="token punctuation">(</span> <span class="token string">"Decimals cannot be less than zero"</span> <span class="token punctuation">)</span> total_supply <span class="token operator">=</span> _initialSupply * <span class="token number">10</span> ** _decimals Logger.debug <span class="token punctuation">(</span> f <span class="token string">'on_install: total_supply={total_supply}'</span> , TAG <span class="token punctuation">)</span> self._total_supply.set <span class="token punctuation">(</span> total_supply <span class="token punctuation">)</span> self._decimals.set <span class="token punctuation">(</span> _decimals <span class="token punctuation">)</span> self._balances <span class="token punctuation">[</span> self.msg.sender <span class="token punctuation">]</span> <span class="token operator">=</span> total_supply def on_update <span class="token punctuation">(</span> self <span class="token punctuation">)</span> - <span class="token operator">></span> None: super <span class="token punctuation">(</span> <span class="token punctuation">)</span> .on_update <span class="token punctuation">(</span> <span class="token punctuation">)</span> <span class="token comment"># Tên của token</span> @external <span class="token punctuation">(</span> readonly <span class="token operator">=</span> True <span class="token punctuation">)</span> def name <span class="token punctuation">(</span> self <span class="token punctuation">)</span> - <span class="token operator">></span> str: <span class="token builtin class-name">return</span> <span class="token string">"SampleToken"</span> <span class="token comment"># Ký hiệu của token</span> @external <span class="token punctuation">(</span> readonly <span class="token operator">=</span> True <span class="token punctuation">)</span> def symbol <span class="token punctuation">(</span> self <span class="token punctuation">)</span> - <span class="token operator">></span> str: <span class="token builtin class-name">return</span> <span class="token string">"ST"</span> @external <span class="token punctuation">(</span> readonly <span class="token operator">=</span> True <span class="token punctuation">)</span> def decimals <span class="token punctuation">(</span> self <span class="token punctuation">)</span> - <span class="token operator">></span> int: <span class="token builtin class-name">return</span> self._decimals.get <span class="token punctuation">(</span> <span class="token punctuation">)</span> @external <span class="token punctuation">(</span> readonly <span class="token operator">=</span> True <span class="token punctuation">)</span> def totalSupply <span class="token punctuation">(</span> self <span class="token punctuation">)</span> - <span class="token operator">></span> int: <span class="token builtin class-name">return</span> self._total_supply.get <span class="token punctuation">(</span> <span class="token punctuation">)</span> <span class="token comment"># truy vấn số dư của địa chỉ</span> @external <span class="token punctuation">(</span> readonly <span class="token operator">=</span> True <span class="token punctuation">)</span> def balanceOf <span class="token punctuation">(</span> self, _owner: Address <span class="token punctuation">)</span> - <span class="token operator">></span> int: <span class="token builtin class-name">return</span> self._balances <span class="token punctuation">[</span> _owner <span class="token punctuation">]</span> @external def transfer <span class="token punctuation">(</span> self, _to: Address, _value: int, _data: bytes <span class="token operator">=</span> None <span class="token punctuation">)</span> : <span class="token keyword">if</span> _data is None: _data <span class="token operator">=</span> b <span class="token string">'None'</span> self._transfer <span class="token punctuation">(</span> self.msg.sender, _to, _value, _data <span class="token punctuation">)</span> <span class="token comment"># Chuyển tokne từ </span> <span class="token variable">`</span></span> _from <span class="token variable"><span class="token variable">`</span> sang <span class="token variable">`</span></span> _to <span class="token variable"><span class="token variable">`</span> def _transfer <span class="token punctuation">(</span> self, _from: Address, _to: Address, _value: int, _data: bytes <span class="token punctuation">)</span> : <span class="token comment"># Nếu giá trị âm hoặc địa chỉ gửi không đủ số dư thì giao dịch sẽ bị revert</span> <span class="token keyword">if</span> _value <span class="token operator"><</span> <span class="token number">0</span> : revert <span class="token punctuation">(</span> <span class="token string">"Transferring value cannot be less than zero"</span> <span class="token punctuation">)</span> <span class="token keyword">if</span> self._balances <span class="token punctuation">[</span> _from <span class="token punctuation">]</span> <span class="token operator"><</span> _value: revert <span class="token punctuation">(</span> <span class="token string">"Out of balance"</span> <span class="token punctuation">)</span> self._balances <span class="token punctuation">[</span> _from <span class="token punctuation">]</span> <span class="token operator">=</span> self._balances <span class="token punctuation">[</span> _from <span class="token punctuation">]</span> - _value self._balances <span class="token punctuation">[</span> _to <span class="token punctuation">]</span> <span class="token operator">=</span> self._balances <span class="token punctuation">[</span> _to <span class="token punctuation">]</span> + _value <span class="token comment"># Nếu địa chỉ đích là 1 contract thì sẽ gọi đến hàm tokenFallback</span> <span class="token keyword">if</span> _to.is_contract: recipient_score <span class="token operator">=</span> self.create_interface_score <span class="token punctuation">(</span> _to, TokenFallbackInterface <span class="token punctuation">)</span> recipient_score.tokenFallback <span class="token punctuation">(</span> _from, _value, _data <span class="token punctuation">)</span> <span class="token comment"># Emits an event log </span> <span class="token variable">`</span></span> Transfer` self.Transfer <span class="token punctuation">(</span> _from, _to, _value, _data <span class="token punctuation">)</span> Logger.debug <span class="token punctuation">(</span> f <span class="token string">'Transfer({_from}, {_to}, {_value}, {_data})'</span> , TAG <span class="token punctuation">)</span> |
Deploy
Contract is finished, now let’s learn about deploying them to testnet Yeouido with tools tbears.
B1 : Create a deploy config file
deploy_hello.json
1 2 3 4 5 6 7 8 9 10 11 12 13 14 15 | <span class="token punctuation">{</span> <span class="token property">"uri"</span> <span class="token operator">:</span> <span class="token string">"https://bicon.net.solidwallet.io/api/v3"</span> <span class="token punctuation">,</span> <span class="token property">"nid"</span> <span class="token operator">:</span> <span class="token string">"0x3"</span> <span class="token punctuation">,</span> <span class="token property">"keyStore"</span> <span class="token operator">:</span> <span class="token null keyword">null</span> <span class="token punctuation">,</span> <span class="token property">"from"</span> <span class="token operator">:</span> <span class="token string">"ĐỊA CHỈ CỦA BẠN"</span> <span class="token punctuation">,</span> <span class="token property">"to"</span> <span class="token operator">:</span> <span class="token string">"cx0000000000000000000000000000000000000000"</span> <span class="token punctuation">,</span> <span class="token property">"stepLimit"</span> <span class="token operator">:</span> <span class="token string">"0x5a000000"</span> <span class="token punctuation">,</span> <span class="token property">"deploy"</span> <span class="token operator">:</span> <span class="token punctuation">{</span> <span class="token property">"contentType"</span> <span class="token operator">:</span> <span class="token string">"tbears"</span> <span class="token punctuation">,</span> <span class="token property">"mode"</span> <span class="token operator">:</span> <span class="token string">"install"</span> <span class="token punctuation">}</span> <span class="token punctuation">,</span> <span class="token property">"txresult"</span> <span class="token operator">:</span> <span class="token punctuation">{</span> <span class="token punctuation">}</span> <span class="token punctuation">,</span> <span class="token property">"transfer"</span> <span class="token operator">:</span> <span class="token punctuation">{</span> <span class="token punctuation">}</span> <span class="token punctuation">}</span> |
deploy_sample_token.json
1 2 3 4 5 6 7 8 9 10 11 12 13 14 15 16 17 18 19 | <span class="token punctuation">{</span> <span class="token property">"uri"</span> <span class="token operator">:</span> <span class="token string">"https://bicon.net.solidwallet.io/api/v3"</span> <span class="token punctuation">,</span> <span class="token property">"nid"</span> <span class="token operator">:</span> <span class="token string">"0x3"</span> <span class="token punctuation">,</span> <span class="token property">"keyStore"</span> <span class="token operator">:</span> <span class="token null keyword">null</span> <span class="token punctuation">,</span> <span class="token property">"from"</span> <span class="token operator">:</span> <span class="token string">"ĐỊA CHỈ CỦA BẠN"</span> <span class="token punctuation">,</span> <span class="token property">"to"</span> <span class="token operator">:</span> <span class="token string">"cx0000000000000000000000000000000000000000"</span> <span class="token punctuation">,</span> <span class="token property">"stepLimit"</span> <span class="token operator">:</span> <span class="token string">"0x5a000000"</span> <span class="token punctuation">,</span> <span class="token property">"deploy"</span> <span class="token operator">:</span> <span class="token punctuation">{</span> <span class="token property">"contentType"</span> <span class="token operator">:</span> <span class="token string">"tbears"</span> <span class="token punctuation">,</span> <span class="token property">"mode"</span> <span class="token operator">:</span> <span class="token string">"install"</span> <span class="token punctuation">,</span> <span class="token property">"scoreParams"</span> <span class="token operator">:</span> <span class="token punctuation">{</span> <span class="token property">"_decimals"</span> <span class="token operator">:</span> <span class="token string">"0x12"</span> <span class="token punctuation">,</span> <span class="token property">"_initialSupply"</span> <span class="token operator">:</span> <span class="token string">"0x3e8"</span> <span class="token punctuation">}</span> <span class="token punctuation">}</span> <span class="token punctuation">,</span> <span class="token property">"txresult"</span> <span class="token operator">:</span> <span class="token punctuation">{</span> <span class="token punctuation">}</span> <span class="token punctuation">,</span> <span class="token property">"transfer"</span> <span class="token operator">:</span> <span class="token punctuation">{</span> <span class="token punctuation">}</span> <span class="token punctuation">}</span> |
Ham on_install in contract SampleToken need to pass two arguments to _decimals and _initialSupply to execute.
B2 : Create wallet
We install the ICONex extension (eg Metamask) to create an address on the ICON network. With Chrome browser, you can here
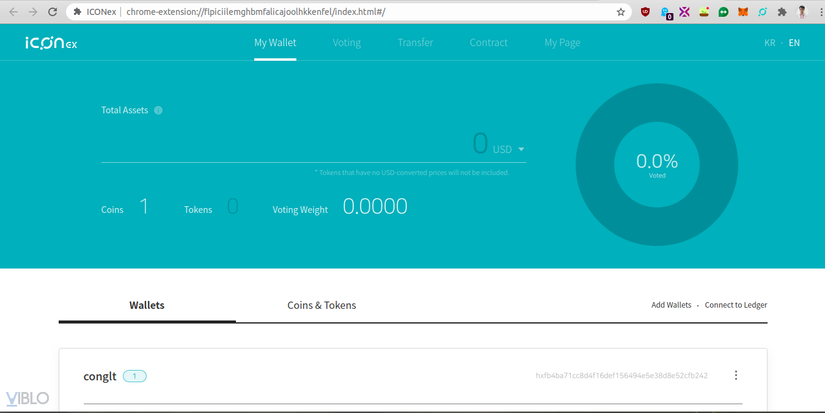
Click on the new wallet creation section, you will download the keystore file and change the extension to a json file, such as keystore.json .
B3 : Deploy to testnet with tbears
The current directory we have
1 2 3 4 5 6 | /hello /sample-token deploy-hello.json deploy_sample_token.json keystore.json |
Before deploying we need faucet ICX for the account on testnet at
1 2 3 | tbears deploy hello -k keystore.json -c deploy-hello.json tbears deploy sample-token -k keystore.json -c deploy-sample_token.json |
Transaction hash will be returned after deploying, we can check whether the transaction was successful or not as well as the contract’s address on bicon.tracker.solidwallet.io page.
4. ICON SDK (Javascript SDK)
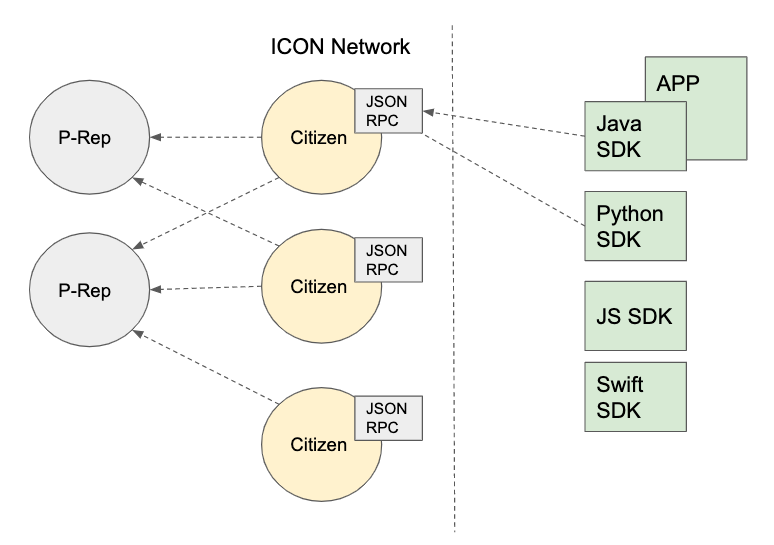
Each ICON node provides JSON-RPC APIs. To interact with an ICON node, we can either send raw JSON-RPC requests or use the ICON SDK in many different languages. ICON officially supports Java, Python, JavaScript and Swift. In the framework of the article, we will just learn about 1 type of SDK that is the Javascript SDK.
Setting
Javascript SDK is integrated in a node.js package, making it easy to install and use
Install via npm
1 2 | <span class="token function">npm</span> <span class="token function">install</span> --save icon-sdk-js |
Or CDN link
1 2 | <span class="token operator"><</span> script src <span class="token operator">=</span> <span class="token string">"https://cdn.jsdelivr.net/gh/icon-project/ <a class="__cf_email__" href="/cdn-cgi/l/email-protection">[email protected]</a> /build/icon-sdk-js.web.min.js"</span> <span class="token operator">></span> <span class="token operator"><</span> <span class="token operator">/</span> script <span class="token operator">></span> |
Using the SDK to interact with the deployed contract
Create an sdk directory and create an environment variable
1 2 3 4 | mkdir sdk cd sdk touch .env |
1 2 3 4 5 6 | <span class="token comment"># .env</span> API_ENPOINT <span class="token operator">=</span> <span class="token string">'https://bicon.net.solidwallet.io/api/v3'</span> PRIVATE_KEY <span class="token operator">=</span> <span class="token string">'PRIVATE KEY ĐỊA CHỈ CỦA BẠN'</span> ADDRESS_CONTRACT_SAMPLE_TOKEN <span class="token operator">=</span> <span class="token string">'ĐỊA CHRI CONTRACT SAMPLE TOKEN ĐÃ DEPLOY'</span> OWNER <span class="token operator">=</span> <span class="token string">'ĐỊA CHỈ DÙNG ĐỂ DEPLOY'</span> |
With the readonly functions, when called, there is no need to sign a transaction
1 2 3 4 5 6 7 8 9 10 11 12 13 14 15 16 17 18 19 20 21 22 23 24 25 26 27 28 29 30 31 32 33 34 35 36 37 38 39 40 41 42 43 | <span class="token comment">// getBalance.js</span> <span class="token keyword">const</span> IconService <span class="token operator">=</span> <span class="token function">require</span> <span class="token punctuation">(</span> <span class="token string">'icon-sdk-js'</span> <span class="token punctuation">)</span> <span class="token punctuation">;</span> <span class="token keyword">const</span> <span class="token punctuation">{</span> argv <span class="token punctuation">}</span> <span class="token operator">=</span> <span class="token function">require</span> <span class="token punctuation">(</span> <span class="token string">'yargs'</span> <span class="token punctuation">)</span> <span class="token punctuation">;</span> <span class="token function">require</span> <span class="token punctuation">(</span> <span class="token string">'dotenv'</span> <span class="token punctuation">)</span> <span class="token punctuation">.</span> <span class="token function">config</span> <span class="token punctuation">(</span> <span class="token punctuation">)</span> <span class="token punctuation">;</span> <span class="token keyword">const</span> <span class="token punctuation">{</span> HttpProvider <span class="token punctuation">,</span> IconBuilder <span class="token punctuation">}</span> <span class="token operator">=</span> IconService <span class="token punctuation">;</span> <span class="token comment">// Kết nối đến mạng testnet</span> <span class="token keyword">const</span> provider <span class="token operator">=</span> <span class="token keyword">new</span> <span class="token class-name">HttpProvider</span> <span class="token punctuation">(</span> process <span class="token punctuation">.</span> env <span class="token punctuation">.</span> <span class="token constant">API_ENPOINT</span> <span class="token punctuation">)</span> <span class="token punctuation">;</span> <span class="token keyword">const</span> iconService <span class="token operator">=</span> <span class="token keyword">new</span> <span class="token class-name">IconService</span> <span class="token punctuation">(</span> provider <span class="token punctuation">)</span> <span class="token punctuation">;</span> <span class="token keyword">const</span> <span class="token punctuation">{</span> CallBuilder <span class="token punctuation">}</span> <span class="token operator">=</span> IconBuilder <span class="token punctuation">;</span> <span class="token keyword">const</span> owner <span class="token operator">=</span> process <span class="token punctuation">.</span> env <span class="token punctuation">.</span> <span class="token constant">OWNER</span> <span class="token punctuation">;</span> <span class="token keyword">const</span> instanceContract <span class="token operator">=</span> process <span class="token punctuation">.</span> env <span class="token punctuation">.</span> <span class="token constant">ADDRESS_CONTRACT_SAMPLE_TOKEN</span> <span class="token punctuation">;</span> <span class="token keyword">let</span> account <span class="token operator">=</span> owner <span class="token punctuation">;</span> <span class="token keyword">if</span> <span class="token punctuation">(</span> argv <span class="token punctuation">.</span> address <span class="token punctuation">)</span> <span class="token punctuation">{</span> account <span class="token operator">=</span> argv <span class="token punctuation">.</span> address <span class="token punctuation">;</span> <span class="token punctuation">}</span> <span class="token keyword">async</span> <span class="token keyword">function</span> <span class="token function">getBalance</span> <span class="token punctuation">(</span> <span class="token punctuation">)</span> <span class="token punctuation">{</span> <span class="token keyword">try</span> <span class="token punctuation">{</span> <span class="token comment">// class CallBuilder dùng để build thành các transaction object chuyên gọi các hàm read-only</span> <span class="token comment">// https://link.sun-asterisk.vn/FPM4jf </span> <span class="token keyword">const</span> txObj <span class="token operator">=</span> <span class="token keyword">new</span> <span class="token class-name">CallBuilder</span> <span class="token punctuation">(</span> <span class="token punctuation">)</span> <span class="token punctuation">.</span> <span class="token function">from</span> <span class="token punctuation">(</span> owner <span class="token punctuation">)</span> <span class="token punctuation">.</span> <span class="token function">to</span> <span class="token punctuation">(</span> instanceContract <span class="token punctuation">)</span> <span class="token punctuation">.</span> <span class="token function">method</span> <span class="token punctuation">(</span> <span class="token string">'balanceOf'</span> <span class="token punctuation">)</span> <span class="token punctuation">.</span> <span class="token function">params</span> <span class="token punctuation">(</span> <span class="token punctuation">{</span> _owner <span class="token operator">:</span> account <span class="token punctuation">,</span> <span class="token punctuation">}</span> <span class="token punctuation">)</span> <span class="token punctuation">.</span> <span class="token function">build</span> <span class="token punctuation">(</span> <span class="token punctuation">)</span> <span class="token punctuation">;</span> <span class="token keyword">let</span> balance <span class="token operator">=</span> <span class="token keyword">await</span> <span class="token function">iconService</span> <span class="token punctuation">.</span> <span class="token function">call</span> <span class="token punctuation">(</span> txObj <span class="token punctuation">)</span> <span class="token punctuation">.</span> <span class="token function">execute</span> <span class="token punctuation">(</span> <span class="token punctuation">)</span> <span class="token punctuation">;</span> balance <span class="token operator">=</span> <span class="token function">parseInt</span> <span class="token punctuation">(</span> balance <span class="token punctuation">)</span> <span class="token punctuation">;</span> console <span class="token punctuation">.</span> <span class="token function">log</span> <span class="token punctuation">(</span> <span class="token punctuation">{</span> balance <span class="token punctuation">}</span> <span class="token punctuation">)</span> <span class="token punctuation">;</span> <span class="token keyword">return</span> balance <span class="token punctuation">;</span> <span class="token punctuation">}</span> <span class="token keyword">catch</span> <span class="token punctuation">(</span> err <span class="token punctuation">)</span> <span class="token punctuation">{</span> console <span class="token punctuation">.</span> <span class="token function">log</span> <span class="token punctuation">(</span> <span class="token punctuation">{</span> err <span class="token punctuation">}</span> <span class="token punctuation">)</span> <span class="token punctuation">;</span> <span class="token punctuation">}</span> <span class="token punctuation">}</span> <span class="token function">getBalance</span> <span class="token punctuation">(</span> <span class="token punctuation">)</span> <span class="token punctuation">;</span> |
For other functions, when we call through the SDK we need to do the signing
1 2 3 4 5 6 7 8 9 10 11 12 13 14 15 16 17 18 19 20 21 22 23 24 25 26 27 28 29 30 31 32 33 34 35 36 37 38 39 40 41 42 43 44 45 46 | <span class="token comment">// transfer.js</span> <span class="token keyword">const</span> IconService <span class="token operator">=</span> <span class="token function">require</span> <span class="token punctuation">(</span> <span class="token string">'icon-sdk-js'</span> <span class="token punctuation">)</span> <span class="token punctuation">;</span> <span class="token keyword">const</span> <span class="token punctuation">{</span> argv <span class="token punctuation">}</span> <span class="token operator">=</span> <span class="token function">require</span> <span class="token punctuation">(</span> <span class="token string">'yargs'</span> <span class="token punctuation">)</span> <span class="token punctuation">;</span> <span class="token function">require</span> <span class="token punctuation">(</span> <span class="token string">'dotenv'</span> <span class="token punctuation">)</span> <span class="token punctuation">.</span> <span class="token function">config</span> <span class="token punctuation">(</span> <span class="token punctuation">)</span> <span class="token punctuation">;</span> <span class="token keyword">const</span> <span class="token punctuation">{</span> IconWallet <span class="token punctuation">,</span> HttpProvider <span class="token punctuation">,</span> SignedTransaction <span class="token punctuation">,</span> IconBuilder <span class="token punctuation">,</span> IconConverter <span class="token punctuation">}</span> <span class="token operator">=</span> IconService <span class="token punctuation">;</span> <span class="token keyword">const</span> provider <span class="token operator">=</span> <span class="token keyword">new</span> <span class="token class-name">HttpProvider</span> <span class="token punctuation">(</span> process <span class="token punctuation">.</span> env <span class="token punctuation">.</span> <span class="token constant">API_ENPOINT</span> <span class="token punctuation">)</span> <span class="token punctuation">;</span> <span class="token keyword">const</span> iconService <span class="token operator">=</span> <span class="token keyword">new</span> <span class="token class-name">IconService</span> <span class="token punctuation">(</span> provider <span class="token punctuation">)</span> <span class="token punctuation">;</span> <span class="token keyword">const</span> <span class="token punctuation">{</span> CallTransactionBuilder <span class="token punctuation">}</span> <span class="token operator">=</span> IconBuilder <span class="token punctuation">;</span> <span class="token comment">// Import private key cảu account vào wallet, dùng cho việc ký giao dịch</span> <span class="token keyword">const</span> wallet <span class="token operator">=</span> IconWallet <span class="token punctuation">.</span> <span class="token function">loadPrivateKey</span> <span class="token punctuation">(</span> process <span class="token punctuation">.</span> env <span class="token punctuation">.</span> <span class="token constant">PRIVATE_KEY</span> <span class="token punctuation">)</span> <span class="token punctuation">;</span> <span class="token keyword">const</span> owner <span class="token operator">=</span> process <span class="token punctuation">.</span> env <span class="token punctuation">.</span> <span class="token constant">OWNER</span> <span class="token punctuation">;</span> <span class="token keyword">const</span> instanceContract <span class="token operator">=</span> process <span class="token punctuation">.</span> env <span class="token punctuation">.</span> <span class="token constant">ADDRESS_CONTRACT_SAMPLE_TOKEN</span> <span class="token punctuation">;</span> <span class="token keyword">const</span> to <span class="token operator">=</span> argv <span class="token punctuation">.</span> to <span class="token punctuation">;</span> <span class="token keyword">const</span> value <span class="token operator">=</span> <span class="token function">parseInt</span> <span class="token punctuation">(</span> argv <span class="token punctuation">.</span> value <span class="token punctuation">)</span> <span class="token punctuation">;</span> <span class="token keyword">async</span> <span class="token keyword">function</span> <span class="token function">transfer</span> <span class="token punctuation">(</span> <span class="token punctuation">)</span> <span class="token punctuation">{</span> <span class="token keyword">try</span> <span class="token punctuation">{</span> <span class="token comment">// Class CallTransactionBuilder dùng để build các giao dịch gọi đến các hàm thay đổi trạng thái của blockchain</span> <span class="token comment">// Hàm transfer nhận vào 2 params là `_to` và `_value`</span> <span class="token keyword">const</span> txObj <span class="token operator">=</span> <span class="token keyword">new</span> <span class="token class-name">CallTransactionBuilder</span> <span class="token punctuation">(</span> <span class="token punctuation">)</span> <span class="token punctuation">.</span> <span class="token function">from</span> <span class="token punctuation">(</span> owner <span class="token punctuation">)</span> <span class="token punctuation">.</span> <span class="token function">to</span> <span class="token punctuation">(</span> instanceContract <span class="token punctuation">)</span> <span class="token punctuation">.</span> <span class="token function">stepLimit</span> <span class="token punctuation">(</span> IconConverter <span class="token punctuation">.</span> <span class="token function">toBigNumber</span> <span class="token punctuation">(</span> <span class="token string">'2000000'</span> <span class="token punctuation">)</span> <span class="token punctuation">)</span> <span class="token punctuation">.</span> <span class="token function">nid</span> <span class="token punctuation">(</span> IconConverter <span class="token punctuation">.</span> <span class="token function">toBigNumber</span> <span class="token punctuation">(</span> <span class="token string">'3'</span> <span class="token punctuation">)</span> <span class="token punctuation">)</span> <span class="token punctuation">.</span> <span class="token function">nonce</span> <span class="token punctuation">(</span> IconConverter <span class="token punctuation">.</span> <span class="token function">toBigNumber</span> <span class="token punctuation">(</span> <span class="token string">'1'</span> <span class="token punctuation">)</span> <span class="token punctuation">)</span> <span class="token punctuation">.</span> <span class="token function">version</span> <span class="token punctuation">(</span> IconConverter <span class="token punctuation">.</span> <span class="token function">toBigNumber</span> <span class="token punctuation">(</span> <span class="token string">'3'</span> <span class="token punctuation">)</span> <span class="token punctuation">)</span> <span class="token punctuation">.</span> <span class="token function">timestamp</span> <span class="token punctuation">(</span> <span class="token keyword">new</span> <span class="token class-name">Date</span> <span class="token punctuation">(</span> <span class="token punctuation">)</span> <span class="token punctuation">.</span> <span class="token function">getTime</span> <span class="token punctuation">(</span> <span class="token punctuation">)</span> <span class="token operator">*</span> <span class="token number">1000</span> <span class="token punctuation">)</span> <span class="token punctuation">.</span> <span class="token function">method</span> <span class="token punctuation">(</span> <span class="token string">'transfer'</span> <span class="token punctuation">)</span> <span class="token punctuation">.</span> <span class="token function">params</span> <span class="token punctuation">(</span> <span class="token punctuation">{</span> _to <span class="token operator">:</span> to <span class="token punctuation">,</span> _value <span class="token operator">:</span> IconConverter <span class="token punctuation">.</span> <span class="token function">toHex</span> <span class="token punctuation">(</span> value <span class="token punctuation">)</span> <span class="token punctuation">,</span> <span class="token punctuation">}</span> <span class="token punctuation">)</span> <span class="token punctuation">.</span> <span class="token function">build</span> <span class="token punctuation">(</span> <span class="token punctuation">)</span> <span class="token punctuation">;</span> <span class="token keyword">const</span> signedTransaction <span class="token operator">=</span> <span class="token keyword">new</span> <span class="token class-name">SignedTransaction</span> <span class="token punctuation">(</span> txObj <span class="token punctuation">,</span> wallet <span class="token punctuation">)</span> <span class="token punctuation">;</span> <span class="token keyword">const</span> txHash <span class="token operator">=</span> <span class="token keyword">await</span> iconService <span class="token punctuation">.</span> <span class="token function">sendTransaction</span> <span class="token punctuation">(</span> signedTransaction <span class="token punctuation">)</span> <span class="token punctuation">.</span> <span class="token function">execute</span> <span class="token punctuation">(</span> <span class="token punctuation">)</span> <span class="token punctuation">;</span> console <span class="token punctuation">.</span> <span class="token function">log</span> <span class="token punctuation">(</span> <span class="token punctuation">{</span> txHash <span class="token punctuation">}</span> <span class="token punctuation">)</span> <span class="token punctuation">;</span> <span class="token punctuation">}</span> <span class="token keyword">catch</span> <span class="token punctuation">(</span> err <span class="token punctuation">)</span> <span class="token punctuation">{</span> console <span class="token punctuation">.</span> <span class="token function">log</span> <span class="token punctuation">(</span> <span class="token punctuation">{</span> err <span class="token punctuation">}</span> <span class="token punctuation">)</span> <span class="token punctuation">;</span> <span class="token punctuation">}</span> <span class="token punctuation">}</span> <span class="token function">transfer</span> <span class="token punctuation">(</span> <span class="token punctuation">)</span> <span class="token punctuation">;</span> |
Run:
1 2 3 | node getBalance --address <span class="token operator">=</span> <span class="token operator"><</span> tài khoản bạn cần truy vấn số dư token <span class="token operator">></span> node transfer --to <span class="token operator">=</span> <span class="token operator"><</span> địa chỉ nhận token <span class="token operator">></span> --value <span class="token operator">=</span> |
Note : To learn the functions of the modules in the Javascript SDK, you can refer to Github above.