
When it comes to discovering that a product has an error, it’s a serious problem, affecting customers’ business and the quality of the production team. So how to avoid making mistakes to end users. In this article I will introduce the workflow that allows when a product adds a new feature, this feature makes no mistake, a process that combines automation functions with group discipline.
Errors can occur at all times, errors can be found when the product is still in the development stage or it is not until the product is released that defects can be found. But preventing and finding bugs while developing will reduce the cost of fixing bugs. According to IBM research, fixing a defect in a product can cost up to 5 times more than detecting it in the development environment (during design, local development, or test phase).
One of the situations that occur when the product has an error:
- A customer found the error and notified the customer service side.
- The errors are recorded by the production team.
- Developers get a description of the error, open the specifications and take the time to read it.
- The developer will then take the time to reproduce the bug.
- After that, the developer must learn how to fix the errors and make corrections.
- Next, the corrected version must go through tests.
- The fix is then built and deployed in different environments.
- Finally, the fix goes through the QA team testing process.
How to prevent errors on released products
To catch errors and fix errors at the most cost-effective and time-consuming stage, we follow these steps, following some core principles:
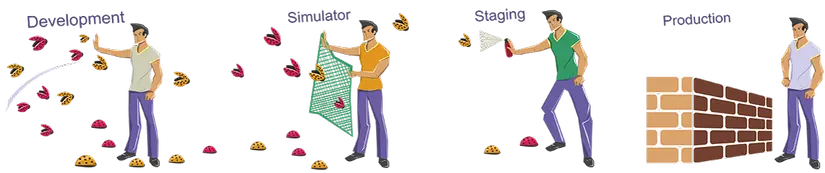
Phase 1 – Development environment
Step 1 : Good design. Keep it simple
Create the design before programming: try to divide difficult problems into smaller parts / steps / modules that you can solve one by one, thinking about well-defined objects. Share plans with the team at design review meetings. Good design is the key to reducing errors and improving code quality.
Step 2 : Start programming
The code must be easy to read and simple. Design principles and development models will be indispensable elements to help you better programming. Unit testing is part of the development process. We use them to test individual code units and ensure that the unit is logically correct. Unit tests are written and implemented by the developers, using JUnit as a testing framework.
Step 3 : Use code analysis tools
To help ensure and maintain code quality, we use some automated code analysis tools such as:
- FindBugs – A static code analysis tool that detects possible errors in Java programs, helping us improve code accuracy.
- Checkstyle – Checkstyle is a development tool to help Java coding programmers comply with an coding standard. It automates the process of checking Java code.
Step 4 : Perform code checking
We all know that code evaluation is very important. All code is included in ReviewBoard and developers can review the code. For more important teams, we have a build to ensure every line of code has passed the assessment – in case the review has not been done, the build will alert the team that there is an unpatched change. consider. It is important to ensure that any changes in code are checked and evaluated.
Step 5 : CI
This is where all the code is being integrated. We use TeamCity to enforce code standards and accuracy by running Unit tests, FindBugs validation, and other types of policies.
Phase 2 – Test environment
Step 1 : Integration testing
Integration testing is also performed by the developers, but instead of testing individual components, it aims to test components. A system consists of many separate components such as code, databases, web servers, etc. Integrating testing can detect problems between components, network access, database problems. …
Step 2 : Functional testing
Test cases are written based on specification and actual results are compared with expected results. We run a functional test using Selenium and Protractor to test the user interface and Junit to test the API.
Phase 3 – Staging environment
This environment is often referred to as a pre-production environment, system testing area, or simply organizational area. Its purpose is to provide a real product environment simulation environment as close as possible to be able to test its application in conjunction with other applications.
** Phase 4 – Product environment **
Step 1 : Deploy the product
Deploy is a process of putting code into devices. If a number of errors occur during deployment, the system will halt the deployment, preventing the problematic version from reaching all machines and allow us to return for quick fixes.
Step 2 : Combine feature flags
All new components are released with feature flags, essentially to control the entire life cycle of the features. The feature flag allows managing components and preventing risks.
Step 3 : Release products
There are two ways to release a product. The first is to test new features on a small group of users before releasing them to everyone. The second way is to open the feature initially for 10% of customers, then 30%, then 50%, and then 100%. Both methods allow us to monitor and monitor problematic scenarios in our systems.
Step 4 : Monitoring and warning
Setting notifications is also part of a developer’s job, and it’s your responsibility to make adjustments to trigger PagerDuty alerts. PagerDuty is an automated phone call, texting and emailing service that helps notify responsible parties to ensure problems are solved by the right people at the right time.
The above is the entire process of closely developing to find bugs, but one problem that many projects will encounter is that fixing bugs causes errors. At the end of the project, there are still many errors, fixing this error causes many other errors. How to ensure delivery of products to customers without errors arising? Many people will answer that they have to check all 1 time before release. Indeed, it has never been a solution.
Even projects that follow strict procedures cannot guarantee that no defects will arise. But obviously we can not re-test the entire system over and over to be assured of the quality, doing so will increase the time and cost a lot.
The cause of the problem caused by the error is usually due to the developer experience, not careful repair, just fix a place where the error occurred without checking the scope of influence. The solution is to analyze the impact range when fixing errors and list all affected areas. Testers check the error and all surrounding effects. So we need to regularly apply the process of error analysis and scope of influence to ensure cases occur, limiting leakage errors when delivering products to customers.
Reference source: https://www.outbrain.com/techblog/2017/11/keep-bugs-out-of-production/