Hello everyone, I’ve come back here. Today we continue to learn how the Controller returns the response to the client.
1. Basic HTTP response
When the Controller receives the request data, it will be pushed down to the Service layer to process. Then the data will be returned by the Service, and the Controller will have to return it back to the client.
In the previous post we knew that the request was what was being sent, the response is the opposite, the data returned for each request. For example you give me money (send request), then I return you a bowl of pho (response).
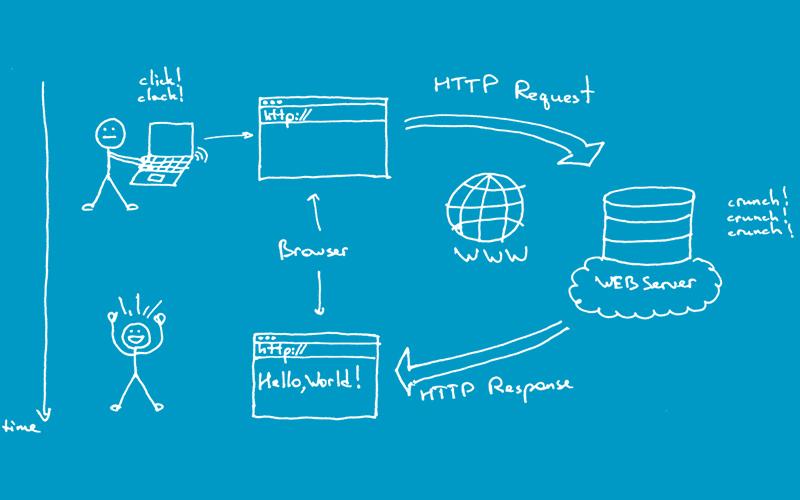
The HTTP response has three main information to consider:
- Status code: a number of whether the response is successful or not. Example 200 is OK, 401 is not authenticated, 403 is not enough permissions, 404 is not found.
- Header: Similar to request, the response also has headers
- Body: just returning the status code is not enough, you may want to add some information, or something. They will then be contained in the response body.
Spring Boot uses annotations, a few other classes to handle the return response.
2. Handling response in Controller
2.1. @ResponseBody and @ResponseStatus
With REST API, the data returned will be in the response body, in JSON format. As in the previous post I said, if you use @RestController , you do not need @ResponseBody because it is available by default, while @Controller must specify where the data is in the response.
1 2 3 4 5 6 7 8 9 10 11 12 13 14 15 | <span class="token annotation punctuation">@Controller</span> <span class="token keyword">public</span> <span class="token keyword">class</span> <span class="token class-name">UserController</span> <span class="token punctuation">{</span> <span class="token annotation punctuation">@GetMapping</span> <span class="token punctuation">(</span> <span class="token string">"/"</span> <span class="token punctuation">)</span> <span class="token keyword">public</span> <span class="token class-name">String</span> <span class="token function">homePage</span> <span class="token punctuation">(</span> <span class="token punctuation">)</span> <span class="token punctuation">{</span> <span class="token keyword">return</span> <span class="token string">"index"</span> <span class="token punctuation">;</span> <span class="token comment">// Trả về view có tên là index</span> <span class="token punctuation">}</span> <span class="token annotation punctuation">@GetMapping</span> <span class="token punctuation">(</span> <span class="token string">"/info"</span> <span class="token punctuation">)</span> <span class="token annotation punctuation">@ResponseBody</span> <span class="token keyword">public</span> <span class="token class-name">UserInfo</span> <span class="token function">getUserInfo</span> <span class="token punctuation">(</span> <span class="token punctuation">)</span> <span class="token punctuation">{</span> <span class="token punctuation">.</span> <span class="token punctuation">.</span> <span class="token punctuation">.</span> <span class="token keyword">return</span> userInfo <span class="token punctuation">;</span> <span class="token comment">// Do có @ResponseBody nên userInfo sẽ nằm trong body</span> <span class="token punctuation">}</span> <span class="token punctuation">}</span> |
By default, Spring Boot will return some status codes such as 200, 401, … automatically if you do not configure a custom. For example, when the request is not valid, status 400 (Bad request) will be automatically returned if you have no code to handle that.
Besides, Spring Boot also has @ResponseStatus to specify that the controller will return a certain status, even if the implementation is successful. For example, if I want to let my friend fix the game bug, just add this line to the code.
1 2 3 4 5 6 7 8 9 10 11 | <span class="token annotation punctuation">@Controller</span> <span class="token keyword">public</span> <span class="token keyword">class</span> <span class="token class-name">UserController</span> <span class="token punctuation">{</span> <span class="token annotation punctuation">@GetMapping</span> <span class="token punctuation">(</span> <span class="token string">"/info"</span> <span class="token punctuation">)</span> <span class="token annotation punctuation">@ResponseBody</span> <span class="token annotation punctuation">@ResponseStatus</span> <span class="token punctuation">(</span> <span class="token class-name">HttpStatus</span> <span class="token punctuation">.</span> BAD_REQUEST <span class="token punctuation">)</span> <span class="token comment">// Đây</span> <span class="token keyword">public</span> <span class="token class-name">UserInfo</span> <span class="token function">getUserInfo</span> <span class="token punctuation">(</span> <span class="token punctuation">)</span> <span class="token punctuation">{</span> <span class="token punctuation">.</span> <span class="token punctuation">.</span> <span class="token punctuation">.</span> <span class="token keyword">return</span> userInfo <span class="token punctuation">;</span> <span class="token punctuation">}</span> <span class="token punctuation">}</span> |
At this point, although the processing is successful (should return 200), but due to @ResponseStatus , the status code always returns 404 at this time.
2.2. Use the HttpServletResponse param object
Hm this method is not very recommended, but sometimes you will still see it in old Servlet projects.
This way uses the HttpServletResponse parameter object in the Controller method, when the Controller method is called, this object is automatically passed on. Usually it comes with HttpServletRequest as follows.
1 2 3 4 5 6 7 8 9 10 | <span class="token keyword">public</span> <span class="token keyword">class</span> <span class="token class-name">UserController</span> <span class="token punctuation">{</span> <span class="token annotation punctuation">@GetMapping</span> <span class="token punctuation">(</span> <span class="token string">"/info"</span> <span class="token punctuation">)</span> <span class="token keyword">public</span> <span class="token keyword">void</span> <span class="token function">getUserInfo</span> <span class="token punctuation">(</span> <span class="token class-name">HttpServletRequest</span> req <span class="token punctuation">,</span> <span class="token class-name">HttpServletResponse</span> res <span class="token punctuation">)</span> <span class="token punctuation">{</span> <span class="token punctuation">.</span> <span class="token punctuation">.</span> <span class="token punctuation">.</span> res <span class="token punctuation">.</span> <span class="token function">setHeader</span> <span class="token punctuation">(</span> <span class="token string">"abc"</span> <span class="token punctuation">,</span> <span class="token string">"123"</span> <span class="token punctuation">)</span> <span class="token punctuation">;</span> res <span class="token punctuation">.</span> <span class="token function">setStatus</span> <span class="token punctuation">(</span> <span class="token number">404</span> <span class="token punctuation">)</span> <span class="token punctuation">;</span> <span class="token punctuation">.</span> <span class="token punctuation">.</span> <span class="token punctuation">.</span> <span class="token punctuation">}</span> <span class="token punctuation">}</span> |
2.3. Use the ResponseEntity<T> class
This is the best way to use repsonse and I recommend it. It has advantages over the previous two ways as follows:
- No need for lengthy code, this class uses builder, so it is quite convenient to use.
- With
@ResponseStatus, only hard set the status code, but what if I want the status code to be different depending on the condition.ResponseEntity<T>will get all the work done. - It is possible to both put data in the body, customize the header, just, … at the same time.
In the code, you just need to change the return type of the method from return something (temporarily called X ) to the ResponseEntity<X> .
1 2 3 4 5 6 7 8 9 10 11 12 13 14 15 | <span class="token keyword">public</span> <span class="token keyword">class</span> <span class="token class-name">UserController</span> <span class="token punctuation">{</span> <span class="token annotation punctuation">@GetMapping</span> <span class="token punctuation">(</span> <span class="token string">"/info"</span> <span class="token punctuation">)</span> <span class="token keyword">public</span> <span class="token class-name">ResponseEntity</span> <span class="token generics"><span class="token punctuation"><</span> <span class="token class-name">User</span> <span class="token punctuation">></span></span> <span class="token function">getUserInfo</span> <span class="token punctuation">(</span> <span class="token annotation punctuation">@RequestParam</span> <span class="token punctuation">(</span> <span class="token string">"username"</span> <span class="token punctuation">)</span> <span class="token class-name">String</span> username <span class="token punctuation">)</span> <span class="token punctuation">{</span> <span class="token comment">// Tìm User trong database bằng username</span> <span class="token class-name">User</span> user <span class="token operator">=</span> userRepository <span class="token punctuation">.</span> <span class="token function">findByUsername</span> <span class="token punctuation">(</span> username <span class="token punctuation">)</span> <span class="token punctuation">;</span> <span class="token comment">// Nếu không tìm thấy, trả về message lỗi 404 Not found</span> <span class="token keyword">if</span> <span class="token punctuation">(</span> user <span class="token operator">==</span> <span class="token keyword">null</span> <span class="token punctuation">)</span> <span class="token keyword">return</span> <span class="token class-name">ResponseEntity</span> <span class="token punctuation">.</span> <span class="token function">notFound</span> <span class="token punctuation">(</span> <span class="token punctuation">)</span> <span class="token punctuation">;</span> <span class="token comment">// Tạm thời là vậy, thực tế người ta dùng AOP để bắt exception</span> <span class="token comment">// Nếu tìm thấy return 200 OK</span> <span class="token keyword">return</span> <span class="token class-name">ResponseEntity</span> <span class="token punctuation">.</span> <span class="token function">ok</span> <span class="token punctuation">(</span> user <span class="token punctuation">)</span> <span class="token punctuation">;</span> <span class="token punctuation">}</span> <span class="token punctuation">}</span> |
ResponseEntity<T> can be used in three ways:
- Create a new object of form
new ResponseEntity<>(user, HttpStatus.OK) - Use the static method of
ResponseEntity.ok(user) - Use the
ResponseEntity.status(HttpStatus.BAD_REQUEST).body("User not found").build()builderResponseEntity.status(HttpStatus.BAD_REQUEST).body("User not found").build()
With ResponseEntity , you can both customize the status code, body response depending on different conditions, and also adjust other response parameters such as header, … quite convenient.
Ok next post is over. Through the two parts I have presented some concepts of Controller, hope everyone has understood somewhat. Thank you for watching the series, and don’t forget to upvote if the article was helpful. Dear.