Hello, I’m back with the basic Spring Boot series, and now I’m getting a pretty good match, so maybe launching a new series on Java core.
However, I will try to keep the progress of 2 articles / week of Spring Boot series.
Today’s post we will continue with how to organize the source code for the Spring Boot standard.
1. Application structure
1.1. The general structure of the application
Whether the project is created with Maven or Gradle, the general structure is still similar, because it follows an available template (named Archetype):
- The root directory contains miscellaneous files like
pom.xml(of Maven),build.gradleand other files like.gitignore, … used to configure the project. - The
.mvnor.gradlefolders are separate folders of Maven and Gradle, so they should be.mvnor.gradlefrom source code. - The code is contained in the
srcdirectory. - The build directory contains class files, JAR files. With Maven as the
targetand Gradle as thebuild.
As mentioned above, the source code is stored in the src directory. We’ll go into more depth in the next section.
1.2. Detailed source code structure
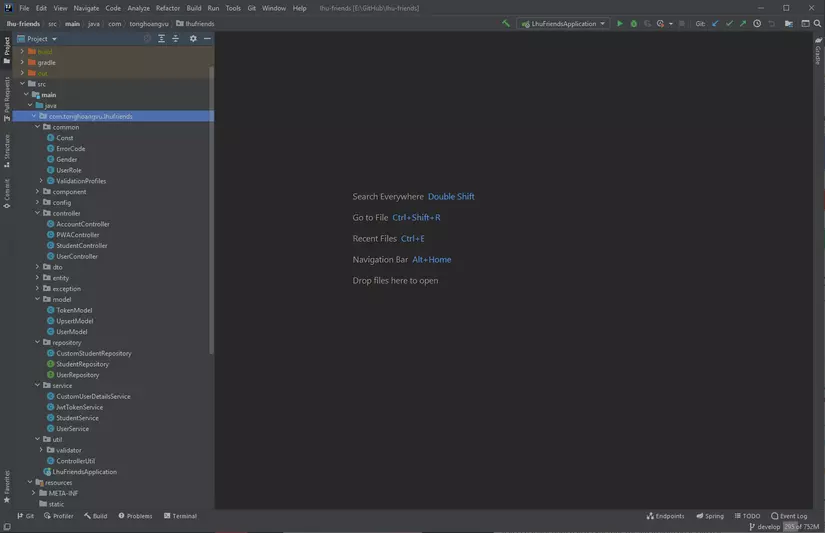
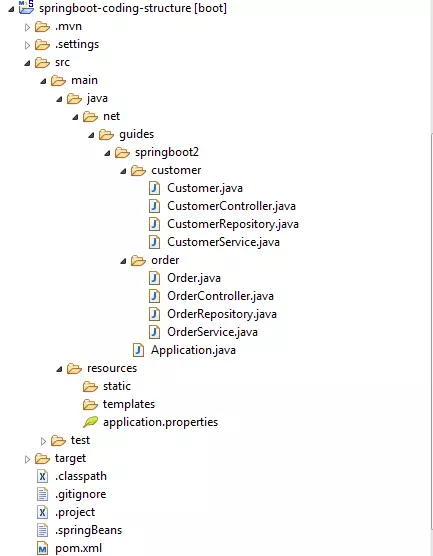
As shown, the main directory we need to care about is src/main/java/<tên package> . Every java code is in this:
- The main package name is set in reverse to the domain name. For example,
tonghoangvu.comis set tocom.tonghoangvu. Plus the project name. - There are sub-packages, each one representing classes of a specific layer (for example,
service,controller, …) - The
resourcesdirectory contains application resources such as images, static files, properties files, …
There is also src/test used to store test classes, used for unit tests.
2. Organize source code in a 3-class model
For those of you who do not remember about the 3-layer model, please review this article https://viblo.asia/p/luong-di-trong-spring-boot-ORNZqdELK0n . Actually, the 3-layer model is necessary to understand, because most Spring Boot projects follow this model.
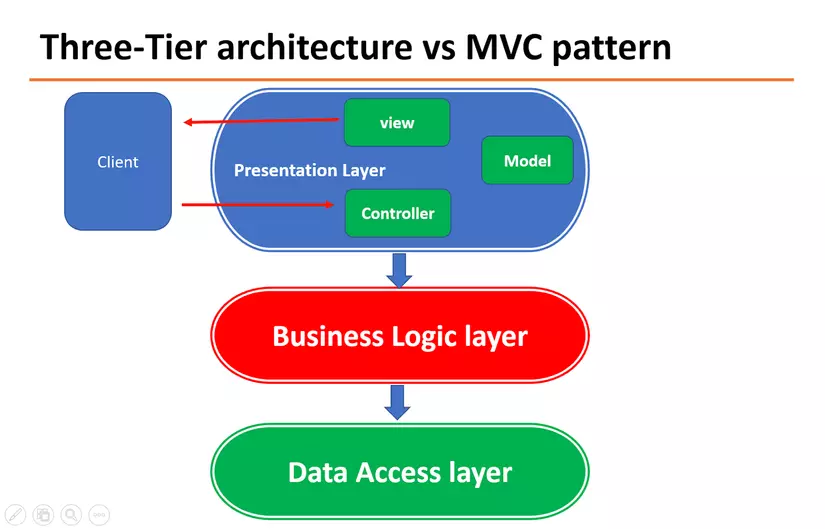
Corresponding to each component of the 3-class model, we will have the corresponding folders and naming:
- Controller layer: put in
controller, thecontrollerclass will have Controller suffix (for exampleUserController,AuthController, …) - Service layer: placed in the
service, the classes have the suffix of Service and usually correspond to the controller (for example,UserService, …) - Data access layer: this case is difficult, because this layer includes repository (put in
repositoryand similar suffix), DTO, model, entity … details I will talk about in the following articles.
In addition, for other types:
utilpackage contains util classes, such as convert end date, simple calculation, …commonpackage contains defined classes such as enum, interface, and class shared and simpleexceptionpackage contains the classes that are responsible for handling exception in Spring Boot.componentcontains the remaining defined beans but not of any layer.
Done, most Spring Boot applications have up to 80% similar structure. The difference is very small, simply in the naming.
3. Organize code by features
This way is slightly different from the organization in the 3-layer model above. Specifically, instead of dividing into packages based on layers, this method divides by features. That means that each feature, for example user package, will contain any UserController , UserService , …
To be honest, this is the first time I have seen this type of architecture, but it is quite good and suitable when the project has many features.
Reference source here https://shareprogramming.net/wp-content/uploads/2021/01/project-structure-1.png .
So today’s article has ended. Click vote or clip the article if it feels good. Forever.