How did I build a static website from Amazon S3?
Two days ago, I learned about Amazon S3, Cloudfront and Letsencrypt to build 2 static websites, the first is Rust 's homepage in Vietnam and the second is the personal blog site. Today this article to share gives you a way to make blogs of individuals as well as notes so that later on you don't know how to do it but do ahihi.
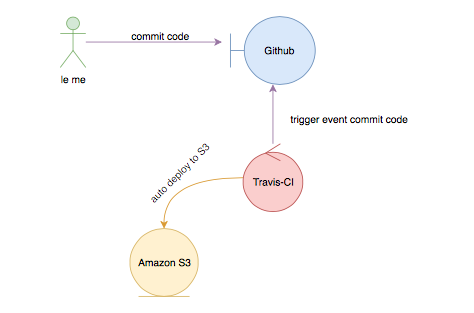
All 2 pages on me use the provided services and almost all free and 2 websites on the static website , I do not have to write php code, nodejs or ruby to save the database, all articles write yourself saved on Github, after I push an article up, there will be 1 service that automatically runs the test and does the content upload work is Amazon S3, too simple, no need to be big to do these things.
In order for me to understand it, I seem to illustrate it (Robustness Diagrams)
Before entering the article, the requirement to use it must be at least a domain, registered AWS, travis-ci, using command line.
Talking too much, I will share with you how to setup
Switch the DNS management section to Amazon Route 53 for management.
Since I use most of Amazon's stack, I will let Amazon manage it all. First you need to switch DNS management to Amazon Route 53 .
Depending on the domain service provider you will have different DNS changes, here I use Namecheap .
First go to Route 53 console to create a new hosted zone.
- Click Create Hosted Zone
- type information into the Domain Name (this is your domain name)
Note that Amazon Route 53 is not free, but every time you create a hosted zone is $ 0.52
After you have created it, clicking on the zone you created will see two information, NS and SOA
The following examples are:
1 2 3 4 5 6 | ns-xxcom. ns-xxnet. rust-lang.vn. NS ns-xxco.uk. ns-xxorg. rust-lang.vn SOA xxxx |
Then go to your domain management section to reset the DNS section. After adjusting the DNS part, it will take 24-48 hours for the DNS system to be updated, you can use the command to check if DNS has been set by the following command:
1 2 3 4 5 6 | $ dig rust-lang.vn rust-lang.vn. 59 IN A 54.182.2.136 rust-lang.vn. 59 IN A 54.182.2.57 rust-lang.vn. 59 IN A 54.182.2.192 ... |
Step 1 is complete, the next step is
Create email in the form of @ domain.com
In this step, if you want to add or add SSL to your domain, you should create an email in the above format. Also, setup cloudfront to alias the default domain of cloudfront as https: //*.cloudfront.net to https: / /example.com . If you do not want to replace the cloudfront domain, you can skip this step.
In order to register an email with the extension of your domain, there are many ways such as:
- use google app domain (cost money)
- use zoho
- or manually setup mail server (time consuming)
I chose zoho because there are some key features:
- free
- upto 20 users
- Simple setup
The steps to create an email with zoho can be found on the homepage of zoho.
There are already 53 routes and email, then they will create Bucket for S3 on creating CDN with Cloudfront
Create Bucket Amazon S3
The steps to create a bucket for Amazon S3 are extremely simple, just click on Create Bucket and fill the necessary parameters
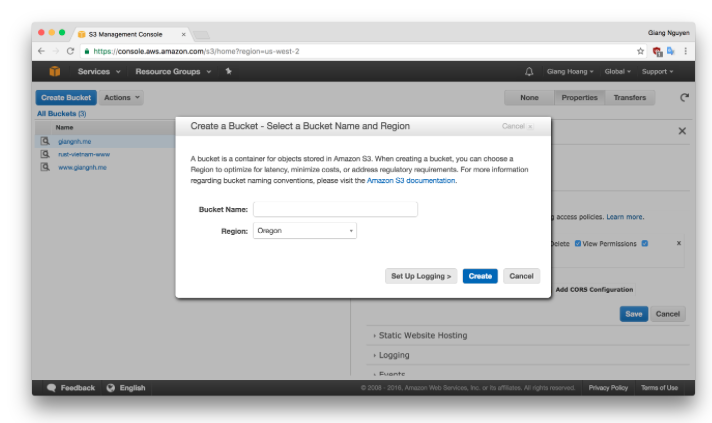
Here I have made it available as rust-vietnam-www .
For each bucket there will be many different policies that can be referenced in Managing Amazon Access Permissions S3 Resources to learn more about how to manage the policy of a bucket.
After creating the next bucket need to enable static function website hosting by selecting properties of bucket and click on Static Website Hosting then select Enable website hosting , section:
- Index Document: index.html
- Eror Document: error.html
In the above section, I suggest the file name, you can leave whatever name you want. After you have fully typed the save custom.
If you enable website hosting, you can view the bucket's content with endpoint
<bucket-name> .s3-website- <region> .amazonaws.com .
Created the Bucket section followed by creating Cloudfront.
Create Cloudfront and link with Bucket
Create a new cloudfront distribution
- Origin domain name: Select bucket just created with amazon S3.
- Origin path: this section will specify the path you want cloudfront request to your content, if left / will root object bucketname / , if / folder_name is equivalent to bucketname / folder_name .
- Origin ID: will automatically generate when selecting Origin domain.
- Restrict Bucket Access: Yes
- Origin Access Identity: Use an Existing Identity
- Your Identities: access-identity-
- Grant Read Permissions on Bucket: Yes, Update Bucket Policy
- Alternate Domain Names: Your domain
- Cloudfront SSL Certificate: default will update again.
- The rest for default if you need to update, we will edit again.
Then click Create Distribution and wait, it will take 15-20 to use the destribution when this is deployed
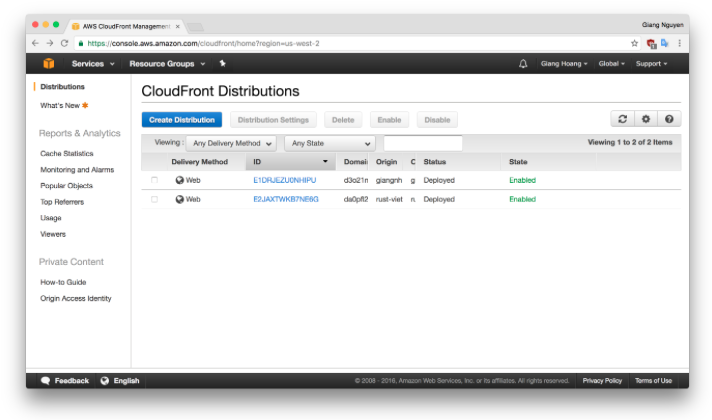
Each distribution will have a unique domain name and you can view the content of the bucket S3 with the domain name of the cloudfront respectively, for example here for bucket rust-vietname-www with the domain name of cloudfront is: da0pflxxxxx. cloudfront.net .
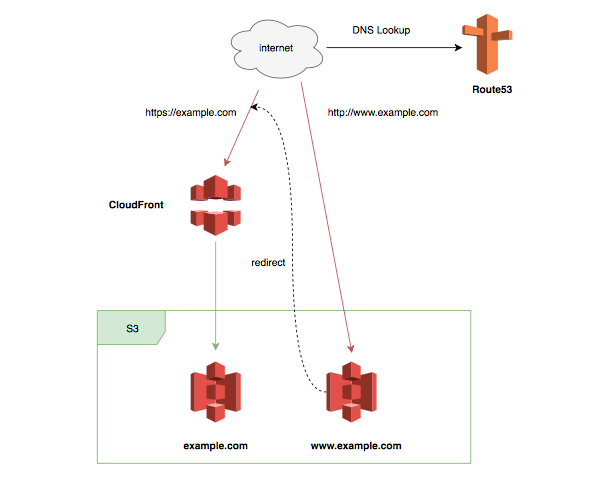
But with such a domain, it is difficult to remember that we need a half step to add alias for the domain about Cloudfront distribution. To do this step on Route 53, select hosted zones as your domain and choose create record set for 2 types as A and AAAA , both of them will select Alias as Yes and Alias target to cloudfront distribution has been created.
After you have selected, click create .
To check if it is done correctly, go to your domain and check if the header has the following fields:
- server: AmazonS3
- x-cache: Miss from cloudfront
If you have the above fields, then you have set up the correct zone. If not, then it must be wrong somewhere ahihi.
Add cert to domain by using Letsencrypt
With custom section cloudfront by domain, we can add cert to the domain by uploading ssl to AWS Certificate Manager.
Click on the cloudfront distribution you just created, the general tab select edit, the SSL Certificate section, click on Request or Import Cert with ACM, you will enter the domain to request, during the request the amazon will automatically send a link to approve the request then go to the specified mail like admin@domain.com , hostmaster@domain.com , … Previously we created a mail as admin@domain.com , so check mail and approve request sent.
So we can upload the cert, but when the cert is up, go buy it. But there is a tool that helps us create free cert which is Letsencrypt.
Create cert using letsencrypt client
1 2 3 4 5 6 7 8 9 10 11 12 | #folder to save cert mkdir -p ~ / letsencrypt / {etc, lib} # Let's Encrypt client via Docker docker run -it --rm --name letsencrypt -v "~ / letsencrypt / etc: / etc / letsencrypt" -v "~ / letsencrypt / lib: / var / lib / letsencrypt" spin.io/letsencrypt/letsencrypt:latest --agree-dev-preview --server https://acme-v01.api.letsencrypt.org/directory -a manual Auth |
After answering a few questions you will receive the following message
1 2 3 4 5 6 7 8 9 | Make sure your web server displays the following content at http://domain.com/.well-known/acme-challenge/some_long_path before r: some_long_string Content-Type header MUST be set to text / plain. ... <snip> ... Press ENTER để tiếp tục |
In this case, there is a manual way to go to the bucket when booting and creating the folder and then the file, or you can do that with aws client.
After you do the necessary steps to letsencrypt verify then press Enter if all is well, you will get the same message as Congratulations! Certificate and chuỗi của bạn đã được lưu vào ~ / letsencrypt / live / domain.com / fullchain.pem
Next, upload the newly created cert to ACM with aws client
1 2 3 4 5 6 | aws iam upload-server-certificate --server-certificate-name your-site.whatever --certificate-body file: //~/letsencrypt/etc/live/domain.com/cert.pem --private-key file: //~/letsencrypt/etc/live/domain.com/privkey.pem --certificate-chain file: //~/letsencrypt/etc/live/domain.com/chain.pem --path / cloudfront / |
After the upload is successful, go back to the cloud distribution page and select the distribution you created earlier and click Edit, the Custom SSL Certificate section of the cert that you uploaded earlier.
After selecting it, click Yes, Edit , and then select the Behaviors tab change Viewer Protocol Policy to Redirect HTTP to HTTPS and also click Yest, Edit .
Then wait 15-20p to cloudfront build again. After the status changes to Deployed , the check is done right or not by going to the browser, typing example.com if you can see https://example.com then you have done it right. hihi
However, since each object on cloudfront will expires after 24 hours, every time you upload a new content, wait 24 hours to multiply the change. hehe, we need a script to auto create invalidation at cloudfront and automatically deploy to S3, to do that, we choose travis-ci
Deploy code with travis-ci
The last job is to setup a travis to work automatically for me, I just need to upload content then go to coffee and then go back to the page to see the coffee after hehe.
Before setup travis we need to create IAM, so the term does not use root account. To create an IAM into the IAM , click on the Users tab on the left and select Add user, enter the user name here for example: travis-auto-deploy . Click Programmatic access , choose Next permissions , select Attach existing …
Search frame, find CloudFrontFullAccess and S3FullAccess , with what permission you want, tick.
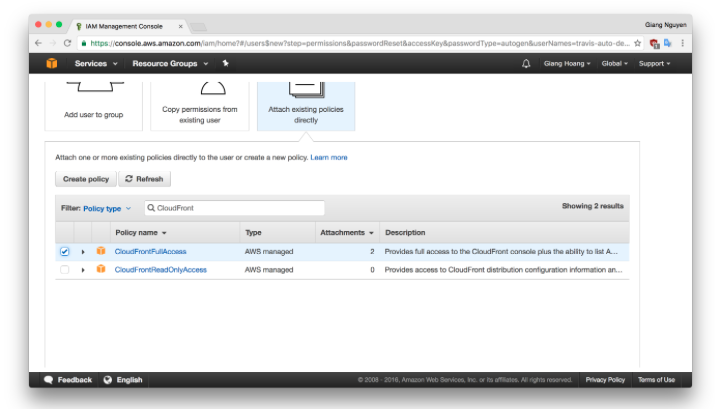
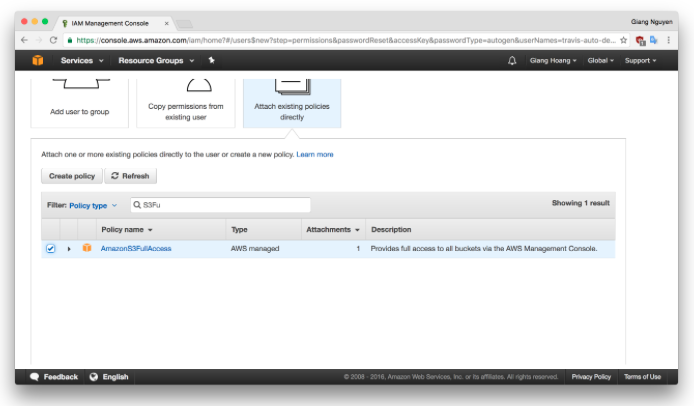
Click preview to review if nothing changes, click create user .
Đây là thời gian cuối cùng này thông báo sẽ được sẵn sàng để tải về
Remember this is the first time and also the last time you see the Secret access key , so download .csv to use it again with travis.
Next to travis-ci sync account with Github and enable CI repo you want. In the settings section of the repo in the directory where the 2 variables are added, it is the corresponding AWS_ACCESS_KEY_ID and AWS_SECRET_ACCESS_KEY in the previously downloaded file.
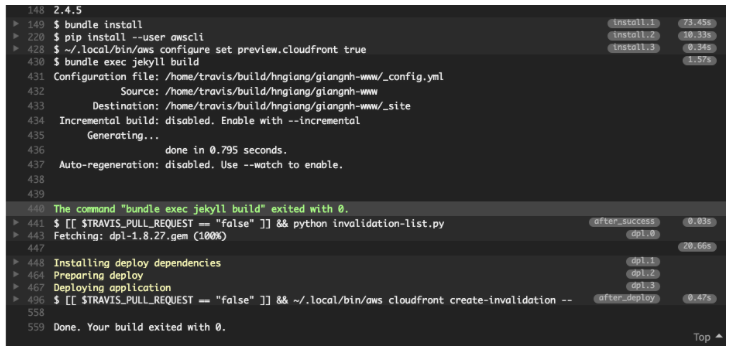
Setup code travis
1 2 3 4 5 6 7 8 9 10 11 12 13 14 15 16 17 18 19 20 21 22 23 24 25 26 27 28 29 30 31 32 33 34 35 36 37 | language: ruby rvm: - 2.1 # Containers are cool! sudo: false install: - bundle install - pip install --user awscli - ~ / .local / bin / aws configure set preview.cloudfront true # Build and deploy site to S3 bucket vào push vào, Unless PR script: bundle exec jekyll build branches: only: - master deploy: provider: s3 access_key_id: xxx secret_access_key: secure: "xxx" bucket: rust-vietnam-www acl: public_read skip_cleanup: true local_dir: _site region: ap-souther-1 on: branch: master condition: $ TRAVIS_PULL_REQUEST = "false" after_success: - '[[$ TRAVIS_PULL_REQUEST == "false"]] && python invalidation-list.py' after_deploy: - '[[TRAVIS_PULL_REQUEST == "false"]] && ~ / .local / bin / aws cloudfront create-invalidation --invalidation-batch file: //payload.json --distribution-id xx ' |
Access_key_id access key part is in csv file down, secret_access_key.secure the content was encoded using the command travis
1 | $ travis encrypt secret_access_key_here |
distribution-id can be found in the cloudfront distribution list.
When the build is successful, we will run the following python file to create a list of invalid objects:
1 2 3 4 5 6 7 8 9 10 11 12 13 14 15 16 17 18 19 20 21 22 23 24 25 26 27 28 29 30 31 32 33 34 35 36 37 38 39 40 41 42 43 44 45 46 47 48 49 50 51 52 53 54 | #! / usr / bin / env python "" " Đây script tạo một khối sai cho sử dụng bởi CLI AWS. https://docs.aws.amazon.com/cli/latest/reference/cloudfront/create-invalidation.html Tập tin được chọn từ `site` và xuất được được ghi vào` target`. Author: brson@mozilla.com "" " import os import time import json def pretty_time (): return '-'. join (time.strftime ('% c'). split ()) def list_files (site, name): base = site + name files = [name] for f in os.listdir (base): path = os.path.join (base, f) if os.path.isfile (path): files.extend ([name + f]) if os.path.isdir (path): files.extend (list_files (site, name + f + "/")) return file def build_payload (site): # translations files = list_files (site, "/") obj = {"Paths": { "Quantity": wool (files), "Items": [f for f in files]}, "CallerReference": "travis-" + pretty_time ()} return obj def write_output (obj, target): f = open (target, "w") json.dump (obj, f) f.close () def main (): site = "_site" target = "payload.json" payload = build_payload (site) write_output (payload, target) if __name__ == "__main__": main () |
After completing setup, try pushing push to branch master if there is no error, then we will see the status of travis showing up in green, and if there is a check error in log section.

Summary
We have built a website that has full caching, ssl, content that is stored at Github, auto deploy and tested by travis.
Go live:
The article is a bit long, if there is any wrong knowledge, I hope to receive your suggestions.
Update 1: Total cost of damage
With the first time you register for AWS, you will be exempted from the services provided by aws, using free here means limiting the number of requests, the number of hours used, but also enough for you to run a normal site. Specifically, here three services are used:
1. Amazon S3
As part of Free Usage AWS Tier, bạn có thể lấy đầu với Amazon S3 for free. Upon sign-up, new AWS customers receive 5 GB of Amazon S3 standard storage, 20,000 Get Requests, 2,000 Put Requests, and 15GB of data transfer out each month for one year.
Note the request here amazon it calculated how? Each time you upload is 1 request, you edit is 1 request, you delete is 1 request, … With Put, this is the number of requests you have to upload, update, delete 1 object. With static website, the storage itself is not very interested, because never upload through floating 1gb static content.
2. Amazon Route 53
This is like saying at first that it is not in the free tier package of aws, but the price is not significant, every 1 hosted zone costs about $ 0.52 / month, yes, not with bright coffee cup, played with amazon I should use this guy, not a problem.
3. Amazon Cloudfront
Cloudfront is included in AWS free tier package, will be free of 2,000,000 HTTP and HTTPS Requests , too much to use.
4. Letsencrypt
Free, but 90 days must renew again
5. Github
Providing both free and private source packages for you, private packages cost 7 $ / 1 month
6. Travis-CI
Free if your repo is open-source and you want to play private, it is a bit expensive.
Total costs : Money Amazon + money domain = 0.52 x (number of hosted zones that you want to manage) + domain money, assuming you use domain 10 trump 1 year and aws only have each zone of your domain, the total cost : 0.52 x 12 + 10 = 16.24 trump is too cheap to make a static website, I guarantee that you can't make a website as good as me but at that price.