Writing Unit tests is almost mandatory in every project, but do you really understand its benefits? Before embarking on the practice of writing Unit tests, let’s talk a little about its benefits!
Benefits of Unit tests
- Improve your design : Embarking on the code without paying too much attention to the design is a common mistake of developers, writing unit tests will force you to think, even think back and forth about design.
- Easy refactor : Because you already have test cases to make sure your code runs as expected, you can easily refactor the code without worrying about creating new bugs.
- Adding new features without affecting the old features : adding new code and running tests shows red is wrong then: v
- Test is a spec document : if you write a standard test and have enough cases, just read the test, you can understand the spec faster than reading the code.
- Writing tests helps developers gain more confidence
You might think that writing tests is too time-consuming, especially FE testing, sometimes it takes longer than writing code, but I think it will save more time when you want to refactor the code or develop the calculation. new feature, reducing the time to fix bugs compared to not writing tests.
Now let’s start with a small but fairly complete example using Angular, Jasmine and Karma. The next section of the article will cover the following:
- Explain a little bit about Karma and Jasmine
- Karma config
- Create a simple test file
- Test angular form
- Test component with service
Create Angular project with Jasmine and Karma
Install angular-cli and create new project
1 2 3 | npm install -g @angular/cli ng new angular-unit-testing |
Explain a little bit about Jasmine and Karma, who didn’t say anything until now
- Jasmine : is a framework for writing tests, it has built-in functions to support writing different types of tests
- Karma : is a Javascript tool used to load applications and execute your tests. Karma will be executed by the command line and will display the results to let you know every time you run the browser.
To run the test, just type ng test . This command will execute test cases, open the browser, display the results in the browser and in the console.
Karma config
Now look at the Karma config file generated from angular-cli
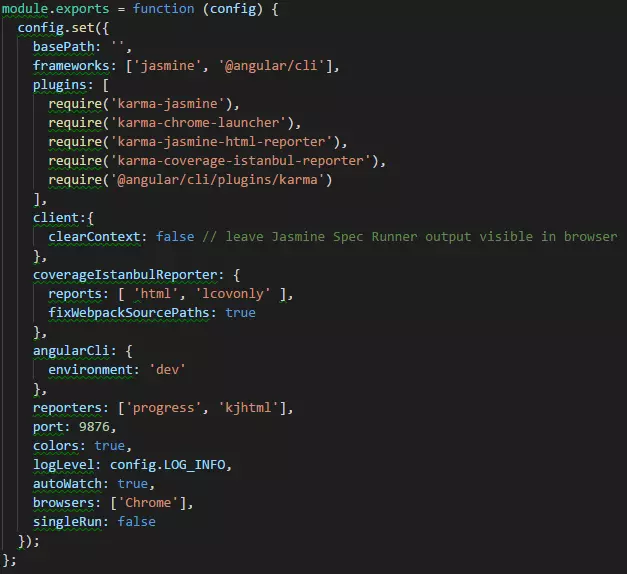
You probably guess what these configs are for, but let’s take a quick look
- frameworks : this is where jasmine is set as a framework for testing, if you want to use another framework then you can enter it here.
- autoWatch : if it is set to true, the test will run watch mode, which means that every time you change any line of code in the test file and save it will automatically rebuild and run again.
- browsers : this is the place to set the browser and test will run, the default will be Chrome, but you can use another browser by declaring here.
Start with a simple test file
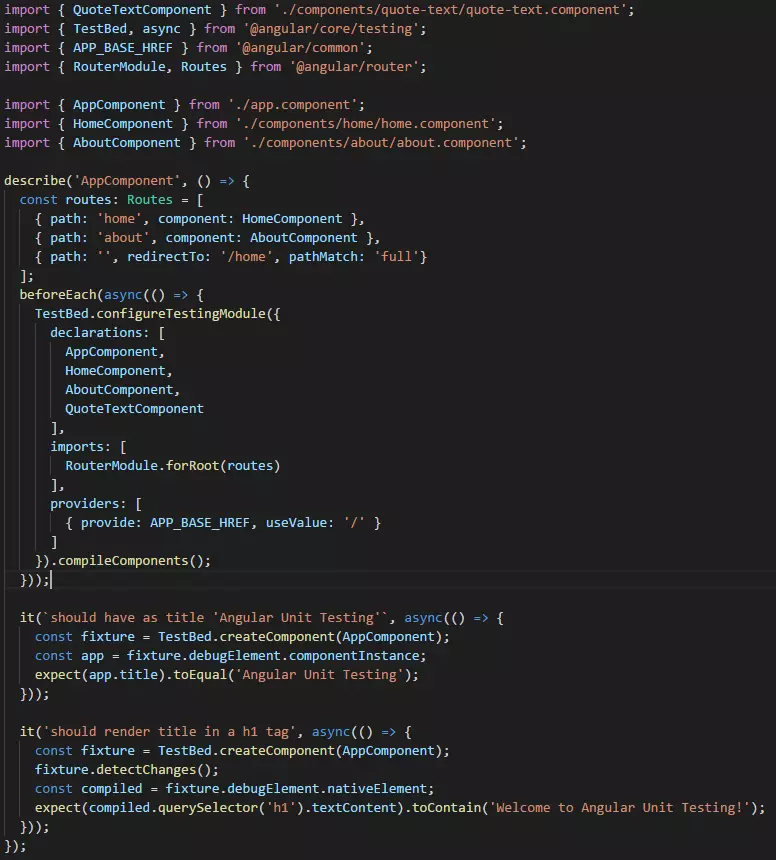
Now start writing tests with app.component.ts ! This component has only one text attribute with the content “Angular Unit Testing” placed in the <h1> tag. Now create a test file to check if the component actually contains the attribute, as well as the content displayed in the HTML.
A little glance, here we have
- import the angular testing libraries we will use
- Import dependent components
- Use
describeto start the test writing section with the title that matches the component test name. - Using
asyncbefore each test case, the purpose is so that the asynchronous piece of code can end before continuing, it is similar to using async at the time of writing the code.
Before running any test cases in Angular, you need to configure Angular testbed. It helps create an environment for the component being tested. Any module, component, or service that the component you are testing needs, must be included in the testbed. Finally, after the configuration is completed, you will call the compileComponents() function.
Next, we have 2 test cases. I will explain each case one by one:
In the first case, we will check to see if the component actually contains the text we expected in the title. First, we need an instance of app.component, so we use the createComponent() , create a fixture object, which allows us to create an instance of the component. Once we have an instance of app.component, we can check if the value of the title attribute is the same as the text we expected with the toEqual() function.
In the second case, similar to the first case, we will check that the <h1> tag contains the text we expect. First do the same thing, then call the detectChanges() function, which will apply the latest changes to the HTML. Then retrieve the HTML elements and check that the <h1> tag contains the correct text.
Test angular form
Start with 1 HTML file contact.component.html containing the form
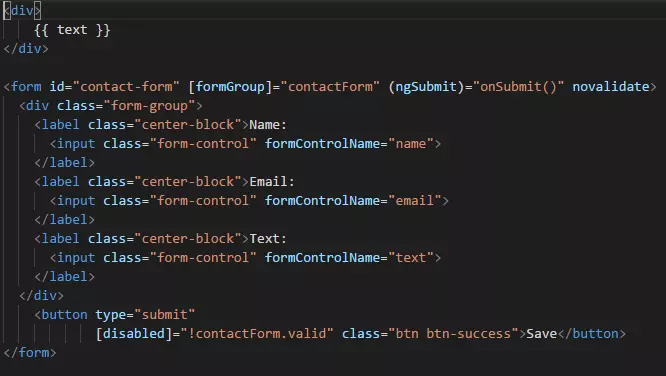
This form is quite simple so there’s no need to explain much. The submit button will be disabled if the form is invalid.
Next go to contact.component.ts
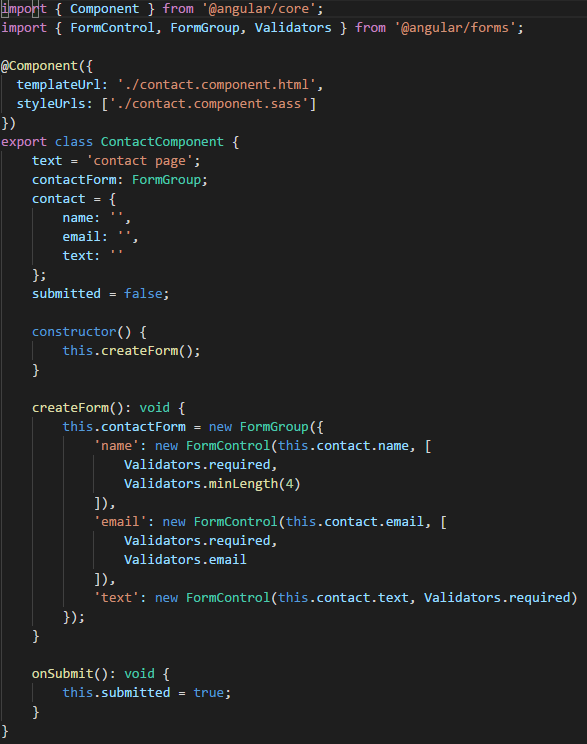
This file is also simple, the onSubmit() function changes the submited variable to true, the form has 3 controls with validate.
Now go to the test file
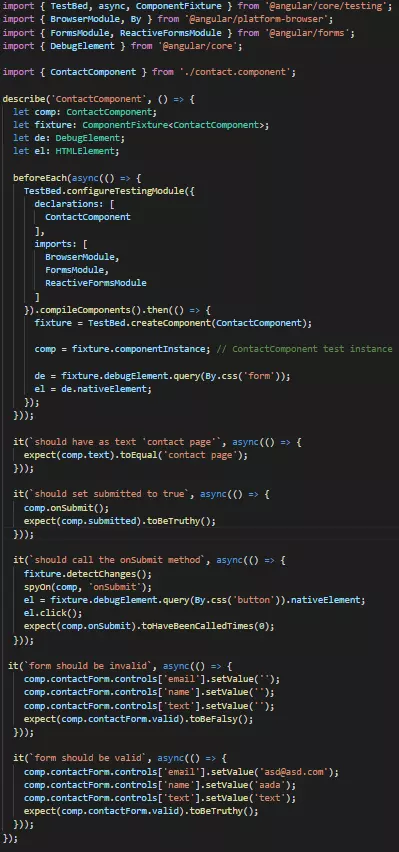
It looks a lot more complicated than the test file above, don’t worry, I’ll explain each part in detail
The first is still the import part, not much different, except to add By to select the element from the DOM.
In beforeEach() , we use the promise to function compileComponent() , when the promise is resolved, we will create the component instance in this always, to help to rewrite the test in each case.
The first case simply tests the text property value of the component.
The second case checks that the value of the submitted variable is true when the onSubmit() function is called.
In the third case, we will apply the state of the HTML using the detectChanges() function, then get the submit button from the DOM, and execute the click event. First of all, we need to create a spy for the component’s onSubmit() function. Finally, we expect the onSubmit() function to not be executed, because the Submit button will be disabled when the form is invalid.
The fourth case checks when passing invalid values, the form’s valid attribute will be false.
Finally, the fifth case is the opposite of the fourth case, when passed in valid values, the form’s valid attribute will be true.
Before finishing the article, we will come to the final part, how to handle services when the component that needs to test uses them.
Test component with service
When the test component uses the service, we must add it to the provider section in beforeEach() . In most cases, you will not need to use the actual service, let’s see how to mockup it
For example, a component uses a service

This component will call to the service to get a list of users, at the time of writing the test, it does not matter where to get users from, so we can create component mocking for this service.
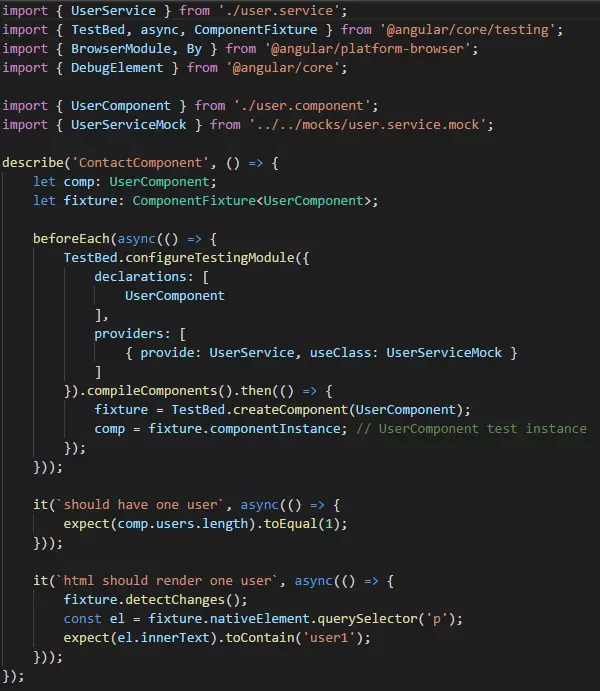
Basically the same as the above examples, except that when the UserService is called, it will be replaced with UserServiceMock . UserServiceMock is a dummy service to return dummy data to run the test. That’s it, that’s how you should mock the component service.
Source: https://medium.com/swlh/angular-unit-testing-jasmine-karma-step-by-step-e3376d110ab4