I write this article to share all my knowledge as well as the knowledge that I have learned about Coroutine.
This article is used in a casual way. For those who want to learn about Coroutine but have not found the most accurate source of information, you can consult immediately.
Knowledge comes to those who crave for it. Translation: Knowledge only comes to those who desire to have it
In this article we will go through the following topics in turn:
- What is Coroutine?
- Why use Coroutine?
- Detailed instructions on how to use Coroutine.
- What is Scope in Coroutine?
- Handling Exception in Kotlin Coroutine.
Existing frameworks allow us to handle multithreading but inevitably run into unexpected situations like callback hells or blocking state because we don’t have a simple way to guarantee a safe implementation. thread. And Coroutine emerged, a very useful and complete framework for simple concurrency management.
Now let’s find out exactly what Coroutine is
What is Coroutine?
Coroutines = Co + Routines
Here, Co means cooperation – can be understood as interaction, Routine means functions – this word is too familiar to our developers. That is, the functions interact with each other called Coroutine.
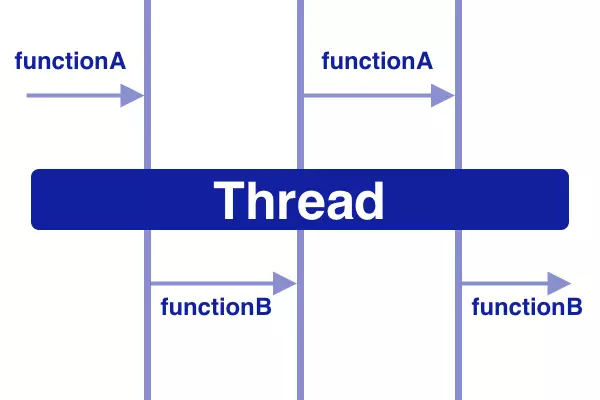
For example, let’s say I have two functions called functionA and functionB as below
1 2 3 4 5 6 7 8 9 10 11 12 13 14 15 16 17 18 19 20 21 | fun functionA(case: Int) { when (case) { 1 -> { taskA1() functionB(1) } 2 -> { taskA2() functionB(2) } 3 -> { taskA3() functionB(3) } 4 -> { taskA4() functionB(4) } } } |
1 2 3 4 5 6 7 8 9 10 11 12 13 14 15 16 17 18 19 20 | fun functionB(case: Int) { when (case) { 1 -> { taskB1() functionA(2) } 2 -> { taskB2() functionA(3) } 3 -> { taskB3() functionA(4) } 4 -> { taskB4() } } } |
Then I call functionA as follows: functionA(1) Here functionA will execute task A1 and continue to call functionB to execute task B1, then call back functionA to execute task A2 and so on. The important thing here is that we see functionA and functionB are interacting with each other. With Kotlin Coroutine, the above interaction will be implemented a lot easier without using a switch case or when switch case as in the example above.
Looking at the above example we will have the following points to note:
- The above code will execute a few lines in
functionAthen execute a few lines infunctionB, then return to execute a few lines infunctionAand so on, … This will be useful in example As we have a Thread and it is doing nothing for a few seconds, now I can take advantage of that few seconds to execute some lines of code in another function that will help us take full advantage of Thread. - Another thing is that we can use Coroutine to write asynchronous code as easily as possible. This will be discussed below in the article.
And we can say that Coroutine and Thread have the same point as both are multitasking . The difference is that Thread is managed by the OS, Coroutine is managed by the user in such a way that it only executes a few lines of code in a function depending on the wishes of the user.
Coroutine has supported many languages and it has 2 types: Stackless , Stackful Kotlin implements Stackless Coroutine so there will be no separate stack and no map to native thread so it will not affect processor and therefore it will be lighter and faster . Coroutine can be called Thread, but light-weight Thread (lighter than normal Thread). It can do the things of a normal thread like running in parallel, waiting, and communicating with each other. The biggest difference is that Coroutine is very low cost compared to Thread, we can generate thousands of Coroutine easily.
Having said a lot, now we go to find out how useful Coroutine is
Why is Coroutine needed?
We come up with the most basic use-case in an app:
- Fetch users from the server
- Show users to UI
1 2 3 4 5 6 7 8 9 10 11 12 13 14 | fun fetchUser(): User { // make network call // return user } fun showUser(user: User) { // show user } fun fetchAndShowUser() { val user = fetchUser() showUser(user) } |
When we call the fetchAndShowUser() function, it throws the exception NetworkOnMainThreadException that is not the make network call on the main thread. There are several ways to work around this:
Use callback: call fetchUser() in the background thread and then return result via callback
1 2 3 4 5 6 | fun fetchAndShowUser() { fetchUser { user -> showUser(user) } } |
Using RxJava: a common approach
1 2 3 4 5 6 7 | fetchUser() .subscribeOn(Schedulers.io()) .observerOn(AndroidSchedulers.mainThread()) .subscribe { user -> showUser(user) } |
Use Coroutine: Yup, which is Coroutine
1 2 3 4 5 | suspend fun fetchAndShowUser() { val user = fetchUser() // fetch on IO thread showUser(user) // back on UI thread } |
Here, the above code looks like synchronous, but in fact this is asynchronous. We’ll see how it works in a moment.
Implement Kotlin Coroutine on Android project Add Kotlin Coroutine dependencies to project:
1 2 3 4 5 | dependencies { implementation "org.jetbrains.kotlinx:kotlinx-coroutines-core:x.x.x" implementation "org.jetbrains.kotlinx:kotlinx-coroutines-android:x.x.x" } |
Now the function fetchUser() would be written like this:
1 2 3 4 5 6 7 | suspend fun fetchUser(): User { return GlobalScope.async(Dispatchers.IO) { // make network call // return user }.await() } |
Don’t worry, we will slowly explore these: suspend, GlobalScope, async, await, and Dispatchers.IO The fetchAndShowUser function should look like this:
1 2 3 4 5 | suspend fun fetchAndShowUser() { val user = fetchUser() // fetch on IO thread showUser(user) // back on UI thread } |
And the showUser function will stay the same:
1 2 3 4 | fun showUser(user: User) { // show user } |
We start to learn two things as follows: Dispatchers : This one helps Coroutine determine how it will work, there are 3 types of Dispatchers: IO, Default, and Main . IO is used to execute background tasks such as network calls, access database, … Default is used to do more CPU-related tasks. Main is UI Thread in Android. To use it, Dispatchers need to put in async function like this: suspend fun async() // implementation removed for brevity
suspend : a suspend function can start, pause, resume.
The suspend function is called only in a Coroutine or another suspend function (which also contains a key work suspend). Thus the fetchAndShowUser function will be called on another suspend function or in a Coroutine. We can’t suspend the Android onCreate function so there’s a Coroutine here:
1 2 3 4 5 6 7 8 9 10 | override fun onCreate(savedInstanceState: Bundle?) { super.onCreate(savedInstanceState) GlobalScope.launch(Dispatchers.Main) { // coroutine scope fetchAndShowUser() } } |
Similarly, we have the code below:
1 2 3 4 5 6 7 8 9 10 | override fun onCreate(savedInstanceState: Bundle?) { super.onCreate(savedInstanceState) GlobalScope.launch(Dispatchers.Main) { val user = fetchUser() // fetch on IO thread showUser(user) // back on UI thread } } |
The showUser function will run on the main thread because it is in Dispatchers.Main There are two ways to start a Coroutine:
- launch {}
- async {}
So what are Launch and Async?
The difference between these two is: launch{} does not care about the results of the Coroutine scope, while async{} will return the instance of Deferred<T> via the await() function. In other words: launch {}: only runs the Coroutine scope. async {}: runs and returns result.
We come to the example to visualize these 2 ways, we have a function fetchUserAndSaveInDatabase as follows:
1 2 3 4 5 6 | suspend fun fetchUserAndSaveInDatabase() { // fetch user from network // save user in database // and do not return anything } |
And I will use launch as below:
1 2 3 4 | GlobalScope.launch(Dispatchers.Main) { fetchUserAndSaveInDatabase() // do on IO thread } |
So fetchUserAndSaveInDatabase will not return anything and after execution we can do something on the main thread. But when we need a result, async will do this, let’s say I have 2 functions to return User as below:
1 2 3 4 5 6 7 8 9 10 | suspend fun fetchFirstUser(): User { // make network call // return user } suspend fun fetchSecondUser(): User { // make network call // return user } |
Now let’s see the async shown:
1 2 3 4 5 6 | GlobalScope.launch(Dispatchers.Main) { val userOne = async(Dispatchers.IO) { fetchFirstUser() } val userTwo = async(Dispatchers.IO) { fetchSecondUser() } showUsers(userOne.await(), userTwo.await()) // back on UI thread } |
Here the two functions fetchFirstUser and fetchSecondUser will run in parallel, after having the result of both then assign two variables userOne and userTwo and then run showUsers . Yeah and so we have understood what launch and async , so easy
And next, another way we can get a result without using async{} then await() as above. That is withContext , let’s see if I change the code using async to use withContext :
1 2 3 4 5 6 7 8 | // async suspend fun fetchUser(): User { return GlobalScope.async(Dispatchers.IO) { // make network call // return user }.await() } |
1 2 3 4 5 6 7 8 | // withContext suspend fun fetchUser(): User { return withContext(Dispatchers.IO) { // make network call // return user } } |
Yeah they both return a User but have two different spellings. But there are a few things I need to take care here about async and withContext , try using withContext in the async example running fetchFirstUser and fetchSecondUser in parallel above:
1 2 3 4 5 6 | GlobalScope.launch(Dispatchers.Main) { val userOne = withContext(Dispatchers.IO) { fetchFirstUser() } val userTwo = withContext(Dispatchers.IO) { fetchSecondUser() } showUsers(userOne, userTwo) // back on UI thread } |
When using withContext, the above code will run sequentially from top to bottom instead of parallel as before, this is also the difference of async and withContext . Thereby a few things are drawn as follows:
- Use
withContextwhen we don’t need to run it in parallel. - Use
asynconly when we want to run in parallel. - Both
asyncandwithContextare used to return a result. - Use
withContextwhen you need to run single task. - Use
asyncwhen you need to run multiple tasks and they will run in parallel.
At that time I mentioned Scope, so what is Scope in Coroutine ? Scope in Coroutine is very useful because I can proactively cancel a background task when the activity runs on onDestroy , … Now we will learn how to use Scope to handle some situations.
Assuming an activity implements a scope, a backgroud task should be executed as soon as possible when the activity enters onDestroy , we have the code below:
1 2 3 4 5 6 7 8 9 | class MainActivity : AppCompatActivity(), CoroutineScope { override val coroutineContext: CoroutineContext get() = Dispatchers.Main + job private lateinit var job: Job } |
And here is the function onCreate (), onDestroy ()
1 2 3 4 5 6 7 8 9 10 | override fun onCreate(savedInstanceState: Bundle?) { super.onCreate(savedInstanceState) job = Job() // create the Job } override fun onDestroy() { job.cancel() // cancel the Job super.onDestroy() } |
And now see how to launch as below:
1 2 3 4 5 6 | launch { val userOne = async(Dispatchers.IO) { fetchFirstUser() } val userTwo = async(Dispatchers.IO) { fetchSecondUser() } showUsers(userOne.await(), userTwo.await()) } |
Accordingly, when the activity is destroyed, if this task is running, it will also be destroyed. When we need a scope for the whole application, not limited to an activity, use GlobalScope like this:
1 2 3 4 5 | GlobalScope.launch(Dispatchers.Main) { val userOne = async(Dispatchers.IO) { fetchFirstUser() } val userTwo = async(Dispatchers.IO) { fetchSecondUser() } } |
And in the case of using GlobalScope , when the activity is destroyed, the fetch user fetchFirstUser() , fetchSecondUser() will continue to run. Hence, use of GlobalScope should be considered.
Handling Exception in Kotlin Coroutine This is an important treatment, we will learn about it in a moment.
1. Using launch: One way is to use try-catch:
1 2 3 4 5 6 7 8 | GlobalScope.launch(Dispatchers.Main) { try { fetchUserAndSaveInDatabase() // do on IO thread and back to UI Thread } catch (exception: Exception) { Log.d(TAG, "$exception handled !") } } |
Another way is to use Handler, in this way we need to raise an exception handler like this:
1 2 3 4 | val handler = CoroutineExceptionHandler { _, exception -> Log.d(TAG, "$exception handled !") } |
Then attach this handler to a scope:
1 2 3 4 | GlobalScope.launch(Dispatchers.Main + handler) { fetchUserAndSaveInDatabase() // do on IO thread and back to UI Thread } |
If an exception occurs in the fetchUserAndSaveInDatabase function, it will handle that exception in the handler I just attached.
When using activity scope, we can attach handler to coroutineContext as follows:
1 2 3 4 5 6 7 8 9 | class MainActivity : AppCompatActivity(), CoroutineScope { override val coroutineContext: CoroutineContext get() = Dispatchers.Main + job + handler private lateinit var job: Job } |
And use it as follows:
1 2 3 4 | launch { fetchUserAndSaveInDatabase() } |
2. Using async: When using async, we need to use try-catch to handle exception as follows:
1 2 3 4 5 6 7 8 9 | val deferredUser = GlobalScope.async { fetchUser() } try { val user = deferredUser.await() } catch (exception: Exception) { Log.d(TAG, "$exception handled !") } |
Now let’s see a few more ways to handle exception in some use-cases: Let’s say we have two network call functions as follows:
- getUsers ()
- getMoreUsers () And are called sequentially like this:
1 2 3 4 5 6 7 8 9 | launch { try { val users = getUsers() val moreUsers = getMoreUsers() } catch (exception: Exception) { Log.d(TAG, "$exception handled !") } } |
If one of the two functions fails, it will jump to the catch block. But assuming I need to return an empty list when an exception occurs and continue to execute, I will add try-catch every time I call the network call function, the code will be revised as follows:
1 2 3 4 5 6 7 8 9 10 11 12 13 14 15 16 17 | launch { try { val users = try { getUsers() } catch (e: Exception) { emptyList<User>() } val moreUsers = try { getMoreUsers() } catch (e: Exception) { emptyList<User>() } } catch (exception: Exception) { Log.d(TAG, "$exception handled !") } } |
So with any error, it will return an empty list and continue to execute.
Now, if we want to call the above two functions by running in parallel, we can use async :
1 2 3 4 5 6 7 8 9 10 11 | launch { try { val usersDeferred = async { getUsers() } val moreUsersDeferred = async { getMoreUsers() } val users = usersDeferred.await() val moreUsers = moreUsersDeferred.await() } catch (exception: Exception) { Log.d(TAG, "$exception handled !") } } |
This way, we will face a problem that even if there is no network error, our app will crash and the above code will not jump into the catch block. To solve this problem, I can use coroutineScope as below:
1 2 3 4 5 6 7 8 9 10 11 12 13 | launch { try { coroutineScope { val usersDeferred = async { getUsers() } val moreUsersDeferred = async { getMoreUsers() } val users = usersDeferred.await() val moreUsers = moreUsersDeferred.await() } } catch (exception: Exception) { Log.d(TAG, "$exception handled !") } } |
Now, if there is a network error, the above code will jump to the catch-block.
And I assume again, I want to return an empty list when a network call error occurs and continue to execute. We will use supervisorScope and add try-catch from the network function call like so:
1 2 3 4 5 6 7 8 9 10 11 12 13 14 15 16 17 18 19 20 21 | launch { try { supervisorScope { val usersDeferred = async { getUsers() } val moreUsersDeferred = async { getMoreUsers() } val users = try { usersDeferred.await() } catch (e: Exception) { emptyList<User>() } val moreUsers = try { moreUsersDeferred.await() } catch (e: Exception) { emptyList<User>() } } } catch (exception: Exception) { Log.d(TAG, "$exception handled !") } } |
And that’s the usage of supervisorScope
Conclude:
- When not using async, we can use
try-catchorCoroutineExceptionHandlerto handle any situation. - Using async, add
try-catch, we have 2 options:coroutineScopeandsupervisorScope. - Using async with
supervisorScope, we will addtry-catchto every function call that we want when an exception occurs and will jump to catch block in atry-catchtop level. - Use async with
coroutineScopein atry-catchtop level when we want it to jump to catch block as soon as an exception occurs.
It should be noted that coroutineScope will cancel whenever there is an exception, if we want to continue executing taskB () when taskA () fails then we can use supervisorScope .
Those are exception handling ways that can be executed using Kotlin Coroutine.
With all the things I have shared, it will more or less help you to begin learning about Coroutine. I hope these things really benefit: v This is also my first post, if there is a mistake, please comment under the comment for better improvement in the following articles ^^
Reference: https://blog.mindorks.com/mastering-kotlin-coroutines-in-android-step-by-step-guide
Thanks for reading and happy learning.