Hello everyone, today I will introduce you to the Opencv2 library, a very powerful library used in image processing, this is also the library I use mainly in the next article. And here I will code in python 3 on jupyter notebook school.
Setup
I encourage you to use anaconda there will jupyter notebook settup way you can refer to the following link here .
Install opencv2 library:
1 2 | pip install opencv <span class="token operator">-</span> python |
Check the version:
1 2 3 4 | <span class="token keyword">import</span> cv2 cv2 <span class="token punctuation">.</span> __version__ <span class="token comment">#'4.1.1'</span> |
Or if you don’t want to waste time you can use colab
Read and display image
The picture I will use will be the following: 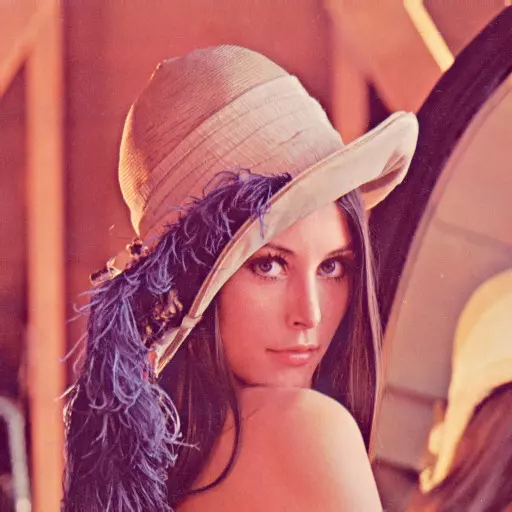
1 2 3 4 5 | iname <span class="token operator">=</span> <span class="token string">'lena.jpg'</span> <span class="token comment">#read image</span> img <span class="token operator">=</span> cv2 <span class="token punctuation">.</span> imread <span class="token punctuation">(</span> iname <span class="token punctuation">)</span> img |
The output of img will now be a three-dimensional matrix but in the theory of RGB. We will have a command to view the shape and size of the image:
1 2 3 4 5 | img <span class="token punctuation">.</span> shape <span class="token punctuation">(</span> <span class="token punctuation">)</span> <span class="token comment"># output: (512, 512, 3)</span> img <span class="token punctuation">.</span> size <span class="token comment"># output: 786432</span> |
When displaying images, there are 2 ways:
- Method 1 uses the function available in cv2:123<span class="token comment"># cv2.imshow(window_name, image)</span>cv2 <span class="token punctuation">.</span> imshow <span class="token punctuation">(</span> <span class="token string">'test'</span> <span class="token punctuation">,</span> img <span class="token punctuation">)</span>
- Option 2 uses the matplotlib library.12345<span class="token comment">#to display at jupyter notebook</span><span class="token keyword">import</span> matplotlib <span class="token punctuation">.</span> pyplot <span class="token keyword">as</span> plt<span class="token comment">#Note cv2 read BGR as default</span>plt <span class="token punctuation">.</span> imshow <span class="token punctuation">(</span> image <span class="token punctuation">)</span>
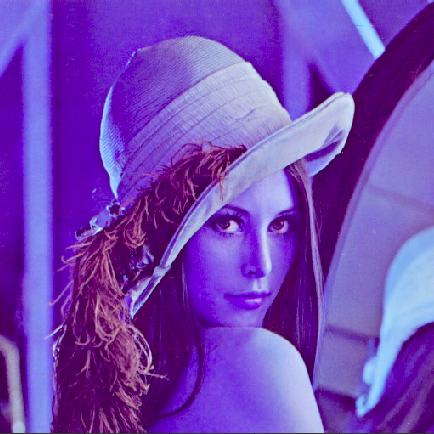
If the code as above, the output image will be as follows:
Because cv2 defaults to reading color images in the order of BGR (blue, green and red). Therefore, if you want to display correctly, you must write:
123<span class="token comment">#display rgb image</span>plt <span class="token punctuation">.</span> imshow <span class="token punctuation">(</span> image <span class="token punctuation">[</span> <span class="token punctuation">:</span> <span class="token punctuation">,</span> <span class="token punctuation">:</span> <span class="token punctuation">,</span> <span class="token punctuation">:</span> <span class="token punctuation">:</span> <span class="token operator">-</span> <span class="token number">1</span> <span class="token punctuation">]</span> <span class="token punctuation">)</span>
Accessing image data with numpy.array
The operations we are familiar with using numpy are also used in image data. For example:
1 2 3 | img <span class="token punctuation">[</span> <span class="token number">0</span> <span class="token punctuation">,</span> <span class="token number">0</span> <span class="token punctuation">]</span> <span class="token comment">#output: array([128, 138, 225], dtype=uint8)</span> |
Crop out part of the image and display them:
1 2 3 4 | <span class="token comment">#crop image</span> crop <span class="token operator">=</span> img <span class="token punctuation">[</span> <span class="token number">100</span> <span class="token punctuation">:</span> <span class="token number">300</span> <span class="token punctuation">,</span> <span class="token number">100</span> <span class="token punctuation">:</span> <span class="token number">300</span> <span class="token punctuation">]</span> plt <span class="token punctuation">.</span> imshow <span class="token punctuation">(</span> crop <span class="token punctuation">[</span> <span class="token punctuation">:</span> <span class="token punctuation">,</span> <span class="token punctuation">:</span> <span class="token punctuation">,</span> <span class="token punctuation">:</span> <span class="token punctuation">:</span> <span class="token operator">-</span> <span class="token number">1</span> <span class="token punctuation">]</span> <span class="token punctuation">)</span> |
Result: 
Change the color of the area we have cropped to green:
1 2 3 4 | copy = img.copy() copy[100:300, 100:300] = [255, 0, 0] #assign blue color plt.imshow(copy[:,:,::-1]) |
Result: 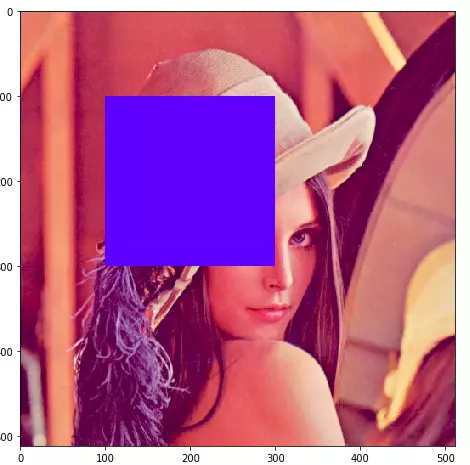
Resizing images
We want to resize the image into an image of size 200, 200 will do the following:
1 2 3 4 | h <span class="token punctuation">,</span> w <span class="token operator">=</span> image <span class="token punctuation">.</span> shape <span class="token punctuation">[</span> <span class="token punctuation">:</span> <span class="token number">2</span> <span class="token punctuation">]</span> resized <span class="token operator">=</span> cv2 <span class="token punctuation">.</span> resize <span class="token punctuation">(</span> image <span class="token punctuation">,</span> <span class="token punctuation">(</span> <span class="token number">200</span> <span class="token punctuation">,</span> <span class="token number">200</span> <span class="token punctuation">)</span> <span class="token punctuation">)</span> plt <span class="token punctuation">.</span> imshow <span class="token punctuation">(</span> resized <span class="token punctuation">[</span> <span class="token punctuation">:</span> <span class="token punctuation">,</span> <span class="token punctuation">:</span> <span class="token punctuation">,</span> <span class="token punctuation">:</span> <span class="token punctuation">:</span> <span class="token operator">-</span> <span class="token number">1</span> <span class="token punctuation">]</span> <span class="token punctuation">)</span> |
Write images
Save the image file using the following command:
1 2 3 | <span class="token comment"># cv2.imwrite(filename, image)</span> cv2 <span class="token punctuation">.</span> imwrite <span class="token punctuation">(</span> <span class="token string">"test.jpg"</span> <span class="token punctuation">,</span> resized <span class="token punctuation">)</span> |
summary
All the code you can see here: here
Above I introduced you on how to read, display and save an image file