When it comes to building Docker containers, we should always try to be able to create images of smaller sizes. Reducing your image size will help improve the security, efficiency, and maintainability of your containers.
In this article, I will share some methods that can help optimize our image size.
1. Choose the correct base image.
Choosing the right base image is the first and crucial step in building your docker image. Choosing the base image depends on a variety of conditions such as what type of application you want to run on the container? or the tools you need in the container to run your application, … There are two
- Select the base image as close to your application needs as possible. For example when you need an environment to run the laravel app with composer. Instead of choosing the base image ubuntu then you should install laravel yourself, you should choose the base image as Docker available composer. This helps us to optimize build time. In addition, these base images have often been built by Docker as the most optimized base images. It’s hard for you to do better.
- Unless your app asks your app to disallow it or an image isn’t available, always use an image built on top of
alpine.Alpine Linuxis a linux distro based on musl and BusyBox, developed with emphasis on simplicity, security and resource efficiency . In short, this is a lighter and more secure linux distro.The only downside of alpine is that it is very small, so you have to manually install the tools or libraries you need to use for your application, and sometimes it is quite a hassle.For example, instead of usingFROM node:12, try switching to usingFROM node:12-alpine, you will see the size of the image decrease a lot. Images built on alpine are very lightweight, with nodejs being reduced from 900MB by default to only 70MB for alpine.
2. Optimize Layers.
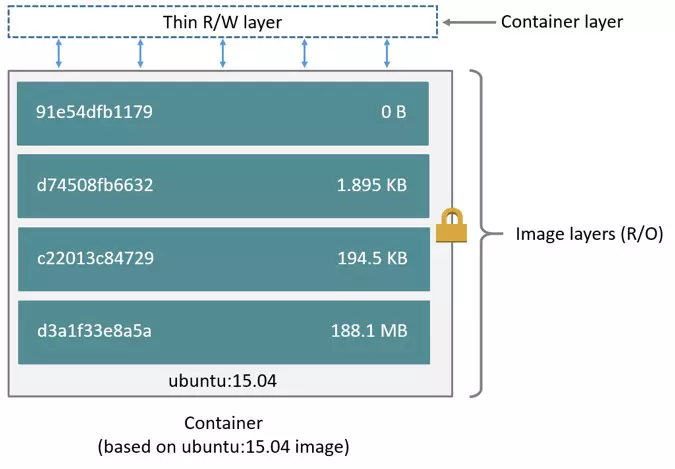
The Docker image is built from a series of layers. Each statement in Dockerfile creates a read-only layer wrapped in the image generated by the above statement and continues to create a new image. The final image is a large onion with many layers. Even the container is actually a writable layer wrapped on top of the image.
The layers are not free . They take up space, and as the layers overlap more and more, your final image size increases. The reason is that the system will keep all changes between different Dockerfile directives. Therefore. Reducing the number of layers is the first thing to think about when you want to reduce the image size.
Each step in Dockerfile creates layers, however, steps with Dockerfile directives make changes to the current layer, creating new layers> 0 bytes. As of Docker 1.10, the COPY , ADD and RUN directives in Dockerfile will add a new layer to your image as they will change the file system. Directives like WORDIR , CMD or EXPOSE , … will create empty layers with size = 0 bytes.
For example, we have the following simple Dockerfile:
1 2 3 4 5 6 7 8 | FROM ubuntu:18.04 WORKDIR /var/www RUN apt-get update RUN apt-get -y install curl RUN apt-get -y install vim |
Then, we perform a build image from Dpckerfile treen: docker build -t layer:example .
After the image has been created, you can see all the layers created with the docker history <image> command
1 2 3 4 5 6 7 8 9 10 11 12 | $ ~ docker history ubuntu:example IMAGE CREATED CREATED BY SIZE COMMENT 3254f0ec9c48 8 minutes ago /bin/sh -c apt-get -y install vim 54.8MB dac7e4ba12f9 8 minutes ago /bin/sh -c apt-get -y install curl 14.3MB be0ed9278c8f 2 hours ago /bin/sh -c apt-get update 34.1MB a6494da55123 2 hours ago /bin/sh -c #(nop) WORKDIR /var/www 0B 56def654ec22 2 weeks ago /bin/sh -c #(nop) CMD ["/bin/bash"] 0B <missing> 2 weeks ago /bin/sh -c mkdir -p /run/systemd && echo 'do… 7B <missing> 2 weeks ago /bin/sh -c [ -z "$(apt-get indextargets)" ] 0B <missing> 2 weeks ago /bin/sh -c set -xe && echo '#!/bin/sh' > /… 745B <missing> 2 weeks ago /bin/sh -c #(nop) ADD file:4974bb5483c392fb5… 63.2MB |
Next, instead of using the three RUN directives above, we can rewrite the above Dockerfile to:
1 2 3 4 5 6 | FROM ubuntu:18.04 WORKDIR /var/www RUN apt-get update && apt-get -y install curl vim |
Then, we perform a build image from Dpckerfile treen: docker build -t layer:example.01 . and see the layers created:
1 2 3 4 5 6 7 8 9 10 | $ ~ history ubuntu:example.01 IMAGE CREATED CREATED BY SIZE COMMENT 27f132fcb254 5 seconds ago /bin/sh -c apt-get update && apt-get -y inst… 102MB a6494da55123 2 hours ago /bin/sh -c #(nop) WORKDIR /var/www 0B 56def654ec22 2 weeks ago /bin/sh -c #(nop) CMD ["/bin/bash"] 0B <missing> 2 weeks ago /bin/sh -c mkdir -p /run/systemd && echo 'do… 7B <missing> 2 weeks ago /bin/sh -c [ -z "$(apt-get indextargets)" ] 0B <missing> 2 weeks ago /bin/sh -c set -xe && echo '#!/bin/sh' > /… 745B <missing> 2 weeks ago /bin/sh -c #(nop) ADD file:4974bb5483c392fb5… 63.2MB |
3. Use multi-stage builds.
Multi-stage build is a new feature introduced in Docker v17.05. Multi-stage build is useful when you want to optimize your Dockerfile while keeping it both readable and mantain easy.
When the program is built by you and that program only needs to run one or more executable files, configuration. The files in that program require the installation of environments, packages, and modules very difficult and complex. It also takes a pretty high amount of space, which may make your Images heavier. However, with multi-stage build you can perform those installations in stages with full environment, and then copy the required files to a stage based on lighter, but sufficient images to execute / run your application. friend.
For example, to build Dockerfile for a simple Laravel application, we would do the following:
- Step 1: Composer
- Use a composer base image
- Copy the files needed for “composer install”
- Run “composer install”
- Copy remaining files
- Run “composer dump-autoload”
1 2 3 4 5 6 7 8 9 10 11 12 13 14 15 16 17 18 19 20 21 | # # PHP Dependencies # FROM composer:2.0 as vendor WORKDIR /app COPY database/ database/ COPY composer.json composer.json COPY composer.lock composer.lock RUN composer install --no-interaction --no-plugins --no-scripts --no-dev --prefer-dist COPY . . RUN composer dump-autoload |
- Step 2: NPM
- Use the base image using NodeJs
- Cop files are required for “npm install”.
- Run “npm install”.
- Copy files needed for the frontend build.
- Build
1 2 3 4 5 6 7 8 9 10 11 12 13 14 15 16 | # # Frontend # FROM node:14.9 as frontend WORKDIR /app COPY artisan package.json webpack.mix.js yarn.lock tailwind.js ./ RUN npm install COPY resources/js ./resources/js COPY resources/sass ./resources/sass RUN npm run production |
- Step 3: Application
- Use the base image of php-fpm
- Copy files that were built from previous steps
- Deploy your application
1 2 3 4 5 6 7 8 9 10 11 12 13 14 15 16 17 18 19 20 21 22 23 24 | # # Application # FROM php:7.4-fpm WORKDIR /app # Install PHP dependencies RUN apt-get update -y && apt-get install -y libxml2-dev RUN docker-php-ext-install pdo pdo_mysql mbstring opcache tokenizer xml ctype json bcmath pcntl # Copy Frontend build COPY --from=frontend /app/node_modules/ ./node_modules/ COPY --from=frontend /app/public/js/ ./public/js/ COPY --from=frontend /app/public/css/ ./public/css/ COPY --from=frontend /app/public/mix-manifest.json ./public/mix-manifest.json # Copy Composer dependencies COPY --from=vendor /app/vendor/ ./vendor/ COPY . . RUN php artisan config:cache RUN php artisan route:cache |
4. Remove or not use unnecessary packages or files.
” When building containers to run in production, any unused packages, or packages included for debugging purposes, need to be removed. ”
Here are a few tips to help you do that:
Don’t install debug tools like vim / curl / …
One common case is that developers install tools like vim and curl in their Dockerfile so they can more easily debug their apps. However, unless your application depends on them, don’t install those dependencies. Doing so is against the purpose of using a compact base image.
But if not installed, how can I debug?
The answer is that you always have Dockerfile with all the tools you need in staging environment. Then, when you bring them to production on a production environment, remove all those tools =)))
Use .dockerignore files
The directory on the host that contains Dockerfile is called build context. When building all the files / folders in the build context are sent to the docker server. If the build context has a file that weighs several G that is not used in the image, it is also sent to the server and this not only increases the size of the image, but also wastes time building the image significantly. Therefore, when you want to remove one or several files / folders, you need to create a file called .dockerignore , its role is like .gitignore , and the syntax is similar.
For example :
1 2 3 4 5 6 7 8 9 10 11 12 13 14 15 16 17 18 19 20 21 22 23 24 25 26 27 28 | # Git */**/.git */**/.gitignore */**/.gitattributes # Docker .dockerignore # Env files .env* # node_modules node_modules # Logs */**/*.log # Tests tests jest.config.js # Linters .eslintrc .eslintignore # Readme README.md |
Use --no-install-recommends in apt-get install
Use -- no-install-recommends on your apt-get install -y . This can help you significantly reduce the size by avoiding the installation of packages that your application doesn’t need at all, but is encouraged to install them with packages.
Alternatively, use the --no-cache on the apk add to allow no local index storage, helping to reduce the size of your image.
Add rm -rf /var/lib/apt/lists/* to the same layer as apt-get installs
Add rm -rf /var/lib/apt/lists/* at the end after installing with apt-get -y install for cleanup. Similar to yum install , add yum clean all .
Also, for example if you install wget or curl to download some packages, remember to combine them all in one RUN directive. Then at the end of the RUN directive layer, use apt-get remove curl or wget when you no longer need them. This works for any package that you just need temporarily.
Conclusion
Through some of the methods I just shared above, I hope you can build the docker image with the most optimal size and bring many benefits in the process of using your image.
Thank you for watching my post!