1. Introduction
In the previous section I gave an overview of what Dependency Injection is. It is mentioned that the implementation of DI can be manual (manual) or automatic. In this article I will share how to use DI technology in an Android application manually as well as its advantages and disadvantages ^^
2. Application graph
The proposed Android application architecture encourages dividing your code into separate modules and modules to benefit from separation of concerns, there is a basic principle that each class of the hierarchy has a responsibility. The mission is determined to be unique. This split will result in many smaller layers that need to be connected to each other to implement each other’s dependencies. Below is the chart model of the recommended android Android application 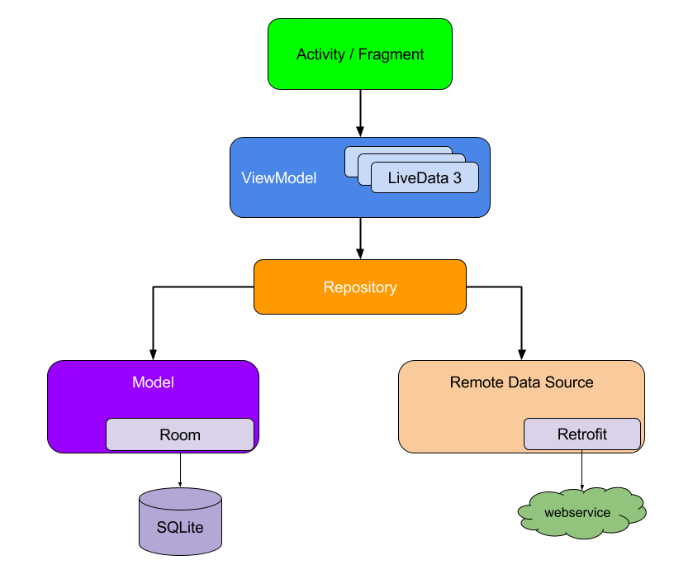 Dependencies between classes can be represented in the form of a graph, in which each class is connected to the classes it depends on. The representation of all your classes and the dependencies that hold them makes up the application graph. As the diagram above you can see its abstraction. When class A (ViewModel) depends on class B (Repository), there will be an arrow from A to B indicating that dependency.
Dependency injection helps to make these connections and allows us to swap deployments for testing. For example, when testing the ViewModel, the dependent class and the Repository, we can easily test Repository implementations with fakes or mocks to test different cases.
3. Basic of manual dependency injection
This section will guide Dependency injection manually in real Android applications. Will tell you how to use DI in your application. These manual approaches will give you an understanding of the nature of Dagger, but later you can use it automatically.
Consider a thread as a group of screens within an application that serve a feature. Login, Registration, checkout are flow examples.
A login flow of a regular Android application, LoginActivity depends on LoginViewModel, LoginViewModel depends on UserRepository. Then UserRepository depends on UserLocalDataSource and UserRemoteDataSource, UserRemoteDataSource depends on Retrofit Service, … 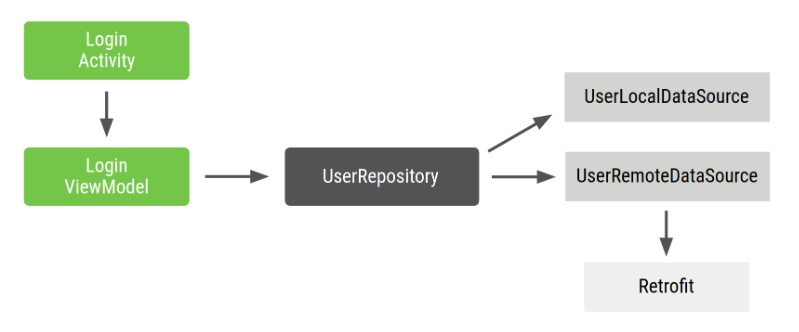 LoginActivity is the input of the login stream, and is where users interact. Therefore, LoginActivity needs to create LoginViewModel with all its dependencies.
The Repository and DataSource classes will look like this
Kotlin:
1 2 3 4 5 6 7 8 9 10 | <span class="token keyword">class</span> <span class="token function">UserRepository</span> <span class="token punctuation">(</span> <span class="token keyword">private</span> <span class="token keyword">val</span> localDataSource <span class="token operator">:</span> UserLocalDataSource <span class="token punctuation">,</span> <span class="token keyword">private</span> <span class="token keyword">val</span> remoteDataSource <span class="token operator">:</span> UserRemoteDataSource <span class="token punctuation">)</span> <span class="token punctuation">{</span> <span class="token operator">..</span> <span class="token punctuation">.</span> <span class="token punctuation">}</span> <span class="token keyword">class</span> UserLocalDataSource <span class="token punctuation">{</span> <span class="token operator">..</span> <span class="token punctuation">.</span> <span class="token punctuation">}</span> <span class="token keyword">class</span> <span class="token function">UserRemoteDataSource</span> <span class="token punctuation">(</span> <span class="token keyword">private</span> <span class="token keyword">val</span> loginService <span class="token operator">:</span> LoginRetrofitService <span class="token punctuation">)</span> <span class="token punctuation">{</span> <span class="token operator">..</span> <span class="token punctuation">.</span> <span class="token punctuation">}</span> |
Java:
1 2 3 4 5 6 7 8 9 10 11 12 13 14 15 16 17 18 19 20 21 22 23 24 25 26 27 28 29 | <span class="token keyword">class</span> <span class="token class-name">UserLocalDataSource</span> <span class="token punctuation">{</span> <span class="token keyword">public</span> <span class="token function">UserLocalDataSource</span> <span class="token punctuation">(</span> <span class="token punctuation">)</span> <span class="token punctuation">{</span> <span class="token punctuation">}</span> <span class="token punctuation">.</span> <span class="token punctuation">.</span> <span class="token punctuation">.</span> <span class="token punctuation">}</span> <span class="token keyword">class</span> <span class="token class-name">UserRemoteDataSource</span> <span class="token punctuation">{</span> <span class="token keyword">private</span> <span class="token keyword">final</span> Retrofit retrofit <span class="token punctuation">;</span> <span class="token keyword">public</span> <span class="token function">UserRemoteDataSource</span> <span class="token punctuation">(</span> Retrofit retrofit <span class="token punctuation">)</span> <span class="token punctuation">{</span> <span class="token keyword">this</span> <span class="token punctuation">.</span> retrofit <span class="token operator">=</span> retrofit <span class="token punctuation">;</span> <span class="token punctuation">}</span> <span class="token punctuation">.</span> <span class="token punctuation">.</span> <span class="token punctuation">.</span> <span class="token punctuation">}</span> <span class="token keyword">class</span> <span class="token class-name">UserRepository</span> <span class="token punctuation">{</span> <span class="token keyword">private</span> <span class="token keyword">final</span> UserLocalDataSource userLocalDataSource <span class="token punctuation">;</span> <span class="token keyword">private</span> <span class="token keyword">final</span> UserRemoteDataSource userRemoteDataSource <span class="token punctuation">;</span> <span class="token keyword">public</span> <span class="token function">UserRepository</span> <span class="token punctuation">(</span> UserLocalDataSource userLocalDataSource <span class="token punctuation">,</span> UserRemoteDataSource userRemoteDataSource <span class="token punctuation">)</span> <span class="token punctuation">{</span> <span class="token keyword">this</span> <span class="token punctuation">.</span> userLocalDataSource <span class="token operator">=</span> userLocalDataSource <span class="token punctuation">;</span> <span class="token keyword">this</span> <span class="token punctuation">.</span> userRemoteDataSource <span class="token operator">=</span> userRemoteDataSource <span class="token punctuation">;</span> <span class="token punctuation">}</span> <span class="token punctuation">.</span> <span class="token punctuation">.</span> <span class="token punctuation">.</span> <span class="token punctuation">}</span> |
Here is the code in LoginActivity:
Kotlin:
1 2 3 4 5 6 7 8 9 10 11 12 13 14 15 16 17 18 19 20 21 22 23 24 25 26 27 | <span class="token keyword">class</span> LoginActivity <span class="token operator">:</span> <span class="token function">Activity</span> <span class="token punctuation">(</span> <span class="token punctuation">)</span> <span class="token punctuation">{</span> <span class="token keyword">private</span> <span class="token keyword">lateinit</span> <span class="token keyword">var</span> loginViewModel <span class="token operator">:</span> LoginViewModel <span class="token keyword">override</span> <span class="token keyword">fun</span> <span class="token function">onCreate</span> <span class="token punctuation">(</span> savedInstanceState <span class="token operator">:</span> Bundle <span class="token operator">?</span> <span class="token punctuation">)</span> <span class="token punctuation">{</span> <span class="token keyword">super</span> <span class="token punctuation">.</span> <span class="token function">onCreate</span> <span class="token punctuation">(</span> savedInstanceState <span class="token punctuation">)</span> <span class="token comment">// In order to satisfy the dependencies of LoginViewModel, you have to also</span> <span class="token comment">// satisfy the dependencies of all of its dependencies recursively.</span> <span class="token comment">// First, create retrofit which is the dependency of UserRemoteDataSource</span> <span class="token keyword">val</span> retrofit <span class="token operator">=</span> Retrofit <span class="token punctuation">.</span> <span class="token function">Builder</span> <span class="token punctuation">(</span> <span class="token punctuation">)</span> <span class="token punctuation">.</span> <span class="token function">baseUrl</span> <span class="token punctuation">(</span> <span class="token string">"https://example.com"</span> <span class="token punctuation">)</span> <span class="token punctuation">.</span> <span class="token function">build</span> <span class="token punctuation">(</span> <span class="token punctuation">)</span> <span class="token punctuation">.</span> <span class="token function">create</span> <span class="token punctuation">(</span> LoginService <span class="token operator">::</span> <span class="token keyword">class</span> <span class="token punctuation">.</span> java <span class="token punctuation">)</span> <span class="token comment">// Then, satisfy the dependencies of UserRepository</span> <span class="token keyword">val</span> remoteDataSource <span class="token operator">=</span> <span class="token function">UserRemoteDataSource</span> <span class="token punctuation">(</span> retrofit <span class="token punctuation">)</span> <span class="token keyword">val</span> localDataSource <span class="token operator">=</span> <span class="token function">UserLocalDataSource</span> <span class="token punctuation">(</span> <span class="token punctuation">)</span> <span class="token comment">// Now you can create an instance of UserRepository that LoginViewModel needs</span> <span class="token keyword">val</span> userRepository <span class="token operator">=</span> <span class="token function">UserRepository</span> <span class="token punctuation">(</span> localDataSource <span class="token punctuation">,</span> remoteDataSource <span class="token punctuation">)</span> <span class="token comment">// Lastly, create an instance of LoginViewModel with userRepository</span> loginViewModel <span class="token operator">=</span> <span class="token function">LoginViewModel</span> <span class="token punctuation">(</span> userRepository <span class="token punctuation">)</span> <span class="token punctuation">}</span> <span class="token punctuation">}</span> |
Java:
1 2 3 4 5 6 7 8 9 10 11 12 13 14 15 16 17 18 19 20 21 22 23 24 25 26 27 28 29 | <span class="token keyword">public</span> <span class="token keyword">class</span> <span class="token class-name">MainActivity</span> <span class="token keyword">extends</span> <span class="token class-name">Activity</span> <span class="token punctuation">{</span> <span class="token keyword">private</span> LoginViewModel loginViewModel <span class="token punctuation">;</span> <span class="token annotation punctuation">@Override</span> <span class="token keyword">protected</span> <span class="token keyword">void</span> <span class="token function">onCreate</span> <span class="token punctuation">(</span> Bundle savedInstanceState <span class="token punctuation">)</span> <span class="token punctuation">{</span> <span class="token keyword">super</span> <span class="token punctuation">.</span> <span class="token function">onCreate</span> <span class="token punctuation">(</span> savedInstanceState <span class="token punctuation">)</span> <span class="token punctuation">;</span> <span class="token function">setContentView</span> <span class="token punctuation">(</span> R <span class="token punctuation">.</span> layout <span class="token punctuation">.</span> activity_main <span class="token punctuation">)</span> <span class="token punctuation">;</span> <span class="token comment">// In order to satisfy the dependencies of LoginViewModel, you have to also</span> <span class="token comment">// satisfy the dependencies of all of its dependencies recursively.</span> <span class="token comment">// First, create retrofit which is the dependency of UserRemoteDataSource</span> Retrofit retrofit <span class="token operator">=</span> <span class="token keyword">new</span> <span class="token class-name">Retrofit <span class="token punctuation">.</span> Builder</span> <span class="token punctuation">(</span> <span class="token punctuation">)</span> <span class="token punctuation">.</span> <span class="token function">baseUrl</span> <span class="token punctuation">(</span> <span class="token string">"https://example.com"</span> <span class="token punctuation">)</span> <span class="token punctuation">.</span> <span class="token function">build</span> <span class="token punctuation">(</span> <span class="token punctuation">)</span> <span class="token punctuation">.</span> <span class="token function">create</span> <span class="token punctuation">(</span> LoginService <span class="token punctuation">.</span> <span class="token keyword">class</span> <span class="token punctuation">)</span> <span class="token punctuation">;</span> <span class="token comment">// Then, satisfy the dependencies of UserRepository</span> UserRemoteDataSource remoteDataSource <span class="token operator">=</span> <span class="token keyword">new</span> <span class="token class-name">UserRemoteDataSource</span> <span class="token punctuation">(</span> retrofit <span class="token punctuation">)</span> <span class="token punctuation">;</span> UserLocalDataSource localDataSource <span class="token operator">=</span> <span class="token keyword">new</span> <span class="token class-name">UserLocalDataSource</span> <span class="token punctuation">(</span> <span class="token punctuation">)</span> <span class="token punctuation">;</span> <span class="token comment">// Now you can create an instance of UserRepository that LoginViewModel needs</span> UserRepository userRepository <span class="token operator">=</span> <span class="token keyword">new</span> <span class="token class-name">UserRepository</span> <span class="token punctuation">(</span> localDataSource <span class="token punctuation">,</span> remoteDataSource <span class="token punctuation">)</span> <span class="token punctuation">;</span> <span class="token comment">// Lastly, create an instance of LoginViewModel with userRepository</span> loginViewModel <span class="token operator">=</span> <span class="token keyword">new</span> <span class="token class-name">LoginViewModel</span> <span class="token punctuation">(</span> userRepository <span class="token punctuation">)</span> <span class="token punctuation">;</span> <span class="token punctuation">}</span> <span class="token punctuation">}</span> |
With this old approach there would be the following problem:
- There is a lot of code written down. If we want to create a LoginViewModel in another place we have to duplicate the above code.
- Dependencies must be ordered in order to run. We must create Retrofit before RemoteDataSource, must create DataSource before UserRepository, must create UserRepository before LoginViewModel.
- It is difficult to reuse objects. If you want to reuse the UserRepository on many other features, you must let it follow the singleton pattern. But the singleton pattern makes testing difficult because all test cases are created only by the UserRepository object.
4. Managing dependency with a container
To solve the problem of reusing the above object, we can create a container dependencies class to use to contain the dependencies. All instances provided by this class can be made public. In the above example we only need an instance of UserRepository and can use many places. You can set private dependencies and when provided, switch to public. Kotlin:
1 2 3 4 5 6 7 8 9 10 11 12 13 14 15 16 17 | <span class="token comment">// Container of objects shared across the whole app</span> <span class="token keyword">class</span> AppContainer <span class="token punctuation">{</span> <span class="token comment">// Since you want to expose userRepository out of the container, you need to satisfy</span> <span class="token comment">// its dependencies as you did before</span> <span class="token keyword">private</span> <span class="token keyword">val</span> retrofit <span class="token operator">=</span> Retrofit <span class="token punctuation">.</span> <span class="token function">Builder</span> <span class="token punctuation">(</span> <span class="token punctuation">)</span> <span class="token punctuation">.</span> <span class="token function">baseUrl</span> <span class="token punctuation">(</span> <span class="token string">"https://example.com"</span> <span class="token punctuation">)</span> <span class="token punctuation">.</span> <span class="token function">build</span> <span class="token punctuation">(</span> <span class="token punctuation">)</span> <span class="token punctuation">.</span> <span class="token function">create</span> <span class="token punctuation">(</span> LoginService <span class="token operator">::</span> <span class="token keyword">class</span> <span class="token punctuation">.</span> java <span class="token punctuation">)</span> <span class="token keyword">private</span> <span class="token keyword">val</span> remoteDataSource <span class="token operator">=</span> <span class="token function">UserRemoteDataSource</span> <span class="token punctuation">(</span> retrofit <span class="token punctuation">)</span> <span class="token keyword">private</span> <span class="token keyword">val</span> localDataSource <span class="token operator">=</span> <span class="token function">UserLocalDataSource</span> <span class="token punctuation">(</span> <span class="token punctuation">)</span> <span class="token comment">// userRepository is not private; it'll be exposed</span> <span class="token keyword">val</span> userRepository <span class="token operator">=</span> <span class="token function">UserRepository</span> <span class="token punctuation">(</span> localDataSource <span class="token punctuation">,</span> remoteDataSource <span class="token punctuation">)</span> <span class="token punctuation">}</span> |
Java:
1 2 3 4 5 6 7 8 9 10 11 12 13 14 15 16 17 | <span class="token comment">// Container of objects shared across the whole app</span> <span class="token keyword">public</span> <span class="token keyword">class</span> <span class="token class-name">AppContainer</span> <span class="token punctuation">{</span> <span class="token comment">// Since you want to expose userRepository out of the container, you need to satisfy</span> <span class="token comment">// its dependencies as you did before</span> <span class="token keyword">private</span> Retrofit retrofit <span class="token operator">=</span> <span class="token keyword">new</span> <span class="token class-name">Retrofit <span class="token punctuation">.</span> Builder</span> <span class="token punctuation">(</span> <span class="token punctuation">)</span> <span class="token punctuation">.</span> <span class="token function">baseUrl</span> <span class="token punctuation">(</span> <span class="token string">"https://example.com"</span> <span class="token punctuation">)</span> <span class="token punctuation">.</span> <span class="token function">build</span> <span class="token punctuation">(</span> <span class="token punctuation">)</span> <span class="token punctuation">.</span> <span class="token function">create</span> <span class="token punctuation">(</span> LoginService <span class="token punctuation">.</span> <span class="token keyword">class</span> <span class="token punctuation">)</span> <span class="token punctuation">;</span> <span class="token keyword">private</span> UserRemoteDataSource remoteDataSource <span class="token operator">=</span> <span class="token keyword">new</span> <span class="token class-name">UserRemoteDataSource</span> <span class="token punctuation">(</span> retrofit <span class="token punctuation">)</span> <span class="token punctuation">;</span> <span class="token keyword">private</span> UserLocalDataSource localDataSource <span class="token operator">=</span> <span class="token keyword">new</span> <span class="token class-name">UserLocalDataSource</span> <span class="token punctuation">(</span> <span class="token punctuation">)</span> <span class="token punctuation">;</span> <span class="token comment">// userRepository is not private; it'll be exposed</span> <span class="token keyword">public</span> UserRepository userRepository <span class="token operator">=</span> <span class="token keyword">new</span> <span class="token class-name">UserRepository</span> <span class="token punctuation">(</span> localDataSource <span class="token punctuation">,</span> remoteDataSource <span class="token punctuation">)</span> <span class="token punctuation">;</span> <span class="token punctuation">}</span> |
Because these dependencies are used throughout the application, they need to be placed in a common place that all activities can use: Application class. Create a custom application class that contains an instance of AppContainer.
Kotlin:
1 2 3 4 5 6 7 8 | <span class="token comment">// Custom Application class that needs to be specified</span> <span class="token comment">// in the AndroidManifest.xml file</span> <span class="token keyword">class</span> MyApplication <span class="token operator">:</span> <span class="token function">Application</span> <span class="token punctuation">(</span> <span class="token punctuation">)</span> <span class="token punctuation">{</span> <span class="token comment">// Instance of AppContainer that will be used by all the Activities of the app</span> <span class="token keyword">val</span> appContainer <span class="token operator">=</span> <span class="token function">AppContainer</span> <span class="token punctuation">(</span> <span class="token punctuation">)</span> <span class="token punctuation">}</span> |
Java:
1 2 3 4 5 6 7 8 | <span class="token comment">// Custom Application class that needs to be specified</span> <span class="token comment">// in the AndroidManifest.xml file</span> <span class="token keyword">public</span> <span class="token keyword">class</span> <span class="token class-name">MyApplication</span> <span class="token keyword">extends</span> <span class="token class-name">Application</span> <span class="token punctuation">{</span> <span class="token comment">// Instance of AppContainer that will be used by all the Activities of the app</span> <span class="token keyword">public</span> AppContainer appContainer <span class="token operator">=</span> <span class="token keyword">new</span> <span class="token class-name">AppContainer</span> <span class="token punctuation">(</span> <span class="token punctuation">)</span> <span class="token punctuation">;</span> <span class="token punctuation">}</span> |
Note that AppContainer is just a regular class with a single instance shared and placed in Application Class. And it does not follow the singleton pattern (Not an object in Kotlin, and Java, not accessed using the typical Singleton.getInstance () method)
Now we can get the AppContainer instance from the application and get the share of the UserRepository instances.
Kotlin:
1 2 3 4 5 6 7 8 9 10 11 12 13 14 15 | <span class="token keyword">public</span> <span class="token keyword">class</span> MainActivity extends Activity <span class="token punctuation">{</span> <span class="token keyword">private</span> LoginViewModel loginViewModel <span class="token punctuation">;</span> <span class="token annotation builtin">@Override</span> <span class="token keyword">protected</span> void <span class="token function">onCreate</span> <span class="token punctuation">(</span> Bundle savedInstanceState <span class="token punctuation">)</span> <span class="token punctuation">{</span> <span class="token keyword">super</span> <span class="token punctuation">.</span> <span class="token function">onCreate</span> <span class="token punctuation">(</span> savedInstanceState <span class="token punctuation">)</span> <span class="token punctuation">;</span> <span class="token function">setContentView</span> <span class="token punctuation">(</span> R <span class="token punctuation">.</span> layout <span class="token punctuation">.</span> activity_main <span class="token punctuation">)</span> <span class="token punctuation">;</span> <span class="token comment">// Gets userRepository from the instance of AppContainer in Application</span> AppContainer appContainer <span class="token operator">=</span> <span class="token punctuation">(</span> <span class="token punctuation">(</span> MyApplication <span class="token punctuation">)</span> <span class="token function">getApplication</span> <span class="token punctuation">(</span> <span class="token punctuation">)</span> <span class="token punctuation">)</span> <span class="token punctuation">.</span> appContainer <span class="token punctuation">;</span> loginViewModel <span class="token operator">=</span> new <span class="token function">LoginViewModel</span> <span class="token punctuation">(</span> appContainer <span class="token punctuation">.</span> userRepository <span class="token punctuation">)</span> <span class="token punctuation">;</span> <span class="token punctuation">}</span> <span class="token punctuation">}</span> |
Java:
1 2 3 4 5 6 7 8 9 10 11 12 13 14 15 | <span class="token keyword">public</span> <span class="token keyword">class</span> <span class="token class-name">MainActivity</span> <span class="token keyword">extends</span> <span class="token class-name">Activity</span> <span class="token punctuation">{</span> <span class="token keyword">private</span> LoginViewModel loginViewModel <span class="token punctuation">;</span> <span class="token annotation punctuation">@Override</span> <span class="token keyword">protected</span> <span class="token keyword">void</span> <span class="token function">onCreate</span> <span class="token punctuation">(</span> Bundle savedInstanceState <span class="token punctuation">)</span> <span class="token punctuation">{</span> <span class="token keyword">super</span> <span class="token punctuation">.</span> <span class="token function">onCreate</span> <span class="token punctuation">(</span> savedInstanceState <span class="token punctuation">)</span> <span class="token punctuation">;</span> <span class="token function">setContentView</span> <span class="token punctuation">(</span> R <span class="token punctuation">.</span> layout <span class="token punctuation">.</span> activity_main <span class="token punctuation">)</span> <span class="token punctuation">;</span> <span class="token comment">// Gets userRepository from the instance of AppContainer in Application</span> AppContainer appContainer <span class="token operator">=</span> <span class="token punctuation">(</span> <span class="token punctuation">(</span> MyApplication <span class="token punctuation">)</span> <span class="token function">getApplication</span> <span class="token punctuation">(</span> <span class="token punctuation">)</span> <span class="token punctuation">)</span> <span class="token punctuation">.</span> appContainer <span class="token punctuation">;</span> loginViewModel <span class="token operator">=</span> <span class="token keyword">new</span> <span class="token class-name">LoginViewModel</span> <span class="token punctuation">(</span> appContainer <span class="token punctuation">.</span> userRepository <span class="token punctuation">)</span> <span class="token punctuation">;</span> <span class="token punctuation">}</span> <span class="token punctuation">}</span> |
In this example you do not have a Singleton of UserRepository. Instead you have a shared AppContainer for the Activity. If LoginViewModel is needed in many places in the application. There is a centralized place where you create its instance. We can create a LoginViewModel in the container and supply new objects according to the Factory.
Kotlin:
1 2 3 4 5 6 7 8 9 10 11 12 13 14 | <span class="token comment">// Definition of a Factory interface with a function to create objects of a type</span> <span class="token keyword">interface</span> Factory <span class="token punctuation">{</span> <span class="token keyword">fun</span> <span class="token function">create</span> <span class="token punctuation">(</span> <span class="token punctuation">)</span> <span class="token operator">:</span> T <span class="token punctuation">}</span> <span class="token comment">// Factory for LoginViewModel.</span> <span class="token comment">// Since LoginViewModel depends on UserRepository, in order to create instances of</span> <span class="token comment">// LoginViewModel, you need an instance of UserRepository that you pass as a parameter.</span> <span class="token keyword">class</span> <span class="token function">LoginViewModelFactory</span> <span class="token punctuation">(</span> <span class="token keyword">private</span> <span class="token keyword">val</span> userRepository <span class="token operator">:</span> UserRepository <span class="token punctuation">)</span> <span class="token operator">:</span> Factory <span class="token punctuation">{</span> <span class="token keyword">override</span> <span class="token keyword">fun</span> <span class="token function">create</span> <span class="token punctuation">(</span> <span class="token punctuation">)</span> <span class="token operator">:</span> LoginViewModel <span class="token punctuation">{</span> <span class="token keyword">return</span> <span class="token function">LoginViewModel</span> <span class="token punctuation">(</span> userRepository <span class="token punctuation">)</span> <span class="token punctuation">}</span> <span class="token punctuation">}</span> |
Java:
1 2 3 4 5 6 7 8 9 10 11 12 13 14 15 16 17 18 19 20 21 22 | <span class="token comment">// Definition of a Factory interface with a function to create objects of a type</span> <span class="token keyword">public</span> <span class="token keyword">interface</span> <span class="token class-name">Factory</span> <span class="token punctuation">{</span> T <span class="token function">create</span> <span class="token punctuation">(</span> <span class="token punctuation">)</span> <span class="token punctuation">;</span> <span class="token punctuation">}</span> <span class="token comment">// Factory for LoginViewModel.</span> <span class="token comment">// Since LoginViewModel depends on UserRepository, in order to create instances of</span> <span class="token comment">// LoginViewModel, you need an instance of UserRepository that you pass as a parameter.</span> <span class="token keyword">class</span> <span class="token class-name">LoginViewModelFactory</span> <span class="token keyword">implements</span> <span class="token class-name">Factory</span> <span class="token punctuation">{</span> <span class="token keyword">private</span> <span class="token keyword">final</span> UserRepository userRepository <span class="token punctuation">;</span> <span class="token keyword">public</span> <span class="token function">LoginViewModelFactory</span> <span class="token punctuation">(</span> UserRepository userRepository <span class="token punctuation">)</span> <span class="token punctuation">{</span> <span class="token keyword">this</span> <span class="token punctuation">.</span> userRepository <span class="token operator">=</span> userRepository <span class="token punctuation">;</span> <span class="token punctuation">}</span> <span class="token annotation punctuation">@Override</span> <span class="token keyword">public</span> LoginViewModel <span class="token function">create</span> <span class="token punctuation">(</span> <span class="token punctuation">)</span> <span class="token punctuation">{</span> <span class="token keyword">return</span> <span class="token keyword">new</span> <span class="token class-name">LoginViewModel</span> <span class="token punctuation">(</span> userRepository <span class="token punctuation">)</span> <span class="token punctuation">;</span> <span class="token punctuation">}</span> <span class="token punctuation">}</span> |
Then we can declare LoginViewModelFactory in AppContainer and get LoginViewModel in LoginActivity.
Kotlin:
1 2 3 4 5 6 7 8 9 10 11 12 13 14 15 16 17 18 19 20 21 22 | <span class="token comment">// AppContainer can now provide instances of LoginViewModel with LoginViewModelFactory</span> <span class="token keyword">class</span> AppContainer <span class="token punctuation">{</span> <span class="token operator">..</span> <span class="token punctuation">.</span> <span class="token keyword">val</span> userRepository <span class="token operator">=</span> <span class="token function">UserRepository</span> <span class="token punctuation">(</span> localDataSource <span class="token punctuation">,</span> remoteDataSource <span class="token punctuation">)</span> <span class="token keyword">val</span> loginViewModelFactory <span class="token operator">=</span> <span class="token function">LoginViewModelFactory</span> <span class="token punctuation">(</span> userRepository <span class="token punctuation">)</span> <span class="token punctuation">}</span> <span class="token keyword">class</span> LoginActivity <span class="token operator">:</span> <span class="token function">Activity</span> <span class="token punctuation">(</span> <span class="token punctuation">)</span> <span class="token punctuation">{</span> <span class="token keyword">private</span> <span class="token keyword">lateinit</span> <span class="token keyword">var</span> loginViewModel <span class="token operator">:</span> LoginViewModel <span class="token keyword">override</span> <span class="token keyword">fun</span> <span class="token function">onCreate</span> <span class="token punctuation">(</span> savedInstanceState <span class="token operator">:</span> Bundle <span class="token operator">?</span> <span class="token punctuation">)</span> <span class="token punctuation">{</span> <span class="token keyword">super</span> <span class="token punctuation">.</span> <span class="token function">onCreate</span> <span class="token punctuation">(</span> savedInstanceState <span class="token punctuation">)</span> <span class="token comment">// Gets LoginViewModelFactory from the application instance of AppContainer</span> <span class="token comment">// to create a new LoginViewModel instance</span> <span class="token keyword">val</span> appContainer <span class="token operator">=</span> <span class="token punctuation">(</span> application <span class="token keyword">as</span> MyApplication <span class="token punctuation">)</span> <span class="token punctuation">.</span> appContainer loginViewModel <span class="token operator">=</span> appContainer <span class="token punctuation">.</span> loginViewModelFactory <span class="token punctuation">.</span> <span class="token function">create</span> <span class="token punctuation">(</span> <span class="token punctuation">)</span> <span class="token punctuation">}</span> <span class="token punctuation">}</span> |
Java:
1 2 3 4 5 6 7 8 9 10 11 12 13 14 15 16 17 18 19 20 21 22 23 24 25 | <span class="token comment">// AppContainer can now provide instances of LoginViewModel with LoginViewModelFactory</span> <span class="token keyword">public</span> <span class="token keyword">class</span> <span class="token class-name">AppContainer</span> <span class="token punctuation">{</span> <span class="token punctuation">.</span> <span class="token punctuation">.</span> <span class="token punctuation">.</span> <span class="token keyword">public</span> UserRepository userRepository <span class="token operator">=</span> <span class="token keyword">new</span> <span class="token class-name">UserRepository</span> <span class="token punctuation">(</span> localDataSource <span class="token punctuation">,</span> remoteDataSource <span class="token punctuation">)</span> <span class="token punctuation">;</span> <span class="token keyword">public</span> LoginViewModelFactory loginViewModelFactory <span class="token operator">=</span> <span class="token keyword">new</span> <span class="token class-name">LoginViewModelFactory</span> <span class="token punctuation">(</span> userRepository <span class="token punctuation">)</span> <span class="token punctuation">;</span> <span class="token punctuation">}</span> <span class="token keyword">public</span> <span class="token keyword">class</span> <span class="token class-name">MainActivity</span> <span class="token keyword">extends</span> <span class="token class-name">Activity</span> <span class="token punctuation">{</span> <span class="token keyword">private</span> LoginViewModel loginViewModel <span class="token punctuation">;</span> <span class="token annotation punctuation">@Override</span> <span class="token keyword">protected</span> <span class="token keyword">void</span> <span class="token function">onCreate</span> <span class="token punctuation">(</span> Bundle savedInstanceState <span class="token punctuation">)</span> <span class="token punctuation">{</span> <span class="token keyword">super</span> <span class="token punctuation">.</span> <span class="token function">onCreate</span> <span class="token punctuation">(</span> savedInstanceState <span class="token punctuation">)</span> <span class="token punctuation">;</span> <span class="token function">setContentView</span> <span class="token punctuation">(</span> R <span class="token punctuation">.</span> layout <span class="token punctuation">.</span> activity_main <span class="token punctuation">)</span> <span class="token punctuation">;</span> <span class="token comment">// Gets LoginViewModelFactory from the application instance of AppContainer</span> <span class="token comment">// to create a new LoginViewModel instance</span> AppContainer appContainer <span class="token operator">=</span> <span class="token punctuation">(</span> <span class="token punctuation">(</span> MyApplication <span class="token punctuation">)</span> <span class="token function">getApplication</span> <span class="token punctuation">(</span> <span class="token punctuation">)</span> <span class="token punctuation">)</span> <span class="token punctuation">.</span> appContainer <span class="token punctuation">;</span> loginViewModel <span class="token operator">=</span> appContainer <span class="token punctuation">.</span> loginViewModelFactory <span class="token punctuation">.</span> <span class="token function">create</span> <span class="token punctuation">(</span> <span class="token punctuation">)</span> <span class="token punctuation">;</span> <span class="token punctuation">}</span> <span class="token punctuation">}</span> |
These approaches are better than the method on which there are still a few things to consider:
- You must manage AppContainer yourself, create instances of dependencies manually.
- There is still a lot of code to write. You need to create factories and parameters manually depending on whether you want to use an object or not.
5. Managing dependencies in application flows
AppContainer will become cumbersome when the application has many functions. When a large application starts to perform the same steps again, there are even many things that arise:
- When you have different feature streams, you may also want objects that only live within that region. For example, in case you create a LoginUserData (username and password), you don’t want to store data from the old login stream from another user. You need a new data for a new thread. You can achieve that by creating a FlowContainer object in AppContainer (example below)
- Optimizing Application Graph and flow containers can be difficult.
Let’s create a LoginContainer. We can create multiple LoginContainer instances in the application if desired, so instead of turning it into a Singleton, turn it into a class with the dependencies that the login flow needs from AppContainer.
Kotlin:
1 2 3 4 5 6 7 8 9 10 11 12 13 14 15 16 | <span class="token keyword">class</span> <span class="token function">LoginContainer</span> <span class="token punctuation">(</span> <span class="token keyword">val</span> userRepository <span class="token operator">:</span> UserRepository <span class="token punctuation">)</span> <span class="token punctuation">{</span> <span class="token keyword">val</span> loginData <span class="token operator">=</span> <span class="token function">LoginUserData</span> <span class="token punctuation">(</span> <span class="token punctuation">)</span> <span class="token keyword">val</span> loginViewModelFactory <span class="token operator">=</span> <span class="token function">LoginViewModelFactory</span> <span class="token punctuation">(</span> userRepository <span class="token punctuation">)</span> <span class="token punctuation">}</span> <span class="token comment">// AppContainer contains LoginContainer now</span> <span class="token keyword">class</span> AppContainer <span class="token punctuation">{</span> <span class="token operator">..</span> <span class="token punctuation">.</span> <span class="token keyword">val</span> userRepository <span class="token operator">=</span> <span class="token function">UserRepository</span> <span class="token punctuation">(</span> localDataSource <span class="token punctuation">,</span> remoteDataSource <span class="token punctuation">)</span> <span class="token comment">// LoginContainer will be null when the user is NOT in the login flow</span> <span class="token keyword">var</span> loginContainer <span class="token operator">:</span> LoginContainer <span class="token operator">?</span> <span class="token operator">=</span> <span class="token keyword">null</span> <span class="token punctuation">}</span> |
Java:
1 2 3 4 5 6 7 8 9 10 11 12 13 14 15 16 17 18 19 20 21 22 23 24 | <span class="token comment">// Container with Login-specific dependencies</span> <span class="token keyword">class</span> <span class="token class-name">LoginContainer</span> <span class="token punctuation">{</span> <span class="token keyword">private</span> <span class="token keyword">final</span> UserRepository userRepository <span class="token punctuation">;</span> <span class="token keyword">public</span> <span class="token function">LoginContainer</span> <span class="token punctuation">(</span> UserRepository userRepository <span class="token punctuation">)</span> <span class="token punctuation">{</span> <span class="token keyword">this</span> <span class="token punctuation">.</span> userRepository <span class="token operator">=</span> userRepository <span class="token punctuation">;</span> loginViewModelFactory <span class="token operator">=</span> <span class="token keyword">new</span> <span class="token class-name">LoginViewModelFactory</span> <span class="token punctuation">(</span> userRepository <span class="token punctuation">)</span> <span class="token punctuation">;</span> <span class="token punctuation">}</span> <span class="token keyword">public</span> LoginUserData loginData <span class="token operator">=</span> <span class="token keyword">new</span> <span class="token class-name">LoginUserData</span> <span class="token punctuation">(</span> <span class="token punctuation">)</span> <span class="token punctuation">;</span> <span class="token keyword">public</span> LoginViewModelFactory loginViewModelFactory <span class="token punctuation">;</span> <span class="token punctuation">}</span> <span class="token comment">// AppContainer contains LoginContainer now</span> <span class="token keyword">public</span> <span class="token keyword">class</span> <span class="token class-name">AppContainer</span> <span class="token punctuation">{</span> <span class="token punctuation">.</span> <span class="token punctuation">.</span> <span class="token punctuation">.</span> <span class="token keyword">public</span> UserRepository userRepository <span class="token operator">=</span> <span class="token keyword">new</span> <span class="token class-name">UserRepository</span> <span class="token punctuation">(</span> localDataSource <span class="token punctuation">,</span> remoteDataSource <span class="token punctuation">)</span> <span class="token punctuation">;</span> <span class="token comment">// LoginContainer will be null when the user is NOT in the login flow</span> <span class="token keyword">public</span> LoginContainer loginContainer <span class="token punctuation">;</span> <span class="token punctuation">}</span> |
When you have a Container for a Flow, you must decide when to create and delete the instance of the Container. Because the login stream is closed in ActivityLogin. So we create the instance in onCreate () and delete it in onDestroy ().
Kotlin:
1 2 3 4 5 6 7 8 9 10 11 12 13 14 15 16 17 18 19 20 21 22 23 24 25 26 | <span class="token keyword">class</span> LoginActivity <span class="token operator">:</span> <span class="token function">Activity</span> <span class="token punctuation">(</span> <span class="token punctuation">)</span> <span class="token punctuation">{</span> <span class="token keyword">private</span> <span class="token keyword">lateinit</span> <span class="token keyword">var</span> loginViewModel <span class="token operator">:</span> LoginViewModel <span class="token keyword">private</span> <span class="token keyword">lateinit</span> <span class="token keyword">var</span> loginData <span class="token operator">:</span> LoginUserData <span class="token keyword">private</span> <span class="token keyword">lateinit</span> <span class="token keyword">var</span> appContainer <span class="token operator">:</span> AppContainer <span class="token keyword">override</span> <span class="token keyword">fun</span> <span class="token function">onCreate</span> <span class="token punctuation">(</span> savedInstanceState <span class="token operator">:</span> Bundle <span class="token operator">?</span> <span class="token punctuation">)</span> <span class="token punctuation">{</span> <span class="token keyword">super</span> <span class="token punctuation">.</span> <span class="token function">onCreate</span> <span class="token punctuation">(</span> savedInstanceState <span class="token punctuation">)</span> appContainer <span class="token operator">=</span> <span class="token punctuation">(</span> application <span class="token keyword">as</span> MyApplication <span class="token punctuation">)</span> <span class="token punctuation">.</span> appContainer <span class="token comment">// Login flow has started. Populate loginContainer in AppContainer</span> appContainer <span class="token punctuation">.</span> loginContainer <span class="token operator">=</span> <span class="token function">LoginContainer</span> <span class="token punctuation">(</span> appContainer <span class="token punctuation">.</span> userRepository <span class="token punctuation">)</span> loginViewModel <span class="token operator">=</span> appContainer <span class="token punctuation">.</span> loginContainer <span class="token punctuation">.</span> loginViewModelFactory <span class="token punctuation">.</span> <span class="token function">create</span> <span class="token punctuation">(</span> <span class="token punctuation">)</span> loginData <span class="token operator">=</span> appContainer <span class="token punctuation">.</span> loginContainer <span class="token punctuation">.</span> loginData <span class="token punctuation">}</span> <span class="token keyword">override</span> <span class="token keyword">fun</span> <span class="token function">onDestroy</span> <span class="token punctuation">(</span> <span class="token punctuation">)</span> <span class="token punctuation">{</span> <span class="token comment">// Login flow is finishing</span> <span class="token comment">// Removing the instance of loginContainer in the AppContainer</span> appContainer <span class="token punctuation">.</span> loginContainer <span class="token operator">=</span> <span class="token keyword">null</span> <span class="token keyword">super</span> <span class="token punctuation">.</span> <span class="token function">onDestroy</span> <span class="token punctuation">(</span> <span class="token punctuation">)</span> <span class="token punctuation">}</span> <span class="token punctuation">}</span> |
Java:
1 2 3 4 5 6 7 8 9 10 11 12 13 14 15 16 17 18 19 20 21 22 23 24 25 26 27 28 29 30 | <span class="token keyword">public</span> <span class="token keyword">class</span> <span class="token class-name">LoginActivity</span> <span class="token keyword">extends</span> <span class="token class-name">Activity</span> <span class="token punctuation">{</span> <span class="token keyword">private</span> LoginViewModel loginViewModel <span class="token punctuation">;</span> <span class="token keyword">private</span> LoginData loginData <span class="token punctuation">;</span> <span class="token keyword">private</span> AppContainer appContainer <span class="token punctuation">;</span> <span class="token annotation punctuation">@Override</span> <span class="token keyword">protected</span> <span class="token keyword">void</span> <span class="token function">onCreate</span> <span class="token punctuation">(</span> Bundle savedInstanceState <span class="token punctuation">)</span> <span class="token punctuation">{</span> <span class="token keyword">super</span> <span class="token punctuation">.</span> <span class="token function">onCreate</span> <span class="token punctuation">(</span> savedInstanceState <span class="token punctuation">)</span> <span class="token punctuation">;</span> <span class="token function">setContentView</span> <span class="token punctuation">(</span> R <span class="token punctuation">.</span> layout <span class="token punctuation">.</span> activity_main <span class="token punctuation">)</span> <span class="token punctuation">;</span> appContainer <span class="token operator">=</span> <span class="token punctuation">(</span> <span class="token punctuation">(</span> MyApplication <span class="token punctuation">)</span> <span class="token function">getApplication</span> <span class="token punctuation">(</span> <span class="token punctuation">)</span> <span class="token punctuation">)</span> <span class="token punctuation">.</span> appContainer <span class="token punctuation">;</span> <span class="token comment">// Login flow has started. Populate loginContainer in AppContainer</span> appContainer <span class="token punctuation">.</span> loginContainer <span class="token operator">=</span> <span class="token keyword">new</span> <span class="token class-name">LoginContainer</span> <span class="token punctuation">(</span> appContainer <span class="token punctuation">.</span> userRepository <span class="token punctuation">)</span> <span class="token punctuation">;</span> loginViewModel <span class="token operator">=</span> appContainer <span class="token punctuation">.</span> loginContainer <span class="token punctuation">.</span> loginViewModelFactory <span class="token punctuation">.</span> <span class="token function">create</span> <span class="token punctuation">(</span> <span class="token punctuation">)</span> <span class="token punctuation">;</span> loginData <span class="token operator">=</span> appContainer <span class="token punctuation">.</span> loginContainer <span class="token punctuation">.</span> loginData <span class="token punctuation">;</span> <span class="token punctuation">}</span> <span class="token annotation punctuation">@Override</span> <span class="token keyword">protected</span> <span class="token keyword">void</span> <span class="token function">onDestroy</span> <span class="token punctuation">(</span> <span class="token punctuation">)</span> <span class="token punctuation">{</span> <span class="token comment">// Login flow is finishing</span> <span class="token comment">// Removing the instance of loginContainer in the AppContainer</span> appContainer <span class="token punctuation">.</span> loginContainer <span class="token operator">=</span> null <span class="token punctuation">;</span> <span class="token keyword">super</span> <span class="token punctuation">.</span> <span class="token function">onDestroy</span> <span class="token punctuation">(</span> <span class="token punctuation">)</span> <span class="token punctuation">;</span> <span class="token punctuation">}</span> <span class="token punctuation">}</span> |
6. Conclusion
Dependency injection is a good technique for creating scalable and easy to test Android applications. Using containers as a way to share instances of different parts of the application, or in other words it is a central place to create instances of classes (using factories).
As your application gets bigger, you will start to see that you have to write a lot of code (like factories), so it can be error-prone. You also have to manage the scope and lifecycle of the containers yourself, optimize and eliminate unnecessary containers to free up memory. Failure to do so could result in very sophisticated errors or memory leaks in your application. This is the downside of using Dagger manually
In the next part, I will share how to use Dagger automatically. This shared knowledge I refer to from Google, thank you for following the article.