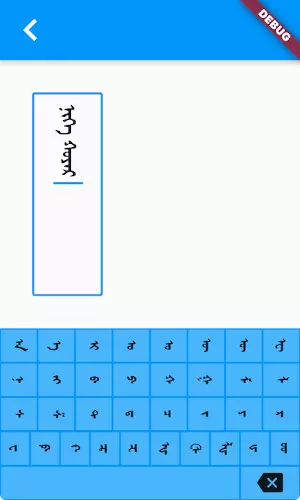
This article will guide you on how to create a custom keyboard for typing in your own application. Use cases include entering text for special characters or languages in which the system keyboard might not exist or the user might not have the correct keyboard installed. For example, I used this method with the mongol package to create a basic keyboard for entering traditional Mongolian text:
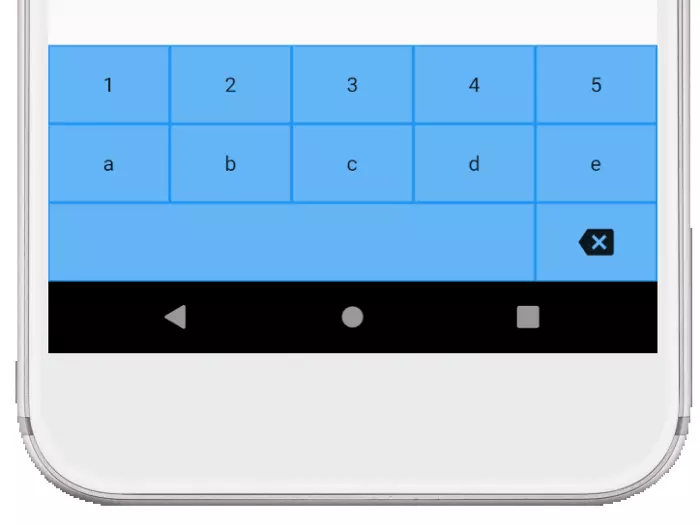
Today we will create a simpler version:
Note: This article won’t tell you how to build a system keyboard that users install and can use in any application. This is just a widget-based approach to use in your own app. The full code is at the bottom of the article. It’s updated for Flutter 1.22 and Dart 2.10.
1. Create widget key
Flutter can easily create complex keyboard layouts by incorporating simpler widgets. So to get started, you’ll create a few simple main widgets.
1.1 Text key
I have circled the keys generated from the TextKey utility that you will create first.
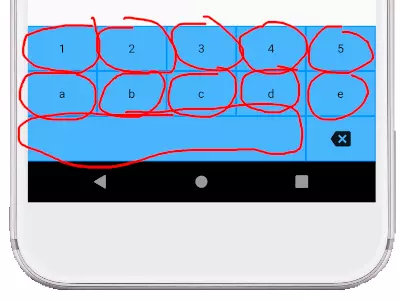
Add this TextKey widget to your project:
1 2 3 4 5 6 7 8 9 10 11 12 13 14 15 16 17 18 19 20 21 22 23 24 25 26 27 28 29 30 31 32 | class TextKey extends StatelessWidget { const TextKey({ Key key, @required this.text, this.onTextInput, this.flex = 1, }) : super(key: key); final String text; final ValueSetter<String> onTextInput; final int flex; @override Widget build(BuildContext context) { return Expanded( flex: flex, child: Padding( padding: const EdgeInsets.all(1.0), child: Material( color: Colors.blue.shade300, child: InkWell( onTap: () { onTextInput?.call(text); }, child: Container( child: Center(child: Text(text)), ), ), ), ), ); } } |
Here’s the cool part: The flex property allows your keys to be evenly distributed across a row or even take up a larger proportion of a row (like the space key in the image above). When the key is pressed, it passes its value onto the keyboard as an onTextInput callback.
1.2 Backspace key
You also need a delete key that looks and functions differently from the TextKey utility.
1 2 3 4 5 6 7 8 9 10 11 12 13 14 15 16 17 18 19 20 21 22 23 24 25 26 27 28 29 30 31 32 | class BackspaceKey extends StatelessWidget { const BackspaceKey({ Key key, this.onBackspace, this.flex = 1, }) : super(key: key); final VoidCallback onBackspace; final int flex; @override Widget build(BuildContext context) { return Expanded( flex: flex, child: Padding( padding: const EdgeInsets.all(1.0), child: Material( color: Colors.blue.shade300, child: InkWell( onTap: () { onBackspace?.call(); }, child: Container( child: Center( child: Icon(Icons.backspace), ), ), ), ), ), ); } } |
Note: There is a bit of overlap with the TextKey code, so some refactoring will make it DRY, especially if you add other key types like shift. However, it is allowed for learning purposes today. onBackspace is a VoidCallback because there is no need to convert any text back to the keyboard.
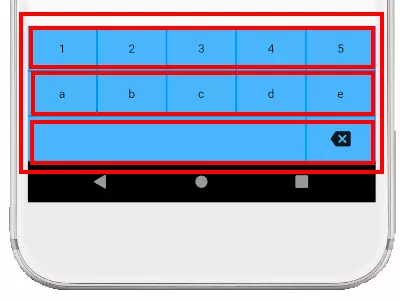
1.3 Organize the keys into a keyboard
The keyboards are easy to layout when you have the keys because they are just rows in a column.
Here is the code. I omit some repetitions for brevity. However, you can find them all at the end of the article.
1 2 3 4 5 6 7 8 9 10 11 12 13 14 15 16 17 18 19 20 21 22 23 24 25 26 27 28 29 30 31 32 33 34 35 36 37 38 39 40 41 42 43 44 45 46 47 48 49 50 51 52 53 54 55 56 57 58 59 60 61 62 | class CustomKeyboard extends StatelessWidget { CustomKeyboard({ Key key, this.onTextInput, this.onBackspace, }) : super(key: key); final ValueSetter<String> onTextInput; final VoidCallback onBackspace; void _textInputHandler(String text) => onTextInput?.call(text); void _backspaceHandler() => onBackspace?.call(); @override Widget build(BuildContext context) { return Container( height: 160, color: Colors.blue, child: Column( // <-- Column children: [ buildRowOne(), // <-- Row buildRowTwo(), // <-- Row buildRowThree(), // <-- Row ], ), ); } Expanded buildRowOne() { return Expanded( child: Row( children: [ TextKey( text: '1', onTextInput: _textInputHandler, ), TextKey( text: '2', onTextInput: _textInputHandler, ), ... ], ), ); } Expanded buildRowTwo() { ... } Expanded buildRowThree() { return Expanded( child: Row( children: [ TextKey( text: ' ', flex: 4, onTextInput: _textInputHandler, ), BackspaceKey( onBackspace: _backspaceHandler, ), ], ), ); } } |
The keyboard collects the callbacks from the keys and transfers them to the interface. That way, anyone using CustomKeyboard will get a callback. You can see how flex is used in the third row. The space key has a flexibility of 4 while the backspace key retains the default flexibility of 1. That makes the space key four times the width of the backspace key.
1 2 3 4 5 6 7 8 9 | CustomKeyboard( onTextInput: (myText) { _insertText(myText); }, onBackspace: () { _backspace(); }, ), |
1.4 Handling text input
1 2 3 4 5 6 7 8 9 10 11 12 13 14 15 16 | void _insertText(String myText) { final text = _controller.text; final textSelection = _controller.selection; final newText = text.replaceRange( textSelection.start, textSelection.end, myText, ); final myTextLength = myText.length; _controller.text = newText; _controller.selection = textSelection.copyWith( baseOffset: textSelection.start + myTextLength, extentOffset: textSelection.start + myTextLength, ); } |
Controller is TextE EditorController for TextField. You must remember that there may be an option, so if so, replace it with the text that the key was passed on.
1.5 Handling backspace
You think the backspace will be simple, but there are a few different cases to think about: There is a choice (delete selection) Cursor at the top (do nothing) Everything else (delete previous character) Here is the implementation of the _backspace method:
1 2 3 4 5 6 7 8 9 10 11 12 13 14 15 16 17 18 19 20 21 22 23 24 25 26 27 28 29 30 31 32 33 34 35 36 37 38 39 40 41 42 | void _backspace() { final text = _controller.text; final textSelection = _controller.selection; final selectionLength = textSelection.end - textSelection.start; // There is a selection. if (selectionLength > 0) { final newText = text.replaceRange( textSelection.start, textSelection.end, '', ); _controller.text = newText; _controller.selection = textSelection.copyWith( baseOffset: textSelection.start, extentOffset: textSelection.start, ); return; } // The cursor is at the beginning. if (textSelection.start == 0) { return; } // Delete the previous character final previousCodeUnit = text.codeUnitAt(textSelection.start - 1); final offset = _isUtf16Surrogate(previousCodeUnit) ? 2 : 1; final newStart = textSelection.start - offset; final newEnd = textSelection.start; final newText = text.replaceRange( newStart, newEnd, '', ); _controller.text = newText; _controller.selection = textSelection.copyWith( baseOffset: newStart, extentOffset: newStart, ); } bool _isUtf16Surrogate(int value) { return value & 0xF800 == 0xD800; } |
Even deleting the previous character is a bit difficult. If you only undo a code unit when you have emojis or some other alternate pair (see Working with Unicode and Grapheme Clusters in Dart), this will cause an error. As another workaround in the above code, I checked if the previous character is the UFT-16 alternate character and if so then the space between the two characters. (I got the isUtf16Surrogate method from the Flutter TextPainter source code.) However, this is still not a perfect solution as it will not work for grapheme clusters like ?? or ???, generated into words more than a single surrogate pair. However, at least it won’t cause a problem. Here is a pictogram keyboard and emojis as a demonstration:
1.5 Prevent the system keyboard from showing
It will be very annoying if you want to use your custom keyboard with TextField but the system keyboard keeps popping up. That is the default behavior. The way to prevent the system keyboard from displaying is to set the readOnly property of TextField to true.
1 2 3 4 5 6 | TextField( ... showCursor: true, readOnly: true, ), |
1.6 Switch between the system keyboard and your keyboard
If you want to give the user the option of using your system keyboard or custom keyboard, you can simply recreate it with a different value for readOnly.
Here’s how TextField is set up in the demo application:
1 2 3 4 5 6 7 8 9 10 11 12 13 14 15 16 17 18 19 20 21 22 23 24 25 26 27 | class _KeyboardDemoState extends State<KeyboardDemo> { TextEditingController _controller = TextEditingController(); bool _readOnly = true; @override Widget build(BuildContext context) { return Scaffold( resizeToAvoidBottomInset: false, body: Column( children: [ ... TextField( controller: _controller, decoration: ..., style: TextStyle(fontSize: 24), autofocus: true, showCursor: true, readOnly: _readOnly, ), IconButton( icon: Icon(Icons.keyboard), onPressed: () { setState(() { _readOnly = !_readOnly; }); }, ), |
When IconButton is pressed on the keyboard, the value of _readOnly is changed and the layout is then rebuilt. This makes the system keyboard invisible or visible. Setting resizeToAvoidBottomInset on Scaffold to false allows the system keyboard to mask the custom keyboard. Another option is to hide the custom keyboard while the system keyboard is showing. However, when I did that in my tests, I found that I had to use a separate boolean to hide the custom keyboard so I could delay displaying it until the system keyboard disappeared. If not, it will jump to the top of the system keyboard in an instant. That’s it! As you can see, it’s not too difficult to create your own in-app keyboard.
1.7 Full code
1 2 3 4 5 6 7 8 9 10 11 12 13 14 15 16 17 18 19 20 21 22 23 24 25 26 27 28 29 30 31 32 33 34 35 36 37 38 39 40 41 42 43 44 45 46 47 48 49 50 51 52 53 54 55 56 57 58 59 60 61 62 63 64 65 66 67 68 69 70 71 72 73 74 75 76 77 78 79 80 81 82 83 84 85 86 87 88 89 90 91 92 93 94 95 96 97 98 99 100 101 102 103 104 105 106 107 108 109 110 111 112 113 114 115 116 117 118 119 120 121 122 123 124 125 126 127 128 129 130 131 132 133 134 135 136 137 138 139 140 141 142 143 144 145 146 147 148 149 150 151 152 153 154 155 156 157 158 159 160 161 162 163 164 165 166 167 168 169 170 171 172 173 174 175 176 177 178 179 180 181 182 183 184 185 186 187 188 189 190 191 192 193 194 195 196 197 198 199 200 201 202 203 204 205 206 207 208 209 210 211 212 213 214 215 216 217 218 219 220 221 222 223 224 225 226 227 228 229 230 231 232 233 234 235 236 237 238 239 240 241 242 243 244 245 246 247 248 249 250 251 252 253 254 255 256 257 258 259 260 261 262 263 264 265 266 267 268 269 270 271 272 273 274 275 276 277 278 279 280 281 282 283 284 285 286 287 288 289 290 291 292 293 294 295 296 297 298 299 300 301 302 303 304 305 | import 'package:flutter/material.dart'; void main() => runApp(MyApp()); class MyApp extends StatelessWidget { @override Widget build(BuildContext context) { return MaterialApp( home: KeyboardDemo(), ); } } class KeyboardDemo extends StatefulWidget { @override _KeyboardDemoState createState() => _KeyboardDemoState(); } class _KeyboardDemoState extends State<KeyboardDemo> { TextEditingController _controller = TextEditingController(); bool _readOnly = true; @override Widget build(BuildContext context) { return Scaffold( resizeToAvoidBottomInset: false, body: Column( children: [ SizedBox(height: 50), TextField( controller: _controller, decoration: InputDecoration( border: OutlineInputBorder( borderRadius: BorderRadius.circular(3), ), ), style: TextStyle(fontSize: 24), autofocus: true, showCursor: true, readOnly: _readOnly, ), IconButton( icon: Icon(Icons.keyboard), onPressed: () { setState(() { _readOnly = !_readOnly; }); }, ), Spacer(), CustomKeyboard( onTextInput: (myText) { _insertText(myText); }, onBackspace: () { _backspace(); }, ), ], ), ); } void _insertText(String myText) { final text = _controller.text; final textSelection = _controller.selection; final newText = text.replaceRange( textSelection.start, textSelection.end, myText, ); final myTextLength = myText.length; _controller.text = newText; _controller.selection = textSelection.copyWith( baseOffset: textSelection.start + myTextLength, extentOffset: textSelection.start + myTextLength, ); } void _backspace() { final text = _controller.text; final textSelection = _controller.selection; final selectionLength = textSelection.end - textSelection.start; // There is a selection. if (selectionLength > 0) { final newText = text.replaceRange( textSelection.start, textSelection.end, '', ); _controller.text = newText; _controller.selection = textSelection.copyWith( baseOffset: textSelection.start, extentOffset: textSelection.start, ); return; } // The cursor is at the beginning. if (textSelection.start == 0) { return; } // Delete the previous character final previousCodeUnit = text.codeUnitAt(textSelection.start - 1); final offset = _isUtf16Surrogate(previousCodeUnit) ? 2 : 1; final newStart = textSelection.start - offset; final newEnd = textSelection.start; final newText = text.replaceRange( newStart, newEnd, '', ); _controller.text = newText; _controller.selection = textSelection.copyWith( baseOffset: newStart, extentOffset: newStart, ); } bool _isUtf16Surrogate(int value) { return value & 0xF800 == 0xD800; } @override void dispose() { _controller.dispose(); super.dispose(); } } class CustomKeyboard extends StatelessWidget { CustomKeyboard({ Key key, this.onTextInput, this.onBackspace, }) : super(key: key); final ValueSetter<String> onTextInput; final VoidCallback onBackspace; void _textInputHandler(String text) => onTextInput?.call(text); void _backspaceHandler() => onBackspace?.call(); @override Widget build(BuildContext context) { return Container( height: 160, color: Colors.blue, child: Column( children: [ buildRowOne(), buildRowTwo(), buildRowThree(), ], ), ); } Expanded buildRowOne() { return Expanded( child: Row( children: [ TextKey( text: '1', onTextInput: _textInputHandler, ), TextKey( text: '2', onTextInput: _textInputHandler, ), TextKey( text: '3', onTextInput: _textInputHandler, ), TextKey( text: '4', onTextInput: _textInputHandler, ), TextKey( text: '5', onTextInput: _textInputHandler, ), ], ), ); } Expanded buildRowTwo() { return Expanded( child: Row( children: [ TextKey( text: 'a', onTextInput: _textInputHandler, ), TextKey( text: 'b', onTextInput: _textInputHandler, ), TextKey( text: 'c', onTextInput: _textInputHandler, ), TextKey( text: 'd', onTextInput: _textInputHandler, ), TextKey( text: 'e', onTextInput: _textInputHandler, ), ], ), ); } Expanded buildRowThree() { return Expanded( child: Row( children: [ TextKey( text: ' ', flex: 4, onTextInput: _textInputHandler, ), BackspaceKey( onBackspace: _backspaceHandler, ), ], ), ); } } class TextKey extends StatelessWidget { const TextKey({ Key key, @required this.text, this.onTextInput, this.flex = 1, }) : super(key: key); final String text; final ValueSetter<String> onTextInput; final int flex; @override Widget build(BuildContext context) { return Expanded( flex: flex, child: Padding( padding: const EdgeInsets.all(1.0), child: Material( color: Colors.blue.shade300, child: InkWell( onTap: () { onTextInput?.call(text); }, child: Container( child: Center(child: Text(text)), ), ), ), ), ); } } class BackspaceKey extends StatelessWidget { const BackspaceKey({ Key key, this.onBackspace, this.flex = 1, }) : super(key: key); final VoidCallback onBackspace; final int flex; @override Widget build(BuildContext context) { return Expanded( flex: flex, child: Padding( padding: const EdgeInsets.all(1.0), child: Material( color: Colors.blue.shade300, child: InkWell( onTap: () { onBackspace?.call(); }, child: Container( child: Center( child: Icon(Icons.backspace), ), ), ), ), ), ); } } |