Surely in us, many times there is a need to copy folders from one place to another on google drive. Unlike copying on PC, google drive only allows copying files.
I also do not understand why google does not allow directory copy
I searched on the Internet, there are many ways, either you can use that power to download the folder and upload it again, or use a 3rd party extension. I guess most of you use the way 3rd party extension is both fast and easy. But for folders that are project documents, the use of any 3rd party software should be avoided for security reasons .
So today, I would like to introduce another way, it may take some time to install initially, but then each time you want to copy the folder, it only takes 2, 3 light actions.
content
- Setting
- Use
1. Install
We will use Google Apps Scripts. For those of you who are programming, it may be easier to understand, you do not have to worry about other industries because simply copying your code is ok.
Google Apps Script – is a Javascript-based programming language with editors and translators located on Google’s servers. With this tool, you can program to manipulate, intervene directly with Google services.
You go to https://script.google.com/ , because it is a google service, you should log in with your google account. After logging in, click the New Project button
Will open to the new screen, copy the code I have below the image and add it as shown below:
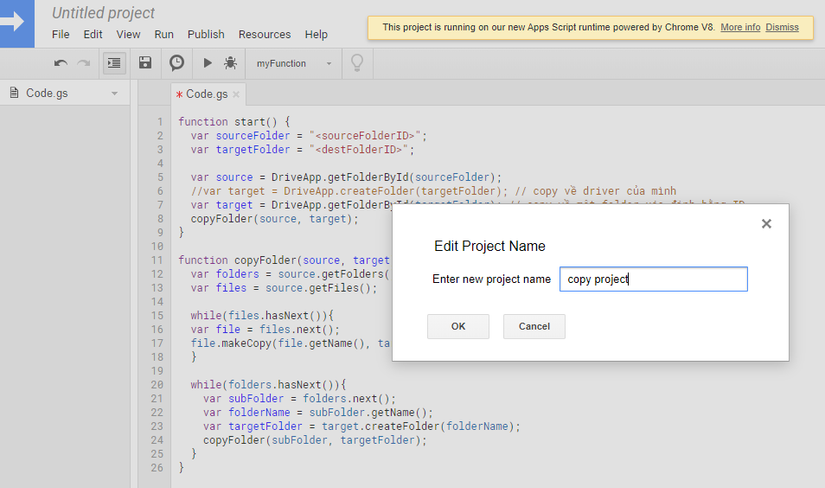
After adding the code, remember Ctrl S to save, and add a project name of your choice.
1 2 3 4 5 6 7 8 9 10 11 12 13 14 15 16 17 18 19 20 21 22 23 24 25 26 27 | <span class="token keyword">function</span> <span class="token function">start</span> <span class="token punctuation">(</span> <span class="token punctuation">)</span> <span class="token punctuation">{</span> <span class="token keyword">var</span> sourceFolder <span class="token operator">=</span> <span class="token double-quoted-string string">"<sourceFolderID>"</span> <span class="token punctuation">;</span> <span class="token keyword">var</span> targetFolder <span class="token operator">=</span> <span class="token double-quoted-string string">"<destFolderID/namefolder>"</span> <span class="token punctuation">;</span> <span class="token keyword">var</span> source <span class="token operator">=</span> DriveApp <span class="token punctuation">.</span> <span class="token function">getFolderById</span> <span class="token punctuation">(</span> sourceFolder <span class="token punctuation">)</span> <span class="token punctuation">;</span> <span class="token comment">//var target = DriveApp.createFolder(targetFolder); // copy về driver của mình</span> <span class="token keyword">var</span> target <span class="token operator">=</span> DriveApp <span class="token punctuation">.</span> <span class="token function">getFolderById</span> <span class="token punctuation">(</span> targetFolder <span class="token punctuation">)</span> <span class="token punctuation">;</span> <span class="token comment">// copy về một folder xác định bằng ID</span> <span class="token function">copyFolder</span> <span class="token punctuation">(</span> source <span class="token punctuation">,</span> target <span class="token punctuation">)</span> <span class="token punctuation">;</span> <span class="token punctuation">}</span> <span class="token keyword">function</span> <span class="token function">copyFolder</span> <span class="token punctuation">(</span> source <span class="token punctuation">,</span> target <span class="token punctuation">)</span> <span class="token punctuation">{</span> <span class="token keyword">var</span> folders <span class="token operator">=</span> source <span class="token punctuation">.</span> <span class="token function">getFolders</span> <span class="token punctuation">(</span> <span class="token punctuation">)</span> <span class="token punctuation">;</span> <span class="token keyword">var</span> files <span class="token operator">=</span> source <span class="token punctuation">.</span> <span class="token function">getFiles</span> <span class="token punctuation">(</span> <span class="token punctuation">)</span> <span class="token punctuation">;</span> <span class="token keyword">while</span> <span class="token punctuation">(</span> files <span class="token punctuation">.</span> <span class="token function">hasNext</span> <span class="token punctuation">(</span> <span class="token punctuation">)</span> <span class="token punctuation">)</span> <span class="token punctuation">{</span> <span class="token keyword">var</span> file <span class="token operator">=</span> files <span class="token punctuation">.</span> <span class="token function">next</span> <span class="token punctuation">(</span> <span class="token punctuation">)</span> <span class="token punctuation">;</span> file <span class="token punctuation">.</span> <span class="token function">makeCopy</span> <span class="token punctuation">(</span> file <span class="token punctuation">.</span> <span class="token function">getName</span> <span class="token punctuation">(</span> <span class="token punctuation">)</span> <span class="token punctuation">,</span> target <span class="token punctuation">)</span> <span class="token punctuation">;</span> <span class="token punctuation">}</span> <span class="token keyword">while</span> <span class="token punctuation">(</span> folders <span class="token punctuation">.</span> <span class="token function">hasNext</span> <span class="token punctuation">(</span> <span class="token punctuation">)</span> <span class="token punctuation">)</span> <span class="token punctuation">{</span> <span class="token keyword">var</span> subFolder <span class="token operator">=</span> folders <span class="token punctuation">.</span> <span class="token function">next</span> <span class="token punctuation">(</span> <span class="token punctuation">)</span> <span class="token punctuation">;</span> <span class="token keyword">var</span> folderName <span class="token operator">=</span> subFolder <span class="token punctuation">.</span> <span class="token function">getName</span> <span class="token punctuation">(</span> <span class="token punctuation">)</span> <span class="token punctuation">;</span> <span class="token keyword">var</span> targetFolder <span class="token operator">=</span> target <span class="token punctuation">.</span> <span class="token function">createFolder</span> <span class="token punctuation">(</span> folderName <span class="token punctuation">)</span> <span class="token punctuation">;</span> <span class="token function">copyFolder</span> <span class="token punctuation">(</span> subFolder <span class="token punctuation">,</span> targetFolder <span class="token punctuation">)</span> <span class="token punctuation">;</span> <span class="token punctuation">}</span> <span class="token punctuation">}</span> |
There will be many options for you to choose in copying, but here I introduce the two options I use most:
- Copy to your own drive.
- Copy to another directory that you have the right to modify.
2. Use
1. Copy to your own drive In the above code, there are 2 important parts that
1 2 3 | <span class="token keyword">var</span> sourceFolder <span class="token operator">=</span> <span class="token double-quoted-string string">"<sourceFolderID>"</span> <span class="token punctuation">;</span> <span class="token keyword">var</span> targetFolder <span class="token operator">=</span> <span class="token double-quoted-string string">"<destFolderID/namefolder>"</span> <span class="token punctuation">;</span> |
- sourceFolderID is the ID of the folder you want to copy
- destFolderID is the ID of the destination folder that you want to copy to, you temporarily ignore.
- namefolder is the name of the folder that you want to give the copied folder after it is saved to your My folder.
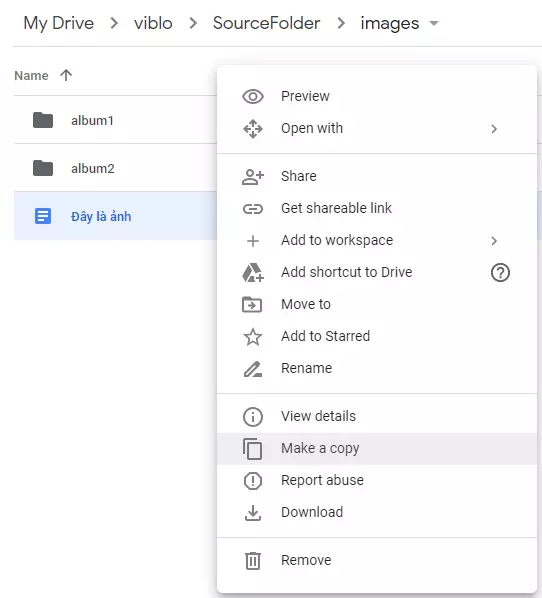
First, go to the folder you want to copy to get the ID. In this example, I assume I want to copy the album1 folder to My drive.
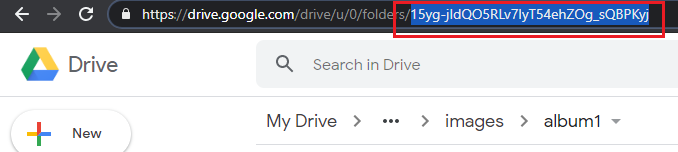
Replace the <sourceFolderID>
1 2 | <span class="token keyword">var</span> sourceFolder <span class="token operator">=</span> <span class="token double-quoted-string string">"15yg-jIdQO5RLv7lyT54ehZOg_sQBPKyj"</span> <span class="token punctuation">;</span> |
After that the targetFolder part will fill in the name you like for example
1 2 | <span class="token keyword">var</span> targetFolder <span class="token operator">=</span> <span class="token double-quoted-string string">"album anh"</span> <span class="token punctuation">;</span> |
At this point, you will need to change a bit in the above code: remove comment – 2 // marks from line 1 and add these 2 marks in the 2nd as below.
1 2 3 | <span class="token keyword">var</span> target <span class="token operator">=</span> DriveApp <span class="token punctuation">.</span> <span class="token function">createFolder</span> <span class="token punctuation">(</span> targetFolder <span class="token punctuation">)</span> <span class="token punctuation">;</span> <span class="token comment">// copy về driver của mình</span> <span class="token comment">//var target = DriveApp.getFolderById(targetFolder); // copy về một folder xác định bằng ID</span> |
Once done, press Ctrl S to save the code. The final step is to press Start as shown below and wait.
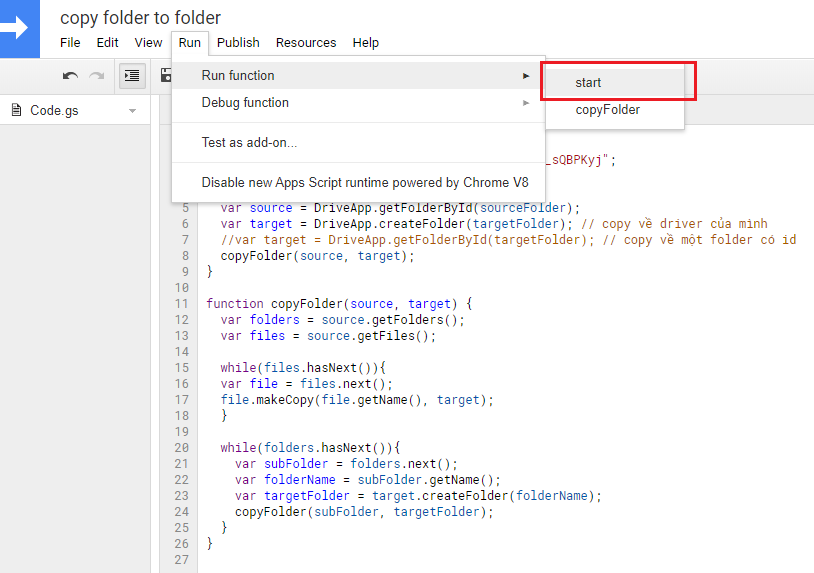
When the message below turns off is considered to have finished running.

You try to check My Drive offline
2. Copy to another directory that you have the right to modify
I would like to introduce the second option. Back to the source and target code
1 2 3 | <span class="token keyword">var</span> sourceFolder <span class="token operator">=</span> <span class="token double-quoted-string string">"<sourceFolderID>"</span> <span class="token punctuation">;</span> <span class="token keyword">var</span> targetFolder <span class="token operator">=</span> <span class="token double-quoted-string string">"<destFolderID/namefolder>"</span> <span class="token punctuation">;</span> |
At this time, you still need to copy the folder to get the ID and replace the <sourceFolderID>
1 2 | <span class="token keyword">var</span> sourceFolder <span class="token operator">=</span> <span class="token double-quoted-string string">"15yg-jIdQO5RLv7lyT54ehZOg_sQBPKyj"</span> <span class="token punctuation">;</span> |
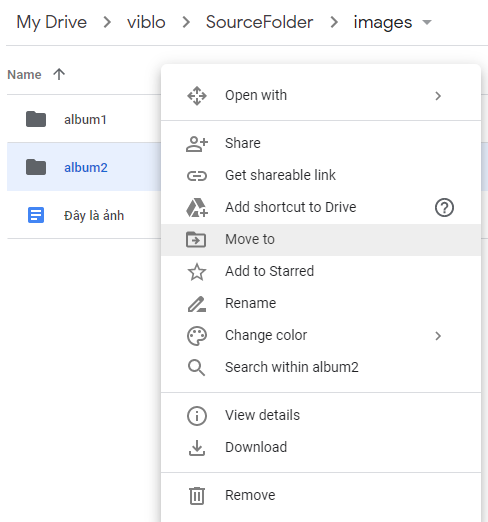
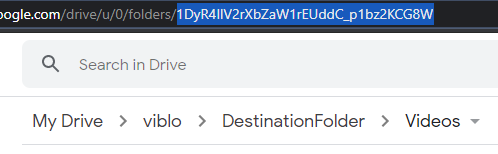
Then go to the destination folder – the folder you want to copy to also get the ID and replace the destFolderID part. For example, I want to copy album1 folder to videos folder
1 2 | <span class="token keyword">var</span> targetFolder <span class="token operator">=</span> <span class="token double-quoted-string string">"1DyR4IlV2rXbZaW1rEUddC_p1bz2KCG8W"</span> <span class="token punctuation">;</span> |
At this point, the code copy will be as follows.
1 2 3 | <span class="token comment">//var target = DriveApp.createFolder(targetFolder); // copy về driver của mình</span> <span class="token keyword">var</span> target <span class="token operator">=</span> DriveApp <span class="token punctuation">.</span> <span class="token function">getFolderById</span> <span class="token punctuation">(</span> targetFolder <span class="token punctuation">)</span> <span class="token punctuation">;</span> <span class="token comment">// copy về một folder xác định bằng ID</span> |
Similar to the above, save and start the code, wait for the copy and check the goods.
Note: In option 2, will copy the contents of the album1 folder. For example, in album1, you have 2 image files, it will only copy 2 image files only. And album1 folder will not be moved. Therefore, create the folder containing the contents of the album1 folder first, get that ID is sourceID and ID of album1 is targetID.
From next time onwards, all you need to do is change the sourceID , targetID and 2 lines of code related to the copy of the 2 options.
Thanks for reading. If there is anything difficult to understand, please comment below.