As we all know nowadays working with React mostly uses create-react-app , a great tool that helps us to just focus on React without having to worry about how they’re configured. . After learning React for a while, I think you will have some questions about that. So today we will learn about Webpack and Babel 7 configuration for React.
First, let’s learn about Webpack and Babel !
 Webpack
 Webpack
Webpack is a packaging module that helps us to package our project into a file. It requires a webpack.config.js config file located in the root directory of the project, where we will tell webpack how to work with our project by providing input and output information.
1 2 3 4 5 6 7 8 9 10 11 | const path = require('path'); module.exports = { entry: './src/app.js', // relative path output: { path: path.join(__dirname, 'public'), // absolute path filename: 'bundle.js' // file name } }; |
entry is where our application will start and output is the output. In the output we must provide a relative path – where it was created and the name of the file.
Babel
Babel is a Javascript compiler. Actually it’s not a function, it won’t compile anything by default, instead we will provide plugins and preset so that it can add features in your language. You can visit Babel ‘s home page to view its doc . On the babel website you will easily find Try It Out , click on it to see a window like this
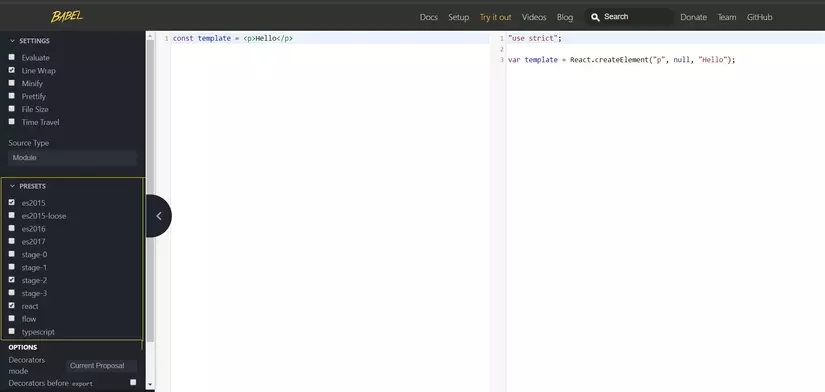
In the left column where you will write the code and the right column you will see the code after babel compiles, now let’s write some JSX in the left column.
1 2 | const template = <p>Hello</p>; |
In the right column, you will see the JavaScript code that is more explicit, easier to understand, and your browser will read this code. On the left side you see several PRESETS options of which some are highlighted. If you uncheck this option now, you’ll see an error caused by this react-preset which is responsible for converting our JSX syntax to JavaScript code.
In this article we will use two presets:
- babel / preset-env: Help babel convert ES6, ES7 and ES8 code into ES5.
- babel / preset-react: Helps convert JSX to Javascript code.
Now that we have a rough profile of webpack and babel , let’s go configure your React app.
- Create directories with the command below
1 2 3 4 5 | mkdir react-setup-tutorial cd react-setup-tutorial mkdir public src touch public/index.html src/app.js |
We just added the index.html file to public . Now add the following html code
1 2 3 4 5 6 7 8 9 10 11 12 13 14 15 16 | <!DOCTYPE html> <html> <head> <meta charset="UTF-8" /> <meta name="viewport" content="width=device-width, initial-scale=1.0" /> <meta http-equiv="X-UA-Compatible" content="ie=edge" /> <title>React App</title> </head> <body> <div id="root"></div> <script src="./bundle.js"></script> </body> </html> |
- Initialize the project with
1 2 | npm init -y |
- Install Webpack and Babel
1 2 | npm install webpack webpack-cli --save-dev |
We have webpack-cli installed so we can use webpack in the command line. We already know we will need the webpack configuration file in the root directory, create the webpack.config.js file with the code.
1 2 3 4 5 6 7 8 9 10 | const path = require('path'); module.exports = { entry: './src/app.js', output: { path: path.join(__dirname, 'public'), filename: 'bundle.js' } }; |
Next, add the webpack command in the package.json file
1 2 3 4 5 | "scripts": { "start": "webpack --mode=development", "build": "webpack --mode=production" } |
There will be 2 modes, develop and production . In production the output file will be optimized for best performance in production environments
- Install React
1 2 | npm install react react-dom |
Now import react into the app.js file and add the following lines of code
1 2 3 4 5 6 7 | import React from 'react'; import ReactDOM from 'react-dom'; const template = React.createElement('p', {}, 'Hello from react'); ReactDOM.render(template, document.getElementById('root')); |
Now run npm start command line in terminal and open index.html file in your browser.
Your app is working properly, but you will wonder why not use JSX. Let’s try adding JSX to the app.js nka file
1 2 3 4 5 6 7 | import React from 'react'; import ReactDOM from 'react-dom'; const template = <p>Hello from react</p>; ReactDOM.render(template, document.getElementById('root')); |
Now run the command npm start
Our app will have an error, because we use JSX and Javacript does not support JSX, so we need to compile JSX into Javascript, it’s time to use babel
- Install and configure babel
1 2 | npm install @babel/core @babel/preset-env @babel/preset-react babel-loader --save-dev |
We already know about @babel/preset-env @babel/preset-react
babel / core: Lets run babel tool like webpack
babel-loader: Is a plugin. It tells webpack how to run babel when webpack sees certain files.
Create config .babelrc file to root directory
1 2 3 4 | { "presets": ["@babel/preset-env", "@babel/preset-react"] } |
This file will declare preset so that babel can compile.
Now we add the following code to the webpack.config.js file
1 2 3 4 5 6 7 8 9 10 11 12 13 14 15 16 17 18 19 | const path = require('path'); module.exports = { entry: './src/app.js', output: { path: path.join(__dirname, 'public'), filename: 'bundle.js' }, module: { rules: [ { test: /.js$/, exclude: /node_modules/, loader: 'babel-loader' } ] } }; |
- Install Dev Server:
1 2 | npm install webpack-dev-server --save-dev |
Add the following code to the webpack.config.js file
1 2 3 4 5 6 7 8 9 10 11 12 13 14 15 16 17 18 19 20 21 22 23 24 | const path = require('path'); module.exports = { entry: './src/app.js', output: { path: path.join(__dirname, 'public'), filename: 'bundle.js' }, module: { rules: [ { test: /.js$/, exclude: /node_modules/, loader: 'babel-loader' } ] }, devtool: 'cheap-module-eval-source-map', // changed line devServer: { contentBase: path.join(__dirname, 'public') } }; |
Add the webpack-dev-server command to package.json
1 2 3 4 5 6 | "scripts": { "start": "webpack --mode=development", "build": "webpack --mode=production", "dev-server": "webpack-dev-server" } |
Let’s start
1 2 | npm run dev-server |
- Load styles for the App
1 2 3 | mkdir src/styles touch src/styles/styles.css |
Add css code to styles.css file
1 2 3 4 | * { color: blue } |
To load css you need to add new rules in webpack.config.js . Some loaders support css reading
1 2 | npm install css-loader style-loader --save-dev |
css-loader: Allows webpack to load css files
style-loader: Read the css and add the <style> tag
Now add new rules to webpack.config.js
1 2 3 4 5 6 7 8 9 10 11 12 13 14 15 16 17 18 19 20 21 22 23 24 25 26 27 28 | const path = require('path'); module.exports = { entry: './src/app.js', output: { path: path.join(__dirname, 'public'), filename: 'bundle.js' }, module: { rules: [ { test: /.js$/, exclude: /node_modules/, loader: 'babel-loader' }, // New rules to load css { test: /.css$/, use: ['style-loader', 'css-loader'] } ] }, devtool: 'cheap-module-eval-source-map', devServer: { contentBase: path.join(__dirname, 'public') } }; |
Import styles.css file into app.js and run run dev-server to see css changes.
1 2 3 4 5 6 7 8 | import React from 'react'; import ReactDOM from 'react-dom'; import './styles/styles.css'; const template = <p>Hello from react</p>; ReactDOM.render(template, document.getElementById('root')); |
Now that we have Webpack and Babel configured for React, you can create your own React project. The article still has many shortcomings, thank you for taking the time to read this article
The article is available at: Setup Webpack and Babel for React