1.Thư viện cần dùng
1 2 3 4 5 | <dependency> <groupId>org.springframework.security.oauth</groupId> <artifactId>spring-security-oauth2</artifactId> </dependency> |
2.@EnableAuthorizationServer
Cấu hình authorization server chịu trách nhiệm quản lý access tokens
Ở đây tôi sẽ cấu hình lưu token vào memory của server , bạn cũng có thể cấu hình lưu token vào database :
1 2 3 4 5 6 7 8 9 10 11 12 13 14 15 16 17 18 19 20 21 22 23 24 25 26 27 28 29 30 31 32 33 34 35 36 37 | @Configuration @EnableAuthorizationServer public class AuthServerOAuth2Config extends AuthorizationServerConfigurerAdapter { @Autowired private AuthenticationManager authenticationManager; @Autowired private TokenStore tokenStore; @Override public void configure(ClientDetailsServiceConfigurer clients) throws Exception { clients.inMemory() .withClient("client") .authorizedGrantTypes("password", "authorization_code", "refresh_token", "implicit") .authorities("ROLE_CLIENT", "ROLE_TRUSTED_CLIENT", "USER") .scopes("read", "write") .autoApprove(true) .secret(passwordEncoder().encode("secret")); } @Bean public PasswordEncoder passwordEncoder() { return new BCryptPasswordEncoder(); } @Override public void configure(AuthorizationServerEndpointsConfigurer endpoints) { endpoints .authenticationManager(authenticationManager) .tokenStore(tokenStore); } @Bean public TokenStore tokenStore() { return new InMemoryTokenStore(); } } |
Chúng ta xem qua các cấu hình :
tokenStore ở đây là nơi lưu trữ token InMemoryTokenStore có nghĩa là sẽ lưu trữ token vào memory chúng ta cũng có thể sử dụng
JdbcTokenStore để lưu token vào database.
withClient ("client") là user được xác định trong bank. trong trường hợp này chúng ta gọi là client
uthorizedGrantTypes ("password", "authorization_code", "refresh_token", "implicit") sử dụng password service
secret (passwordEncoder (). encode ("password")) là password của “client”
3.Security Configuration
1 2 3 4 5 6 7 8 9 10 11 12 13 14 15 16 17 18 19 20 21 22 23 24 25 26 27 28 29 30 31 | @Configuration @EnableWebSecurity public class AuthServerWebSecurityConfig extends WebSecurityConfigurerAdapter { @Autowired private PasswordEncoder passwordEncoder; @Override @Bean public AuthenticationManager authenticationManagerBean() throws Exception { return super.authenticationManagerBean(); } @Override protected void configure(final HttpSecurity http) throws Exception { http.csrf().disable(); http.authorizeRequests() .antMatchers("/login").permitAll() .anyRequest().authenticated(); } @Bean @Override public UserDetailsService userDetailsService() { UserDetails user = User.builder().username("user").password(passwordEncoder.encode("password")). roles("USER").build(); UserDetails userAdmin = User.builder().username("admin").password(passwordEncoder.encode("password")). roles("ADMIN").build(); return new InMemoryUserDetailsManager(user, userAdmin); } } |
Ở đây tôi @Override lại userDetailsService và set hai user và trong memory trong thực tế khi bạn @Override userDetailsService
bạn cần query vào database để lấy ra user tương ứng.
4.Controller
1 2 3 4 5 6 7 8 9 10 | @RestController @RequestMapping @EnableResourceServer public class TestController { @GetMapping("/test") public String test() { return "oke"; } } |
5.Kiểm tra security
Đầu tiên chúng ta hãy thử gọi api /test mà chưa login
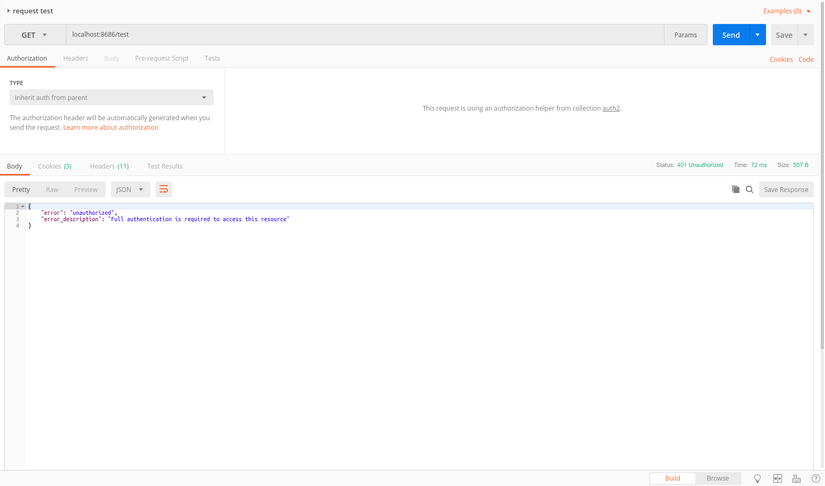
Kết quả này là những gì chúng ta cần khi chưa login thì sẽ trả về lỗi 401
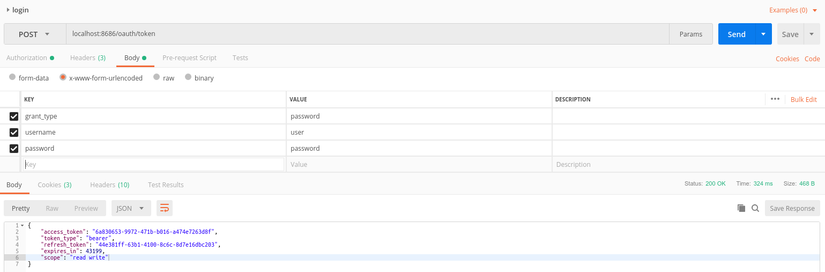
Chúng ta sẽ login để lấy token với path/oauth/token
1 2 3 4 5 6 7 8 | curl -X POST http://localhost:8686/oauth/token -H 'Authorization: Basic bm9uYW1lOjEyMzQ1Ng==' -H 'Cache-Control: no-cache' -H 'Content-Type: application/x-www-form-urlencoded' -H 'Postman-Token: 7ec2be4e-a7e6-4049-ad5e-c96829683cb1' -d 'grant_type=password&username=user&password=password' |

Chúng ta copy access_token và quay lại api/test thêm token vào header Authorization
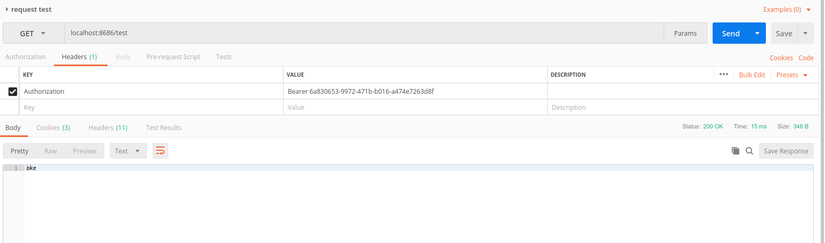
Như các bạn thấy chúng ta đã gọi thành công vào api test
6.Kết
Vậy là tôi đã hướng dẫn các bạn cấu hình security với oauth2 trong spring-boot xong hẹn gặp lại ở những bài viết tiếp theo