Configure BasicAuthentication + SSL in Apache Webserver
The Apache Webserver is already familiar with web developers, so I won't introduce it anymore, but I'll go straight to the installation. If you don't know, you can google with the Apache Webserver keyword to find out more ?
I – Installation:
Apache server can be installed on both Windows, Mac OSX and Linux. In this article, I will use Linux specifically Ubuntu server 16.04 as the deployment environment. Please note that some commands or paths of system files may be different for different OS versions.
- Installing Apache server:
1 2 | test @ ubuntu: ~ $ sudo apt-get update test @ ubuntu: ~ $ sudo apt-get install apache2 |
After the installation is completed, you can use the apache2 -v command to see if the apache version is installed or you can open the browser and access localhost to see the results.
1 2 3 | test @ ubuntu: ~ $ apache2 -v Server version: Apache / 2.4.18 (Ubuntu) Server built: 2016-07-14T12: 32: 26 |
Command to manage apache server:
The command tag includes commands to restart, stop, start, status ….
II – Basic Authentication:
Apache provides two possibilities to authenticate users who are Basic authentication and Digest authentication. In particular, Digest authentication is considered to be safer but less developed. Authentication is commonly used with Apache Web servers currently basic authentication, this authentication uses 64 bits to encrypt account names and passwords before sending to the server.
The account and password information is created using the htpasswd program . This information will be saved to a text file with an encrypted password field and when Apache user authentication is needed, it will decrypt the password provided by the user and then compare it with the stored password. The syntax of htpasswd statement is as follows:
1 | htpasswd [options] pwfile username [password] |
Options include:
m: Select password encryption algorithm is MD5.
d: Use the system's encryption algorithm to encrypt passwords.
s: Password encryption according to SHA algorithm.
b: Enter the password directly into the command line.
c: Default htpasswd understands that the file containing the account and password (pwfile) already exists. So to create a new file you must use the -c option .
Other parameters of the command
pwfile: Is the file name stored account name and password.
username: Account name to create.
password: Password of the corresponding account (use only when the option is -b).
For example, I will create an account as admin1 with a password of 123456 saved to a file named user
1 | test @ ubuntu: ~ $ sudo htpasswd -cb / etc / apache2 / user admin1 123456 |
The result of the above command will create the user file stored in / etc / apache2 / user containing admin1 account information . Note that the -c option is only used for the first time to create a user file . In case you already have 1 file available to save your account information, no more -c options are required.
After the accounts have been declared. We will proceed to configure the user to access your website must have the account name and password created above.
The apache configuration file in ubuntu is the apache2.conf file located in / etc / apache2 / . Note that on CentOS or another distro version of Linux may be different.
To edit the apache2.conf file , we can use the editing tools in linux such as vi , nano and must use it with super user rights. Here I will use nano .
1 | test @ ubuntu: / etc / apache2 / user $ sudo nano /etc/apache2/apache2.conf |
After opening the file. You add the config file of apache to the following command:
1 2 3 4 5 6 | <Directory "/ var / www / html /"> "Free description" AuthName AuthType Basic AuthUserFile / etc / apache2 / user Require hợp lệ-user </Directory> |
Save and exit. Remember to restart apache.
After restarting apache, you can access localhost again. This will display a window asking for user / pass entry that you have succeeded ^^.
Note the optional section <Directory "/ var / www / html /"> If your site is located, change the corresponding path there. It will correspond to DocumentRoot in apache.
To change DocumentRoot apache, go to edit /etc/apache2/sites-available/000-default.conf file . This link may be different if you use CentOS or another Linux version.

III – Secure Sockets Layer (SSL):
This is a global technology security standard that creates a link between the web server and the browser. This link ensures all data exchanged between the web server and the browser is always secure and secure.
The idea of this technique is that a reliable third party will provide a set of certificates for a website (domain name). Each SSL certificate is unique for a domain name. When users visit a website that has registered and uses SSL. The web browser will immediately check whether the SSL certificate of the site is "trusted". If so, it will allow access to that site. Now the site will also send a browser a set of keys to encrypt and decrypt the data during the interaction process.
Often webmasters will ask (rather than buy @@) these SSL certificates from certain third parties to use. Of course, the third guy who issued the SSL certificate must be a reputable guy in the security field. Can be included as Symantec. These certificates are valid for use.
In this tutorial, since we do not have a domain and do not have any money to buy SSL certificates, I will guide you to create an SSL certificate, called Self-Signed SSL Certificat, a form of selfie. more equally ^^.
As for usage as well as configuration, it is like a "genuine" certificate only different from the way it is owned. The genuine you go to buy and people give, and then I have to create.
Step 1: enable SSL mode in apache
1 | sudo a2enmod ssl |
After activating, remember to sudo service apache2 restart .
Step 2: Create a Self-Signed SSL Certificate (take a selfie )
- First, create a key folder (the key that you bought should also be easy to manage).
1 | sudo mkdir / etc / apache2 / ssl |
- Run the self-command SSL key:
1 | sudo openssl req -x509 -nodes -days 365 -newkey rsa: 2048 -keyout /etc/apache2/ssl/apache.key -out /etc/apache2/ssl/apache.crt |
- The above command will create a set of SSL keys including 2 files apache.crt and apache.key stored in / etc / apache2 / ssl / with a shelf life of 365 days.
When you press ENTER to run the command the key gene itself. The system will return an interactive dialog for you to enter information about the key to be created. Full of information as follows:
1 2 3 4 5 6 7 | Country Name (2 letter code) [AU]: US State or Province Name (full name) [Some-State]: New York Name Locality (eg, city) []: New York City Organization Name (eg, company) [Internet Widgits Pty Ltd]: Your Company Organizational Unit Name (eg, section) []: Department of Kittens Common Name (eg server FQDN or YOUR name) []: your_domain.com Email Address []: your_email@domain.com |
For a "selfie" SSL key set, the information on how you fill in is also deducted from the Common Name line (eg server FQDN or YOUR name) []: You must enter your domain name correctly or IP web host IP .
In case I do, I use VMWere virtual machine to install Ubuntu server and Apache so I will enter IP virtual machine. After filling in, you will see 2 apache.crt and apache.key files appear in / etc / apache2 / ssl / .
Step 3: Configure Apache to use SSL
To use SSL, we proceed to edit the file default-ssl.conf stored in / etc / apache2 / sites-available / . Note that apache installed on a different version of Linux distro may be different from saving config files.
1 | sudo nano /etc/apache2/sites-available/default-ssl.conf |
Content file default-ssl.conf after ignoring the comment lines:
1 2 3 4 5 6 7 8 9 10 11 12 13 14 15 16 17 18 19 20 21 | <IfModule mod_ssl.c> <VirtualHost _default_: 443> ServerAdmin webmaster @ localhost DocumentRoot / var / www / html ErrorLog $ {APACHE_LOG_DIR} /error.log CustomLog $ {APACHE_LOG_DIR} /access.log combined SSLEngine on SSLCertificateFile /etc/ssl/certs/ssl-cert-snakeoil.pem SSLCertificateKeyFile /etc/ssl/private/ssl-cert-snakeoil.key <FilesMatch "(cgi | shtml | phtml | php) $"> SSLOptions + StdEnvVars </FilesMatch> <Directory / usr / lib / cgi-bin> SSLOptions + StdEnvVars </Directory> BrowserMatch "MSIE [2-6]" nokeepalive ssl-unclean-shutdown downgrade-1.0 force-response-1.0 BrowserMatch "MSIE [17-9]" ssl-unclean-shutdown </VirtualHost> </IfModule> |
To use SSL, you only need to note the following lines:
1 – DocumentRoot / var / www / html : Like the 000-default.conf file, this line will specify the path to save your website. In the config of the Apache server, there will be 2 files specifying DocumentRoot which is 000-default.conf and default-ssl.conf , usually 2 files are stored in the same place (in your guide using Ubuntu server + Apache then they are stored in / etc / apache2 / sites-available / ).
Their functions are as follows:
- 000-default.conf will configure the default HTTP protocol using port 80
- default-ssl.conf uses HTTPS by default port 443 .
2 – SSL declaration lines:
1 2 3 | SSLEngine on SSLCertificateFile /etc/ssl/certs/ssl-cert-snakeoil.pem SSLCertificateKeyFile /etc/ssl/private/ssl-cert-snakeoil.key |
- SSLEngine on : Declare using SSL.
- SSLCertificateFile /etc/ssl/certs/ssl-cert-snakeoil.pem : Declare the path to save the .crt file
- SSLCertificateKeyFile /etc/ssl/private/ssl-cert-snakeoil.key : Declare the path to save the .key file
Note : For those who already own a domain name and want to use SSL, they must declare 2 more lines as follows:
1 2 | ServerName your_domain.com ServerAlias www.your_domain.com |
The above two lines will be added after the ServerAdmin line and before the DocumentRoot line
Content file default-ssl.conf after editing:
1 2 3 4 5 6 7 8 9 10 11 12 13 14 15 16 17 18 19 20 | <IfModule mod_ssl.c> <VirtualHost _default_: 443> ServerAdmin admin@example.com ErrorLog $ {APACHE_LOG_DIR} /error.log CustomLog $ {APACHE_LOG_DIR} /access.log combined SSLEngine on SSLCertificateFile /etc/apache2/ssl/apache.crt SSLCertificateKeyFile /etc/apache2/ssl/apache.key <FilesMatch "(cgi | shtml | phtml | php) $"> SSLOptions + StdEnvVars </FilesMatch> <Directory / usr / lib / cgi-bin> SSLOptions + StdEnvVars </Directory> BrowserMatch "MSIE [2-6]" nokeepalive ssl-unclean-shutdown downgrade-1.0 force-response-1.0 BrowserMatch "MSIE [17-9]" ssl-unclean-shutdown </VirtualHost> </IfModule> |
After editing, save and close it.
Step 4: Turn on HTTPS mode and test.
Command to activate HTTPS page: sudo a2ensite default-ssl.conf
Restart apache to load the installation: sudo service apache2 restart
To check if the installation was successful. Open the browser and go to https: // server_domain_name_or_IP
Successfully, you will have to enter user / pass (due to BasicAuth installation above) and then see this:
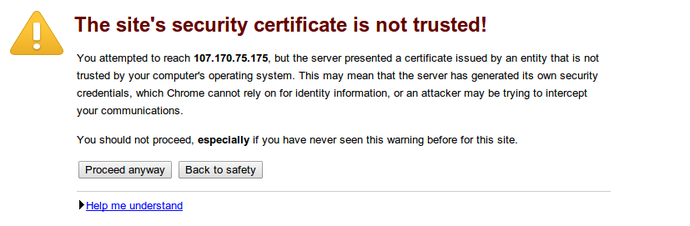
After ignoring the warning, you will see this:
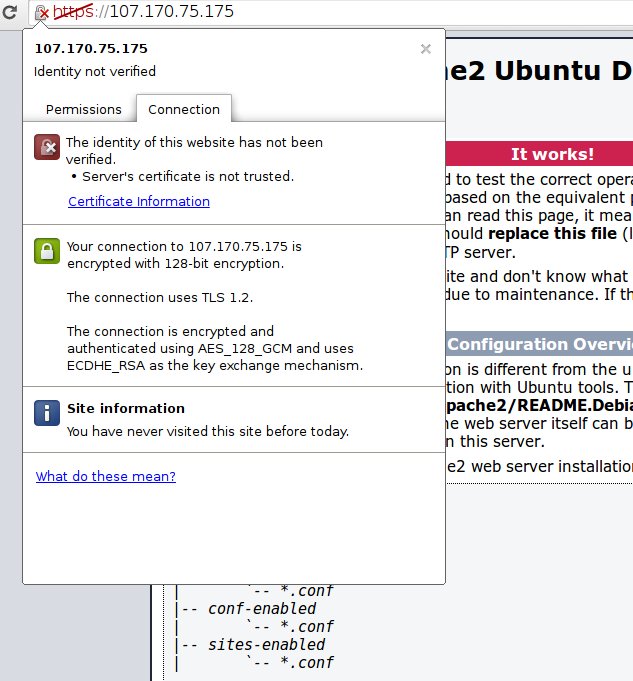
So successful!
Note :
In fact, websites with SSL settings are automatically transferred to HTTPS protocol even though you do not type HTTPS://xxx.xxx (if you type google.com, it automatically changes to https: / /www.google.com )
The idea of this is to direct access to the default http protocol to become the https protocol automatically. To do this, we need to configure it in the /etc/apache2/sites-available/000-default.conf file . As I mentioned above, this file will configure related issues http port 80 .
Add these lines to the 000-default.conf file
1 2 | ServerName minhung.tk Redirect / https://minhung.tk |