Data access class
A very common case in applications is storing large amounts of data. This data can be transaction data, user information or the state of the application. There are many ways that data can be stored in the application. Determining the right way to store data can be one of the most important decisions a developer needs to make.
As an architect we should separate the actual data storage from the logic of the application. This will allow the application to change the way data is stored in the future without affecting the application logic. This is called the data access layer.
The key when designing an application is to design a good data retrieval class. Because having a good data access class makes the code maintainable when requirements are changed. If we separate the data retrieval class from the main logic part of the application, then if the data storage part is changed only the code inside the data retrieval class is changed.
Requirements: Our data retrieval class will have the following requirements:
- All access to data storage should be through the helper form. These types of helper data will handle Create, Read, Update, Delete (CRUD) adding, reading, updating, and deleting.
- The external code for the data retrieval class will not know or care about how the data is stored
- In our example, we will need to create two types: 1 is the type named player that contains information about the players, and the other is the team, which contains information about a team. Each player will contain the team ID and information about the team on which they play
- In our example, we will be storing data in an array, however we will need the ability to change the storage mechanism without affecting the application logic.
Before reading on, based on the requirements, you should think about what kind of design is right. Once you’ve finished your design, keep reading and compare with the designs we offer in this section.
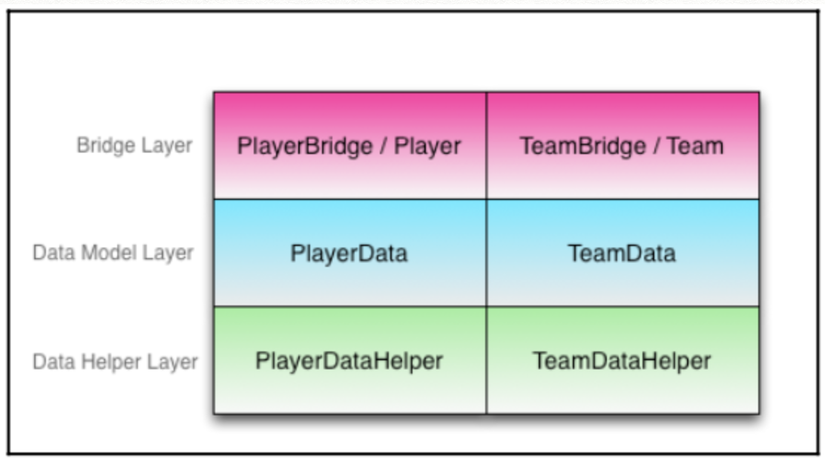
Design Layer data retrieval will contain 3 layers. The lowest layer is known as the Data Helper Layer, which will contain the types that will be used to store the data. For example the data will be stored in an array. These data types will be easily updated to store data by any other way in the future.
The next layer is the Data Model Layer. It will contain a model set of how the data is stored in the data helper class. These units will be used as temporary memory to read and write data to / from where the data is stored. Some people prefer to use struct in this class. But I found that they worked quite well because these data types should not contain any part of the application logic.
Finally, the Bridge layer. Will convert the data from the application logic to the data retrieval layer. Bridge layer is the layer that separates the application logic from the data access layer. This layer will contain the data types that the application logic will use to access the data, and will contain the type of bridge that converts the data type used in the application logic access layer to the data type used. in the data access layer.
In this example. There will be 2 types of data stored in 2 tables. They are named Teams and Players. From the description above, it means that there is a helper class TeamDataHelper and PlayerDataHelper with 2 sets of Team and Player. It should look like this:
Let’s start looking at the Data Model layer as it will connect between the Bridge layer and the data helper.
Data Model Layer There are 2 types defined in the data model layer. These types are used to convert between the data data helper and the Bridge layer. Because these types should be used for data transformation, it is recommended that these types be used. Keep in mind that we want to avoid sticking too much between the application logic and the data access layer, so these types cannot be used outside of the data access layer. If we avoid this we will be able to change components independent of the others.
1 2 3 4 | typealias TeamData = (teamId: Int64?, city: String?, nickName: String?, abbreviation: String?) typealias PlayerData = (playerId: Int64?, firstName: String?, lastName:String?,number: Int?, temaId:Int64?, position: Positions?) |
We will have a section required to convert these data types to struct used for application logic. We will do these bridging later in this chapter. In tuple Player there is an element of type Position. This type is an enumeration that holds all the positions that exist can be played.
1 2 3 4 5 6 7 8 9 10 11 12 13 | enum Positions: String { case pitcher = "Pitcher" case catcher = "Catcher" case firstBase = "First Base" case secondBase = "Second Base" case thirdBase = "Third Base" case shortstop = "Shortstop" case leftField = "Left Field" case centerField = "Center Field" case rightField = "Right field" case designatedHitter = "Designated Hitter" } |
Next is the Data Helper layer In a design that has a need for error checking, this will allow the internal code to know when something bad happens. So we’ll start with the data helper by defining the errors. Swift error will be used. hence the error will be defined as follows:
1 2 3 4 5 6 7 8 | enum DataAccessError: Error { case datastoreConnectionError case insertError case deleteError case searchError case nilInData } |
We will see bugs thrown in code. Depending on the storage type used, the error types can be changed to give true details about the error.
The helper layer will be used to store data. This layer will change as the storage mechanism changes. In this example the data will be stored in an array; However these types in this layer will likely change to other storage mechanisms in the future. This layer will contain one type for each data type in the data model layer. These types will be used to read and write data.
We will start by creating a DataHelper protocol that defines a set of methods for each type of data that the helper needs to execute. The DataHelper protocol looks like this:
1 2 3 4 5 6 7 | protocol DataHelper { associatedtype T static func insert(_ item: T) throws -> Int64 static func delete(_ item: T) throws -> Void static func findAll() throws -> [T]? } |
In this protocol we define three methods as follows:
- insert: Add a row into the table
- delete: delete a row from the table
- findAll: return all rows in the table
There is a defined method to query data. This is accomplished because the methods for querying Each data type and depending on the data type therefore these methods need these other data types. We need to evaluate the query methods for each data type separately.
Now let’s build TeamDataHelper which will satisfy the DataHelper protocol. This is the data type for storing teams. in which type T will be TeamData
1 2 3 4 5 | struct TeamDataHelper: DataHelper { typealias T = TeamData static var teamData: [T] = [] } |
The teamData array is statically defined, so there will be one and only one instance of this array in the code. Now let’s see how we implemented the three methods defined in the protocol. We won’t discuss the implementation in detail as we worry more about the design than how to store or search in an array.
The first method we will execute is insert () to add an element to the array. This method returns an Int64 value representing a single value of the element if everything was successfully cached. This method will return an error if there is a problem while adding data. If another storage mode is used, this method may need to throw the error like this:
1 2 3 4 5 6 7 8 9 | static func insert(_ item: TeamData) throws -> Int64 { guard item.teamId != nil , item.city != nil, item.nickName != nil, item.abbreviation != nil else { throw DataAccessError.nilInData } teamData.append(item) return item.teamId! } |
Now let’s see delete () function to remove an element from array. The method will throw an error if the element doesn’t exist in the array or teamId is nil.
1 2 3 4 5 6 7 8 9 10 11 12 13 | static func delete(_ item: TeamData) throws { guard let id = item.teamId else { throw DataAccessError.nilInData } let teamArray = teamData for(index, team) in teamArray.enumerated() where team.teamId == id { teamData.remove(at: index) return } throw DataAccessError.deleteError } |
Now let’s look at the findAll () method, which will return all elements in the array. This method can throw errors, but it’s for the future.
1 2 3 4 | static func findAll() throws -> [TeamData]? { return teamData } |
Finally is the find () method to find and return a single element from the array. We may need to add a find () method depending on our needs. But this method will return the team with teamId. This method will also throw an error but it is also in demand later. If teamId is not found in the array, it will return an nil value.
1 2 3 4 5 6 7 | static func find(_ id: Int64) throws -> T? { for team in teamData where team.teamId == id { return team } return nil } |
Next is PlayerDataHelper which is implemented almost like TeamDataHelper.
1 2 3 4 5 6 7 8 9 10 11 12 13 14 15 16 17 18 19 20 21 22 23 24 25 26 27 28 29 30 31 32 33 | struct PlayerDataHelper: DataHelper { typealias T = PlayerData static var playerData: [T] = [] static func insert(_ item: T) throws -> Int64 { guard item.playerId != nil && item.firstName != nil && item.lastName != nil && item.teamId != nil && item.position != nil else { throw DataAccessError.nilInData } playerData.append(item) return item.playerId! } static func delete (_ item: T) throws -> Void { guard let id = item.playerId else { throw DataAccessError.deleteError } let playerArray = playerData for (index, player) in playerArray.enumerated() where player.playerId == id { playerData.remove(at: index) } } static func findAll() throws -> [T]? { return playerData } static func find(_ id: Int64) throws -> T? { for player in playerData where player.playerId == id { return player } return nil } } |
The idea of the data access layer, the data (PlayerData and TeamData) and the data helper (PlayerDataHelper and TeamDataHelper) these types are pairs of words in the application logic. If you take a look at the design we discussed in the previous chapter. We will see the Bridge template usable here. Let’s see how we will use the bridge pattern to create a good classification between the data access layer and application code.
We’ll want to start defining how to model data in our application. The data can be modeled exactly the same as those in the data access layer, or it can be designed differently.
Note: I often find that my data is often different from what I store and how I use it in my application. By dividing the data access layer that originates the application’s code, we can also model our data differently between these two layers.
Next, let’s see how we use the Bridge pattern in this example:
Bridge Layer In this example, the data in the data retrieval layer and in the application will be slightly different. The difference is that when a player is received, information about that player’s team is also received within it and it will be part of that player’s data structure. Let’s see how to define teams and players in the Bridge layer. Let’s start defining the Team type and it will be of the Player type.
1 2 3 4 5 6 7 | struct Team { var teamId: Int64? var city: String? var nickName: String? var abbreviation:String? } |
The type of value is used for the data structure in this example. When we use the type of value we need to remember that changes to these types are only stored within the scope of that change. If you need to store the change outside of the scope of the change, we need to use the inout keyword. It is up to you to decide what type of reference or reference type is, and it is important to be consistent and the type of document to be used.
In this example the Team struct is designed to map to TeamData what is used to represent a team in the helper data layer. Now let’s see the structure of the Player
1 2 3 4 5 6 7 8 9 10 11 12 13 14 15 16 17 18 19 20 21 22 23 24 25 26 27 28 | struct Player { var playerId: Int64? var firstName: String? var lastName: String? var number: Int? var teamId: Int64? { didSet { if let t = try? TeamBridge.retrieve(teamId!) { team = t } } } var position: Positions? var team: Team? init(playerId: Int64?, firstName: String?, lastName:String?, number:Int?, teamId: Int64?, position: Positions) { self.playerId = playerId self.firstName = firstName self.lastName = lastName self.number = number self.teamId = teamId if let id = self.teamId { if let t = try? TeamBridge.retrieve(id) { team = t } } } } |
The Player structure is similar to PlayerData, except with some extra attributes like Team. This property will hold information about the team each player joins. We use an observation attribute to download team information from the data store whenever the teamId property is set. We also load team information when initializing a player instance. Remember that the observational property is not called during the initialization of the data type. Hence didSet will not be called when we set up teamId during initialization.
Now let’s take a look at the Bridge type, which will serve as the bridge between the data in the data access layer and the code in our application. We’ll start with the TeamBridge struct
1 2 3 4 5 6 7 8 9 10 11 12 13 14 15 16 17 18 19 20 21 22 23 24 25 26 27 28 | struct TeamBridge { static func save(_ team: inout Team) throws { let teamData = toTeamData(team) let id = try TeamDataHelper.insert(teamData) team.teamId = id } static func delete(_ team: Team) throws { let teamData = toTeamData(team) try TeamDataHelper.delete(teamData) } static func retrieve(_ id: Int64) throws -> Team? { if let t = try TeamDataHelper.find(id) { return toTeam(t) } return nil } static func toTeamData(_ team: Team) -> TeamData { return TeamData(teamId: team.teamId, city: team.city, nickName: team.nickName, abbreviation: team.abbreviation) } static func toTeam(_ teamData: TeamData) -> Team { return Team(teamId: teamData.teamId, city: teamData.city, nickName: teamData.nickName, abbreviation: teamData.abbreviation) } } |
The TeamBridge struct has 5 methods. The first three methods use TeamDataHelper’s functionality to add, delete, and receive data from the data retrieval layer. Note that the save () method has a parameter passed with the inout keyword because we will be making changes to the value of the team parameter that we want outside of usable storage. The last two methods are used to convert data between TeamData in the data access layer and Team used in the application. Now if a change is required we can change the data access layer or the application layer independently of each other. The Struct Bridge may need to change when the data access layer or the application layer changes. But there is a lot more ease of changing in Bridge type than having to refactor the entire code in the application.
Now let’s see PlayerBridge
1 2 3 4 5 6 7 8 9 10 11 12 13 14 15 16 17 18 19 20 21 22 23 24 25 26 27 28 29 | struct PlayerBridge { static func save(_ player: inout Player) throws { let playerData = toPlayerData(player) let id = try PlayerDataHelper.insert(playerData) player.playerId = id } static func delete(_ player: Player) throws { let playerData = toPlayerData(player) try PlayerDataHelper.delete(playerData) } static func retrieve(_ id: Int64) throws -> Player? { if let p = try PlayerDataHelper.find(id) { return toPlayer(p) } return nil } static func toPlayerData(_ player: Player) -> PlayerData { return PlayerData(playerId: player.playerId, firstName: player.firstName, lastName: player.lastName, number:player.number, teamId: player.teamId, position: player.position) } static func toPlayer(_ playerData: PlayerData) -> Player { return Player(playerId: playerData.playerId, firstName: playerData.firstName, lastName: playerData.lastName, number: playerData.number, teamId: playerData.teamId, position: playerData.position) } } |
PlayerBridge is similar to TeamBridge except for the switch between PlayerData and Player. Again this allows us to change the data access layer or the application layer independently of each other.
How to use the Data Access Layer. Now let’s see how to use the data access tier by creating a team and a player
1 2 3 4 5 6 7 8 | var bos = Team(teamId: 0, city: "Boston", nickName: "Red Sox", abbreviation: "BOS") try? TeamBridge.save(&bos) var ortiz = Player(playerId: 0, firstName: "David", lastName: "Ortiz", number: 34, teamId: bos.teamId, position: Positions.designatedHitter) try? PlayerBridge.save(&ortiz) |
In the code above, we create a football team named Boston Red Sox and a player, David Ortiz. We also put David Ortiz on the Boston Red Sox team, by assigning the teamId value to the player. This information is obtainable and is presented as follows:
1 2 3 4 5 6 7 8 | if let team = try? TeamBridge.retrieve(0) { print("--- (team.city)") } if let player = try? PlayerBridge.retrieve(0) { print(“—— (player.firstName) (player.lastName) plays for (player.team?.city)") } |
The code will be printed as follows: — Optional (“Boston”) “) —- Optional (” David “)”) Optional (“Ortiz”) “) plays for Optional (” Boston “)”)
By using the TeamBridge and PlayerBridge models we don’t have to worry about how the data is stored in the background. It can use SQLite, an array, or even be stored in a file. We can also change the data storage location independent of the main part of the application code. This will allow us to tailor the storage to new requirements that we may encounter in the future without having to refactor the code of the entire project.
Conclude. Creating separate classes, as shown in this chapter, may take a while when we start building our application, but it will save us a long time because of The bridge will change and new features will be added, so our code needs to be easily modified to accommodate those requirements. Creating separate layers and using the Bridge pattern to connect these layers allows us to have the ability to change each layer easily and independently.
Summary. In this chapter, we have seen instances where we used Swift with the protocol-oriented programming model and how to use it with the design pattern to create ease of maintenance and flexibility for the application. If you work with your own design and your design differs from the one shown here, everything should be fine. There are many correct answers to each problem. It is important to make sure that your application is designed for ease of maintenance and is very flexible.
As an architect, your focus should not just meet the requirements of the framework or application, it should also generate a piece of the underlying code that is easy to maintain and extend in case requirements change. Future. Using a programming paradigm such as Protocol-driven programming and the emphasis on using design patterns in your application design can help meet these needs.
In this section there are 2 examples but I only present one example. So the end of the book about “Swift Protocol oriented Programming”. See you in a book on concurrent processing with Swift (Swift Concurrency)