Use Protocol as a data type. Even if there are no functions implemented in the protocol, they are still considered to be an official data type in the Swift language and can be used as any other data type. This means that we can use the protocol as a variable or the return data type for a function. We can also use them as variables, constants, and lists data types. see example
1 2 3 4 5 6 7 8 | protocol Person { var firstName: String {get set} var lastName: String {get set} var birthDate: Date {get set} var profession: String {get} init (firstName: String, lastName: String, birthDate: Date) } |
This protocol defines 4 properties and an constructor. We’ll see how to use this protocol as a variable and the return value of the function.
1 2 3 4 5 6 | func updatePerson(person: Person) -> Person { var newPerson: Person return newPerson } |
We can also use the protocol as the data type to store in the list.
1 2 3 | var personArray = [Person]() var personDict = [String: Person]() |
We can use instances of any data type that satisfy our protocol wherever this type of protocol is required. Let’s assume that there are two types of SwiftProgrammer and FootballPlayer that satisfy the person protocol. We can use them as follows:
1 2 3 4 | myPerson = SwiftProgrammer(firstName: “Jon”, lastName:”Hoffman”, birthDate: birthDateProgrammer) myPerson = FootballPlayer(firstName: "Dan", lastName: "Marino", birthdate: birthDatePlayer) |
As mentioned above, the protocol is used as an Array datatype, meaning we can store objects that are satisfied with the protocol in Array.
1 2 3 4 5 6 7 8 | var programmer = SwiftProgrammer(firstName: "Jon", lastName: "Hoffman", birthDate: bDateProgrammer) var player = FootballPlayer(firstName: "Dan", lastName: "Marino", birthDate: bDatePlayer) var people: [Person] = [] people.append(programmer) people.append(player) |
Here is another example of the polymorphism of the protocol. To use the protocol’s full potential, we need to understand what polymorphism is.
Polymorphism With protocols
The word polymorphism is derived from the Greek word for plural, but morphe means form. In many programming languages, polymorphism is a single interface of many forms. There are two reasons for learning about the meaning of the word polymorphism. The first reason is special words that can make you feel smarter in conversations. The second reason is that polymorphism provides one of the most useful programming techniques not only in object oriented programming languages but also protocol oriented programming languages. Polymorphism gives us the opportunity to interact with many types of data through a standard interface. In object-oriented programming languages, an identical interface comes from a super class, while in protocol-oriented programming a single interface usually comes from a protocol. In the example above we can see the polymorphism in swift.
1 2 3 4 5 6 | var myPerson: Person myPerson = SwiftProgrammer(firstName: "Jon", lastName: "Hoffman", birthDate: birthDateProgrammer) myPerson = FootballPlayer(firstName: "Dan", lastName: "Marino", birthdate: birthDatePlayer) |
In this example we have a Person variable, Polymorphism allows us to set the variable to different data types meeting the Person protocol. And the Person array example above. When we access an entity through a single identical interface as in the above examples, we cannot access special functions. For example we have an attribute of type FootballPlayer called age. We will not be able to access this property because it is not defined in the Person protocol. If you want to access, you need to cast.
Type casting with protocol
Type casting is a way of checking the type of an entity or interpreting the data type of an entity. In Swift we can keyword is to check for any specified data type and as keyword to interpret about that specified data type. For example
1 2 3 4 | if person is SwiftProgrammer { print(“(person.firstName) is a swift programmer”) } |
In the above example the above condition is true. If the person entity is of type swiftProgrammer, or false if not of the same type. We can use the where keyword in conjunction with the is keyword to filter an array that returns only entities of a specified type. In the next example we filter an array containing entities of the person protocol and return only parts of type swiftProgrammer.
1 2 3 4 | for person in people where is swiftProgrammer { print(“(person.FirstName) is a swift programmer”) } |
Now let’s see how to cast an entity to a specified type. To do this we can use the keyword as. When doing this we can fail if the entity is not the specified type, will the keyword as come with two types of as? and as !. With as? If the casting fails it returns nil. With as! If the casting fails, it will fail to report an error at execution, so it is recommended to use as ?. We can absolutely guarantee the type of the entity or we can check the type of the entity before casting. next example.
1 2 3 4 | if let _ = person as? SwiftProgrammer { print(“(person.firstName) is a swift Programmer”) } |
due to keyword as? returns a custom type, so we can perform casting
Next let’s see how we use associated type with protocol
Associated types (AT) with protocols When defining a protocol, there are times when it is used to define one or more ATs. An AT allows us to substitute a name that we can use in the protocol for that data type. The actual data type for associated type is undefined until the protocol is used. AT basically states: We don’t know the exact type to be used, so when a type is selected this protocol must define it. As an example if we define a queue type protocol, the type of protocol is chosen to define the type of queue it contains.
1 2 3 4 5 6 7 | protocol Queue { associatedtype QueueType mutating func addItem(item: QueueType) mutating func getItem() -> QueueType? func count() -> Int } |
In this protocol we define a related type (AT) called QueueType. We then use this pattern twice in the protocol. We use it as the type of data in the addItem () function. We use it again to define the return type of the getItem () function. Any data type implementing the Queue protocol needs to specify the type for the QueueType and make sure only parts of this type are used. where the protocol requires the QueueType Together, implement the Queue in a non-general class called IntQueue. This class implements the Queue protocol
1 2 3 4 5 6 7 8 9 10 11 12 13 14 15 16 17 18 19 | struct IntQueue : Queue { var items = [Int]() mutating func addItem(item: Int) { items.append(item) } mutating func getItem() -> Int? { if !items.isEmpty { return items.remove(at: 0) } else { return nil } } func count() -> Int { return items.count } } |
As we can see the IntQueue struct we use the integer type for both the variable type of the addItem () function and the return type for the getItem () function. In this example we implemented the Queue protocol in a non-general way. Generics in swift allow us to define the type to use at runtime rather than at compile time. We will see the usage of AT with Generics in Chapter 4.
Now that we have explored the protocol in quite a bit of detail, Now let’s see how we use them in the real world. In the next section we will see how to use the protocol to execute the design delegation.
Delegation Delegation is widely used in Cocoa and Cocoa Touch. The Delegation pattern is quite simple, but the power of this pattern is that one instance of one type of action over represents another. One entity that performs the authorization holds the reference of the delegating entity, and then when an action occurs, the entity that performs the authorization calls the authorization to perform the function, which sounds confusing. . This pattern is implemented in Swift by creating a protocol that defines the authorization responsibilities. Any type that satisfies this protocol is considered a delegate, and will be a child of this protocol, making sure it provides the functionality defined in the protocol.
As an example we will have a struct Person. This struct will contain 2 properties of type String, firstName, lastName. It will also have a 3rd property that will store an authorization entity. When both firstName and LastName are set, we will call the method in the authorization entity that will show the full name. Since the Person struct is authorized to show the name to another entity, it does not care or care how the name is displayed. Hence the full name can be shown in the console or in UILabel….
Let’s start by looking at the definition of delegation responsibility.
1 2 3 4 | protocol DisplayNameDelegate { func displayName(name: String) } |
In the DisplayNameDelegate protocol we define a method that the authorized object needs to implement displayName (). Assume that in this method the delegate will somehow get the name displayed. However, it does not require anything special. The only requirement is that the authorizer must do this work.
1 2 3 4 5 6 7 8 9 10 11 12 13 14 15 16 17 18 19 20 21 22 23 24 | struct Person { var displayNameDelegate: DisplayNameDelegate var firstName = "" { didSet { displayNameDelegate.displayName(name: getFullName()) } } var lastName = "" { didSet { displayNameDelegate.displayName(name: getFullName()) } } init(displayNameDelegate: DisplayNameDelegate) { self.displayNameDelegate = displayNameDelegate } func getFullName() -> String { return "(firstName) (lastName)" } } |
In struct Person we have 3 properties named displayNameDelegate, firstName, lastName. the displayNameDelegate property contains an instance of the authorization type. This entity will be responsible for representing the full name when the value of firstName or lastName changes
We will now create a data type satisfied with the DisplayNameDelegate protocol. We will name it MyDisplayNameDelegate:
1 2 3 4 5 6 | struct MyDisplayNameDelegate: DisplayNameDelegate { func displayName(name: String) { print("Name: (name)") } } |
In this example all we do is print the name onto the console screen. Now let’s see how we can delegate:
1 2 3 4 5 | var displayDelegate = MyDisplayNameDelegate() var person = Person(displayNameDelegate: displayDelegate) person.firstName = "Jon" person.lastName = "Hoffman" |
In the code above we start creating an entity of type MyDisplayNamedelegate and then use this entity to create an instance of type Person. Now when we set the value for the person entity, the proxy is used to print the full name to the console. While printing names to the console might not be interesting, the real power of the authorization pattern comes when the applications we want to change behavior. Maybe in our application we will want to send a name to the web service or show it somewhere on the screen or even ignore it. To change this behavior, we simply add a new satisfied type with the DisplayNameDelegate protocol. We then use this new data type when we create a person entity. Another advantage we get from using the authorization template is loose association. In our example, we separated the logic from the display by using the authorization to show the name whenever there was a change. Loose coupling promotes division of responsibilities, where each type will be responsible for assigned tasks. This is very convenient when converting jobs when requirements change, because we know that changes will occur frequently. So far in this chapter, we have seen that the protocol from a code perspective, now let’s look at the protocol from a design perspective.
Design with protocol.
With protocol oriented programming language, we always start our design with protocol, but how do we design with protocol. In the object oriented programming language, we have superclass, which contains all the basic requirements for subclasses. The design protocol is a little different. In the world of protocol-oriented programming, we can use a protocol instead of a super class and it is suitable for parsing requests into smaller, multi-separate protocols rather than a large monolithic protocol. In this section we will see how to break down the requests into smaller chunks, the very specific protocol, and how to use the legacy and association protocols. In Chapter 3, Extension we will show you how to add functionality for all types of data to satisfy a protocol using the extension.
For the examples in this chapter, we are going to model something. I like it at Robots. There are many types of robots with multiple sensors, so our model needs to be able to develop and handle all of the different options. Since all robots have the same movement pattern, we will start by creating a protocol that defines the movement requirements we will call RobotMovement:
1 2 3 4 5 6 7 8 | protocol RobotMovement { func forward(speedPercent: Double) func reverse(speedPercent: Double) func left(speedPercent: Double) func right(speedPercent: Double) func stop() } |
In this protocol we define five methods so that what types we want to satisfy must be executed. These methods will move the robot forward, backward, left, right, stop. This protocol will suit our needs if we just want the robot to move in 2-dimensional space but if the robot has to fly. To accomplish this goal our robot must also move up and down. To do this we use the legacy protocol to create a new protocol by adding a few requests to be able to navigate three dimensions.
1 2 3 4 5 | protocol RobotMovementThreeDimensions: RobotMovement { func up(speedPercent: Double) func down(speedPercent: Double) } |
Note that we use the legacy protocol when we create this protocol to extend the original requests from the RobotMovement protocol. This allows us to use polymorphism as described in this chapter. This allows us to use entities of data types that satisfy either of the above protocols interchangeably using the interface provided by the RobotMovement protocol. Now we need to add some sensors to our blueprint. We will start to create the protocol sensor which all sensors will inherit. This protocol will contain 4 requests. The first is a read-only attribute that defines the name and type of the sensor. We will need an constructor to allow us to create the sensor and a method that will be used to probe the sensor
1 2 3 4 5 6 7 | protocol Sensor { var sensorType: String {get} var sensorName: String {get set} init(sensorName: String) func pollSensor() } |
The sensor type will be used to define the sensor type and will contain a string such as the DHT22 Environment sensor. The sensor name will help us distinguish between sensors and will contain a string like Rear Environment Sensor. The pollSensor () method will be used to implement the default sensor behavior. In general, this method will be used to regularly read signals. Now we will make the requirements for the specified sensor types. As an example we will create the requirements for the environmental sensor
1 2 3 4 5 | protocol EnvironmentSensor: Sensor { func currentTemperature() -> Double func currentHumidity() -> Double } |
The protocol inherits the requests from the Sensor protocol and adds two special requirements for environmental sensors. currentTemperature () will return the closest temperature read from the sensor, and currentHumidity () returns the humidity of the last read from the sensor. The pollSensor () method from Sensor Protocol will be used to read temperature and humidity values for a regular period of time. PollSensor () can be run on separate threads that further form a pair of sensor types
1 2 3 4 5 6 7 8 9 10 11 12 13 14 | protocol RangeSensor: Sensor { func setRangeNotification(rangeCentimeter: Double, rangeNotification:() -> Void) func currentRange() -> Double } protocol DisplaySensor:Sensor { func displayMessage(message: String) } protocol WirelessSensor:Sensor { func setMessageReceiveNotification(messageNotification: (String) -> Void) func messageSend(message: String) } |
You will notice that the two protocols (RangeSensor and WirelessSensor) define methods for setting messages (setRangeNotification, setMessageReceiveNotification). These methods accept closures in the method variable and will be used in the pollSensor method to notify the robot code immediately if something happens. For RangeSensor, the closure calls if the robot is within a certain distance of the object, while for the WirelessSensor the closure calls if a message arrives.
There are two advantages we get from protocol-oriented design. At first, each protocol contains only the special requirements required for that type of sensor. Second, we can use a federated protocol to allow a single data type to satisfy multiple protocols. In the example. If we have a Display sensor, we will create a type that complies with both the DisplaySensor and the WirelessSensor protocol. There are many different types of sensors, however this should give us a good start for our robot. Now we will create a protocol to define the robot type
1 2 3 4 5 6 7 8 9 10 | protocol Robot { var name: String {get set} var robotMovement: RobotMovement {get set} var sensors: [Sensor] {get} init(name: String, robotMovement: RobotMovement) func addSensor(sensor:Sensor) func pollSensor() } |
This is a protocol that defines 3 properties, a constructor, and two methods that will be required to execute by any data type that wants to satisfy this protocol. These requirements will give us the basic functionality needed by the robot. It can be a bit confusing to think about all these protocols. Especially if we use some superclass. It usually helps us to have a basic map of our protocol
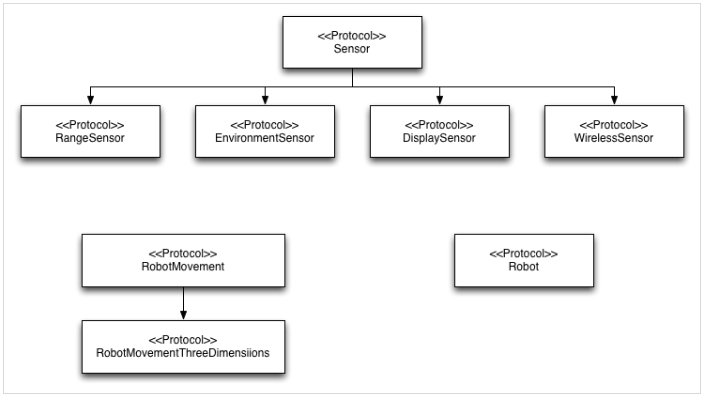
This image gives us a basic concept of the protocol-oriented design model. You will notice that each protocol defines specific requirements for each device type. In Chapter 6 we will go into more detail on how to model our requirements with the protocol.
In this section we use the protocol to define requirements for robot components. Now it’s your turn, take some time to see if you can create an implementation of the Robot protocol without creating any hard implementations of the other protocols. The key to understanding protocols is to understand how to use them without the need for a satisfying implementation. Next we will see how apple uses the protocol in their library. Apple uses protocols intensively in their swift library. The best resource to see this is http://swiftdoc.org. To see how apple uses the protocol let’s look at the Dictionary style. This type is very common, but it is also one of the types that has a simple protocol structure.
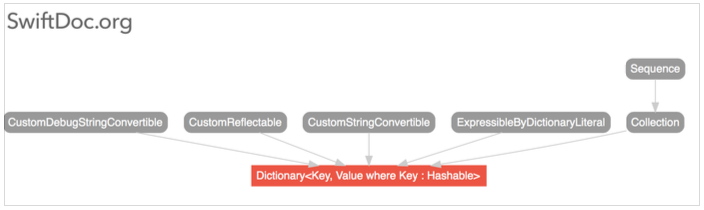
As we have seen, the Dictionary model conforms to five types of protocols, and the collection protocol type inherits from the Sequence Protocol.
summary
While Protocol is by itself nothing attractive, they are actually quite useful. As we have seen in this chapter, we can use them to make special requests. We have used the legacy protocol, aggregation, to create the hierarchical protocol. We also saw how to implement pattern delegation to protocol At the end of this chapter we covered how we can model a robot with sensors using the protocol and how apple uses the protocol in their libraries In Chapter 3, we We’ll see how we can use the protocol extension to add functionality to the data type that satisfies the protocol, but before that we look for our options.
To continue chapter 2, see you every Monday night