Following this series, I want to mention the power of dynamic HTML programming through the DOM. With the DOM and JavaScript getting all the power needed to create dynamic HTML:
- JavaScript can change all HTML elements in the page
- JavaScript can change all HTML attributes in the page
- JavaScript can change all CSS styles in the page
- JavaScript can remove existing HTML elements and attributes
- JavaScript can add new HTML elements and attributes
- JavaScript can respond to all HTML events present in the page
- JavaScript can generate new HTML events in the page ….
To be able to do so we need to continue tracking the next section. I will guide you to affect each element of HTML through the DOM.
DOM Tree
1 2 3 4 5 6 7 8 | <html> <body height="800px"> <div> <p>12345678</p> </div> </body> <html> |
1 2 3 4 5 | |documentElement (HTML) |bodyElement (BODY) |heightAttribute (value = 800px) |textNode (CDATA = '12345678') |
What is a root node? The HTML document is the root node, the starting point for building a DOM tree
Element node:
<body> <ul> <tr> <head> <title> <a> <div> <p>… are allowed sub branches.Attribute node: a child of the element node, this is a leaf, without a branch. Attribute is the attribute of DOM elements. The attribute attribute indicates the characteristics of that DOM element => the body tag has a height of 800px.
Text node:
<h1> <a> <span> <li> <td> <th> text buttons, this is the leaf, there is no branch. Indicates the content is readable (human readable), because it is of course there must be something to read. In addition, the DOM also has a comment node. We have an HTMl representation of 1 DOM structure as follows:

Basic DOM manipulation steps
So now I will practice selecting the right HTML element to create the effects as mentioned above.
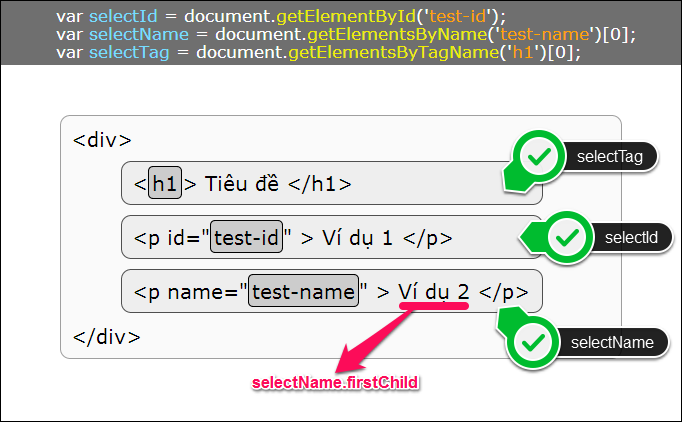
Step 1: Ways to choose the DOM.
- Pass element ID => document.getElementById (‘test-id’)
- By element’s name => document.getElementsByTagName (‘p’) [0]
- By element’s class name => document.getElementsByClassName (‘class-name’) [0]
- Via the name of the element => document.getElementsByName (‘test-name’)
- Through specific depth => document.querySelectorAll (“div p # test-id”)
- Select both 1 array of multiple elements => document.querySelectorAll (“div p”) => contains 1 array of 2 elements
<p>
Step 2: How to change values in the DOM
Assign new values to the text node
1 2 3 4 5 6 7 8 9 | <html> <body> <h1 id="test-id">Giá trị hiện tại</h1> <script> document.getElementById("test-id").innerHTML = "Giá trị đã được thay đổi"; </script> </body> </html> |
And this code means that find the tag with id = “test-id” and assign the internal HTML content of this tag as the words “The value has been changed”.
Change the styling element
We can use it to style an HTML element by selecting that element and using the code below
1 2 3 4 5 6 | element.style.color = "#ff3333"; element.style.marginTop = "20px"; element.style.paddingTop = "10px"; |
Example:
1 2 3 4 5 6 7 8 | <div id="demo" style="width:100px">Nội dung Ví dụ</div> <script> var x = document.getElementById("demo"); x.style.color = "3333FF"; x.style.width = "200px"; </script> |
The above example changed the color and width of the div tag element
Change element properties in the DOM
For example, if the HTML <img> element is known to have the src attribute to indicate the image URL that the tag displays, knowing that it has an attribute with the name src, after getting this part from the DOM, you have Readable, assigned properties and it will update the HTML page if assigned
1 2 3 4 5 6 7 | <img id="myimg" src="orange.png" alt="" /> <script> var el = document.getElementById("myimg"); el.src = "apple.png"; </script> |
Similarly, change the href attribute in the <a> link element
1 2 3 4 5 6 7 | <a href="http://www.example.com">Some link</a> <script> var el = document.getElementsByTagName("a"); el[0].href = "https://smartnext.vn"; </script> |
There are other ways to work:
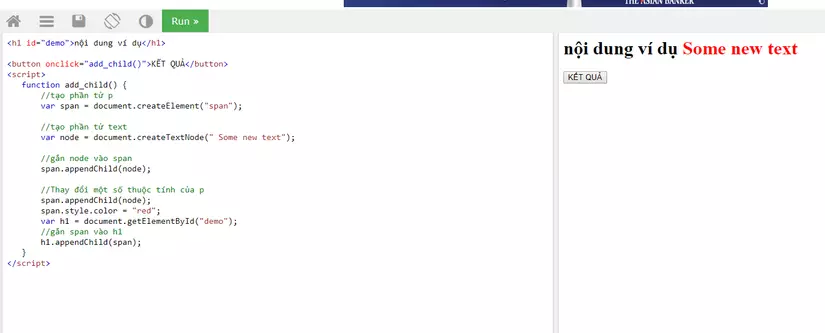
element.appendChild (newNode) Add newNode element to element element it becomes the last child element of the element
element.insertBefore (newNode, node1) Insert the newNode element in front of node1
element.replaceChild (newNode, oldNode) Replace oldNode element with newNode element
1 2 3 4 5 6 7 8 9 10 11 12 13 14 15 16 17 18 19 20 21 22 23 | <h1 id ="demo">nội dung ví dụ</h1> <button onclick="add_child()">KẾT QUẢ</button> <script> function add_child() { //tạo phần tử p var span = document.createElement("span"); //tạo phần tử text var node = document.createTextNode(" Some new text"); //gắn node vào span span.appendChild(node); //Thay đổi một số thuộc tính của p span.appendChild(node); span.style.color = "white"; var h1 = document.getElementById("demo"); //gắn span vào h1 div.appendChild(span); } </script> |
The above code changes h1 with the demo id to create 1 content as follows:
 Similarly, we have methods
removeChild () is used to delete a child.
1 2 3 4 | <div id="top"> <div id="nested"></div> </div> |
Now delete the part with id “nested”.
1 2 3 4 | var d = document.getElementById("top"); var d_nested = document.getElementById("nested"); var throwawayNode = d.removeChild(d_nested); |
replaceChild () to replace a certain child element with a new component.
1 2 3 4 5 6 7 8 9 10 11 12 13 14 | <div id="demo"> <p id="p1">This is a paragraph.</p> <p id="p2">This is another paragraph.</p> </div> <script> var p = document.createElement("p"); p.innerText = 'Đây là đoạn văn mới tạo ra'; var parent = document.getElementById("demo"); var child = document.getElementById("p1"); parent.replaceChild(p, child); </script> |
Summary
In this part, we have become familiar with the most basic or commonly used DOM manipulation:
- DOM Element: is responsible for accessing certain HTML tags through properties such as class name, id, and name of HTML tag.
- DOM HTML: Specialized in handling issues related to the content and attributes of HTML tags
- DOM CSS: is responsible for changing the CSS format of the HTML tags.
- DOM Event: is responsible for assigning events like onclick (), onload () to HTML tags
Coming to the next part 2, I will take a closer look at more advanced and complex DOM techniques:
- DOM EventListener: is responsible for listening for events acting on that HTML tag.
- DOM Navigation: used to manage and manipulate HTML tags, showing the parent-child relationship of HTML tags.
- DOM Node, Nodelist: is responsible for manipulating HTML through objects (Object).
Many thanks for the interest from the readers! Hope to receive more comments and share more from you.
Reference source
Javascript & DOM: https://xuanthulab.net/cap-nhat-thuoc-tinh-phan-tu-dom-javascript.html
Thach Pham: https://thachpham.com/web-development/javascript/dom-in-javascript-can-ban.html#ftoc-heading-9
Some useful DOM manipulations: https://techblog.vn/mot-so-cau-lenh-javascript-huu-ich-de-thao-tac-voi-dom