
Idea
The project of building a personal website is an idea that has been in my head for a long time. As an IT person, creating a private space to share the things that I am passionate about, the knowledge that I accumulate, and the experiences that I have gone through is always an attractive idea for me. However, due to busy work and lack of frontend programming skills, this project has been postponed for quite some time.
However, recently, due to the opportunity to research and learn about Hugo, and I feel very excited and confident to implement my idea again.
Hugo was introduced to Hugo by a comrade in the VietAWS UG admin team a long time ago, but recently I have had the opportunity to contact and learn about it, as seeing this as an opportunity to implement the idea, I decided to apply it immediately. build this website.
Build websites with hugo
To build a website with Hugo, the first step is still to master an overview of it (The article is only an overview, not a technical one, so if you want to understand it, please read the document carefully).
Install Hugo
I use ubuntu to host, so I use apt package manager and the following command:
1 2 | <span class="token function">sudo</span> <span class="token function">apt</span> <span class="token function">install</span> hugo |
Everyone can find out how to install it on the hugo installation page
Create a frame for hugo
After installation, go to create your first website with hugo
1 2 3 | hugo new site mysite <span class="token builtin class-name">cd</span> mysite |
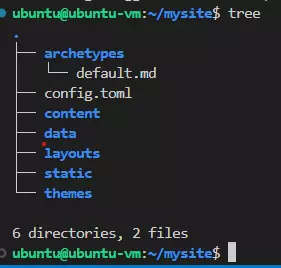
Hugo will create a folder called mysite and this is the structure of the folder that hugo just created
Themes
So there is a frame for hugo. The next job is to find themes for him. So where to find themes? on this page Hugo themes
After searching for a while, I found hugo-profile theme
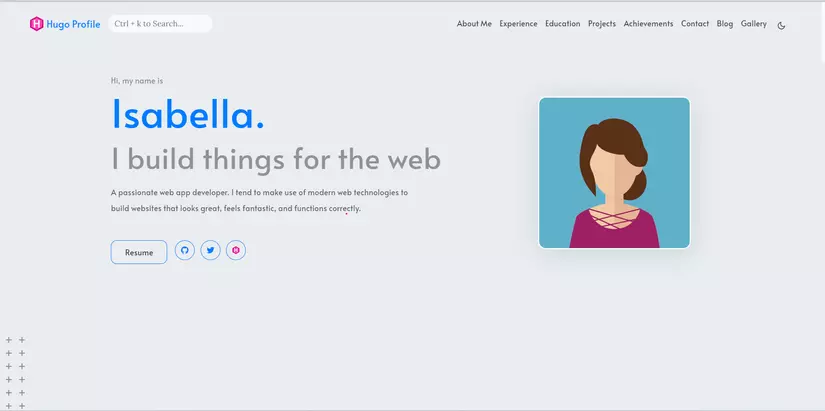
After looking through the interface and displaying Vietnamese, I still think this theme looks too good, so I’m going
Hugo configuration
Once the theme is selected, add it to the hugo project. Regarding the command, because there is a slight difference in the themes, I use a slightly different command from the Hugo quickstart page, so anyone who has an error can refer to Hugo’s document.
1 2 3 4 5 6 | <span class="token builtin class-name">cd</span> mysite <span class="token function">git</span> init <span class="token function">git</span> submodule <span class="token function">add</span> https://github.com/gurusabarish/hugo-profile.git themes/hugo-profile <span class="token function">cp</span> themes/hugo-profile/exampleSite/config.yaml ./ hugo server |
First post
In order to post the first post, the first thing to do is to research through the structure of a blog that I use
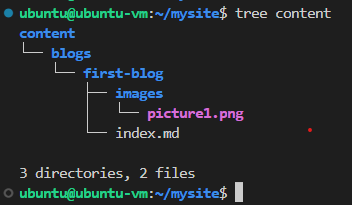
If you want to learn more about this part, you can read about Hugo page bundles in hugo’s documentation.
Learn how to configure theme author single page
1 2 3 4 5 6 7 8 9 10 11 12 13 14 15 16 17 | --- title: <span class="token string">"Xây dựng website cá nhân với Hugo và GitHub"</span> <span class="token comment"># này là title của trang web</span> date: <span class="token number">2023</span> -04-17T00:00:00+07:00 <span class="token comment"># thời gian lên bài</span> draft: <span class="token boolean">false</span> <span class="token comment"># Cái này không biết nó có tác dụng gì</span> author: <span class="token string">"Thạch Phạm"</span> <span class="token comment"># Tên tác giả, được hiển thị ở dưới title</span> tags: <span class="token comment"># phần tag này được hiển thị ở phía bên phải bên dưới phần table of content</span> - Hugoweb - Github Action - StaticWeb image: /images/blogs/20230417-xay-dung-trang-web-voi-hugo-va-github.png <span class="token comment"># ảnh bìa của bài viết được hiển thị ở phần danh sách bài viết và bên dưới title</span> description: <span class="token string">"Trang web này được dựng lên như thế nào?"</span> <span class="token comment"># Phần mô tả này hông thấy được hiển thị</span> toc: <span class="token comment"># này là viết tắt của table of content, mặc định là true (có thể thị phần table of content ở phía bên phải)</span> --- <span class="token operator"><</span> Nội dung bài viết được viết ở đây <span class="token operator">></span> |
So, it looks like you have created a basic hugo project.
Problems encountered and solutions
It looks so simple, but because I’m a newbie in this field, I encounter a lot of bugs
config.toml
This is because I copied Hugo’s document without reading carefully, so I created the hugo project with the following commands:
1 2 3 4 5 6 7 8 | hugo new site website-src <span class="token builtin class-name">cd</span> website-src <span class="token function">git</span> init <span class="token function">git</span> submodule <span class="token function">add</span> https://github.com/gurusabarish/hugo-profile.git themes/hugo-profile <span class="token builtin class-name">echo</span> <span class="token string">"theme = 'hugo-profile'"</span> <span class="token operator">>></span> config.toml <span class="token function">cp</span> themes/hugo-profile/exampleSite/config.yaml ./ hugo server |
So created 2 config files, but hugo it took the configuration in the config.toml file, so the homepage of the web no matter how I fix it, it won’t show anything.

After struggling for a while, I found the problem, so I had to delete the config.toml file.
People who want to better understand this configuration can read Hugo configuration
Show cover photo
Displaying the image in the article is normal, but displaying the cover image is a bit different.
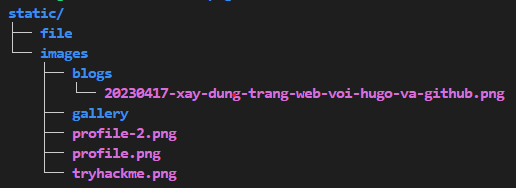
If you put the banner link in the image attribute of the page as images/banner.png , then when displaying the list of articles, you will not see the cover image, and if you leave it as <post>/images/banner.png , you will see it inside the article. Cover image display error. So I had to go through the original post of the author and he used the absolute address of the form /images/banner.png to find the images folder and found it in the static folder in the hugo project’s root directory. Check now and see everything is ok. And I have created a blogs folder inside images to store banners of articles.
I removed the git link to the author’s resource
Instead of using git submodule add https://github.com/gurusabarish/hugo-profile.git themes/hugo-profile , I used git clone https://github.com/gurusabarish/hugo-profile.git then rm -rf .git .
I have edited a bit through the author’s theme source, so I will not use git submodule add ... because then github will recognize other people’s git repo and will create a link there for my edits. I become useless.
It’s a bit disrespectful to the author’s copyright, but that’s all for now Sincere apologies h.
Deploy website to github and configure Github Action
That’s it, the local web part is done, let’s put it online
Create thachpham2k.github.io
This part is written by github a bit easy to understand, so everyone can refer to Create a static website with github
To summarize, what to do here is to create a github repository of the form <username>.github.io .
Create website-src
Similar to the previous step, but this time you can name it whatever you like, this will be the source of the hugo project.
Create Personal Token
What is Personal Token? Why create it? When is it used?
- GitHub Personal Access Token (also known as GitHub Personal Token) is a type of access token provided by GitHub to authenticate and authorize activities on GitHub. It allows users to perform operations like create, read, update and delete repositories, manage issues, pull requests, manage settings and other activities related to GitHub accounts.
- PAT will be used in Github Actions. In the last step, when you want to push content inside hugo’s
publicfolder through thachpham2k.github.io repository, you must give Github bot permission to allow it to push code there. And that permission will be configured with PAT and github bot will use it to have permission to push code to the repo.
To create a PAT then:
- Go to Github Personal Access Token or go to github -> setting -> developer setting -> Personal Access Token -> Tokens (classic)
- Create Token by clicking
Generate new tokenand then selectGenerate new token (classic)and enter a name, set expiration date and permissions for it.
After creating, it will be time to add the Token to secret environment so that the bot can know and use it.
- Access hugo project repository
- Settings -> Secrets and variables -> Actions
- Here select
New repository secretThe application will be directed to the environment creation page - On the environments page create a new environment named
GITHUB_TOKEN - Inside the interface of Environment create an
environment secretnamedTOKENand enter the previously created PAT and the value - Going back to the Settings -> Secrets and variables -> Actions interface, you will see an Enviromnet token created named
GITHUB_TOKEN

In the github action configuration file, if you want to use github PAT, you must declare the form
1 2 | personal_token: ${{ secrets.GITHUB_TOKEN }} |
Generate Github Deploy key
If you do not want to use PAT, there is another option that is to use the ssh key. To be able to use this method first you need to have an ssh key that can be used for github.
Use ssh-keygen to generate key
1 2 | ssh-keygen -t ed25519 -C <span class="token string">"phamthach2506@gmail.com"</span> |
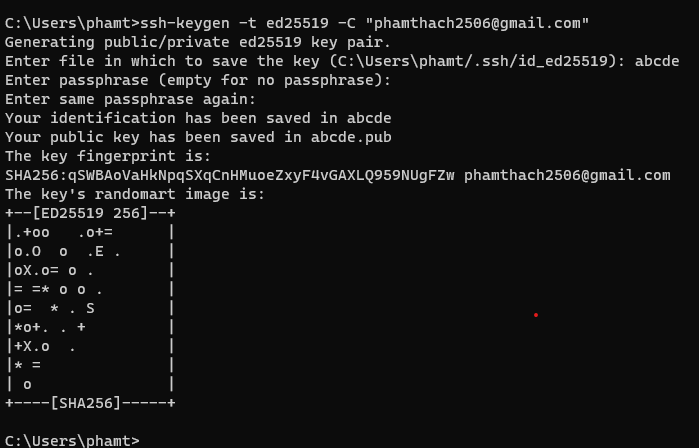
in step Enter file in which to save the key (C:Usersphamt/.ssh/id_ed25519): abcde if you don’t enter anything then ssh will generate a key named id_ed25519 and id_ed25519.pub and here I enter abcde will generate key files named id_abcde and id_abcde.pub .
After creating the key, proceed to configure it on github
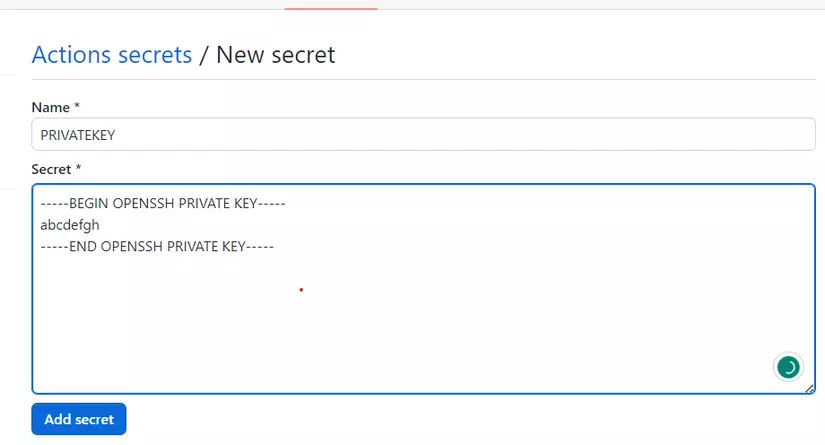
- Upload private key
- Access the hugo project repo (website-src)
- Settings -> Secrets and variables -> Actions
- Here select
New repository secret - Enter the name as
PRIVATEKEYand the value as the content of the newly createdid_adcdefile
- Upload public key
- Visit the repo website ( thachpham2k.github.io )
- Settings -> Deploy key
- Add deploy key
- Enter the title as PUBLICKEY and the Key as the content of the file
id_abcde.pub - Click on
Allow write access
- Usage: In the github action configuration file, if you want to use github PAT, you must declare the form
1 2 | deploy_key: ${{ secrets.privatekey }} |
Create Github action
The first is to find the source repo (website-src) and select the Action tab
Here find workflow search and enter Simple workflow
Inside the blank.yml file edit the content to look like this
1 2 3 4 5 6 7 8 9 10 11 12 13 14 15 16 17 18 19 20 21 22 23 24 25 26 27 28 29 30 31 32 33 34 35 36 37 38 39 40 41 42 43 44 45 46 47 48 49 50 | # This is a basic workflow to help you get started with Actions name: CI # Controls when the workflow will run on: # Triggers the workflow on push or pull request events but only for the "main" branch push: branches: [ "main" ] pull_request: branches: [ "main" ] # Allows you to run this workflow manually from the Actions tab workflow_dispatch: # A workflow run is made up of one or more jobs that can run sequentially or in parallel jobs: # This workflow contains a single job called "build" build: # The type of runner that the job will run on runs-on: ubuntu-latest permissions: write-all # Steps represent a sequence of tasks that will be executed as part of the job steps: # Checks-out your repository under $GITHUB_WORKSPACE, so your job can access it - uses: actions/checkout@v3 # - name: Update themes # run: git submodule update --init --recursive - name: Setup Hugo uses: peaceiris/actions-hugo@v2 with: hugo-version: 'latest' - name: build run: hugo -v - name: Deploy uses: peaceiris/actions-gh-pages@v3.9.3 with: # personal_token: ${{ secrets.GITHUB_TOKEN }} deploy_key: ${{ secrets.privatekey }} external_repository: thachpham2k/thachpham2k.github.io publish_dir: ./public # user_name: thachpham2k # user_email: phamthach2506@gmail.com publish_branch: master allow_empty_commit: true |
This part has quite a lot of things, too lazy to explain. Everyone commits the file and waits for the results.
Problems encountered and solutions
This item appears almost naturally, newbie, how to avoid this error
Using github tokens
First I used github token (recommended for security) but in this project Github token doesn’t meet enough permissions (write permission) so I have to switch to using PAT.
Using PAT
Because Github token did not meet the needs, I switched to using PAT, but the same problem happened that I configured the token and when I ran it, I kept getting Permission deny. I’m too lazy to test the permissions, so I switched to using Deploy key so that I can go back to test the PAT today (it’s a bit far today).
Build build file for github action
I’m having a little problem creating the git action config file.
Specifically, when getting the token value, I used personal_token: ${{ secrets.TOKEN }} instead of personal_token: ${{ secrets.GITHUB_TOKEN }} I was confused and didn’t know where it was wrong (admittedly it was a bit silly at the time) .
Epilogue
The article partially records the process of creating this website. It’s also my first time playing with Hugo as well as git action and haven’t spent a lot of time researching it, so my knowledge will be a bit sketchy or maybe wrong. Hope everyone can comment on my fb or gmail at the bottom of the website.
Thank you very much for reading the whole article. BYE