
Previous articles in the “Building Dapp” series:
- Building decentralized applications (Dapp)
- Building decentralized applications (Dapp) with Reacjs
- Building decentralized applications (Dapp) with Vuejs
- Building decentralized applications (Dapp) with Cocos Creator
- Building decentralized applications (Dapp) with Unity
- Building decentralized applications (Dapp) with Angular
Going back to the dapp building series on different platforms, today, as the most inexperienced member of the team, I would like to continue with an article on building blockchain dapp using Python (Flask) used in the environment. docker
Paradigm

Above is the general model for a Dapp blockchain that will remain from the application and then use Web3 to interact with the Ethereum blockchain network. But because this is not a Javascript environment but a Python environment, instead of using Web3.js we will use Web3.py
Prepare
The environment has always been a headache to any developer. And myself is also a victim when installing web3.py forever after the error of something python guy on the machine, which he faced immediately installed. So I decided to close the plan on a board by using Docker for it quickly.
- Docker: make sure the machine has docker
$ docker --versioninstalled
- Next is … oh, but need to install between where to next

Deployment
Following is the configuration part of Dockerfile and Dokcer-composer
- Dockerfile
Web3.pyrequirement is from Python 3.6 and up123456789101112<span class="token comment"># Dockerfile</span><span class="token keyword">FROM</span> python <span class="token punctuation">:</span> 3.7<span class="token keyword">WORKDIR</span> /app<span class="token keyword">COPY</span> . .<span class="token keyword">RUN</span> pip install <span class="token punctuation">-</span> r requirements.txt<span class="token keyword">CMD</span> <span class="token punctuation">[</span> <span class="token string">"python"</span> <span class="token punctuation">,</span> <span class="token string">"app.py"</span> <span class="token punctuation">]</span> - requirements.txt123Flask <span class="token operator">==</span> <span class="token number">1.1</span> <span class="token number">.1</span>web3 <span class="token operator">==</span> <span class="token number">4.9</span> <span class="token number">.1</span>
- docker-compose.yml12345678910111213141516171819<span class="token key atrule">version</span> <span class="token punctuation">:</span> <span class="token string">'3.7'</span><span class="token key atrule">services</span> <span class="token punctuation">:</span><span class="token key atrule">app</span> <span class="token punctuation">:</span><span class="token key atrule">image</span> <span class="token punctuation">:</span> dapp <span class="token punctuation">-</span> python<span class="token key atrule">build</span> <span class="token punctuation">:</span><span class="token key atrule">context</span> <span class="token punctuation">:</span> .<span class="token key atrule">dockerfile</span> <span class="token punctuation">:</span> Dockerfile<span class="token key atrule">volumes</span> <span class="token punctuation">:</span><span class="token punctuation">-</span> . <span class="token punctuation">:</span> /app<span class="token key atrule">ports</span> <span class="token punctuation">:</span><span class="token punctuation">-</span> <span class="token string">'${PUBLIC_PORT}:${PORT}'</span><span class="token key atrule">restart</span> <span class="token punctuation">:</span> unless <span class="token punctuation">-</span> stopped<span class="token key atrule">environment</span> <span class="token punctuation">:</span><span class="token key atrule">PORT</span> <span class="token punctuation">:</span> $ <span class="token punctuation">{</span> PORT <span class="token punctuation">}</span><span class="token key atrule">PROJECT_ID</span> <span class="token punctuation">:</span> $ <span class="token punctuation">{</span> PROJECT_ID <span class="token punctuation">}</span><span class="token key atrule">ADDRESS</span> <span class="token punctuation">:</span> $ <span class="token punctuation">{</span> ADDRESS <span class="token punctuation">}</span><span class="token key atrule">PRIVATE_KEY</span> <span class="token punctuation">:</span> $ <span class="token punctuation">{</span> PRIVATE_KEY <span class="token punctuation">}</span>
- .env123456PORT=888PUBLIC_PORT=9999PROJECT_ID= <span class="token tag"><span class="token tag"><span class="token punctuation"><</span> YOUR_INFURA_PROJECT_ID</span> <span class="token punctuation">></span></span>ADDRESS= <span class="token tag"><span class="token tag"><span class="token punctuation"><</span> YOUR_ACCOUNT</span> <span class="token punctuation">></span></span>PRIVATE_KEY= <span class="token tag"><span class="token tag"><span class="token punctuation"><</span> PRIVATE_KEY</span> <span class="token punctuation">></span></span>
- app . py
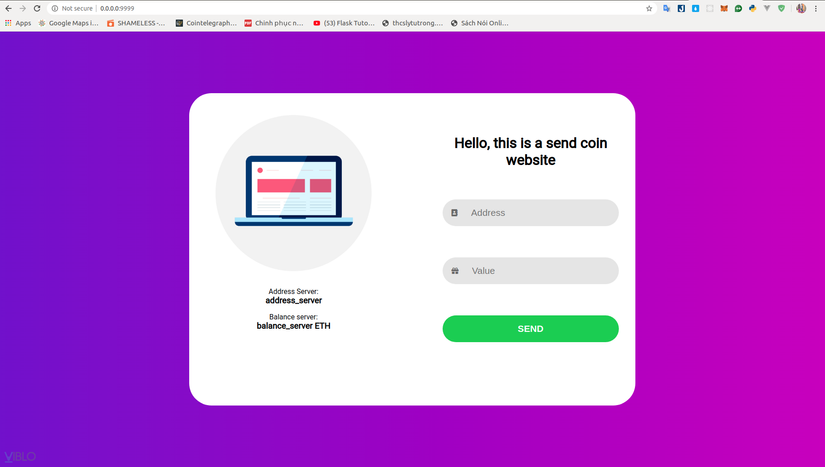
We will create an app flask frame with the libraries as below and simulate variables such as
addressorbalanceto show the test to theindex.htmlfile.12345678910111213141516<span class="token keyword">from</span> flask <span class="token keyword">import</span> Flask <span class="token punctuation">,</span> render_template <span class="token punctuation">,</span> request <span class="token punctuation">,</span> url_for<span class="token keyword">from</span> web3 <span class="token keyword">import</span> Web3<span class="token keyword">import</span> osapp <span class="token operator">=</span> Flask <span class="token punctuation">(</span> __name__ <span class="token punctuation">,</span> static_folder <span class="token operator">=</span> <span class="token string">'static'</span> <span class="token punctuation">)</span>address_server <span class="token operator">=</span> <span class="token string">"address_server"</span>balance <span class="token operator">=</span> <span class="token string">"balance_server"</span>@app <span class="token punctuation">.</span> route <span class="token punctuation">(</span> <span class="token string">"/"</span> <span class="token punctuation">)</span><span class="token keyword">def</span> <span class="token function">hello</span> <span class="token punctuation">(</span> <span class="token punctuation">)</span> <span class="token punctuation">:</span><span class="token keyword">return</span> render_template <span class="token punctuation">(</span> <span class="token string">'index.html'</span> <span class="token punctuation">,</span> title <span class="token operator">=</span> <span class="token string">'Build Dapp By Python'</span> <span class="token punctuation">,</span> address <span class="token operator">=</span> address_server <span class="token punctuation">,</span> balance <span class="token operator">=</span> balance <span class="token punctuation">)</span><span class="token keyword">if</span> __name__ <span class="token operator">==</span> <span class="token string">"__main__"</span> <span class="token punctuation">:</span>app <span class="token punctuation">.</span> run <span class="token punctuation">(</span> host <span class="token operator">=</span> <span class="token string">"0.0.0.0"</span> <span class="token punctuation">,</span> port <span class="token operator">=</span> os <span class="token punctuation">.</span> environ <span class="token punctuation">[</span> <span class="token string">'PORT'</span> <span class="token punctuation">]</span> <span class="token punctuation">,</span> debug <span class="token operator">=</span> <span class="token boolean">True</span> <span class="token punctuation">)</span> - templates / index.html
Minh has added a bit of css and images for it to be ugly, so a bit too long. Then dump the variables passed on the server to the
indexfile as follows12345678910111213141516171819202122232425262728293031323334353637383940<span class="token doctype"><!DOCTYPE html></span><span class="token tag"><span class="token tag"><span class="token punctuation"><</span> html</span> <span class="token punctuation">></span></span><span class="token tag"><span class="token tag"><span class="token punctuation"><</span> head</span> <span class="token punctuation">></span></span><span class="token tag"><span class="token tag"><span class="token punctuation"><</span> title</span> <span class="token punctuation">></span></span> {{ title }} <span class="token tag"><span class="token tag"><span class="token punctuation"></</span> title</span> <span class="token punctuation">></span></span><span class="token tag"><span class="token tag"><span class="token punctuation"><</span> meta</span> <span class="token attr-name">name</span> <span class="token attr-value"><span class="token punctuation">=</span> <span class="token punctuation">"</span> viewport <span class="token punctuation">"</span></span> <span class="token attr-name">content</span> <span class="token attr-value"><span class="token punctuation">=</span> <span class="token punctuation">"</span> width=device-width, initial-scale=1 <span class="token punctuation">"</span></span> <span class="token punctuation">></span></span><span class="token tag"><span class="token tag"><span class="token punctuation"><</span> link</span> <span class="token attr-name">rel</span> <span class="token attr-value"><span class="token punctuation">=</span> <span class="token punctuation">"</span> stylesheet <span class="token punctuation">"</span></span> <span class="token attr-name">href</span> <span class="token attr-value"><span class="token punctuation">=</span> <span class="token punctuation">"</span> https://use.fontawesome.com/releases/v5.3.1/css/all.css <span class="token punctuation">"</span></span><span class="token attr-name">integrity</span> <span class="token attr-value"><span class="token punctuation">=</span> <span class="token punctuation">"</span> sha384-mzrmE5qonljUremFsqc01SB46JvROS7bZs3IO2EmfFsd15uHvIt+Y8vEf7N7fWAU <span class="token punctuation">"</span></span> <span class="token attr-name">crossorigin</span> <span class="token attr-value"><span class="token punctuation">=</span> <span class="token punctuation">"</span> anonymous <span class="token punctuation">"</span></span> <span class="token punctuation">></span></span><span class="token tag"><span class="token tag"><span class="token punctuation"><</span> link</span> <span class="token attr-name">href</span> <span class="token attr-value"><span class="token punctuation">=</span> <span class="token punctuation">"</span> https://fonts.googleapis.com/css?family=Roboto:300,400 <span class="token punctuation">"</span></span> <span class="token attr-name">rel</span> <span class="token attr-value"><span class="token punctuation">=</span> <span class="token punctuation">"</span> stylesheet <span class="token punctuation">"</span></span> <span class="token punctuation">></span></span><span class="token tag"><span class="token tag"><span class="token punctuation"><</span> link</span> <span class="token attr-name">rel</span> <span class="token attr-value"><span class="token punctuation">=</span> <span class="token punctuation">"</span> stylesheet <span class="token punctuation">"</span></span> <span class="token attr-name">href</span> <span class="token attr-value"><span class="token punctuation">=</span> <span class="token punctuation">"</span> {{ url_for( <span class="token punctuation">'</span> static <span class="token punctuation">'</span> , filename= <span class="token punctuation">'</span> css/style.css <span class="token punctuation">'</span> ) }} <span class="token punctuation">"</span></span> <span class="token punctuation">></span></span><span class="token tag"><span class="token tag"><span class="token punctuation"></</span> head</span> <span class="token punctuation">></span></span><span class="token tag"><span class="token tag"><span class="token punctuation"><</span> body</span> <span class="token punctuation">></span></span><span class="token tag"><span class="token tag"><span class="token punctuation"><</span> div</span> <span class="token attr-name">id</span> <span class="token attr-value"><span class="token punctuation">=</span> <span class="token punctuation">"</span> form_wrapper <span class="token punctuation">"</span></span> <span class="token punctuation">></span></span><span class="token tag"><span class="token tag"><span class="token punctuation"><</span> div</span> <span class="token attr-name">id</span> <span class="token attr-value"><span class="token punctuation">=</span> <span class="token punctuation">"</span> form_left <span class="token punctuation">"</span></span> <span class="token punctuation">></span></span><span class="token tag"><span class="token tag"><span class="token punctuation"><</span> img</span> <span class="token attr-name">src</span> <span class="token attr-value"><span class="token punctuation">=</span> <span class="token punctuation">"</span> /static/img/icon.png <span class="token punctuation">"</span></span> <span class="token attr-name">alt</span> <span class="token attr-value"><span class="token punctuation">=</span> <span class="token punctuation">"</span> computer icon <span class="token punctuation">"</span></span> <span class="token punctuation">></span></span><span class="token tag"><span class="token tag"><span class="token punctuation"><</span> p</span> <span class="token punctuation">></span></span> Address Server: <span class="token tag"><span class="token tag"><span class="token punctuation"></</span> p</span> <span class="token punctuation">></span></span><span class="token tag"><span class="token tag"><span class="token punctuation"><</span> h3</span> <span class="token punctuation">></span></span>{{ address }}<span class="token tag"><span class="token tag"><span class="token punctuation"></</span> h3</span> <span class="token punctuation">></span></span><span class="token tag"><span class="token tag"><span class="token punctuation"><</span> p</span> <span class="token punctuation">></span></span> Balance server: <span class="token tag"><span class="token tag"><span class="token punctuation"></</span> p</span> <span class="token punctuation">></span></span><span class="token tag"><span class="token tag"><span class="token punctuation"><</span> h3</span> <span class="token punctuation">></span></span> {{ balance }} ETH <span class="token tag"><span class="token tag"><span class="token punctuation"></</span> h3</span> <span class="token punctuation">></span></span><span class="token tag"><span class="token tag"><span class="token punctuation"></</span> div</span> <span class="token punctuation">></span></span><span class="token tag"><span class="token tag"><span class="token punctuation"><</span> form</span> <span class="token attr-name">action</span> <span class="token attr-value"><span class="token punctuation">=</span> <span class="token punctuation">"</span> /send <span class="token punctuation">"</span></span> <span class="token attr-name">method</span> <span class="token attr-value"><span class="token punctuation">=</span> <span class="token punctuation">"</span> POST <span class="token punctuation">"</span></span> <span class="token attr-name">id</span> <span class="token attr-value"><span class="token punctuation">=</span> <span class="token punctuation">"</span> form_right <span class="token punctuation">"</span></span> <span class="token punctuation">></span></span><span class="token tag"><span class="token tag"><span class="token punctuation"><</span> h1</span> <span class="token punctuation">></span></span> Hello, this is a send coin website <span class="token tag"><span class="token tag"><span class="token punctuation"></</span> h1</span> <span class="token punctuation">></span></span><span class="token tag"><span class="token tag"><span class="token punctuation"><</span> div</span> <span class="token attr-name">class</span> <span class="token attr-value"><span class="token punctuation">=</span> <span class="token punctuation">"</span> input_container <span class="token punctuation">"</span></span> <span class="token punctuation">></span></span><span class="token tag"><span class="token tag"><span class="token punctuation"><</span> i</span> <span class="token attr-name">class</span> <span class="token attr-value"><span class="token punctuation">=</span> <span class="token punctuation">"</span> fas fa-address-book <span class="token punctuation">"</span></span> <span class="token punctuation">></span></span> <span class="token tag"><span class="token tag"><span class="token punctuation"></</span> i</span> <span class="token punctuation">></span></span><span class="token tag"><span class="token tag"><span class="token punctuation"><</span> input</span> <span class="token attr-name">placeholder</span> <span class="token attr-value"><span class="token punctuation">=</span> <span class="token punctuation">"</span> Address <span class="token punctuation">"</span></span> <span class="token attr-name">type</span> <span class="token attr-value"><span class="token punctuation">=</span> <span class="token punctuation">"</span> text <span class="token punctuation">"</span></span> <span class="token attr-name">name</span> <span class="token attr-value"><span class="token punctuation">=</span> <span class="token punctuation">"</span> address <span class="token punctuation">"</span></span> <span class="token attr-name">id</span> <span class="token attr-value"><span class="token punctuation">=</span> <span class="token punctuation">"</span> field_email <span class="token punctuation">"</span></span> <span class="token attr-name">class</span> <span class="token attr-value"><span class="token punctuation">=</span> <span class="token punctuation">'</span> input_field <span class="token punctuation">'</span></span> <span class="token punctuation">></span></span><span class="token tag"><span class="token tag"><span class="token punctuation"></</span> div</span> <span class="token punctuation">></span></span><span class="token tag"><span class="token tag"><span class="token punctuation"><</span> div</span> <span class="token attr-name">class</span> <span class="token attr-value"><span class="token punctuation">=</span> <span class="token punctuation">"</span> input_container <span class="token punctuation">"</span></span> <span class="token punctuation">></span></span><span class="token tag"><span class="token tag"><span class="token punctuation"><</span> i</span> <span class="token attr-name">class</span> <span class="token attr-value"><span class="token punctuation">=</span> <span class="token punctuation">"</span> fas fa-gift <span class="token punctuation">"</span></span> <span class="token punctuation">></span></span> <span class="token tag"><span class="token tag"><span class="token punctuation"></</span> i</span> <span class="token punctuation">></span></span><span class="token tag"><span class="token tag"><span class="token punctuation"><</span> input</span> <span class="token attr-name">placeholder</span> <span class="token attr-value"><span class="token punctuation">=</span> <span class="token punctuation">"</span> Value <span class="token punctuation">"</span></span> <span class="token attr-name">type</span> <span class="token attr-value"><span class="token punctuation">=</span> <span class="token punctuation">"</span> text <span class="token punctuation">"</span></span> <span class="token attr-name">name</span> <span class="token attr-value"><span class="token punctuation">=</span> <span class="token punctuation">"</span> value <span class="token punctuation">"</span></span> <span class="token attr-name">id</span> <span class="token attr-value"><span class="token punctuation">=</span> <span class="token punctuation">"</span> field_password <span class="token punctuation">"</span></span> <span class="token attr-name">class</span> <span class="token attr-value"><span class="token punctuation">=</span> <span class="token punctuation">'</span> input_field <span class="token punctuation">'</span></span> <span class="token punctuation">></span></span><span class="token tag"><span class="token tag"><span class="token punctuation"></</span> div</span> <span class="token punctuation">></span></span><span class="token tag"><span class="token tag"><span class="token punctuation"><</span> input</span> <span class="token attr-name">type</span> <span class="token attr-value"><span class="token punctuation">=</span> <span class="token punctuation">"</span> submit <span class="token punctuation">"</span></span> <span class="token attr-name">value</span> <span class="token attr-value"><span class="token punctuation">=</span> <span class="token punctuation">"</span> send <span class="token punctuation">"</span></span> <span class="token attr-name">id</span> <span class="token attr-value"><span class="token punctuation">=</span> <span class="token punctuation">'</span> input_submit <span class="token punctuation">'</span></span> <span class="token attr-name">class</span> <span class="token attr-value"><span class="token punctuation">=</span> <span class="token punctuation">'</span> input_field <span class="token punctuation">'</span></span> <span class="token punctuation">></span></span><span class="token tag"><span class="token tag"><span class="token punctuation"></</span> form</span> <span class="token punctuation">></span></span><span class="token tag"><span class="token tag"><span class="token punctuation"></</span> div</span> <span class="token punctuation">></span></span><span class="token tag"><span class="token tag"><span class="token punctuation"></</span> body</span> <span class="token punctuation">></span></span><span class="token tag"><span class="token tag"><span class="token punctuation"></</span> html</span> <span class="token punctuation">></span></span> - static / css / style.css
Because this file is quite long, I just illustrate the first few lines, what people should repo on github at the end of the lesson
1234567891011121314151617<span class="token selector">body</span> <span class="token punctuation">{</span><span class="token property">text-align</span> <span class="token punctuation">:</span> center <span class="token punctuation">;</span><span class="token punctuation">}</span><span class="token selector">:root</span> <span class="token punctuation">{</span><span class="token property">--body_gradient_left</span> <span class="token punctuation">:</span> #7200d0 <span class="token punctuation">;</span><span class="token property">--body_gradient_right</span> <span class="token punctuation">:</span> #c800c1 <span class="token punctuation">;</span><span class="token property">--form_bg</span> <span class="token punctuation">:</span> #ffffff <span class="token punctuation">;</span><span class="token property">--input_bg</span> <span class="token punctuation">:</span> #e5e5e5 <span class="token punctuation">;</span><span class="token property">--input_hover</span> <span class="token punctuation">:</span> #eaeaea <span class="token punctuation">;</span><span class="token property">--submit_bg</span> <span class="token punctuation">:</span> #1fcc44 <span class="token punctuation">;</span><span class="token property">--submit_hover</span> <span class="token punctuation">:</span> #40e263 <span class="token punctuation">;</span><span class="token property">--icon_color</span> <span class="token punctuation">:</span> #6b6b6b <span class="token punctuation">;</span><span class="token punctuation">}</span>...
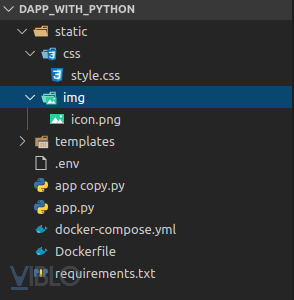
The directory structure will look like this:
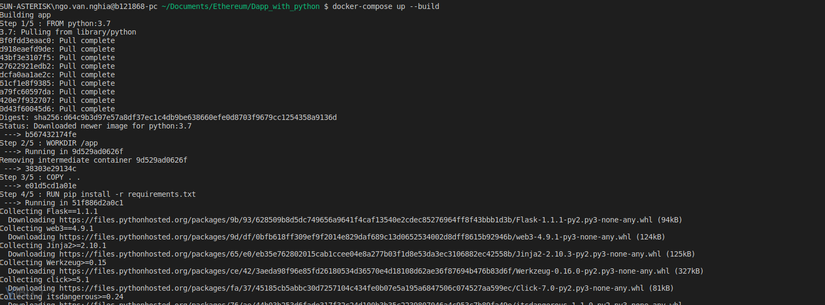
Now run cmd docker-compose up --build to docker to download images and build containers for us
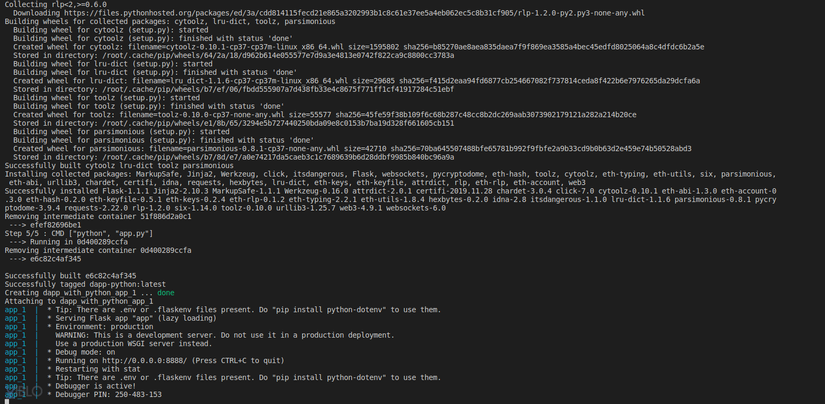
So now that the build has finished, we will check the installation libraries to see if they are available by going to the docker to see:
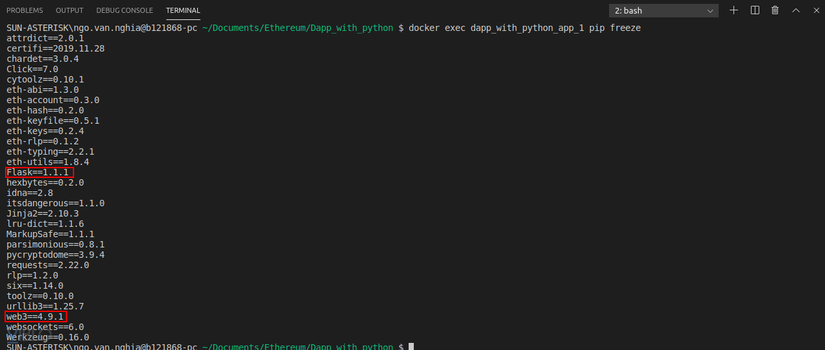
- The first is to check what the name or id of the container is running:
docker psand here its name isdapp_with_python_app_1

- Now let’s go to check:
docker exec dapp_with_python_app_1 pip freezecan be understood asdocker exec <name_container> <cmd_run>then here we are checking to see if the pip library has downloaded and 2 things we need already have
Test it out
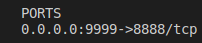
Deliciously there were 2 variables, the string was sent and displayed. Now it’s time to add this interactivity to the blockchian for the application. One thing to note is that in the result of docker-composer , it says that it is running on port 8888 but in fact, if you want to access the web from the browser, we have to go to port 9999 because in the docker-composer we have configured it as port 8888 ‘s mapping. Container with port 9999 of the real machine. And if you pay close attention to everyone looking back at the results of the docker ps we will see
Deploying Interaction With Blockchain
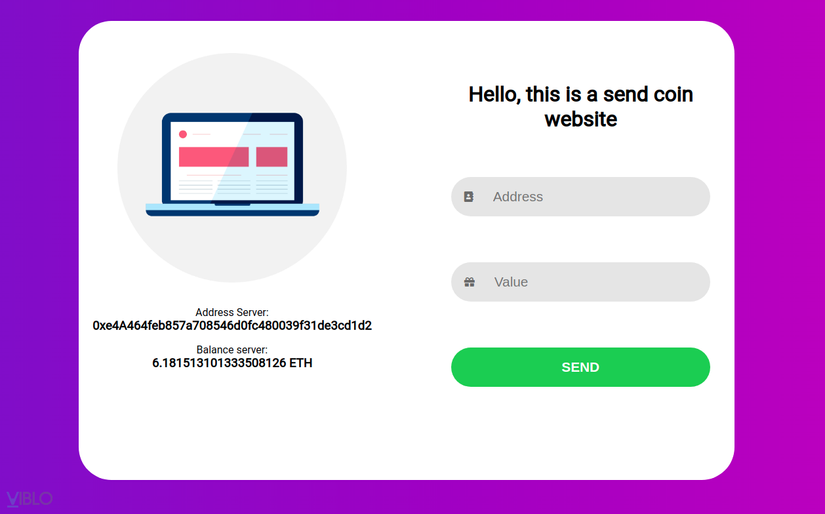
Use web3 to get balance from blockchian
- app . py12345678910111213141516171819202122232425<span class="token keyword">from</span> flask <span class="token keyword">import</span> Flask <span class="token punctuation">,</span> render_template <span class="token punctuation">,</span> request <span class="token punctuation">,</span> url_for<span class="token keyword">from</span> web3 <span class="token keyword">import</span> Web3<span class="token keyword">import</span> osapp <span class="token operator">=</span> Flask <span class="token punctuation">(</span> __name__ <span class="token punctuation">,</span> static_folder <span class="token operator">=</span> <span class="token string">'static'</span> <span class="token punctuation">)</span><span class="token comment"># Ta sẽ cấu hình sử dụng mang ropsten với PROJECT_ID lấy từ trang infura </span><span class="token comment"># và mình đã đưa nó vào biến môi trường</span>infura_url <span class="token operator">=</span> <span class="token string">"https://ropsten.infura.io/v3/"</span> <span class="token operator">+</span> os <span class="token punctuation">.</span> environ <span class="token punctuation">[</span> <span class="token string">'PROJECT_ID'</span> <span class="token punctuation">]</span>web3 <span class="token operator">=</span> Web3 <span class="token punctuation">(</span> Web3 <span class="token punctuation">.</span> HTTPProvider <span class="token punctuation">(</span> infura_url <span class="token punctuation">)</span> <span class="token punctuation">)</span><span class="token comment"># địa chỉ mình cũng đã đưa vào biến môi trường và get balance </span>address_server <span class="token operator">=</span> os <span class="token punctuation">.</span> environ <span class="token punctuation">[</span> <span class="token string">'ADDRESS'</span> <span class="token punctuation">]</span>balance <span class="token operator">=</span> web3 <span class="token punctuation">.</span> fromWei <span class="token punctuation">(</span> web3 <span class="token punctuation">.</span> eth <span class="token punctuation">.</span> getBalance <span class="token punctuation">(</span> address_server <span class="token punctuation">)</span> <span class="token punctuation">,</span> <span class="token string">'ether'</span> <span class="token punctuation">)</span>@app <span class="token punctuation">.</span> route <span class="token punctuation">(</span> <span class="token string">"/"</span> <span class="token punctuation">)</span><span class="token keyword">def</span> <span class="token function">hello</span> <span class="token punctuation">(</span> <span class="token punctuation">)</span> <span class="token punctuation">:</span><span class="token keyword">return</span> render_template <span class="token punctuation">(</span> <span class="token string">'index.html'</span> <span class="token punctuation">,</span> title <span class="token operator">=</span> <span class="token string">'Build Dapp By Python'</span> <span class="token punctuation">,</span>address <span class="token operator">=</span> address_server <span class="token punctuation">,</span> balance <span class="token operator">=</span> balance <span class="token punctuation">)</span><span class="token keyword">if</span> __name__ <span class="token operator">==</span> <span class="token string">"__main__"</span> <span class="token punctuation">:</span>app <span class="token punctuation">.</span> run <span class="token punctuation">(</span> host <span class="token operator">=</span> <span class="token string">"0.0.0.0"</span> <span class="token punctuation">,</span> port <span class="token operator">=</span> os <span class="token punctuation">.</span> environ <span class="token punctuation">[</span> <span class="token string">'PORT'</span> <span class="token punctuation">]</span> <span class="token punctuation">,</span> debug <span class="token operator">=</span> <span class="token boolean">True</span> <span class="token punctuation">)</span>
We will go step by step to carry out and test the results so the address and balance are available
Now write the sendCoin function to transfer money. First we need to set private_key to sign the send and receive transactions, the next parameter is nonce to set the transaction when sending. Next we need to get the params that the form sends home using the request . Once we have the destination address address_des and the value we need to send value we will create the transaction with the parameters as tx variable below. signed_tx is the use of a private key to sign a transaction. Finally, perform a transaction with sendRawTransaction , the value it returns is a hash code that we can use this code on the web blockchain to check transactions with this hash code. After obtaining the hash code, we will go to the website to check the transaction. All parameters need to show that I will send to view send.index
- app . py12345678910111213141516171819202122232425<span class="token punctuation">.</span> <span class="token punctuation">.</span> <span class="token punctuation">.</span>@app <span class="token punctuation">.</span> route <span class="token punctuation">(</span> <span class="token string">"/send"</span> <span class="token punctuation">,</span> methods <span class="token operator">=</span> <span class="token punctuation">[</span> <span class="token string">'POST'</span> <span class="token punctuation">]</span> <span class="token punctuation">)</span><span class="token keyword">def</span> <span class="token function">sendCoin</span> <span class="token punctuation">(</span> <span class="token punctuation">)</span> <span class="token punctuation">:</span>private_key <span class="token operator">=</span> os <span class="token punctuation">.</span> environ <span class="token punctuation">[</span> <span class="token string">'PRIVATE_KEY'</span> <span class="token punctuation">]</span>nonce <span class="token operator">=</span> web3 <span class="token punctuation">.</span> eth <span class="token punctuation">.</span> getTransactionCount <span class="token punctuation">(</span> address_server <span class="token punctuation">)</span>address_des <span class="token operator">=</span> request <span class="token punctuation">.</span> form <span class="token punctuation">.</span> get <span class="token punctuation">(</span> <span class="token string">'address'</span> <span class="token punctuation">)</span>value <span class="token operator">=</span> request <span class="token punctuation">.</span> form <span class="token punctuation">.</span> get <span class="token punctuation">(</span> <span class="token string">'value'</span> <span class="token punctuation">)</span>tx <span class="token operator">=</span> <span class="token punctuation">{</span><span class="token string">'nonce'</span> <span class="token punctuation">:</span> nonce <span class="token punctuation">,</span><span class="token string">'to'</span> <span class="token punctuation">:</span> address_des <span class="token punctuation">,</span><span class="token string">'value'</span> <span class="token punctuation">:</span> web3 <span class="token punctuation">.</span> toWei <span class="token punctuation">(</span> value <span class="token punctuation">,</span> <span class="token string">'ether'</span> <span class="token punctuation">)</span> <span class="token punctuation">,</span><span class="token string">'gas'</span> <span class="token punctuation">:</span> <span class="token number">2000000</span> <span class="token punctuation">,</span><span class="token string">'gasPrice'</span> <span class="token punctuation">:</span> web3 <span class="token punctuation">.</span> toWei <span class="token punctuation">(</span> <span class="token string">'50'</span> <span class="token punctuation">,</span> <span class="token string">'gwei'</span> <span class="token punctuation">)</span> <span class="token punctuation">,</span><span class="token punctuation">}</span>signed_tx <span class="token operator">=</span> web3 <span class="token punctuation">.</span> eth <span class="token punctuation">.</span> account <span class="token punctuation">.</span> signTransaction <span class="token punctuation">(</span> tx <span class="token punctuation">,</span> private_key <span class="token punctuation">)</span>tx_hash <span class="token operator">=</span> web3 <span class="token punctuation">.</span> toHex <span class="token punctuation">(</span> web3 <span class="token punctuation">.</span> eth <span class="token punctuation">.</span> sendRawTransaction <span class="token punctuation">(</span> signed_tx <span class="token punctuation">.</span> rawTransaction <span class="token punctuation">)</span> <span class="token punctuation">)</span>balance_server <span class="token operator">=</span> web3 <span class="token punctuation">.</span> fromWei <span class="token punctuation">(</span> web3 <span class="token punctuation">.</span> eth <span class="token punctuation">.</span> getBalance <span class="token punctuation">(</span> address_server <span class="token punctuation">)</span> <span class="token punctuation">,</span> <span class="token string">'ether'</span> <span class="token punctuation">)</span><span class="token keyword">return</span> render_template <span class="token punctuation">(</span> <span class="token string">'send.html'</span> <span class="token punctuation">,</span> title <span class="token operator">=</span> <span class="token string">'Build Dapp By Python'</span> <span class="token punctuation">,</span> tx_hash <span class="token operator">=</span> tx_hash <span class="token punctuation">,</span>address_des <span class="token operator">=</span> address_des <span class="token punctuation">,</span> value <span class="token operator">=</span> value <span class="token punctuation">)</span><span class="token punctuation">.</span> <span class="token punctuation">.</span> <span class="token punctuation">.</span>
- templates / send.html1234567891011121314151617181920212223242526272829303132333435<span class="token doctype"><!DOCTYPE html></span><span class="token tag"><span class="token tag"><span class="token punctuation"><</span> html</span> <span class="token punctuation">></span></span><span class="token tag"><span class="token tag"><span class="token punctuation"><</span> head</span> <span class="token punctuation">></span></span><span class="token tag"><span class="token tag"><span class="token punctuation"><</span> title</span> <span class="token punctuation">></span></span> {{ title }} <span class="token tag"><span class="token tag"><span class="token punctuation"></</span> title</span> <span class="token punctuation">></span></span><span class="token tag"><span class="token tag"><span class="token punctuation"><</span> meta</span> <span class="token attr-name">name</span> <span class="token attr-value"><span class="token punctuation">=</span> <span class="token punctuation">"</span> viewport <span class="token punctuation">"</span></span> <span class="token attr-name">content</span> <span class="token attr-value"><span class="token punctuation">=</span> <span class="token punctuation">"</span> width=device-width, initial-scale=1 <span class="token punctuation">"</span></span> <span class="token punctuation">></span></span><span class="token tag"><span class="token tag"><span class="token punctuation"><</span> link</span> <span class="token attr-name">rel</span> <span class="token attr-value"><span class="token punctuation">=</span> <span class="token punctuation">"</span> stylesheet <span class="token punctuation">"</span></span> <span class="token attr-name">href</span> <span class="token attr-value"><span class="token punctuation">=</span> <span class="token punctuation">"</span> https://use.fontawesome.com/releases/v5.3.1/css/all.css <span class="token punctuation">"</span></span><span class="token attr-name">integrity</span> <span class="token attr-value"><span class="token punctuation">=</span> <span class="token punctuation">"</span> sha384-mzrmE5qonljUremFsqc01SB46JvROS7bZs3IO2EmfFsd15uHvIt+Y8vEf7N7fWAU <span class="token punctuation">"</span></span> <span class="token attr-name">crossorigin</span> <span class="token attr-value"><span class="token punctuation">=</span> <span class="token punctuation">"</span> anonymous <span class="token punctuation">"</span></span> <span class="token punctuation">></span></span><span class="token tag"><span class="token tag"><span class="token punctuation"><</span> link</span> <span class="token attr-name">href</span> <span class="token attr-value"><span class="token punctuation">=</span> <span class="token punctuation">"</span> https://fonts.googleapis.com/css?family=Roboto:300,400 <span class="token punctuation">"</span></span> <span class="token attr-name">rel</span> <span class="token attr-value"><span class="token punctuation">=</span> <span class="token punctuation">"</span> stylesheet <span class="token punctuation">"</span></span> <span class="token punctuation">></span></span><span class="token tag"><span class="token tag"><span class="token punctuation"><</span> link</span> <span class="token attr-name">rel</span> <span class="token attr-value"><span class="token punctuation">=</span> <span class="token punctuation">"</span> stylesheet <span class="token punctuation">"</span></span> <span class="token attr-name">href</span> <span class="token attr-value"><span class="token punctuation">=</span> <span class="token punctuation">"</span> {{ url_for( <span class="token punctuation">'</span> static <span class="token punctuation">'</span> , filename= <span class="token punctuation">'</span> css/style.css <span class="token punctuation">'</span> ) }} <span class="token punctuation">"</span></span> <span class="token punctuation">></span></span><span class="token tag"><span class="token tag"><span class="token punctuation"></</span> head</span> <span class="token punctuation">></span></span><span class="token tag"><span class="token tag"><span class="token punctuation"><</span> body</span> <span class="token punctuation">></span></span><span class="token tag"><span class="token tag"><span class="token punctuation"><</span> div</span> <span class="token attr-name">id</span> <span class="token attr-value"><span class="token punctuation">=</span> <span class="token punctuation">"</span> form_wrapper <span class="token punctuation">"</span></span> <span class="token punctuation">></span></span><span class="token tag"><span class="token tag"><span class="token punctuation"><</span> div</span> <span class="token attr-name">id</span> <span class="token attr-value"><span class="token punctuation">=</span> <span class="token punctuation">"</span> form_left <span class="token punctuation">"</span></span> <span class="token punctuation">></span></span><span class="token tag"><span class="token tag"><span class="token punctuation"><</span> img</span> <span class="token attr-name">src</span> <span class="token attr-value"><span class="token punctuation">=</span> <span class="token punctuation">"</span> /static/img/icon.png <span class="token punctuation">"</span></span> <span class="token attr-name">alt</span> <span class="token attr-value"><span class="token punctuation">=</span> <span class="token punctuation">"</span> computer icon <span class="token punctuation">"</span></span> <span class="token punctuation">></span></span><span class="token tag"><span class="token tag"><span class="token punctuation"><</span> p</span> <span class="token punctuation">></span></span> tx_hash: <span class="token tag"><span class="token tag"><span class="token punctuation"></</span> p</span> <span class="token punctuation">></span></span><span class="token tag"><span class="token tag"><span class="token punctuation"><</span> h3</span> <span class="token punctuation">></span></span> {{ tx_hash }} <span class="token tag"><span class="token tag"><span class="token punctuation"></</span> h3</span> <span class="token punctuation">></span></span><span class="token tag"><span class="token tag"><span class="token punctuation"></</span> div</span> <span class="token punctuation">></span></span><span class="token tag"><span class="token tag"><span class="token punctuation"><</span> div</span> <span class="token attr-name">id</span> <span class="token attr-value"><span class="token punctuation">=</span> <span class="token punctuation">"</span> form_right <span class="token punctuation">"</span></span> <span class="token punctuation">></span></span><span class="token tag"><span class="token tag"><span class="token punctuation"><</span> h1</span> <span class="token punctuation">></span></span> Page Send <span class="token tag"><span class="token tag"><span class="token punctuation"></</span> h1</span> <span class="token punctuation">></span></span><span class="token tag"><span class="token tag"><span class="token punctuation"><</span> div</span> <span class="token attr-name">class</span> <span class="token attr-value"><span class="token punctuation">=</span> <span class="token punctuation">"</span> input_container <span class="token punctuation">"</span></span> <span class="token punctuation">></span></span><span class="token tag"><span class="token tag"><span class="token punctuation"><</span> p</span> <span class="token punctuation">></span></span> {{address_des}} <span class="token tag"><span class="token tag"><span class="token punctuation"></</span> p</span> <span class="token punctuation">></span></span><span class="token tag"><span class="token tag"><span class="token punctuation"></</span> div</span> <span class="token punctuation">></span></span><span class="token tag"><span class="token tag"><span class="token punctuation"><</span> div</span> <span class="token attr-name">class</span> <span class="token attr-value"><span class="token punctuation">=</span> <span class="token punctuation">"</span> input_container <span class="token punctuation">"</span></span> <span class="token punctuation">></span></span><span class="token tag"><span class="token tag"><span class="token punctuation"><</span> p</span> <span class="token punctuation">></span></span> Value: {{value}} ETH <span class="token tag"><span class="token tag"><span class="token punctuation"></</span> p</span> <span class="token punctuation">></span></span><span class="token tag"><span class="token tag"><span class="token punctuation"></</span> div</span> <span class="token punctuation">></span></span><span class="token tag"><span class="token tag"><span class="token punctuation"><</span> a</span> <span class="token attr-name">id</span> <span class="token attr-value"><span class="token punctuation">=</span> <span class="token punctuation">'</span> input_submit <span class="token punctuation">'</span></span> <span class="token attr-name">class</span> <span class="token attr-value"><span class="token punctuation">=</span> <span class="token punctuation">'</span> input_field <span class="token punctuation">'</span></span> <span class="token attr-name">href</span> <span class="token attr-value"><span class="token punctuation">=</span> <span class="token punctuation">"</span> / <span class="token punctuation">"</span></span> <span class="token punctuation">></span></span> Back Home <span class="token tag"><span class="token tag"><span class="token punctuation"></</span> a</span> <span class="token punctuation">></span></span><span class="token tag"><span class="token tag"><span class="token punctuation"></</span> div</span> <span class="token punctuation">></span></span><span class="token tag"><span class="token tag"><span class="token punctuation"></</span> div</span> <span class="token punctuation">></span></span><span class="token tag"><span class="token tag"><span class="token punctuation"></</span> body</span> <span class="token punctuation">></span></span><span class="token tag"><span class="token tag"><span class="token punctuation"></</span> html</span> <span class="token punctuation">></span></span>
See which result
- First enter the
indexpage to enter the information
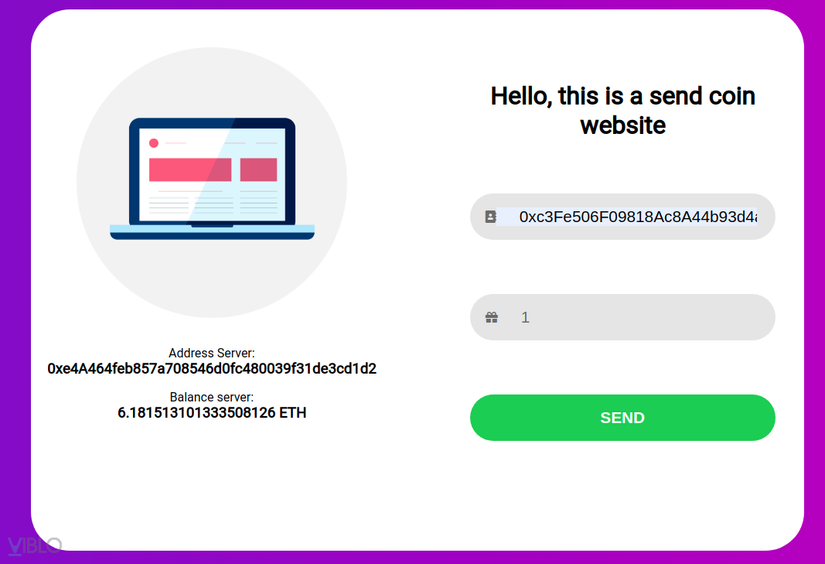
- And check both on the first image metamark server and balance address, the next image will be the send and balance addresses

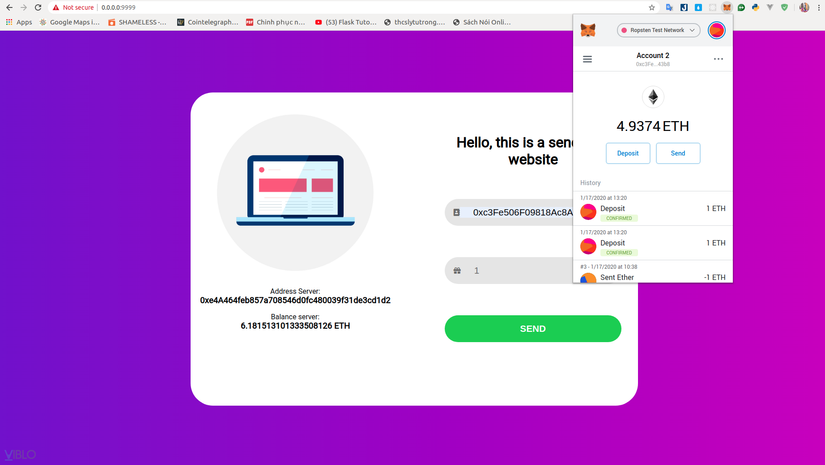
- Then send now to see if this ETH is delivered to the destination address or not
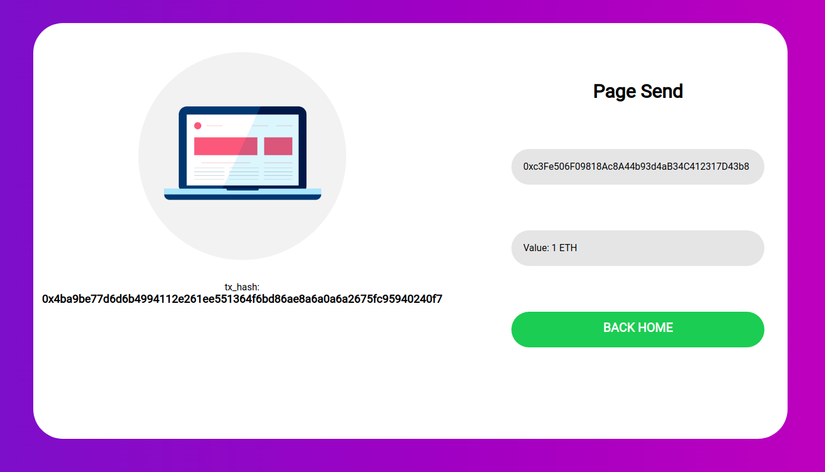
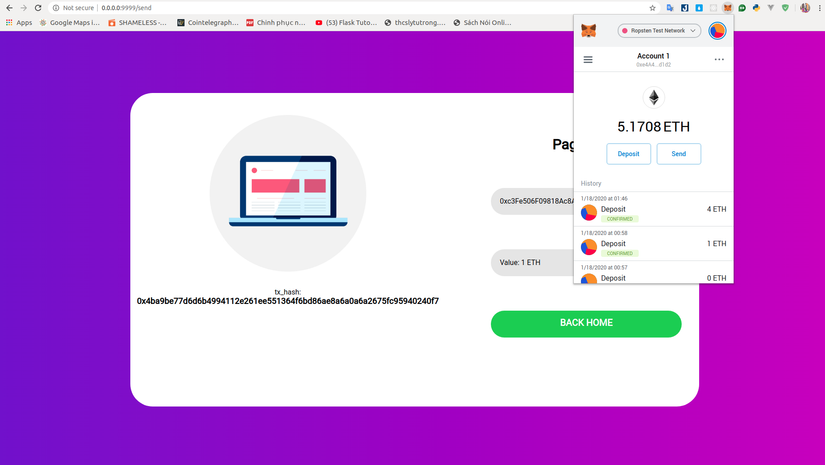
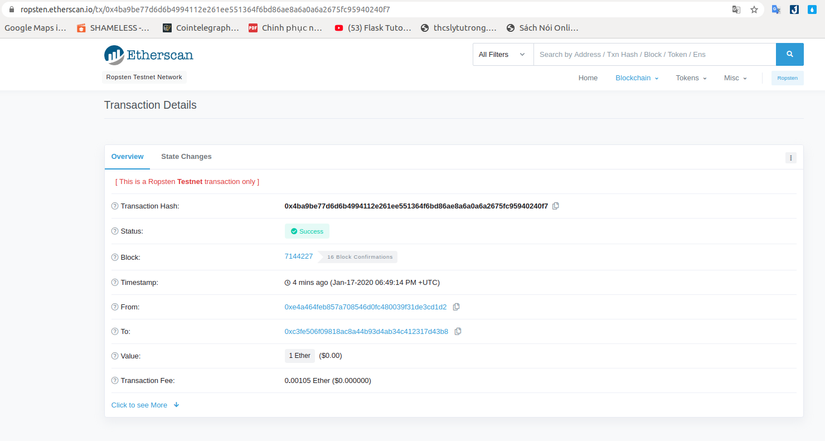
- The hash has been returned and we can get this hash to ropsten to check. But because the transaction needs to be confirmed, it takes a long time to check the transaction information. The simplest way is to check that the balance in the metamark account has changed as we can check the transaction
Conclude
So we have a framework for building dapp blockchain with python, hope that this article can help you in building dapp blockchain with python
Because Python is a server-side language, it is not like client languages that may interact directly with the browser to connect to the metamark. So I had to use this method to connect and sign transactions with the private key on the server itself
This is the complete source code for this article and I have also added a few other functions to be suitable for development: Repo Github