I. INTRODUCTION
Hello everyone, in this sharing I would like to introduce the basic input and output (input, output) in the C # programming language. First, let’s go through a few lines of introduction to what C # is.
- C # (pronounced “C sharp” or “C sharp” (“wax”)) is a pure object oriented programming language developed by Microsoft.
- C # was born in 2000, designed mainly by Anders Hejlsberg – famous software architect for Turbo Pascal, Delphi, products. . .
- Built on the foundation of 2 most powerful programming languages that are C ++ and Java . Hence C # is described as a language that has a balance between C ++, Visual Basic, Delphi and Java.
- C # with the powerful support of .NET Framework helps to create a Windows Forms application or WPF (Windows Presentation Foundation),. . . becomes very easy.
In most programming languages, when we first approach the first thing we are concerned with is how to enter data from the keyboard and how to output data to the screen. So what is the structure of these I / O commands and how are they used?
We will explore this in today’s lesson – BASIC EXPORT STRUCTURE IN C # .
II. CONTENT
In this lesson, we will explore the following issues:
- Basic structure of I / O commands and what they mean in C #.
- Example of C # import and export program.
1. Basic structure of I / O commands and what they mean in C #
In C # there are 5 commands used to enter and output that are:
1 2 3 4 5 6 7 8 9 10 | Console.Write(); Console.WriteLine(); Console.Read(); Console.ReadLine(); Console.ReadKey(); |
Now we will look at the above commands in turn:
a. Console.Write ();
Syntax:
Console.Write (<value to print to the screen>);
Meaning:
Print the value to the console screen. This value can be 1 character, 1 string, a value can be converted to string type (This issue will be detailed in the next monthly reports).
For example:
You create a new Project Console Application:
- File> New ..> Project ..
- Navigate to the C # project and select Console Application.
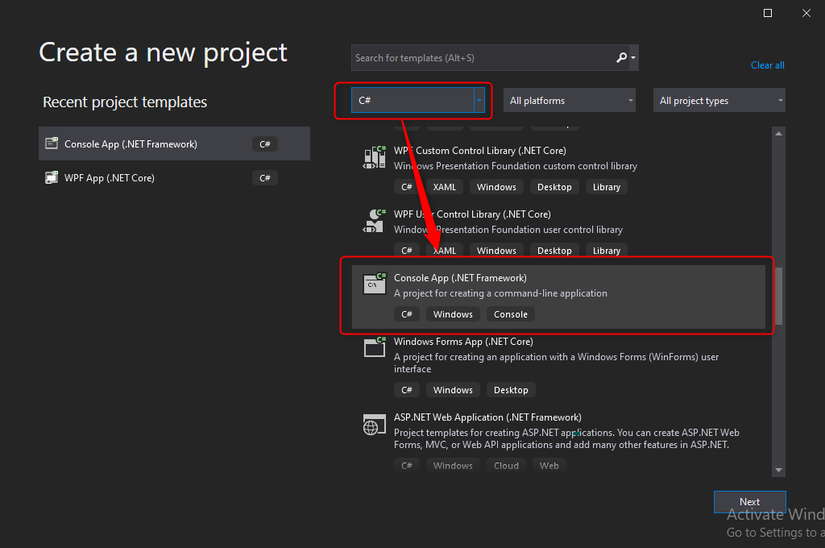
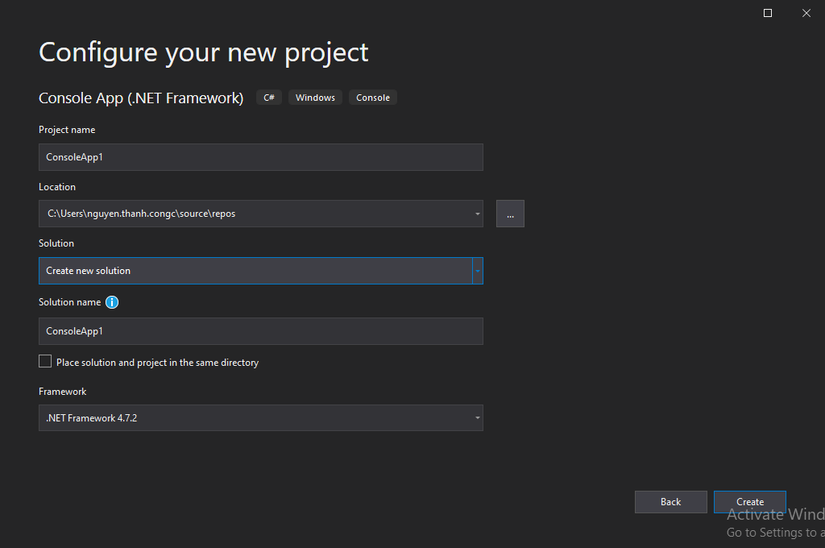
- Then enter all the basic information of the Project into the Configution your new project form.
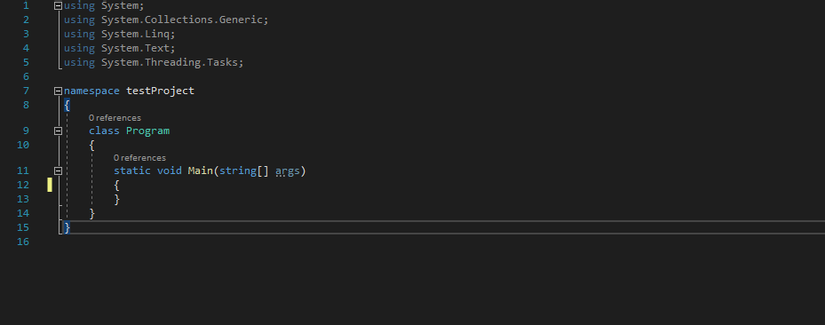
After creating the Console Application project, we receive the following code:
Then, you try the following command:
1 2 3 4 5 6 7 8 9 10 11 12 13 14 15 | static void Main(string[] args) { // In ra màn hình dòng chữ Hello chi Ly Console.Write("Hello chi Ly"); // In ra màn hình số 10 Console.Write(10); // In ra màn hình số 10.9 (f biểu thị cho kiểu dữ liệu float sẽ được trình bày chi tiết ở các bài sau) Console.Write(10.9f); // In ra màn hình chữ true của kiểu dữ liệu bool(sẽ được trình bày chi tiết ở các bài sau) Console.Write(true); } |
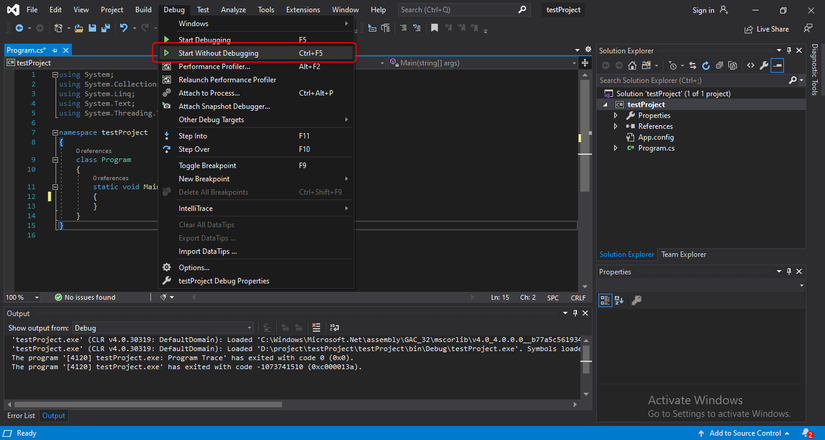
Running the program, we see the console screen has just appeared turned off. So how do I see the results?
To solve this problem we have many ways:
- Use the help of a programming assistant (here is Visual Studio):
- We execute the program by going to Debug> Start Without Debugging.
- Keyboard shortcut Ctrl + F5.
Use this tip to solve:
- The idea: we will use a command that tells the program to stop waiting for us to press any key to finish like that before we press any key, we can observe the results on the screen. console screen.
- The command to do this:
1 2 3 4 | Console.Read(); Console.ReadLine(); Console.ReadKey(); |
We just need to add 1 of the above 3 commands to the end of the program. The meanings of the above 3 commands will be explained in detail later in this lesson.
Finally we get the results:
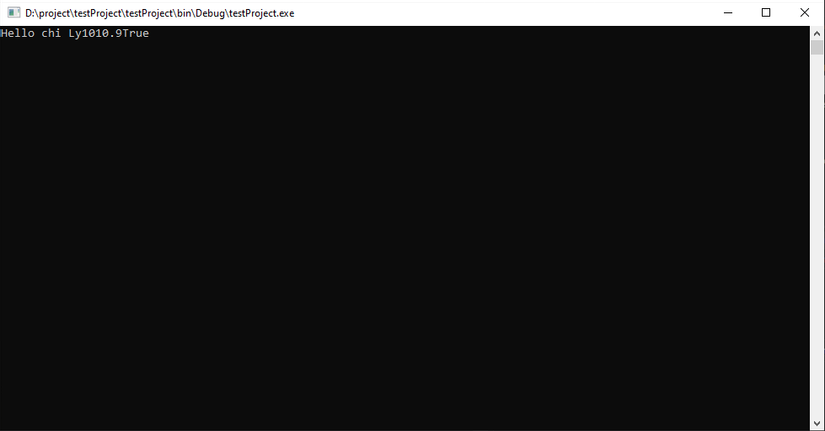
It seems that the print result is not what we expected. The problem now is “what if we want to print each value on one line? “To answer this question we go through the next section.
b. Console.WriteLine ();
Syntax:
Console.WriteLine (<value to print to the screen>);
Meaning:
This command is similar to Console.Write ().
But it will be different when the value is printed to the screen, it will automatically put the cursor down the line. This helps us to solve the problem posed above.
In addition, to break the line we have many other ways such as:
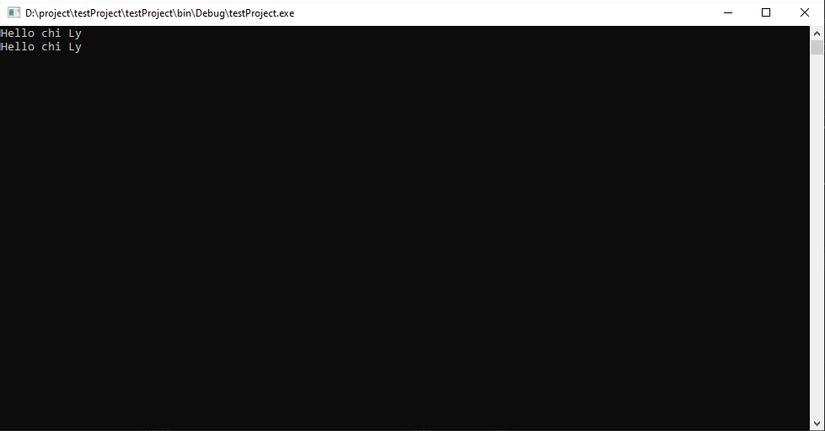
- Use special characters: we use the character ” n ” in the string printed to the screen, the compiler will automatically change it to a carriage return.
- So instead of using Console.WriteLine (“Hello chi Ly”) we can use Console.Write (“Hello chi Ly n “)
- Special characters are introduced later in the lesson.
- Use the line break command: we use an additional line break command:
1 2 | Environment.NewLine |
So instead of using the two above methods, we will write an additional line of code:
1 2 | Console.Write(Environment.NewLine); |
This method is quite wordy compared to the two methods above and very few people use it. Mostly when we use the new line we use Console.WriteLine () or ” n ”
For example:
1 2 3 4 5 6 7 8 | Console.Write("Hello chi Ly n"); // Sử dụng ký tự đặc biệt để xuống dòng Console.WriteLine(5); // Sử dụng lệnh in ra màn hình có xuống dòng Console.Write(6.5f); // In ra giá trị nhưng không xuống dòng Console.Write(Environment.NewLine); // sử dụng lệnh xuống dòng Console.Write(true); Console.ReadLine(); |

So we have learned through 2 output commands to the screen. The basic difference between the two commands is:
- Console.Write (<value to print to the screen>): prints the value to the screen but does not put the cursor down the line.
- Console.WriteLine (<value to print to the screen>): print the value to the screen and put the cursor down the line.
Note : The value printed to the screen can be cumulative and the value of the variable can be printed (the concept and meaning of the variable will be detailed in the following articles).
c. Accumulate string printed to the screen
Instead we write:
1 2 3 4 5 6 | int a = 5; // khai báo biến kiểu nguyên có tên là a và khởi tạo giá trị là 5. Console.Write("a = "); // In ra màn hình giá trị "a = ". Console.Write(a); // In ra giá trị của a là 5 // Kết quả màn hình là: a = 5 |
Then we can write down as Console.Write (“a =” + a); still print a = 5 screen.
So for the short, intuitive program, we can add so directly instead of writing many lines of Console.Write () .
d. Print out the value of the variable
Cumulative is a way of printing a variable’s value.
In addition, we can also specify the position to print the value of the variable in the string with the syntax {<count>} .
For example:
1 2 3 | int a = 5; // khai báo biến kiểu nguyên có tên là a và khởi tạo giá trị là 5. Console.Write("a = {0}", a); // In ra màn hình giá trị "a = 5". |
General syntax:
Console.Write (“{0} {1} {2} {…}”, <value 0>, <value 1>, <value 2>, <value n>);
Inside:
<value 0> will be filled in similar zeros for the remaining values. With the above 2 ways, we can manipulate transforms to make the code more neat and intuitive.
e. Console.Read ();
Syntax:
Console.Read ();
Meaning:
Reading 1 character from the keyboard and returning the integer type (which will be detailed in the following articles) is the ASCII (American Standard Code for Information Interchange), which is the character set and character encoding is based on the Latin alphabet used in modern English and other Western European languages) of the character.
Note : this command cannot read function keys such as Ctrl, Shift, Alt, Caps Lock, Tab,. . .
For example:
To make sure that the computer can read the character we pressed or not, we will try to write a program that reads 1 character and prints that character on the screen as follows:
1 2 3 4 5 6 | static void Main(string[] args) { Console.WriteLine(Console.Read()); // đọc 1 ký tự từ bàn phím bằng lệnh Console.Read() sau đó in ra ký tự vừa đọc được. Console.ReadKey(); // lệnh này dùng với mục đích dừng màn hình để xem kết quả. } |
The results when running the program we get:

As explained the Console.Read () command is used to read 1 character and return an integer that is the ASCII code of that character, so when we enter a, the screen will print 97 (the ASCII code of character a ).
f. Console.ReadLine ();
Syntax:
Console.ReadLine ();
Meaning:
Reading data from the keyboard until you encounter a carriage return will stop (In other words, read until you press enter, then stop) and the read value is always a string.
For example:
1 2 3 4 5 6 | static void Main(string[] args) { Console.WriteLine(Console.ReadLine()); // đọc dữ liệu từ bàn phím cho đến khi gặp ký tự xuống dòng thì dừng. Sau đó in giá trị đã nhập ra màn hình. Console.ReadKey(); // lệnh này dùng với mục đích dừng màn hình để xem kết quả. } |
Results when running the program:
The screen has 2 words “Hello chi Ly” because the first word entered by the user from the keyboard, the second word is printed by the computer with the command Console.WriteLine ()
g. Console.ReadKey ();
Syntax:
Console.ReadKey (<bool type parameter>)
Meaning:
- This command is also used to read a character from the keyboard but returns the ConsoleKeyInfo type (which is a predefined structured data type that holds the keyboard characters including the function keys).
- The bool type parameter includes two values: true or false . If passed to true , the pressed key will not be displayed on the console screen, but read in the background , the pressed key will be displayed on the console screen ( bool type will be detailed in the following articles). If you don’t pass the parameter, the default is false .
The application of this command is very powerful, but for the purposes of today’s lesson we are only looking at the basic syntax and meaning. In the future lessons will explain in detail when encountering the above command. So the example I just present illustrates for passing parameters for you to understand first.
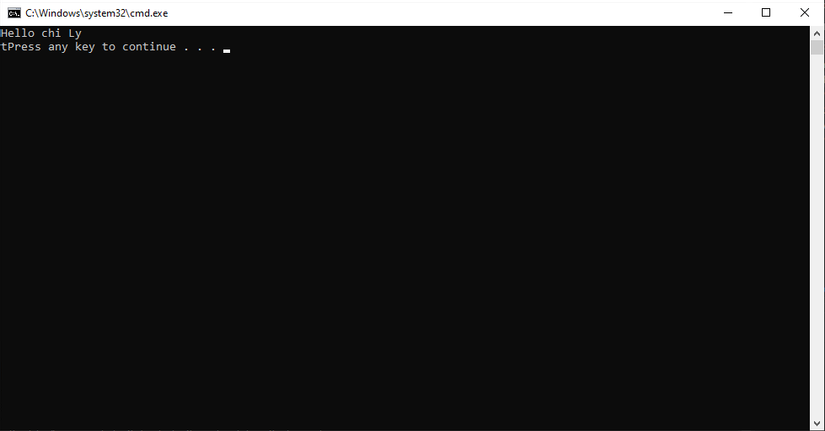
1 2 3 4 5 6 7 8 9 | static void Main(string[] args) { Console.WriteLine("Hello chi Ly"); Console.ReadKey(); // không truyền tham số vào thì mặc định là false. Console.ReadKey(false); // hiển thị phím ấn lên màn hình. Console.ReadKey(true); // Không hiển thị phím ấn lên màn hình. } |
You run the program by pressing Ctrl + F5. The results when running we are:
2. Basic C # import and export program example
To understand more about the import and export commands, let’s take a look at the following example:
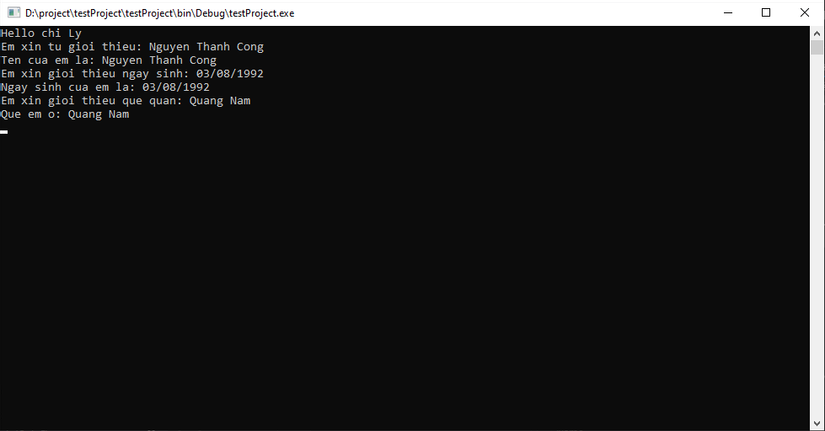
1 2 3 4 5 6 7 8 9 10 11 12 13 | static void Main(string[] args) { Console.WriteLine("Hello chi Ly"); // In chữ "Hello chi Ly" sau đó xuống dòng. Console.Write("Em xin tu gioi thieu: "); // In không xuống dòng. Console.WriteLine("Ten cua em la: " + Console.ReadLine()); // Quy tắc chung trong thực hiện lệnh là lệnh bên trong thực hiện trước rồi đến lệnh bên ngoài chứa nó. Do đó chạy đến đây chương trình sẽ thực hiện lệnh Console.ReadLine() sau đó thực hiện cộng chuỗi và cuối cùng in chuỗi ra màn hình. Console.Write("Em xin gioi thieu ngay sinh: "); Console.WriteLine("Ngay sinh cua em la: " + Console.ReadLine()); // Tương tự như trên Console.Write("Em xin gioi thieu que quan: "); Console.WriteLine("Que em o: " + Console.ReadLine()); // Tương tự như trên. Console.ReadKey(); } |
The results when running the above program are:
II. Reinforcement exercises
- Write a program that allows the user to enter his or her name and display the sentence: Hello Viblo <Name entered>.
- Write a program to enter the following information:
- Name
- Year old
- Address Output to the screen in the format: You name <Name>, <Age> age, in <Address>
Solve and post your solution in the comments below for everyone to see!
III. Conclude
Lesson content helps you to grasp:
- I / O commands in C # Console.
- Understand the syntax and meaning of each command.
- Write a program to execute I / O commands and run a test.
In the following lessons we will learn the concept and details of VARIABLES IN C #
Thank you for watching the article. Please leave your comments or suggestions for better article development. Don’t forget to do reinforcement exercises.