Source: https://www.raywenderlich.com/6236502-avfoundation-tutorial-adding-overlays-and-animations-to-videos
Please download the source code document at the original link before starting!
In this tutorial, you’ll learn how to add overlays and animations to videos, using AVVideoComposition CoreAnimationTool, which will allow you to combine CALayers with videos to add background and overlay.
If you are making a camera app, it is very beneficial to add overlay and animation to the video. If you add a date, an address, a weather, or just a funny GIF, users will find it more interesting to be able to edit their videos.
You can do that with AVFoundation, Apple’s framework for manipulating audio and video content. You can think of AVFoundation as a video and audio editing program, which allows you to combine video and audio clips and add vivid overlays on it.
In this tutorial you will learn: ◾️Add frames to videos ◾️Add text and photos to videos ◾️Add overlay effects ◾️Export videos that have effects added to files
Getting Started
Please download the project file at the original link to get started. This project is called Cubica, which means Custom Birthday Cards. You will create an app to record the video and add an overlay and border to edit it into a birthday card to send to friends.

Open project on Xcode. You can use a simulator or a device, but keep in mind that this tutorial requires video. Make sure to drag and drop videos from Mac into the simulator.
The project already has a screen where you can enter your friend’s name and choose a video to add an overlay. All are being processed in PickerViewController.swift .  Each time the user selects a video, the app sends it to VideoEditor.swift . Currently this file has only a few helper methods and methods called
 makeBirthdayCard(fromVideoAt:forName:onComplete:) . You will fix this method to add an overlay to the video.
When the app adds an overlay to the video, this method will call the completion handler and send the video URL to PlayerViewController.swift . This view controller will play videos and export them to your photo library.
I bet you can’t wait to send this video to your friend! :]
Composing a Video
Before you can add any overlay to the video, you will need to set up a few things. You will want to create a new video from an existing video, with background and overlay already added.
First of all, you will create a new AVFoundation composition. You can think of a composition as a video editor. This composition will hold different types of tracks such as audio and video tracks, and manage them as they begin or end on the video’s time line.
Once you create an empty composition, you will add two tracks to the composition, one for video and the other for audio. With the audio track, you simply copy the audio of the existing video. To create the video, you will use AVVideoCompositionCoreAnimationTool , a class for you to associate an existing video with the Core Animation layer.
Once you have both the combined video and the audio inside the composition, you’ll export the composition into a video file using AVAssetExportSession. Once you have both video and audio in the composition, you will export the composition into a video file using AVAssetExportSession .
Don’t worry, it’s not that hard! Your first step is to create the composition.
Creating a Composition
Open VideoEditor.swift . The main part of this sample project in makeBirthdayCard(fromVideoAt:forName:onComplete:) . Currently, this method simply calls the completion handler for the video that already exists. Replace the onComplete(videoURL) line onComplete(videoURL) with the following code:
1 2 3 | let asset = AVURLAsset(url: videoURL) let composition = AVMutableComposition() |
Create an AVAsset , which will hold all the necessary information and data about the video provided. Also create an empty composition. You will fill the composition with an overlayed video.
Next, add a track to the composition and capture the video track from the asset by adding the following code:
1 2 3 4 5 6 7 8 9 10 | guard let compositionTrack = composition.addMutableTrack( withMediaType: .video, preferredTrackID: kCMPersistentTrackID_Invalid), let assetTrack = asset.tracks(withMediaType: .video).first else { print("Something is wrong with the asset.") onComplete(nil) return } |
You add a new video track by calling addMutableTrack with the media type .video . You may include a non-standard ID constant for the track ID if you do not use the ID later. You also get the video from the asset with .first , and just the video track in the asset. If you cannot do either of these things, print the error and call the completion handler with nil .
Now, add the following code at the end of the makeBirthdayCard(fromVideoAt:forName:onComplete:) function makeBirthdayCard(fromVideoAt:forName:onComplete:) to import the video track from the asset into the video track of the composition:
1 2 3 4 5 6 7 8 9 10 11 12 13 14 15 16 17 18 19 20 21 22 23 | do { // 1 let timeRange = CMTimeRange(start: .zero, duration: asset.duration) // 2 try compositionTrack.insertTimeRange(timeRange, of: assetTrack, at: .zero) // 3 if let audioAssetTrack = asset.tracks(withMediaType: .audio).first, let compositionAudioTrack = composition.addMutableTrack( withMediaType: .audio, preferredTrackID: kCMPersistentTrackID_Invalid) { try compositionAudioTrack.insertTimeRange( timeRange, of: audioAssetTrack, at: .zero) } } catch { // 4 print(error) onComplete(nil) return } |
This is what the code above will handle:
CMTimeRangespecifies the time range in video. In this case, you want to add the video from start to finish, so you create a range from 0 to the end of the video.- Once you have the time range, enter the entire video from the asset into the video track of the composition.
- If the asset also contains an audio track, do the same thing. First add an audio track to the composition then enter the audio of the asset into the track.
- If there is an error, print the error and call the completion handler with
nil.
Setting Up the Composition
Next, get the size and direction of your composition by adding the following code at the end of the method: compositionTrack.preferredTransform = assetTrack.preferredTransform let videoInfo = orientation (from: assetTrack.preferredTransform)
1 2 3 4 5 6 7 8 9 | let videoSize: CGSize if videoInfo.isPortrait { videoSize = CGSize( width: assetTrack.naturalSize.height, height: assetTrack.naturalSize.width) } else { videoSize = assetTrack.naturalSize } |
First of all, you need to make sure that the properties of the asset and composition exports are the same. The project included orientation(from:) , which returns the portrait or landscape orientation of the video. If the orientation is portrait, you will need to invert the width and height when checking the video size. If not, you can use the original size.
Now, you will create a new composition including video and audio from the original file. Next, you’ll set up the layer to make sure you can add background and overlay to the video in the composition.
Core Animation – The Star of the Show
 Your background and overlay will be both
 CALayers . CALayer is the main class of the framework called Core Animation.
Behind every view in your app is Core Animation , feedback for drawing and animate its content. Since CALayer is behind each view, everything that is drawn on the phone screen is a layer.
As the name suggests, you can paint layers below or above other layers, making it perfect for adding background or overlay on video. You take advantage of it in video with the convenient AVFoundation class called AVVideoCompositionCoreAnimationTool . This is like a bridge for composition and Core Animation, so you create a new video that allows you to apply CALayer to the video composition.
To get started, you will need 3 layers. One is the background, drawing behind the video. The second is the layer to draw the frame of the video. The third is an overlay layer above the video. 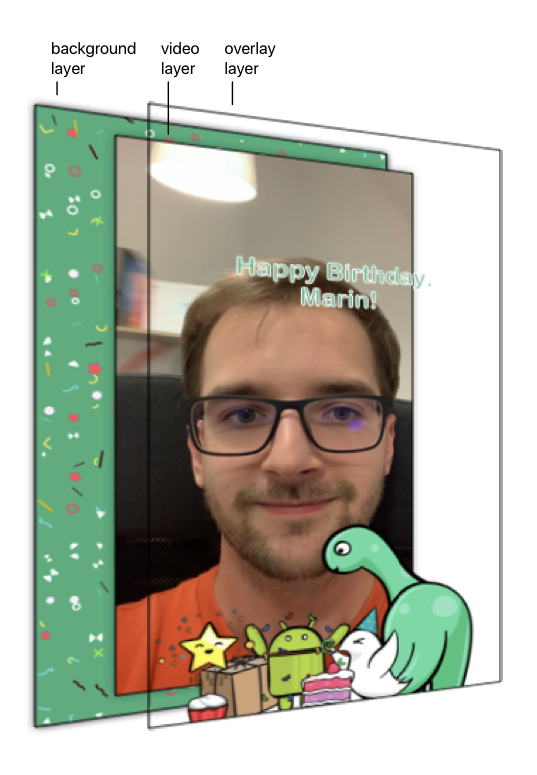
Layering the Cake
Create three layers by adding the following code at the end of makeBirthdayCard(fromVideoAt:forName:onComplete:) :
1 2 3 4 5 6 7 | let backgroundLayer = CALayer() backgroundLayer.frame = CGRect(origin: .zero, size: videoSize) let videoLayer = CALayer() videoLayer.frame = CGRect(origin: .zero, size: videoSize) let overlayLayer = CALayer() overlayLayer.frame = CGRect(origin: .zero, size: videoSize) |
Each layer will have the same frame, spanning the whole video.
Next, group all of these layers into one parent layer by adding the following:
1 2 3 4 5 6 | let outputLayer = CALayer() outputLayer.frame = CGRect(origin: .zero, size: videoSize) outputLayer.addSublayer(backgroundLayer) outputLayer.addSublayer(videoLayer) outputLayer.addSublayer(overlayLayer) |
Here, you create a new layer, which will be the layer of the resulting composition. First, add a background layer, then a video layer and finally, an overlay layer. That is the order of the layers. Here you will arrange the video behind the overlay layer and on the background layer.
Now, you will want to build a project to see the results. Unfortunately, no videos are shown!  You have setup the layers, but you still have to use AVFoundation to export videos from the above layers.
Exporting the Video
Now that you have all the layers, it’s time to use AVVideoCompositionCoreAnimationTool to combine them into one composition video cake!
Creating a Video Composition
Add the following methods:
1 2 3 4 5 6 7 | let videoComposition = AVMutableVideoComposition() videoComposition.renderSize = videoSize videoComposition.frameDuration = CMTime(value: 1, timescale: 30) videoComposition.animationTool = AVVideoCompositionCoreAnimationTool( postProcessingAsVideoLayer: videoLayer, in: outputLayer) |
First, you create a new AVMutableVideoComposition . The composition you created earlier is AVComposition , which will hold video, audio, and track types. On the other hand, you only use AVVideoComposition to compile many video tracks. In this case you only need one video track.
Next, you set the render size of the video to be equal to the size of the original video. frameDuration will determine how long it takes to reach the final frame. By transmitting CMTime a value of 1 and a timescale 30, you set the frame duration to 1/30 seconds, resulting in a video with a rate of 30 frames per second.
Finally add animation to the video using animation tool. This tool will merge overlay layer and video layer to create video.
Next, add the following code to add a video track to the video composition:
1 2 3 4 5 6 7 8 9 10 | let instruction = AVMutableVideoCompositionInstruction() instruction.timeRange = CMTimeRange( start: .zero, duration: composition.duration) videoComposition.instructions = [instruction] let layerInstruction = compositionLayerInstruction( for: compositionTrack, assetTrack: assetTrack) instruction.layerInstructions = [layerInstruction] |
Video composition uses a set of instructions to determine what shows on the video. In this case, you only need one instruction to assemble the video during the merge process.
Each tutorial can have its own layer guide to determine which layers of video tracks to be different. The original project set provided a handy method called compositionLayerInstruction which returns the correct instructions for the video. These instructions tell the video scale and rotate itself to fit the video size and direction. Without these instructions, the resulting video may be in the wrong direction or the wrong size.
Now you have the pieces you need: a composition containing all the original video and audio and a video composition that will render the video. You will combine these pieces into an export session.
Using an Export Session
Please watch part 2 ^^ “~