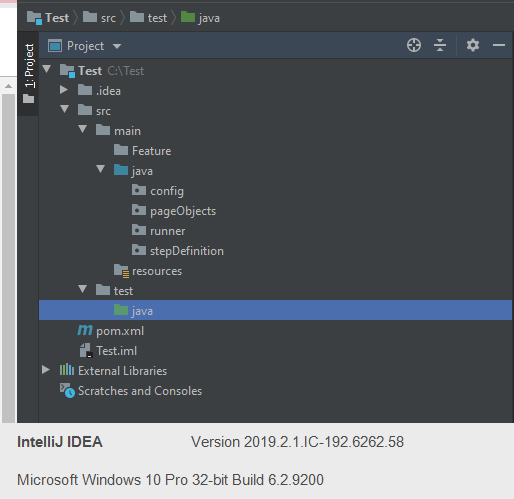
To deploy Cucumber, you need to create 4 packages to store files:
- Feature : to contain test cases written in Gherkin language.
- Page objects: to define the elements on the web / app.
- Step definition : Leave the scripts corresponding to the test case.
- Test runner : to run the script.
1. Scenes
Test with the function to log in to the system successfully, after logging in successfully displays the message: “WELCOME  “.
“.
Link website: http://testing-ground.scraping.pro/login , username / password: admin / 12345.
2. Write a scenario
Define the basic syntax in BDD:
Feature: A short description of the function.
Background: Allows adding some context to all Scenario in the feature. Contains a number of steps to be run before each Scenario Can be understood simply as a prerequisite for implementing all Scenario in the feature Declared later Keyword “Feature”.
Scenario : The keyword begins before each scenario, followed by the title of the scenario that will be executed. Each scenario consists of one or more steps.
Given : Describes the prerequisites for performing a Scenario.
When : Describes the main actions (Steps) that a user takes.
Then : Describe the desired output of Scenario.
And / But : Substitute Given / When / Then keywords to make the program more coherent.
Create a file ending in .feature (in Feature folder) to contain scenarios (scripts).
1 2 3 4 5 6 7 8 9 | Feature:Front site - Login function Scenario: Login successfully with valid front account Given User navigates to Login page of front site When User enters valid account at front site And User enters valid password at front site And User clicks on Login button at front site Then User login successfully into front site |
3. Create the test runner file
Create LoginTestRunner files (in directory runner), here her to run in files Login.feature path.
1 2 3 4 5 6 7 8 9 10 11 12 13 14 15 | package runner; import cucumber.api.CucumberOptions; import cucumber.api.junit.Cucumber; import org.junit.runner.RunWith; @RunWith(Cucumber.class) @CucumberOptions( features = "src/test/Feature/Login.feature" , glue = {"stepDefinition"} ) public class Login_TestRunner { } |
Inside
- @RunWith : is the test run class to start the implementation of the test.
- @CucumberOptions : to set some properties for Cucumber test such as: future file is run, ignores tagged senario, …
4. Make page objects
Create the LoginPage file (in the pageOjects directory) to contain the identifiers of the login page.
1 2 3 4 5 6 7 8 9 10 11 12 13 14 15 16 17 18 19 20 21 22 23 24 25 26 27 28 29 30 31 32 33 34 35 36 | package pageObjects; import org.openqa.selenium.By; import org.openqa.selenium.WebDriver; import org.openqa.selenium.WebElement; public class LoginPage { public static WebDriver driver; private static WebElement element; public LoginPage(WebDriver driver) { this.driver = driver; } public static WebElement ip_username() { element = driver.findElement(By.xpath("//input[@id='usr']")); return element; } public static WebElement ip_password() { element = driver.findElement(By.xpath("//input[@id='pwd']")); return element; } public static WebElement btn_login() { element = driver.findElement(By.xpath("//input[@type='submit']")); return element; } public static WebElement txt_successfully() { element = driver.findElement(By.xpath("//h3[@class='success']")); return element; } } |
5. Create a method to open / close the browser
The following example is to create a controller on Chrome, you can also create on any browser supported by Selenium.
First, you must download ChromeDriver here: https://chromedriver.chromium.org/downloads (the version of chomedriver must be less than or equal to the chrome version installed on the machine).
Next, create the BrowserFactory file
1 2 3 4 5 6 7 8 9 10 11 12 13 14 15 16 17 18 19 20 21 22 23 24 25 26 27 28 29 30 31 32 33 34 35 36 37 38 39 40 41 42 43 44 45 46 47 48 49 50 51 52 53 | package utils; import org.openqa.selenium.Dimension; import org.openqa.selenium.Point; import org.openqa.selenium.WebDriver; import org.openqa.selenium.chrome.ChromeDriver; import java.awt.*; import java.util.concurrent.TimeUnit; public class BrowserFactory { private static WebDriver currentDriver = null; //Get current web driver running public static WebDriver getCurrentDriver() { if (currentDriver == null) { currentDriver = BrowserFactory.createBrowser(); } return currentDriver; } // create new browser public static WebDriver createBrowser() { WebDriver driver; driver = createChromeDriver(); addAllBrowserSetup(driver); return driver; } //Add all browser setup private static void addAllBrowserSetup(WebDriver driver) { driver.manage().timeouts().implicitlyWait(15, TimeUnit.SECONDS); driver.manage().window().setPosition(new Point(0, 0)); java.awt.Dimension screenSize = Toolkit.getDefaultToolkit().getScreenSize(); Dimension dim = new Dimension((int) screenSize.getWidth(), (int) screenSize.getHeight()); driver.manage().window().setSize(dim); } private static WebDriver createChromeDriver() { System.setProperty("webdriver.chrome.driver", "src/main/config/chromedriver.exe"); return new ChromeDriver(); } // Close current browser public static void closeCurrentBrowser() { if (currentDriver != null) { currentDriver.quit(); } currentDriver = null; } } |
And the Hooks file (created in the Step definition folder) allows us to be able to perform certain tasks at a time of executing test cases as before starting a Scenario or after finishing a Scenario.
1 2 3 4 5 6 7 8 9 10 11 12 13 14 15 16 17 18 19 20 21 22 23 24 25 26 27 28 29 30 31 32 33 34 35 36 37 38 | import cucumber.api.Scenario; package stepDefinition; import utils.BrowserFactory; import cucumber.api.Scenario; import cucumber.api.java.After; import cucumber.api.java.Before; import org.apache.log4j.Logger; import org.openqa.selenium.WebDriver; import java.util.concurrent.TimeUnit; public class Hooks{ private static final Logger LOGGER = Logger.getLogger(Hooks.class); private static WebDriver driver; public static WebDriver getDriver() { return driver; } @Before public void BeforeScenario() { try { driver = BrowserFactory.getCurrentDriver(); driver.manage().window().maximize(); driver.manage().timeouts().implicitlyWait(20, TimeUnit.SECONDS); } catch (Exception ex) { LOGGER.error(ex.getMessage(), ex); } } @After public void AfterScenario(Scenario scenario) { BrowserFactory.closeCurrentBrowser(); } } |
And 1 TestBase file
1 2 3 4 5 6 7 8 9 10 11 12 | package utils; import org.openqa.selenium.WebDriver; import stepDefinition.Hooks; public class TestBase { public static WebDriver driver; public TestBase() { this.driver = Hooks.getDriver(); } } |
Note : File BrowserFactory and TestBase must be different from the folder with Hooks file.
6. Write scripts for each scenario
Create a LoginSteps file (in the Step definition folder).
1 2 3 4 5 6 7 8 9 10 11 12 13 14 15 16 17 18 19 20 21 22 23 24 25 26 27 28 29 30 31 32 33 34 35 36 37 38 39 40 41 42 43 | package stepDefinition; import cucumber.api.java.en.And; import cucumber.api.java.en.Given; import cucumber.api.java.en.Then; import org.junit.Assert; import pageObjects.LoginPage; import utils.TestBase; public class LoginSteps extends TestBase { public LoginSteps() { } LoginPage loginPage = new LoginPage(driver); @Given("^User navigates to Login page of front site$") public void userNavigatesToLoginPageOfFrontSite() { driver.get("http://testing-ground.scraping.pro/login"); } @And("^User enters valid account at front site$") public void userEntersValidAccountAtFrontSite() { loginPage.ip_username().sendKeys("admin"); } @And("^User enters valid password at front site$") public void userEntersValidPasswordAtFrontSite() { loginPage.ip_password().sendKeys("12345"); } @And("^User clicks on Login button at front site$") public void userClicksOnLoginButtonAtFrontSite() { loginPage.btn_login().click(); } @Then("^User login successfully into front site$") public void userLoginSuccessfullyIntoFrontSite() { String alertActual = loginPage.txt_successfully().getText(); Assert.assertEquals("WELCOME :)", alertActual); } } |
And finally, you go to the file testRuner to run the login function, when run successfully will display as shown below. 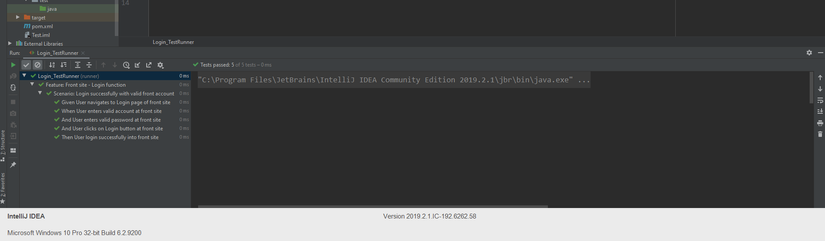
(continue)