Hello everyone, after a few theoretical lessons about NodeJS, let’s put it into practice today. And today we will take a step that I think is quite important in the process of building the API, which is Authenticate and Authorization. I will not talk much about these two concepts and why we have to, there have been many articles comparing these two concepts.
In this article, I will use:
- NodeJS
- Express
- MongoDB
Project creation
We will use the express generator to automatically create the app. You can go to the following page for more information: https://expressjs.com/en/starter/generator.html
Run the following command to install express-generator
1 2 | npm install -g express-generator |
Then run
1 2 | express |
to generate the code

You will see that there are a few folders you do not have because you created them yourself, which I will guide in the next section In the project directory, run
1 2 | npm install |
and run
1 2 | npm start |
to initialize the app. App will be run by default at port 3000. You can create a .env file to change the port or change the default port in binwwww . But the problem is that every time a file modification is made, it will take a lot of work to start again. So please install more nodemon to this action automatically. Details on how to install can be found here: https://www.npmjs.com/package/nodemon .
After you have successfully installed nodemon your package.json file, change start in the script to nodemon ./bin/www
1 2 3 4 | <span class="token string">"scripts"</span> <span class="token operator">:</span> <span class="token punctuation">{</span> <span class="token string">"start"</span> <span class="token operator">:</span> <span class="token string">"nodemon ./bin/www"</span> <span class="token punctuation">}</span> <span class="token punctuation">,</span> |
And now let’s start npm again, then try to change a file.
Create DB
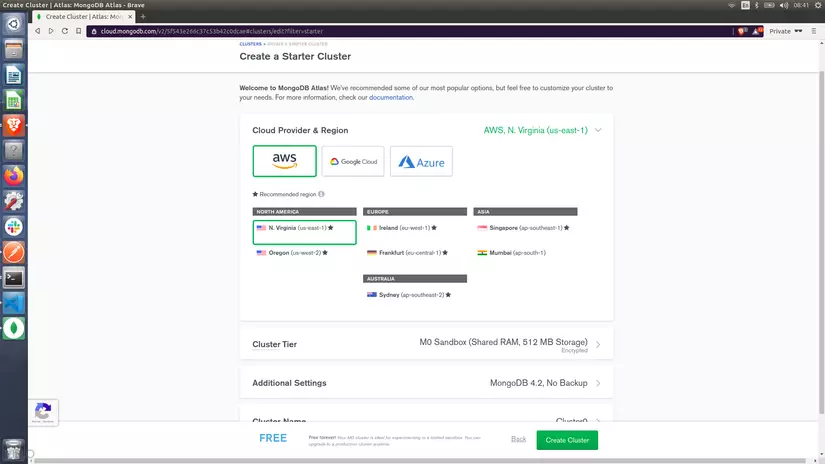
Why is mongoDB? Actually, because I have not worked with mongoDB, I want to find out it is plain and simple. Please visit the website https://www.mongodb.com/ , then sign in. After agreeing to the terms and choosing the free package (if you have money). Then go to the settings for sv, in this section you can choose the same level, server location, … Then click Create Cluster
Then there will be a small table with the following steps, complete all the steps, when clicking on each step will have specific instructions so I will not talk anymore.
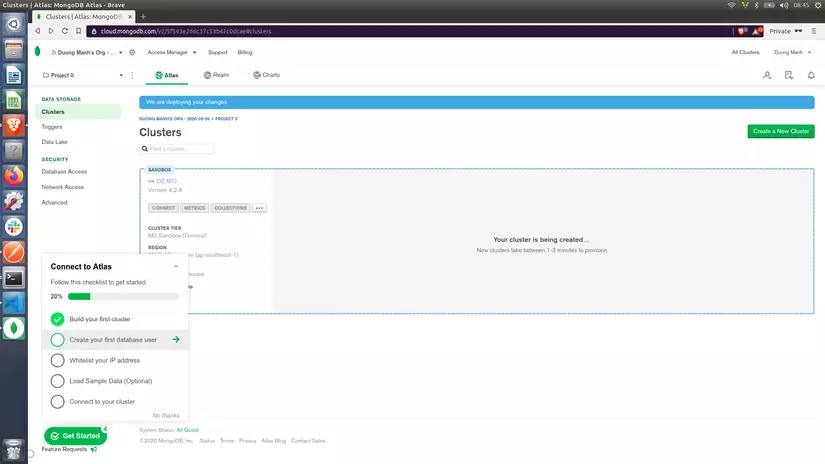
Details of each step are as follows, except for the first step with brick:
- Create a user for db (here you will create a user and authorize that user)
- Set whitelist for IP address (specify which IPs can access, you can also allow access from all IPs)
- Load sample data (this is okay or not, but I like to look at it 100% so I will do)
- Connect to your cluster (for this I will guide you in detail below).
There will be 3 options for you to choose from
- Connect to the mongo shell
- Connect with your app
- Connect using MongoDB Compass
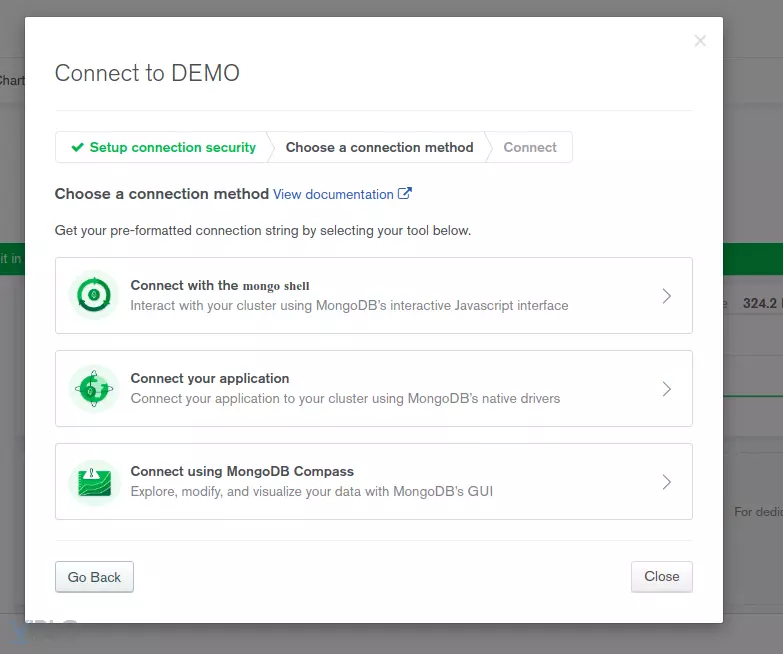
Here I will use number 2 and 3, number 2 for me to use in the project to connect, and number 3 as the interface for me to see (similar to how you use phpmyadmin, mysql workbench, …) . First, I will download mongoDB compass. Click on the 3rd option and download it and install it
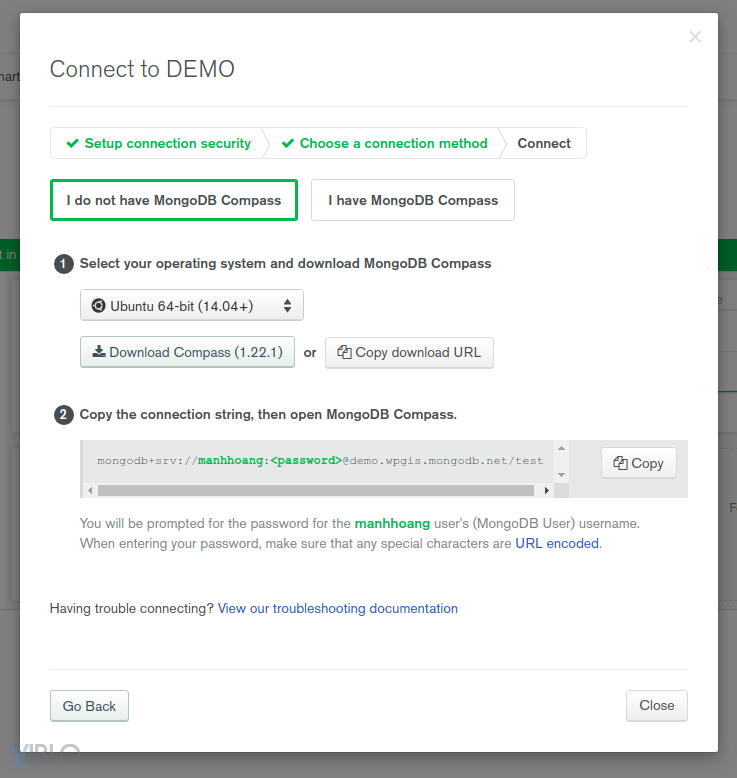
After the installation is complete, copy the paragraph in part 2, then replace the password with the password of the user you created and press connect in the MongoDB Compass app. 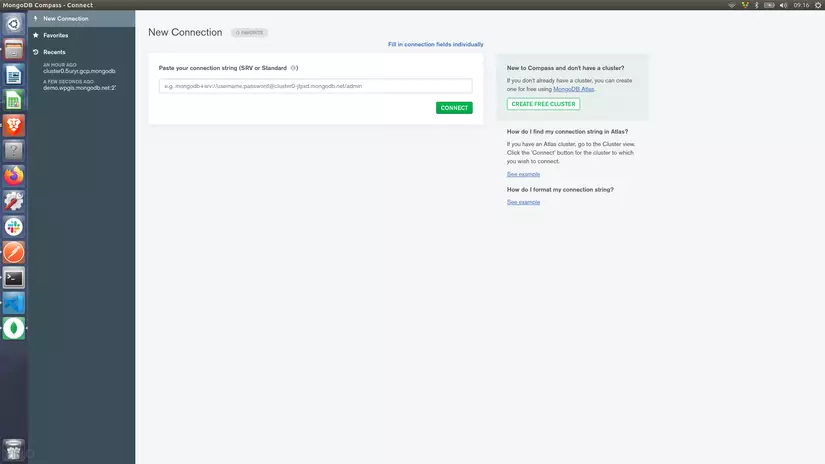
And this is the result. Since I have loaded sample data, I have quite a lot of db, and I have created more db as express to demo
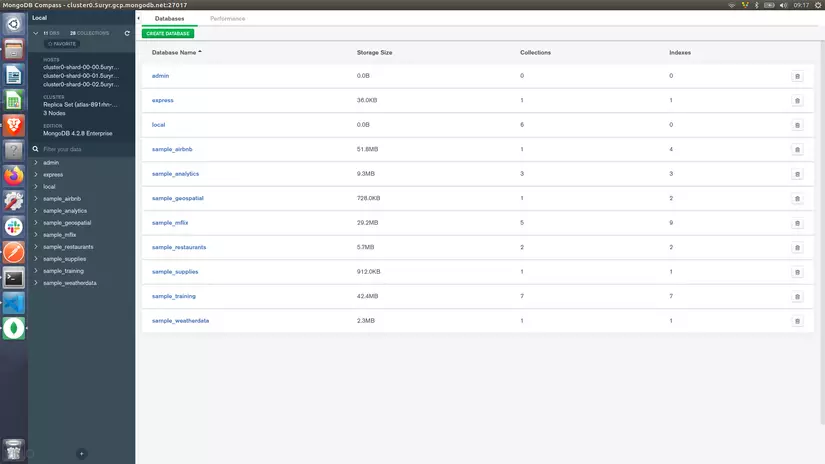
So we have created the DB
DB connection
Now to connect and manipulate the DB, we will use mongoose https://www.npmjs.com/package/mongoose .
First, create a .env file to save these settings, but cannot be saved directly in the code, because if you miss a public repo, it is no different from letting everyone connect to your db. me. Please re-visit mongodb’s website. Please click on the second option in the instructions above. If it’s turned off then you can press the connect button.
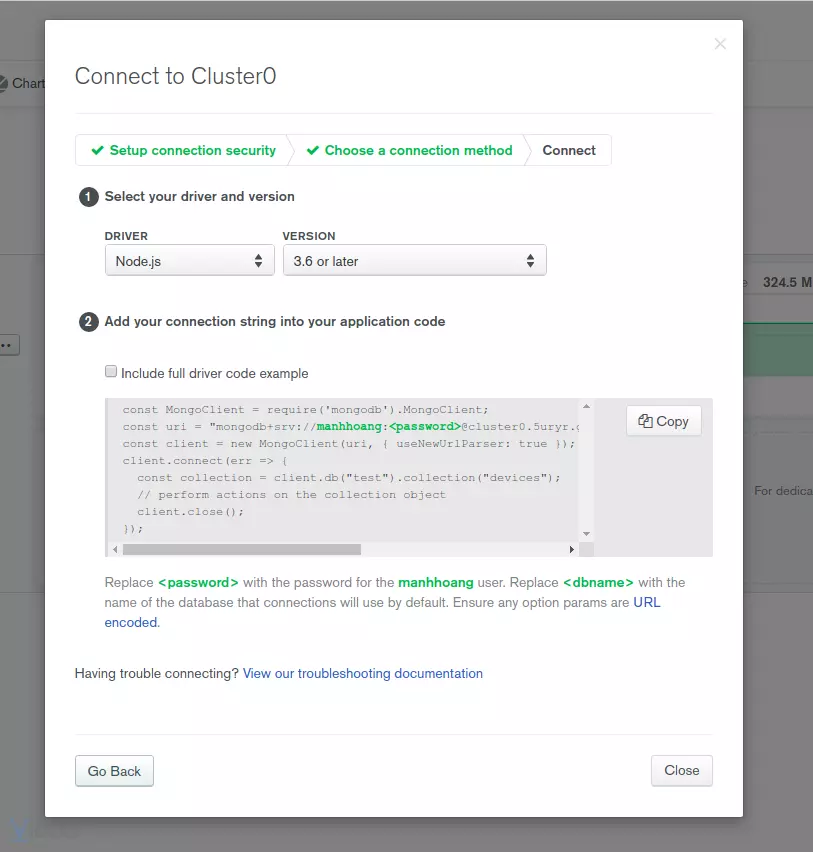
Now copy the value of const uri and paste it in .env remember to enter password and dbname
.env
1 2 | DB_CONNECT=mongodb+srv:..... |
It’s in the app.js file
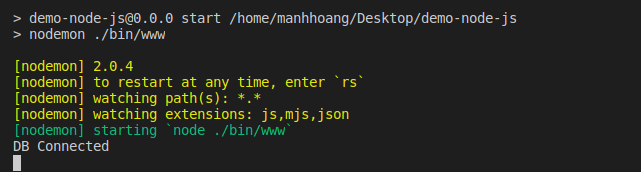
1 2 3 4 5 6 7 8 9 10 11 | <span class="token keyword">const</span> mongoose <span class="token operator">=</span> <span class="token function">require</span> <span class="token punctuation">(</span> <span class="token string">'mongoose'</span> <span class="token punctuation">)</span> <span class="token punctuation">;</span> <span class="token keyword">const</span> dotenv <span class="token operator">=</span> <span class="token function">require</span> <span class="token punctuation">(</span> <span class="token string">'dotenv'</span> <span class="token punctuation">)</span> <span class="token punctuation">;</span> dotenv <span class="token punctuation">.</span> <span class="token function">config</span> <span class="token punctuation">(</span> <span class="token punctuation">)</span> <span class="token punctuation">;</span> mongoose <span class="token punctuation">.</span> <span class="token function">connect</span> <span class="token punctuation">(</span> process <span class="token punctuation">.</span> env <span class="token punctuation">.</span> <span class="token constant">DB_CONNECT</span> <span class="token punctuation">,</span> <span class="token punctuation">{</span> useUnifiedTopology <span class="token operator">:</span> <span class="token boolean">true</span> <span class="token punctuation">,</span> useNewUrlParser <span class="token operator">:</span> <span class="token boolean">true</span> <span class="token punctuation">}</span> <span class="token punctuation">,</span> <span class="token punctuation">(</span> <span class="token punctuation">)</span> <span class="token operator">=></span> console <span class="token punctuation">.</span> <span class="token function">log</span> <span class="token punctuation">(</span> <span class="token string">'DB Connected'</span> <span class="token punctuation">)</span> <span class="token punctuation">)</span> <span class="token punctuation">;</span> |
Now pay attention in the terminal, where sv is running, if you see the line DB Connected , it is connected successfully.
Authenticate
Before authenticate we will have to have a user. So I will create an api to add users first. First let’s create a model
models/User.js :
1 2 3 4 5 6 7 8 9 10 11 12 13 14 15 16 17 18 19 20 21 22 23 24 25 | <span class="token keyword">const</span> mongoose <span class="token operator">=</span> <span class="token function">require</span> <span class="token punctuation">(</span> <span class="token string">'mongoose'</span> <span class="token punctuation">)</span> <span class="token punctuation">;</span> <span class="token keyword">const</span> userSchema <span class="token operator">=</span> <span class="token keyword">new</span> <span class="token class-name">mongoose <span class="token punctuation">.</span> Schema</span> <span class="token punctuation">(</span> <span class="token punctuation">{</span> name <span class="token operator">:</span> <span class="token punctuation">{</span> type <span class="token operator">:</span> String <span class="token punctuation">,</span> required <span class="token operator">:</span> <span class="token boolean">true</span> <span class="token punctuation">,</span> min <span class="token operator">:</span> <span class="token number">6</span> <span class="token punctuation">,</span> max <span class="token operator">:</span> <span class="token number">255</span> <span class="token punctuation">}</span> <span class="token punctuation">,</span> email <span class="token operator">:</span> <span class="token punctuation">{</span> type <span class="token operator">:</span> String <span class="token punctuation">,</span> required <span class="token operator">:</span> <span class="token boolean">true</span> <span class="token punctuation">,</span> min <span class="token operator">:</span> <span class="token number">6</span> <span class="token punctuation">,</span> max <span class="token operator">:</span> <span class="token number">225</span> <span class="token punctuation">}</span> <span class="token punctuation">,</span> password <span class="token operator">:</span> <span class="token punctuation">{</span> type <span class="token operator">:</span> String <span class="token punctuation">,</span> required <span class="token operator">:</span> <span class="token boolean">true</span> <span class="token punctuation">,</span> min <span class="token operator">:</span> <span class="token number">6</span> <span class="token punctuation">,</span> max <span class="token operator">:</span> <span class="token number">255</span> <span class="token punctuation">}</span> <span class="token punctuation">}</span> <span class="token punctuation">)</span> <span class="token punctuation">;</span> module <span class="token punctuation">.</span> exports <span class="token operator">=</span> mongoose <span class="token punctuation">.</span> <span class="token function">model</span> <span class="token punctuation">(</span> <span class="token string">'User'</span> <span class="token punctuation">,</span> userSchema <span class="token punctuation">)</span> <span class="token punctuation">;</span> |
We initialize a schema and condition each key in it.
Because there are conditions, when there is a request to send, we will definitely have to validate, mongoose also supports validate, but I will not use it but will use a Joi package, You can learn more about this package, I will don’t go into detail
validations/auth.js :
1 2 3 4 5 6 7 8 9 10 11 12 13 14 | <span class="token keyword">const</span> Joi <span class="token operator">=</span> <span class="token function">require</span> <span class="token punctuation">(</span> <span class="token string">'joi'</span> <span class="token punctuation">)</span> <span class="token punctuation">;</span> <span class="token keyword">const</span> <span class="token function-variable function">registerValidator</span> <span class="token operator">=</span> <span class="token punctuation">(</span> <span class="token parameter">data</span> <span class="token punctuation">)</span> <span class="token operator">=></span> <span class="token punctuation">{</span> <span class="token keyword">const</span> rule <span class="token operator">=</span> Joi <span class="token punctuation">.</span> <span class="token function">object</span> <span class="token punctuation">(</span> <span class="token punctuation">{</span> name <span class="token operator">:</span> Joi <span class="token punctuation">.</span> <span class="token function">string</span> <span class="token punctuation">(</span> <span class="token punctuation">)</span> <span class="token punctuation">.</span> <span class="token function">min</span> <span class="token punctuation">(</span> <span class="token number">6</span> <span class="token punctuation">)</span> <span class="token punctuation">.</span> <span class="token function">max</span> <span class="token punctuation">(</span> <span class="token number">225</span> <span class="token punctuation">)</span> <span class="token punctuation">.</span> <span class="token function">required</span> <span class="token punctuation">(</span> <span class="token punctuation">)</span> <span class="token punctuation">,</span> email <span class="token operator">:</span> Joi <span class="token punctuation">.</span> <span class="token function">string</span> <span class="token punctuation">(</span> <span class="token punctuation">)</span> <span class="token punctuation">.</span> <span class="token function">min</span> <span class="token punctuation">(</span> <span class="token number">6</span> <span class="token punctuation">)</span> <span class="token punctuation">.</span> <span class="token function">max</span> <span class="token punctuation">(</span> <span class="token number">225</span> <span class="token punctuation">)</span> <span class="token punctuation">.</span> <span class="token function">required</span> <span class="token punctuation">(</span> <span class="token punctuation">)</span> <span class="token punctuation">.</span> <span class="token function">email</span> <span class="token punctuation">(</span> <span class="token punctuation">)</span> <span class="token punctuation">,</span> password <span class="token operator">:</span> Joi <span class="token punctuation">.</span> <span class="token function">string</span> <span class="token punctuation">(</span> <span class="token punctuation">)</span> <span class="token punctuation">.</span> <span class="token function">pattern</span> <span class="token punctuation">(</span> <span class="token keyword">new</span> <span class="token class-name">RegExp</span> <span class="token punctuation">(</span> <span class="token string">'^[a-zA-Z0-9]{6,20}$'</span> <span class="token punctuation">)</span> <span class="token punctuation">)</span> <span class="token punctuation">.</span> <span class="token function">required</span> <span class="token punctuation">(</span> <span class="token punctuation">)</span> <span class="token punctuation">,</span> <span class="token punctuation">}</span> <span class="token punctuation">)</span> <span class="token keyword">return</span> rule <span class="token punctuation">.</span> <span class="token function">validate</span> <span class="token punctuation">(</span> data <span class="token punctuation">)</span> <span class="token punctuation">;</span> <span class="token punctuation">}</span> module <span class="token punctuation">.</span> exports <span class="token punctuation">.</span> registerValidator <span class="token operator">=</span> registerValidator <span class="token punctuation">;</span> |
Create more routes/auth.js file
1 2 3 4 5 6 7 8 9 10 11 12 13 14 15 16 17 18 19 20 21 22 23 24 25 26 27 28 29 30 31 32 33 34 35 | <span class="token keyword">const</span> express <span class="token operator">=</span> <span class="token function">require</span> <span class="token punctuation">(</span> <span class="token string">'express'</span> <span class="token punctuation">)</span> <span class="token punctuation">;</span> <span class="token keyword">const</span> jwt <span class="token operator">=</span> <span class="token function">require</span> <span class="token punctuation">(</span> <span class="token string">'jsonwebtoken'</span> <span class="token punctuation">)</span> <span class="token punctuation">;</span> <span class="token keyword">const</span> bcrypt <span class="token operator">=</span> <span class="token function">require</span> <span class="token punctuation">(</span> <span class="token string">'bcryptjs'</span> <span class="token punctuation">)</span> <span class="token punctuation">;</span> <span class="token keyword">const</span> router <span class="token operator">=</span> express <span class="token punctuation">.</span> <span class="token function">Router</span> <span class="token punctuation">(</span> <span class="token punctuation">)</span> <span class="token punctuation">;</span> <span class="token keyword">const</span> User <span class="token operator">=</span> <span class="token function">require</span> <span class="token punctuation">(</span> <span class="token string">'./../models/User'</span> <span class="token punctuation">)</span> <span class="token punctuation">;</span> <span class="token keyword">const</span> <span class="token punctuation">{</span> registerValidator <span class="token punctuation">}</span> <span class="token operator">=</span> <span class="token function">require</span> <span class="token punctuation">(</span> <span class="token string">'./../validations/auth'</span> <span class="token punctuation">)</span> <span class="token punctuation">;</span> router <span class="token punctuation">.</span> <span class="token function">post</span> <span class="token punctuation">(</span> <span class="token string">'/register'</span> <span class="token punctuation">,</span> <span class="token keyword">async</span> <span class="token punctuation">(</span> <span class="token parameter">request <span class="token punctuation">,</span> response</span> <span class="token punctuation">)</span> <span class="token operator">=></span> <span class="token punctuation">{</span> <span class="token keyword">const</span> <span class="token punctuation">{</span> error <span class="token punctuation">}</span> <span class="token operator">=</span> <span class="token function">registerValidator</span> <span class="token punctuation">(</span> request <span class="token punctuation">.</span> body <span class="token punctuation">)</span> <span class="token punctuation">;</span> <span class="token keyword">if</span> <span class="token punctuation">(</span> error <span class="token punctuation">)</span> <span class="token keyword">return</span> response <span class="token punctuation">.</span> <span class="token function">status</span> <span class="token punctuation">(</span> <span class="token number">422</span> <span class="token punctuation">)</span> <span class="token punctuation">.</span> <span class="token function">send</span> <span class="token punctuation">(</span> error <span class="token punctuation">.</span> details <span class="token punctuation">[</span> <span class="token number">0</span> <span class="token punctuation">]</span> <span class="token punctuation">.</span> message <span class="token punctuation">)</span> <span class="token punctuation">;</span> <span class="token keyword">const</span> checkEmailExist <span class="token operator">=</span> <span class="token keyword">await</span> User <span class="token punctuation">.</span> <span class="token function">findOne</span> <span class="token punctuation">(</span> <span class="token punctuation">{</span> email <span class="token operator">:</span> request <span class="token punctuation">.</span> body <span class="token punctuation">.</span> email <span class="token punctuation">}</span> <span class="token punctuation">)</span> <span class="token punctuation">;</span> <span class="token keyword">if</span> <span class="token punctuation">(</span> checkEmailExist <span class="token punctuation">)</span> <span class="token keyword">return</span> response <span class="token punctuation">.</span> <span class="token function">status</span> <span class="token punctuation">(</span> <span class="token number">422</span> <span class="token punctuation">)</span> <span class="token punctuation">.</span> <span class="token function">send</span> <span class="token punctuation">(</span> <span class="token string">'Email is exist'</span> <span class="token punctuation">)</span> <span class="token punctuation">;</span> <span class="token keyword">const</span> salt <span class="token operator">=</span> <span class="token keyword">await</span> bcrypt <span class="token punctuation">.</span> <span class="token function">genSalt</span> <span class="token punctuation">(</span> <span class="token number">10</span> <span class="token punctuation">)</span> <span class="token punctuation">;</span> <span class="token keyword">const</span> hashPassword <span class="token operator">=</span> <span class="token keyword">await</span> bcrypt <span class="token punctuation">.</span> <span class="token function">hash</span> <span class="token punctuation">(</span> request <span class="token punctuation">.</span> body <span class="token punctuation">.</span> password <span class="token punctuation">,</span> salt <span class="token punctuation">)</span> <span class="token punctuation">;</span> <span class="token keyword">const</span> user <span class="token operator">=</span> <span class="token keyword">new</span> <span class="token class-name">User</span> <span class="token punctuation">(</span> <span class="token punctuation">{</span> name <span class="token operator">:</span> request <span class="token punctuation">.</span> body <span class="token punctuation">.</span> name <span class="token punctuation">,</span> email <span class="token operator">:</span> request <span class="token punctuation">.</span> body <span class="token punctuation">.</span> email <span class="token punctuation">,</span> password <span class="token operator">:</span> hashPassword <span class="token punctuation">,</span> <span class="token punctuation">}</span> <span class="token punctuation">)</span> <span class="token punctuation">;</span> <span class="token keyword">try</span> <span class="token punctuation">{</span> <span class="token keyword">const</span> newUser <span class="token operator">=</span> <span class="token keyword">await</span> user <span class="token punctuation">.</span> <span class="token function">save</span> <span class="token punctuation">(</span> <span class="token punctuation">)</span> <span class="token punctuation">;</span> <span class="token keyword">await</span> response <span class="token punctuation">.</span> <span class="token function">send</span> <span class="token punctuation">(</span> newUser <span class="token punctuation">)</span> <span class="token punctuation">;</span> <span class="token punctuation">}</span> <span class="token keyword">catch</span> <span class="token punctuation">(</span> err <span class="token punctuation">)</span> <span class="token punctuation">{</span> response <span class="token punctuation">.</span> <span class="token function">status</span> <span class="token punctuation">(</span> <span class="token number">400</span> <span class="token punctuation">)</span> <span class="token punctuation">.</span> <span class="token function">send</span> <span class="token punctuation">(</span> err <span class="token punctuation">)</span> <span class="token punctuation">;</span> <span class="token punctuation">}</span> <span class="token punctuation">}</span> <span class="token punctuation">)</span> <span class="token punctuation">;</span> module <span class="token punctuation">.</span> exports <span class="token operator">=</span> router <span class="token punctuation">;</span> |
And to use it, in app.js will add the following:
1 2 | app <span class="token punctuation">.</span> <span class="token function">use</span> <span class="token punctuation">(</span> <span class="token string">'/api/auth'</span> <span class="token punctuation">,</span> authRouter <span class="token punctuation">)</span> <span class="token punctuation">;</span> |
For a little explanation, at first, if there is an error, I will return 402 and its message. You can make the console.log error clear, or you can log the registerValidator(request.body) to see all the returns. To be able to use it in postman you use
1 2 | return response.send(registerValidator(request.body)); |
to make it easier to see. Now try to open the postman and create test accounts that don’t match the validation rules
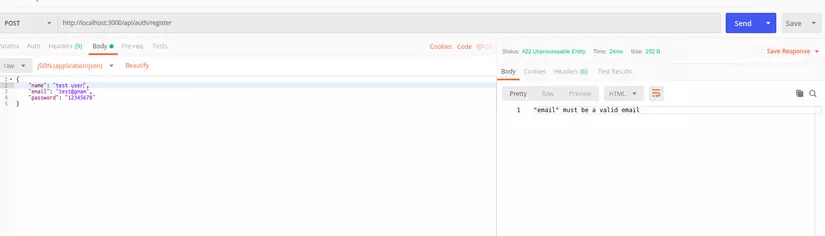
As you can see the email has been reported in the wrong format. Returning to any code, then you can see that I will check if the email exists, this is of course because I do not want to exist 2 identical emails in my system. Next, I have encrypted password, the lib I use is bcryptjs . Finally, save the user and send that information up.
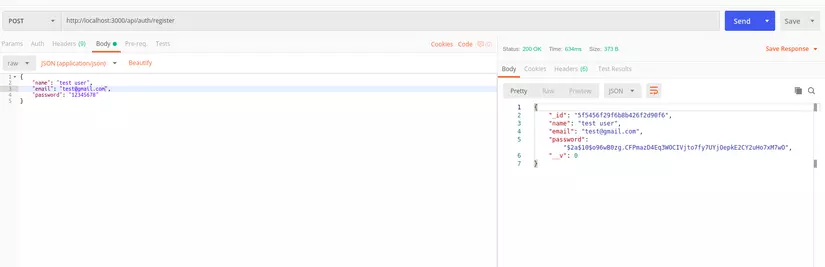
So we have successfully created the user
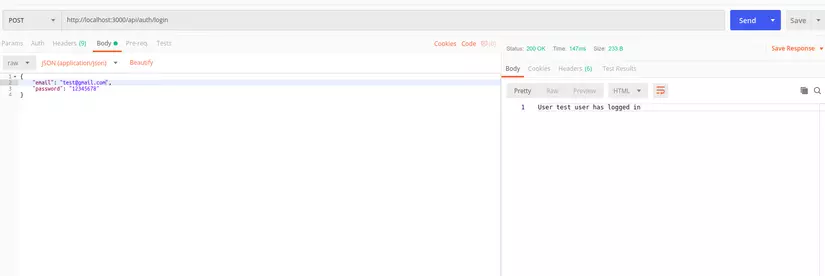
After we have an account, we have to log into the system, right
Return to routes/auth.js file
1 2 3 4 5 6 7 8 9 10 11 | router <span class="token punctuation">.</span> <span class="token function">post</span> <span class="token punctuation">(</span> <span class="token string">'/login'</span> <span class="token punctuation">,</span> <span class="token keyword">async</span> <span class="token punctuation">(</span> <span class="token parameter">request <span class="token punctuation">,</span> response</span> <span class="token punctuation">)</span> <span class="token operator">=></span> <span class="token punctuation">{</span> <span class="token keyword">const</span> user <span class="token operator">=</span> <span class="token keyword">await</span> User <span class="token punctuation">.</span> <span class="token function">findOne</span> <span class="token punctuation">(</span> <span class="token punctuation">{</span> email <span class="token operator">:</span> request <span class="token punctuation">.</span> body <span class="token punctuation">.</span> email <span class="token punctuation">}</span> <span class="token punctuation">)</span> <span class="token punctuation">;</span> <span class="token keyword">if</span> <span class="token punctuation">(</span> <span class="token operator">!</span> user <span class="token punctuation">)</span> <span class="token keyword">return</span> response <span class="token punctuation">.</span> <span class="token function">status</span> <span class="token punctuation">(</span> <span class="token number">422</span> <span class="token punctuation">)</span> <span class="token punctuation">.</span> <span class="token function">send</span> <span class="token punctuation">(</span> <span class="token string">'Email or Password is not correct'</span> <span class="token punctuation">)</span> <span class="token punctuation">;</span> <span class="token keyword">const</span> checkPassword <span class="token operator">=</span> <span class="token keyword">await</span> bcrypt <span class="token punctuation">.</span> <span class="token function">compare</span> <span class="token punctuation">(</span> request <span class="token punctuation">.</span> body <span class="token punctuation">.</span> password <span class="token punctuation">,</span> user <span class="token punctuation">.</span> password <span class="token punctuation">)</span> <span class="token punctuation">;</span> <span class="token keyword">if</span> <span class="token punctuation">(</span> <span class="token operator">!</span> checkPassword <span class="token punctuation">)</span> <span class="token keyword">return</span> response <span class="token punctuation">.</span> <span class="token function">status</span> <span class="token punctuation">(</span> <span class="token number">422</span> <span class="token punctuation">)</span> <span class="token punctuation">.</span> <span class="token function">send</span> <span class="token punctuation">(</span> <span class="token string">'Email or Password is not correct'</span> <span class="token punctuation">)</span> <span class="token punctuation">;</span> <span class="token keyword">return</span> response <span class="token punctuation">.</span> <span class="token function">send</span> <span class="token punctuation">(</span> <span class="token template-string"><span class="token template-punctuation string">`</span> <span class="token string">User </span> <span class="token interpolation"><span class="token interpolation-punctuation punctuation">${</span> user <span class="token punctuation">.</span> name <span class="token interpolation-punctuation punctuation">}</span></span> <span class="token string"> has logged in</span> <span class="token template-punctuation string">`</span></span> <span class="token punctuation">)</span> <span class="token punctuation">;</span> <span class="token punctuation">}</span> <span class="token punctuation">)</span> |
Now let’s create an api to get the users list
routes.users
1 2 3 4 5 6 7 8 9 10 11 12 | <span class="token keyword">const</span> express <span class="token operator">=</span> <span class="token function">require</span> <span class="token punctuation">(</span> <span class="token string">'express'</span> <span class="token punctuation">)</span> <span class="token punctuation">;</span> <span class="token keyword">const</span> User <span class="token operator">=</span> <span class="token function">require</span> <span class="token punctuation">(</span> <span class="token string">'./../models/User'</span> <span class="token punctuation">)</span> <span class="token punctuation">;</span> <span class="token keyword">const</span> router <span class="token operator">=</span> express <span class="token punctuation">.</span> <span class="token function">Router</span> <span class="token punctuation">(</span> <span class="token punctuation">)</span> <span class="token punctuation">;</span> router <span class="token punctuation">.</span> <span class="token function">get</span> <span class="token punctuation">(</span> <span class="token string">'/'</span> <span class="token punctuation">,</span> <span class="token punctuation">(</span> <span class="token parameter">request <span class="token punctuation">,</span> response</span> <span class="token punctuation">)</span> <span class="token operator">=></span> <span class="token punctuation">{</span> User <span class="token punctuation">.</span> <span class="token function">find</span> <span class="token punctuation">(</span> <span class="token punctuation">{</span> <span class="token punctuation">}</span> <span class="token punctuation">)</span> <span class="token punctuation">.</span> <span class="token function">exec</span> <span class="token punctuation">(</span> <span class="token keyword">function</span> <span class="token punctuation">(</span> <span class="token parameter">err <span class="token punctuation">,</span> users</span> <span class="token punctuation">)</span> <span class="token punctuation">{</span> response <span class="token punctuation">.</span> <span class="token function">send</span> <span class="token punctuation">(</span> users <span class="token punctuation">)</span> <span class="token punctuation">;</span> <span class="token punctuation">}</span> <span class="token punctuation">)</span> <span class="token punctuation">;</span> <span class="token punctuation">}</span> <span class="token punctuation">)</span> <span class="token punctuation">;</span> module <span class="token punctuation">.</span> exports <span class="token operator">=</span> router <span class="token punctuation">;</span> |
app.js
1 2 | app <span class="token punctuation">.</span> <span class="token function">use</span> <span class="token punctuation">(</span> <span class="token string">'/api/users'</span> <span class="token punctuation">,</span> userRouter <span class="token punctuation">)</span> <span class="token punctuation">;</span> |
And here is our users list
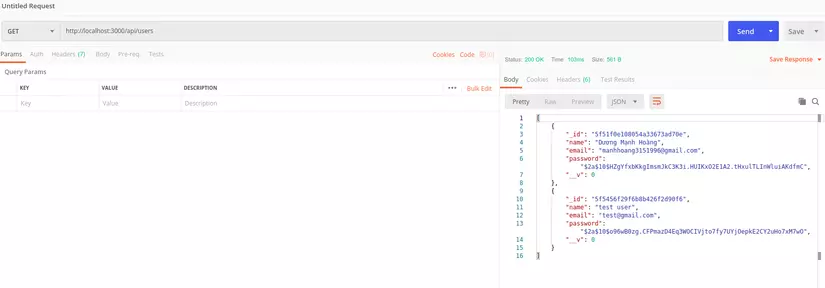
Wait, why can you use the api so easily, this is so wrong. And that’s why we’re coming to the next one
Authorization
Basically we will create an authentication token, each request that the user submits must be accompanied by that token, if the correct token, the user can call the api that we require to authenticate. And we will use JWT https://www.npmjs.com/package/jsonwebtoken .
In the first place to create tokens, each time a user logs in, we will create a token for that user. Now we will have to fix the login functionality a bit .env
1 2 | TOKEN_SECRET=somethingrandom |
routes/auth.js
1 2 3 4 5 6 7 8 9 10 11 12 13 14 | <span class="token keyword">const</span> jwt <span class="token operator">=</span> <span class="token function">require</span> <span class="token punctuation">(</span> <span class="token string">'jsonwebtoken'</span> <span class="token punctuation">)</span> <span class="token punctuation">;</span> router <span class="token punctuation">.</span> <span class="token function">post</span> <span class="token punctuation">(</span> <span class="token string">'/login'</span> <span class="token punctuation">,</span> <span class="token keyword">async</span> <span class="token punctuation">(</span> <span class="token parameter">request <span class="token punctuation">,</span> response</span> <span class="token punctuation">)</span> <span class="token operator">=></span> <span class="token punctuation">{</span> <span class="token keyword">const</span> user <span class="token operator">=</span> <span class="token keyword">await</span> User <span class="token punctuation">.</span> <span class="token function">findOne</span> <span class="token punctuation">(</span> <span class="token punctuation">{</span> email <span class="token operator">:</span> request <span class="token punctuation">.</span> body <span class="token punctuation">.</span> email <span class="token punctuation">}</span> <span class="token punctuation">)</span> <span class="token punctuation">;</span> <span class="token keyword">if</span> <span class="token punctuation">(</span> <span class="token operator">!</span> user <span class="token punctuation">)</span> <span class="token keyword">return</span> response <span class="token punctuation">.</span> <span class="token function">status</span> <span class="token punctuation">(</span> <span class="token number">422</span> <span class="token punctuation">)</span> <span class="token punctuation">.</span> <span class="token function">send</span> <span class="token punctuation">(</span> <span class="token string">'Email or Password is not correct'</span> <span class="token punctuation">)</span> <span class="token punctuation">;</span> <span class="token keyword">const</span> checkPassword <span class="token operator">=</span> <span class="token keyword">await</span> bcrypt <span class="token punctuation">.</span> <span class="token function">compare</span> <span class="token punctuation">(</span> request <span class="token punctuation">.</span> body <span class="token punctuation">.</span> password <span class="token punctuation">,</span> user <span class="token punctuation">.</span> password <span class="token punctuation">)</span> <span class="token punctuation">;</span> <span class="token keyword">if</span> <span class="token punctuation">(</span> <span class="token operator">!</span> checkPassword <span class="token punctuation">)</span> <span class="token keyword">return</span> response <span class="token punctuation">.</span> <span class="token function">status</span> <span class="token punctuation">(</span> <span class="token number">422</span> <span class="token punctuation">)</span> <span class="token punctuation">.</span> <span class="token function">send</span> <span class="token punctuation">(</span> <span class="token string">'Email or Password is not correct'</span> <span class="token punctuation">)</span> <span class="token punctuation">;</span> <span class="token keyword">const</span> token <span class="token operator">=</span> jwt <span class="token punctuation">.</span> <span class="token function">sign</span> <span class="token punctuation">(</span> <span class="token punctuation">{</span> _id <span class="token operator">:</span> user <span class="token punctuation">.</span> _id <span class="token punctuation">}</span> <span class="token punctuation">,</span> process <span class="token punctuation">.</span> env <span class="token punctuation">.</span> <span class="token constant">TOKEN_SECRET</span> <span class="token punctuation">,</span> <span class="token punctuation">{</span> expiresIn <span class="token operator">:</span> <span class="token number">60</span> <span class="token operator">*</span> <span class="token number">60</span> <span class="token operator">*</span> <span class="token number">24</span> <span class="token punctuation">}</span> <span class="token punctuation">)</span> <span class="token punctuation">;</span> response <span class="token punctuation">.</span> <span class="token function">header</span> <span class="token punctuation">(</span> <span class="token string">'auth-token'</span> <span class="token punctuation">,</span> token <span class="token punctuation">)</span> <span class="token punctuation">.</span> <span class="token function">send</span> <span class="token punctuation">(</span> token <span class="token punctuation">)</span> <span class="token punctuation">;</span> <span class="token punctuation">}</span> <span class="token punctuation">)</span> |
You will see that after the validate is complete, I will create a token based on the user’s id, then use token_secret , token_secret extremely important because if the user information is revealed, the token can not be stolen immediately because it remains. token_secret . You can create any string of string, here I just write somethingrandom but I even type a miscellaneous string r encode it: v. And the last option is the customizations you want to add, here I will set the token expiration time to 1 day.
Next, let’s create more middleware to authenticate api
middlewares/verifyToken.js
1 2 3 4 5 6 7 8 9 10 11 12 13 14 15 16 | <span class="token keyword">const</span> jwt <span class="token operator">=</span> <span class="token function">require</span> <span class="token punctuation">(</span> <span class="token string">'jsonwebtoken'</span> <span class="token punctuation">)</span> <span class="token punctuation">;</span> module <span class="token punctuation">.</span> <span class="token function-variable function">exports</span> <span class="token operator">=</span> <span class="token punctuation">(</span> <span class="token parameter">request <span class="token punctuation">,</span> response <span class="token punctuation">,</span> next</span> <span class="token punctuation">)</span> <span class="token operator">=></span> <span class="token punctuation">{</span> <span class="token keyword">const</span> token <span class="token operator">=</span> request <span class="token punctuation">.</span> <span class="token function">header</span> <span class="token punctuation">(</span> <span class="token string">'auth-token'</span> <span class="token punctuation">)</span> <span class="token punctuation">;</span> <span class="token keyword">if</span> <span class="token punctuation">(</span> <span class="token operator">!</span> token <span class="token punctuation">)</span> <span class="token keyword">return</span> response <span class="token punctuation">.</span> <span class="token function">status</span> <span class="token punctuation">(</span> <span class="token number">401</span> <span class="token punctuation">)</span> <span class="token punctuation">.</span> <span class="token function">send</span> <span class="token punctuation">(</span> <span class="token string">'Access Denied'</span> <span class="token punctuation">)</span> <span class="token punctuation">;</span> <span class="token keyword">try</span> <span class="token punctuation">{</span> <span class="token keyword">const</span> verified <span class="token operator">=</span> jwt <span class="token punctuation">.</span> <span class="token function">verify</span> <span class="token punctuation">(</span> token <span class="token punctuation">,</span> process <span class="token punctuation">.</span> env <span class="token punctuation">.</span> <span class="token constant">TOKEN_SECRET</span> <span class="token punctuation">)</span> <span class="token punctuation">;</span> <span class="token function">next</span> <span class="token punctuation">(</span> <span class="token punctuation">)</span> <span class="token punctuation">;</span> <span class="token punctuation">}</span> <span class="token keyword">catch</span> <span class="token punctuation">(</span> err <span class="token punctuation">)</span> <span class="token punctuation">{</span> <span class="token keyword">return</span> response <span class="token punctuation">.</span> <span class="token function">status</span> <span class="token punctuation">(</span> <span class="token number">400</span> <span class="token punctuation">)</span> <span class="token punctuation">.</span> <span class="token function">send</span> <span class="token punctuation">(</span> <span class="token string">'Invalid Token'</span> <span class="token punctuation">)</span> <span class="token punctuation">;</span> <span class="token punctuation">}</span> <span class="token punctuation">}</span> <span class="token punctuation">;</span> |
Here I will check in the auth-token in the header (this can be whatever you set, do not set it with the default one). If there are no tokens, 401 will be returned, but if there are, but the token does not match the token, it will be 400.
Now in routes.users will add the middleware:
1 2 3 4 5 6 7 8 | <span class="token keyword">const</span> verifyToken <span class="token operator">=</span> <span class="token function">require</span> <span class="token punctuation">(</span> <span class="token string">'./../middlewares/verifyToken'</span> <span class="token punctuation">)</span> <span class="token punctuation">;</span> router <span class="token punctuation">.</span> <span class="token function">get</span> <span class="token punctuation">(</span> <span class="token string">'/'</span> <span class="token punctuation">,</span> verifyToken <span class="token punctuation">,</span> <span class="token punctuation">(</span> <span class="token parameter">request <span class="token punctuation">,</span> response</span> <span class="token punctuation">)</span> <span class="token operator">=></span> <span class="token punctuation">{</span> User <span class="token punctuation">.</span> <span class="token function">find</span> <span class="token punctuation">(</span> <span class="token punctuation">{</span> <span class="token punctuation">}</span> <span class="token punctuation">)</span> <span class="token punctuation">.</span> <span class="token function">exec</span> <span class="token punctuation">(</span> <span class="token keyword">function</span> <span class="token punctuation">(</span> <span class="token parameter">err <span class="token punctuation">,</span> users</span> <span class="token punctuation">)</span> <span class="token punctuation">{</span> response <span class="token punctuation">.</span> <span class="token function">send</span> <span class="token punctuation">(</span> users <span class="token punctuation">)</span> <span class="token punctuation">;</span> <span class="token punctuation">}</span> <span class="token punctuation">)</span> <span class="token punctuation">;</span> <span class="token punctuation">}</span> <span class="token punctuation">)</span> <span class="token punctuation">;</span> |
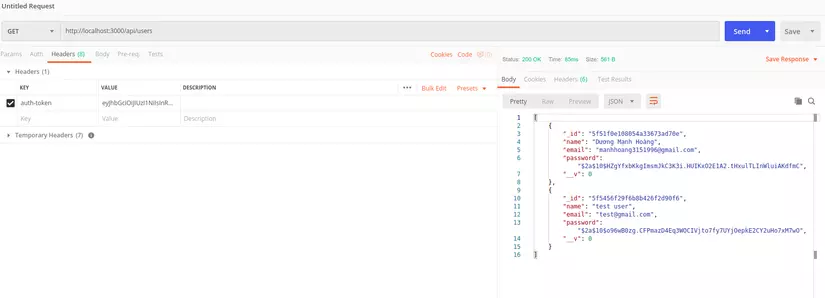
Now try to access it again

Now you can’t, wolf. If you want to be able to use this api, please login again. Now after logging in again, there will be 1 token for you, or copy that token and put it in the header. Key: auth-token, value will be the token you copy it
That’s it, hope this article will help you somewhat
Here is my repo if you want to review the code: https://github.com/duongmanhhoang/demo-node-js