Introduction
Hello friends. This is the 2nd tutorial about PyTorch that I want to write a special way to share with the Vietnamese PyTorch Community. We hope that we will have a lot of inspiration when using this Framework. In today’s article we will learn about how to perform a very important step in the process of performing a digitization problem that is Image Alignment . This is a step in the pre-processing of the input image before extracting the information area for inclusion in the rear OCR system. And I would like to emphasize that it is very important, greatly affecting the outcome of the final OCR model. This method is also applicable to OCR problems that pattern input has a fixed format such as identification cards, identification cards, driver’s license …. OK let’s start.
Identity identification problem
This is not a new problem and quite a lot of you see this as a project to practice processing skills with Deep Learning models. I recommend that you practice this problem because it will help you get acquainted with many different types of models in Deep Learning such as Object Detection, Instance Segmentation, Optical Character Recognition. Its basic pipeline can work like the following flow:

- Cropper , also known as image alignment, receives input from raw data. Crop the identity card container in the image. Use Geometric Transform to rotate the image in the right direction
- Detector is used to detect the image components such as name, date of birth, etc.
- Reader is an OCR module for reading text content from cropped components.
Finally, summarize and rearrange a complete identity card problem. OK now we get to the main part that will be solved today
Alignment
A common technique in image processing It is the process of converting different data sets into the same coordinate system. The pictures are taken from the phone, from the sensor taken by different angles. There are many methods to accomplish this such as using Feature Based or Template Matching. The ultimate goal, however, is still how to obtain a neatly organized image in the coordinate system for easy handling. Here with the ID problem you will need as in the following image:
A photo taken from any position will be rotated straight and neatly

So how to accomplish this, we can immediately think of Geometric Transformations of Images in image processing, namely Perspective Transformation – mapping 4 coordinates in the original image into 4 coordinates in the target image. We can see the classic example image as follows:

In it, the chessboard has been flattened in the new coordinate system, making it easier to handle. So, if you’ve chosen the solution is Perspective Transformation, then our next question is:
How to find 4 points on the source image? Specifically 4 corners of the identity card?
To answer this question, there are many ways, but the simplest way is to build a Deep Leanring model to learn the position of the four corners. So to accomplish that, we need to have data, right. Now we will learn how to do data offline.
Data preparation
Crawl data
You can proceed with crawl data from sources like Google Images or photos on FB. Suggestions for you can search for keywords such as finding lost items, falling papers … or on pawn pages, lending credit to be able to crawl more data. After preparing a small amount of data you save it into the same folder as follows
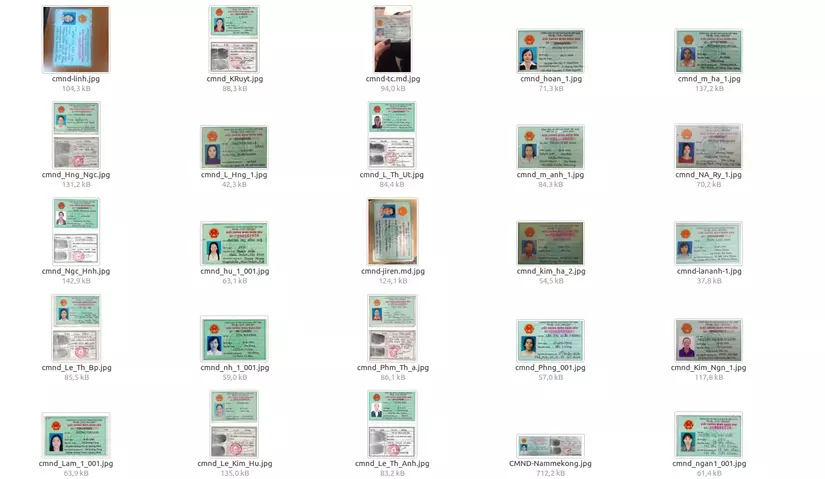
The next step we need to label the data offline.
Assign data labels
We use the LabelImg tool to conduct annotate data. On its homepage there is a fairly detailed user guide then you just need to install it. Open the current directory and proceed with the annotate.
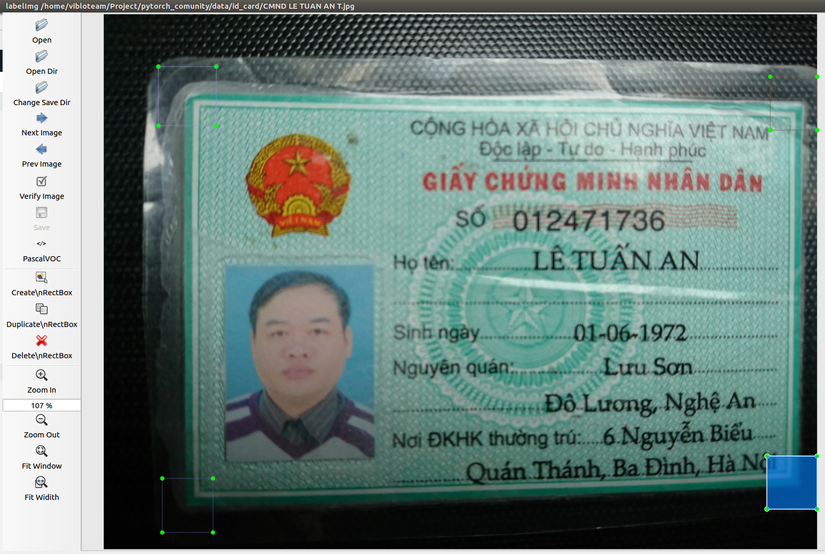
Here we need to annotate 4 corners in 4 corresponding classes as follows:
1 2 | <span class="token punctuation">[</span> <span class="token string">'top_left'</span> <span class="token punctuation">,</span> <span class="token string">'top_right'</span> <span class="token punctuation">,</span> <span class="token string">'bottom_left'</span> <span class="token punctuation">,</span> <span class="token string">'bottom_right'</span> <span class="token punctuation">]</span> |
The more you take the time to assign labels, the bigger the hand will be and of course the sweet fruit will also come because the model will have a better accuracy if the data is diverse and sufficient. If you are lazy, I would like to share a pre-labeled data demo (150 photos only) that you can download and use here . Of course, because of the small episode, just for demo, you guys want to be better then you have to work. If you do, you can eat hihi.
After finishing labeling, you will get a folder with corresponding XML files as follows:
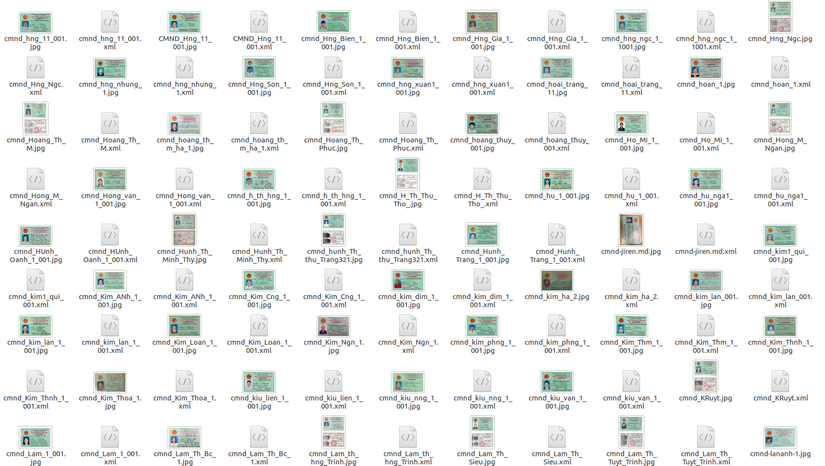
Training models with Detecto
Detecto is a library written on PyTorch platform and very easy to use with the purpose for your lazy code, the least amount of code can still train the object detect model. Detecto supports you with Transfer Learning with custom dataset like our identity card dataset. This library can run inference on both images and videos. You can see the artwork
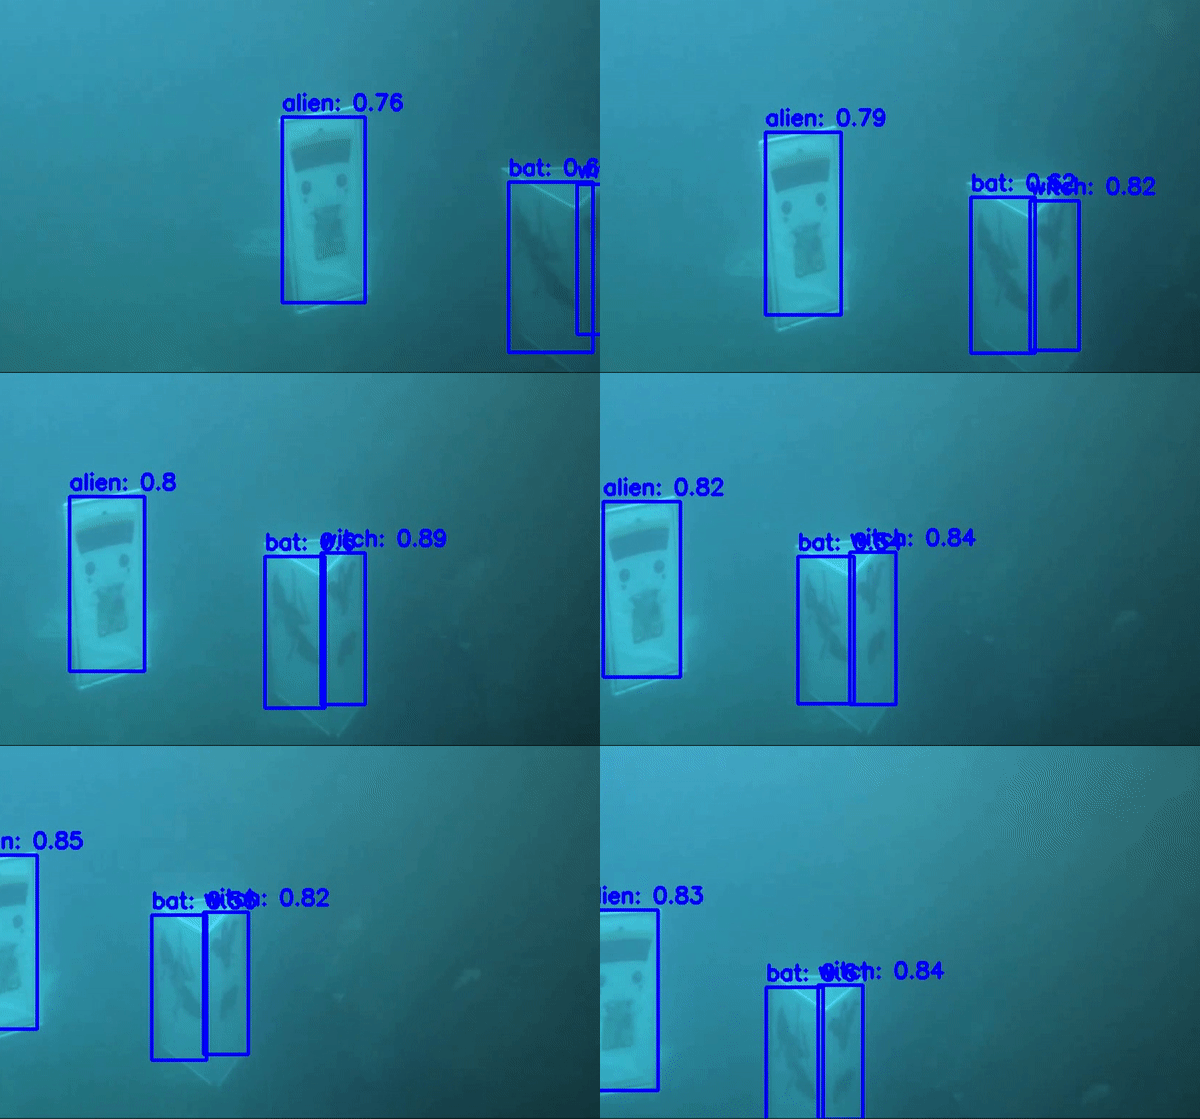
You can see or star the author here . Now, start the training step
Import library
Very simple you just do the following
1 2 | <span class="token keyword">from</span> detecto <span class="token keyword">import</span> core <span class="token punctuation">,</span> utils <span class="token punctuation">,</span> visualize |
Define dataset and classes
Extremely simple too. You just need to declare your directory path and declare the classes used in the previous annotate step.
1 2 3 4 5 | dataset <span class="token operator">=</span> core <span class="token punctuation">.</span> Dataset <span class="token punctuation">(</span> <span class="token string">'.data/sample'</span> <span class="token punctuation">)</span> model <span class="token operator">=</span> core <span class="token punctuation">.</span> Model <span class="token punctuation">(</span> <span class="token punctuation">[</span> <span class="token string">'top_left'</span> <span class="token punctuation">,</span> <span class="token string">'top_right'</span> <span class="token punctuation">,</span> <span class="token string">'bottom_left'</span> <span class="token punctuation">,</span> <span class="token string">'bottom_right'</span> <span class="token punctuation">]</span> <span class="token punctuation">)</span> |
So the step of defining and loading dataset has been solved for us by the Detecto library. You do not need to care about the format of the label file or the transform data anymore. Now we will go into the model training
Training model
Very simple with only 1 line of code.
1 2 | losses <span class="token operator">=</span> model <span class="token punctuation">.</span> fit <span class="token punctuation">(</span> dataset <span class="token punctuation">,</span> epochs <span class="token operator">=</span> <span class="token number">500</span> <span class="token punctuation">,</span> verbose <span class="token operator">=</span> <span class="token boolean">True</span> <span class="token punctuation">,</span> learning_rate <span class="token operator">=</span> <span class="token number">0.001</span> <span class="token punctuation">)</span> |
The next thing is to wait
1 2 3 4 5 6 7 8 9 10 11 | Epoch <span class="token number">1</span> of <span class="token number">500</span> Epoch <span class="token number">2</span> of <span class="token number">500</span> Epoch <span class="token number">3</span> of <span class="token number">500</span> Epoch <span class="token number">4</span> of <span class="token number">500</span> Epoch <span class="token number">5</span> of <span class="token number">500</span> Epoch <span class="token number">6</span> of <span class="token number">500</span> Epoch <span class="token number">7</span> of <span class="token number">500</span> Epoch <span class="token number">8</span> of <span class="token number">500</span> Epoch <span class="token number">9</span> of <span class="token number">500</span> Please waiting <span class="token punctuation">.</span> <span class="token punctuation">.</span> <span class="token punctuation">.</span> |
After training you save the model for further use. Very simple with 1 statement
1 2 | model <span class="token punctuation">.</span> save <span class="token punctuation">(</span> <span class="token string">'id_card_4_corner.pth'</span> <span class="token punctuation">)</span> |
If you are lazy to train, this is a demo model saved at the 30th epoch. Of course, the results are not good enough due to the recent training of some short epochs and small data sets.
Test the results
After saving the model, we check the results with another file downloaded from the web (not on the train set). Suppose for example this file.
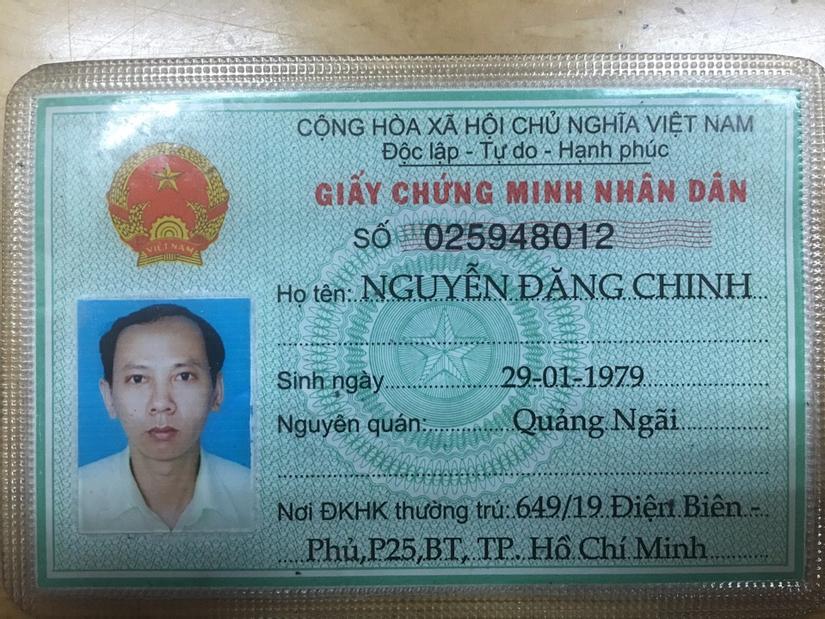
We proceed to read the file
1 2 3 | fname <span class="token operator">=</span> <span class="token string">'data/CMT_0106321395.JPG'</span> image <span class="token operator">=</span> utils <span class="token punctuation">.</span> read_image <span class="token punctuation">(</span> fname <span class="token punctuation">)</span> |
and predict how the model will look
1 2 | labels <span class="token punctuation">,</span> boxes <span class="token punctuation">,</span> scores <span class="token operator">=</span> model <span class="token punctuation">.</span> predict <span class="token punctuation">(</span> image <span class="token punctuation">)</span> |
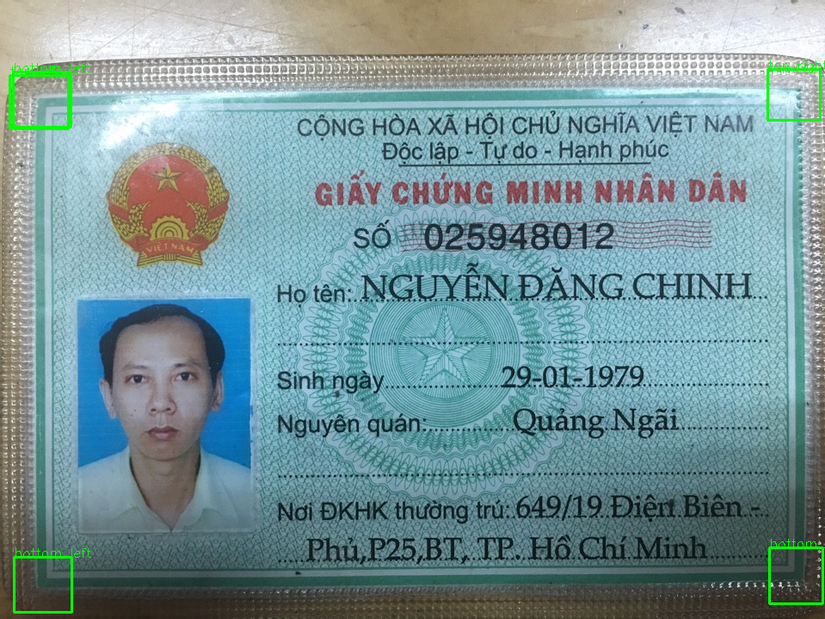
The model’s output will return a list of how the labels , the positions of the boxes and are confident in the scores . Printing these values will see it returns quite a lot of different boxes
1 2 3 4 | <span class="token keyword">print</span> <span class="token punctuation">(</span> labels <span class="token punctuation">)</span> <span class="token punctuation">[</span> <span class="token string">'bottom_left'</span> <span class="token punctuation">,</span> <span class="token string">'bottom_right'</span> <span class="token punctuation">,</span> <span class="token string">'top_left'</span> <span class="token punctuation">,</span> <span class="token string">'top_right'</span> <span class="token punctuation">,</span> <span class="token string">'bottom_left'</span> <span class="token punctuation">]</span> |
Corresponding to the boxes
1 2 3 4 5 6 7 8 | priont <span class="token punctuation">(</span> boxes <span class="token punctuation">)</span> tensor <span class="token punctuation">(</span> <span class="token punctuation">[</span> <span class="token punctuation">[</span> <span class="token number">16.1044</span> <span class="token punctuation">,</span> <span class="token number">647.4228</span> <span class="token punctuation">,</span> <span class="token number">83.3507</span> <span class="token punctuation">,</span> <span class="token number">711.1550</span> <span class="token punctuation">]</span> <span class="token punctuation">,</span> <span class="token punctuation">[</span> <span class="token number">894.2018</span> <span class="token punctuation">,</span> <span class="token number">636.8340</span> <span class="token punctuation">,</span> <span class="token number">956.9724</span> <span class="token punctuation">,</span> <span class="token number">701.6462</span> <span class="token punctuation">]</span> <span class="token punctuation">,</span> <span class="token punctuation">[</span> <span class="token number">11.0550</span> <span class="token punctuation">,</span> <span class="token number">87.7889</span> <span class="token punctuation">,</span> <span class="token number">79.4745</span> <span class="token punctuation">,</span> <span class="token number">149.2691</span> <span class="token punctuation">]</span> <span class="token punctuation">,</span> <span class="token punctuation">[</span> <span class="token number">892.7690</span> <span class="token punctuation">,</span> <span class="token number">80.5926</span> <span class="token punctuation">,</span> <span class="token number">953.7268</span> <span class="token punctuation">,</span> <span class="token number">139.2006</span> <span class="token punctuation">]</span> <span class="token punctuation">,</span> <span class="token punctuation">[</span> <span class="token number">15.8271</span> <span class="token punctuation">,</span> <span class="token number">83.0950</span> <span class="token punctuation">,</span> <span class="token number">82.5982</span> <span class="token punctuation">,</span> <span class="token number">147.1947</span> <span class="token punctuation">]</span> <span class="token punctuation">]</span> <span class="token punctuation">)</span> |
We can still draw positions of these boxes
1 2 3 4 5 6 7 8 | <span class="token keyword">import</span> cv2 <span class="token keyword">for</span> i <span class="token punctuation">,</span> bbox <span class="token keyword">in</span> <span class="token builtin">enumerate</span> <span class="token punctuation">(</span> boxes <span class="token punctuation">)</span> <span class="token punctuation">:</span> bbox <span class="token operator">=</span> <span class="token builtin">list</span> <span class="token punctuation">(</span> <span class="token builtin">map</span> <span class="token punctuation">(</span> <span class="token builtin">int</span> <span class="token punctuation">,</span> bbox <span class="token punctuation">)</span> <span class="token punctuation">)</span> x_min <span class="token punctuation">,</span> y_min <span class="token punctuation">,</span> x_max <span class="token punctuation">,</span> y_max <span class="token operator">=</span> bbox cv2 <span class="token punctuation">.</span> rectangle <span class="token punctuation">(</span> image <span class="token punctuation">,</span> <span class="token punctuation">(</span> x_min <span class="token punctuation">,</span> y_min <span class="token punctuation">)</span> <span class="token punctuation">,</span> <span class="token punctuation">(</span> x_max <span class="token punctuation">,</span> y_max <span class="token punctuation">)</span> <span class="token punctuation">,</span> <span class="token punctuation">(</span> <span class="token number">0</span> <span class="token punctuation">,</span> <span class="token number">255</span> <span class="token punctuation">,</span> <span class="token number">0</span> <span class="token punctuation">)</span> <span class="token punctuation">,</span> <span class="token number">2</span> <span class="token punctuation">)</span> cv2 <span class="token punctuation">.</span> putText <span class="token punctuation">(</span> image <span class="token punctuation">,</span> labels <span class="token punctuation">[</span> i <span class="token punctuation">]</span> <span class="token punctuation">,</span> <span class="token punctuation">(</span> x_min <span class="token punctuation">,</span> y_min <span class="token punctuation">)</span> <span class="token punctuation">,</span> cv2 <span class="token punctuation">.</span> FONT_HERSHEY_SIMPLEX <span class="token punctuation">,</span> <span class="token number">0.5</span> <span class="token punctuation">,</span> <span class="token punctuation">(</span> <span class="token number">0</span> <span class="token punctuation">,</span> <span class="token number">255</span> <span class="token punctuation">,</span> <span class="token number">0</span> <span class="token punctuation">)</span> <span class="token punctuation">)</span> |
The following results are obtained:
Commenting results
It can be seen that the model is still pretty much mistaken. But still out of 4 types of labels. We have the following solutions:
- Create more data to train for more variety
- Training longer models. 30 Epoch is quite little
- Post-processing data with
non_max_suppression
Here we will examine the 3rd and the above two ways, depending on how big your hands are . We will discuss this in the next section
Post-processing of results
As seen above, we need to post-process the results for the output to work. The first way we can think of is to combine boxes that have relatively overlap positions together and combine them and the same class. With this problem, the boxes are often quite far apart so almost two boxes with relatively close coordinates are usually the same class. If not, review whether the data has been mislabeled.
Non Max Suppression
We will merge the overlap boxes and reassign the labels corresponding to the merged boxes. We implement them with the following function:
1 2 3 4 5 6 7 8 9 10 11 12 13 14 15 16 17 18 19 20 21 22 23 24 25 26 27 28 29 30 31 32 33 34 35 36 37 38 39 40 41 42 43 44 45 46 47 48 49 50 51 52 53 54 55 56 57 58 59 60 61 62 | <span class="token keyword">import</span> numpy <span class="token keyword">as</span> np <span class="token keyword">def</span> <span class="token function">non_max_suppression_fast</span> <span class="token punctuation">(</span> boxes <span class="token punctuation">,</span> labels <span class="token punctuation">,</span> overlapThresh <span class="token punctuation">)</span> <span class="token punctuation">:</span> <span class="token comment"># if there are no boxes, return an empty list</span> <span class="token keyword">if</span> <span class="token builtin">len</span> <span class="token punctuation">(</span> boxes <span class="token punctuation">)</span> <span class="token operator">==</span> <span class="token number">0</span> <span class="token punctuation">:</span> <span class="token keyword">return</span> <span class="token punctuation">[</span> <span class="token punctuation">]</span> <span class="token comment"># if the bounding boxes integers, convert them to floats --</span> <span class="token comment"># this is important since we'll be doing a bunch of divisions</span> <span class="token keyword">if</span> boxes <span class="token punctuation">.</span> dtype <span class="token punctuation">.</span> kind <span class="token operator">==</span> <span class="token string">"i"</span> <span class="token punctuation">:</span> boxes <span class="token operator">=</span> boxes <span class="token punctuation">.</span> astype <span class="token punctuation">(</span> <span class="token string">"float"</span> <span class="token punctuation">)</span> <span class="token comment"># </span> <span class="token comment"># initialize the list of picked indexes </span> pick <span class="token operator">=</span> <span class="token punctuation">[</span> <span class="token punctuation">]</span> <span class="token comment"># grab the coordinates of the bounding boxes</span> x1 <span class="token operator">=</span> boxes <span class="token punctuation">[</span> <span class="token punctuation">:</span> <span class="token punctuation">,</span> <span class="token number">0</span> <span class="token punctuation">]</span> y1 <span class="token operator">=</span> boxes <span class="token punctuation">[</span> <span class="token punctuation">:</span> <span class="token punctuation">,</span> <span class="token number">1</span> <span class="token punctuation">]</span> x2 <span class="token operator">=</span> boxes <span class="token punctuation">[</span> <span class="token punctuation">:</span> <span class="token punctuation">,</span> <span class="token number">2</span> <span class="token punctuation">]</span> y2 <span class="token operator">=</span> boxes <span class="token punctuation">[</span> <span class="token punctuation">:</span> <span class="token punctuation">,</span> <span class="token number">3</span> <span class="token punctuation">]</span> <span class="token comment"># compute the area of the bounding boxes and sort the bounding</span> <span class="token comment"># boxes by the bottom-right y-coordinate of the bounding box</span> area <span class="token operator">=</span> <span class="token punctuation">(</span> x2 <span class="token operator">-</span> x1 <span class="token operator">+</span> <span class="token number">1</span> <span class="token punctuation">)</span> <span class="token operator">*</span> <span class="token punctuation">(</span> y2 <span class="token operator">-</span> y1 <span class="token operator">+</span> <span class="token number">1</span> <span class="token punctuation">)</span> idxs <span class="token operator">=</span> np <span class="token punctuation">.</span> argsort <span class="token punctuation">(</span> y2 <span class="token punctuation">)</span> <span class="token comment"># keep looping while some indexes still remain in the indexes</span> <span class="token comment"># list</span> <span class="token keyword">while</span> <span class="token builtin">len</span> <span class="token punctuation">(</span> idxs <span class="token punctuation">)</span> <span class="token operator">></span> <span class="token number">0</span> <span class="token punctuation">:</span> <span class="token comment"># grab the last index in the indexes list and add the</span> <span class="token comment"># index value to the list of picked indexes</span> last <span class="token operator">=</span> <span class="token builtin">len</span> <span class="token punctuation">(</span> idxs <span class="token punctuation">)</span> <span class="token operator">-</span> <span class="token number">1</span> i <span class="token operator">=</span> idxs <span class="token punctuation">[</span> last <span class="token punctuation">]</span> pick <span class="token punctuation">.</span> append <span class="token punctuation">(</span> i <span class="token punctuation">)</span> <span class="token comment"># find the largest (x, y) coordinates for the start of</span> <span class="token comment"># the bounding box and the smallest (x, y) coordinates</span> <span class="token comment"># for the end of the bounding box</span> xx1 <span class="token operator">=</span> np <span class="token punctuation">.</span> maximum <span class="token punctuation">(</span> x1 <span class="token punctuation">[</span> i <span class="token punctuation">]</span> <span class="token punctuation">,</span> x1 <span class="token punctuation">[</span> idxs <span class="token punctuation">[</span> <span class="token punctuation">:</span> last <span class="token punctuation">]</span> <span class="token punctuation">]</span> <span class="token punctuation">)</span> yy1 <span class="token operator">=</span> np <span class="token punctuation">.</span> maximum <span class="token punctuation">(</span> y1 <span class="token punctuation">[</span> i <span class="token punctuation">]</span> <span class="token punctuation">,</span> y1 <span class="token punctuation">[</span> idxs <span class="token punctuation">[</span> <span class="token punctuation">:</span> last <span class="token punctuation">]</span> <span class="token punctuation">]</span> <span class="token punctuation">)</span> xx2 <span class="token operator">=</span> np <span class="token punctuation">.</span> minimum <span class="token punctuation">(</span> x2 <span class="token punctuation">[</span> i <span class="token punctuation">]</span> <span class="token punctuation">,</span> x2 <span class="token punctuation">[</span> idxs <span class="token punctuation">[</span> <span class="token punctuation">:</span> last <span class="token punctuation">]</span> <span class="token punctuation">]</span> <span class="token punctuation">)</span> yy2 <span class="token operator">=</span> np <span class="token punctuation">.</span> minimum <span class="token punctuation">(</span> y2 <span class="token punctuation">[</span> i <span class="token punctuation">]</span> <span class="token punctuation">,</span> y2 <span class="token punctuation">[</span> idxs <span class="token punctuation">[</span> <span class="token punctuation">:</span> last <span class="token punctuation">]</span> <span class="token punctuation">]</span> <span class="token punctuation">)</span> <span class="token comment"># compute the width and height of the bounding box</span> w <span class="token operator">=</span> np <span class="token punctuation">.</span> maximum <span class="token punctuation">(</span> <span class="token number">0</span> <span class="token punctuation">,</span> xx2 <span class="token operator">-</span> xx1 <span class="token operator">+</span> <span class="token number">1</span> <span class="token punctuation">)</span> h <span class="token operator">=</span> np <span class="token punctuation">.</span> maximum <span class="token punctuation">(</span> <span class="token number">0</span> <span class="token punctuation">,</span> yy2 <span class="token operator">-</span> yy1 <span class="token operator">+</span> <span class="token number">1</span> <span class="token punctuation">)</span> <span class="token comment"># compute the ratio of overlap</span> overlap <span class="token operator">=</span> <span class="token punctuation">(</span> w <span class="token operator">*</span> h <span class="token punctuation">)</span> <span class="token operator">/</span> area <span class="token punctuation">[</span> idxs <span class="token punctuation">[</span> <span class="token punctuation">:</span> last <span class="token punctuation">]</span> <span class="token punctuation">]</span> <span class="token comment"># delete all indexes from the index list that have</span> idxs <span class="token operator">=</span> np <span class="token punctuation">.</span> delete <span class="token punctuation">(</span> idxs <span class="token punctuation">,</span> np <span class="token punctuation">.</span> concatenate <span class="token punctuation">(</span> <span class="token punctuation">(</span> <span class="token punctuation">[</span> last <span class="token punctuation">]</span> <span class="token punctuation">,</span> np <span class="token punctuation">.</span> where <span class="token punctuation">(</span> overlap <span class="token operator">></span> overlapThresh <span class="token punctuation">)</span> <span class="token punctuation">[</span> <span class="token number">0</span> <span class="token punctuation">]</span> <span class="token punctuation">)</span> <span class="token punctuation">)</span> <span class="token punctuation">)</span> <span class="token comment"># return only the bounding boxes that were picked using the</span> <span class="token comment"># integer data type</span> final_labels <span class="token operator">=</span> <span class="token punctuation">[</span> labels <span class="token punctuation">[</span> idx <span class="token punctuation">]</span> <span class="token keyword">for</span> idx <span class="token keyword">in</span> pick <span class="token punctuation">]</span> final_boxes <span class="token operator">=</span> boxes <span class="token punctuation">[</span> pick <span class="token punctuation">]</span> <span class="token punctuation">.</span> astype <span class="token punctuation">(</span> <span class="token string">"int"</span> <span class="token punctuation">)</span> <span class="token keyword">return</span> final_boxes <span class="token punctuation">,</span> final_labels |
We try to process data with boxes and labels above:
1 2 | final_boxes <span class="token punctuation">,</span> final_labels <span class="token operator">=</span> non_max_suppression_fast <span class="token punctuation">(</span> boxes <span class="token punctuation">.</span> numpy <span class="token punctuation">(</span> <span class="token punctuation">)</span> <span class="token punctuation">,</span> labels <span class="token punctuation">,</span> <span class="token number">0.15</span> <span class="token punctuation">)</span> |
We will get the following result:
1 2 3 4 5 6 7 8 9 10 11 | final_boxes <span class="token operator">>></span> <span class="token operator">></span> array <span class="token punctuation">(</span> <span class="token punctuation">[</span> <span class="token punctuation">[</span> <span class="token number">16</span> <span class="token punctuation">,</span> <span class="token number">647</span> <span class="token punctuation">,</span> <span class="token number">83</span> <span class="token punctuation">,</span> <span class="token number">711</span> <span class="token punctuation">]</span> <span class="token punctuation">,</span> <span class="token punctuation">[</span> <span class="token number">894</span> <span class="token punctuation">,</span> <span class="token number">636</span> <span class="token punctuation">,</span> <span class="token number">956</span> <span class="token punctuation">,</span> <span class="token number">701</span> <span class="token punctuation">]</span> <span class="token punctuation">,</span> <span class="token punctuation">[</span> <span class="token number">11</span> <span class="token punctuation">,</span> <span class="token number">87</span> <span class="token punctuation">,</span> <span class="token number">79</span> <span class="token punctuation">,</span> <span class="token number">149</span> <span class="token punctuation">]</span> <span class="token punctuation">,</span> <span class="token punctuation">[</span> <span class="token number">892</span> <span class="token punctuation">,</span> <span class="token number">80</span> <span class="token punctuation">,</span> <span class="token number">953</span> <span class="token punctuation">,</span> <span class="token number">139</span> <span class="token punctuation">]</span> <span class="token punctuation">]</span> <span class="token punctuation">)</span> final_labels <span class="token operator">>></span> <span class="token operator">></span> <span class="token punctuation">[</span> <span class="token string">'bottom_left'</span> <span class="token punctuation">,</span> <span class="token string">'bottom_right'</span> <span class="token punctuation">,</span> <span class="token string">'top_left'</span> <span class="token punctuation">,</span> <span class="token string">'top_right'</span> <span class="token punctuation">]</span> |
Now the boxes have been combined with only 4 labels. Rerun the code to produce the output image we have
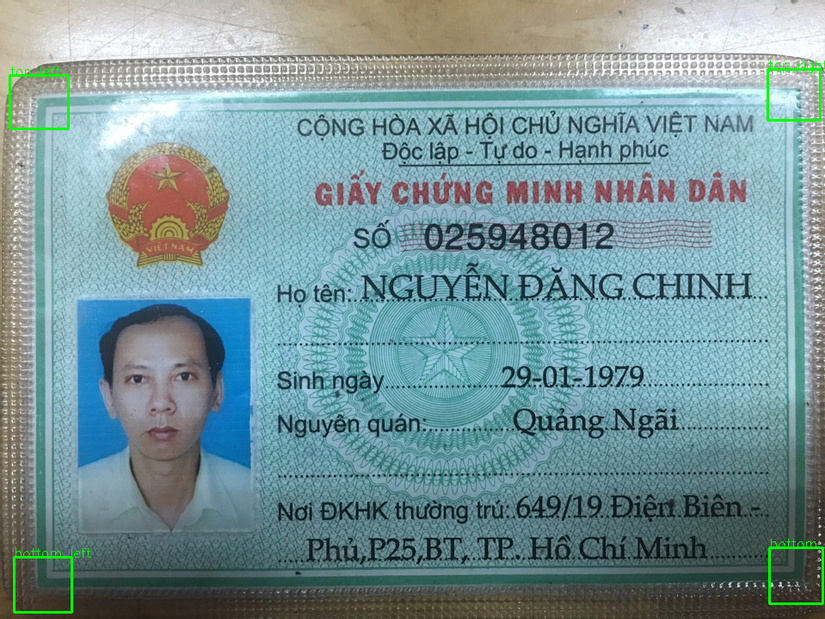
OK now for the last part. We will perform Perspective Transformation to crop the identity card into the new coordinate system
Perspective Transform
Determine the coordinates of the source points
We first need to determine the coordinates of the source points based on the location of the detected boxes. We simplify this process by taking the center point of each box into the source point. Use the following function
1 2 3 4 | <span class="token keyword">def</span> <span class="token function">get_center_point</span> <span class="token punctuation">(</span> box <span class="token punctuation">)</span> <span class="token punctuation">:</span> xmin <span class="token punctuation">,</span> ymin <span class="token punctuation">,</span> xmax <span class="token punctuation">,</span> ymax <span class="token operator">=</span> box <span class="token keyword">return</span> <span class="token punctuation">(</span> xmin <span class="token operator">+</span> xmax <span class="token punctuation">)</span> <span class="token operator">//</span> <span class="token number">2</span> <span class="token punctuation">,</span> <span class="token punctuation">(</span> ymin <span class="token operator">+</span> ymax <span class="token punctuation">)</span> <span class="token operator">//</span> <span class="token number">2</span> |
Next we create the final_points list from the collection of boxes collected above
1 2 | final_points <span class="token operator">=</span> <span class="token builtin">list</span> <span class="token punctuation">(</span> <span class="token builtin">map</span> <span class="token punctuation">(</span> get_center_point <span class="token punctuation">,</span> final_boxes <span class="token punctuation">)</span> <span class="token punctuation">)</span> |
And to facilitate the next step we proceed to create a dictionary to map labels and boxes respectively
1 2 3 4 5 6 7 8 | label_boxes <span class="token operator">=</span> <span class="token builtin">dict</span> <span class="token punctuation">(</span> <span class="token builtin">zip</span> <span class="token punctuation">(</span> final_labels <span class="token punctuation">,</span> final_points <span class="token punctuation">)</span> <span class="token punctuation">)</span> <span class="token operator">>></span> <span class="token operator">></span> <span class="token punctuation">{</span> <span class="token string">'bottom_left'</span> <span class="token punctuation">:</span> <span class="token punctuation">(</span> <span class="token number">49</span> <span class="token punctuation">,</span> <span class="token number">679</span> <span class="token punctuation">)</span> <span class="token punctuation">,</span> <span class="token string">'bottom_right'</span> <span class="token punctuation">:</span> <span class="token punctuation">(</span> <span class="token number">925</span> <span class="token punctuation">,</span> <span class="token number">668</span> <span class="token punctuation">)</span> <span class="token punctuation">,</span> <span class="token string">'top_left'</span> <span class="token punctuation">:</span> <span class="token punctuation">(</span> <span class="token number">45</span> <span class="token punctuation">,</span> <span class="token number">118</span> <span class="token punctuation">)</span> <span class="token punctuation">,</span> <span class="token string">'top_right'</span> <span class="token punctuation">:</span> <span class="token punctuation">(</span> <span class="token number">922</span> <span class="token punctuation">,</span> <span class="token number">109</span> <span class="token punctuation">)</span> <span class="token punctuation">}</span> |
Transform to destination coordinates
We define this function as follows
1 2 3 4 5 6 7 | <span class="token keyword">def</span> <span class="token function">perspective_transoform</span> <span class="token punctuation">(</span> image <span class="token punctuation">,</span> source_points <span class="token punctuation">)</span> <span class="token punctuation">:</span> dest_points <span class="token operator">=</span> np <span class="token punctuation">.</span> float32 <span class="token punctuation">(</span> <span class="token punctuation">[</span> <span class="token punctuation">[</span> <span class="token number">0</span> <span class="token punctuation">,</span> <span class="token number">0</span> <span class="token punctuation">]</span> <span class="token punctuation">,</span> <span class="token punctuation">[</span> <span class="token number">500</span> <span class="token punctuation">,</span> <span class="token number">0</span> <span class="token punctuation">]</span> <span class="token punctuation">,</span> <span class="token punctuation">[</span> <span class="token number">500</span> <span class="token punctuation">,</span> <span class="token number">300</span> <span class="token punctuation">]</span> <span class="token punctuation">,</span> <span class="token punctuation">[</span> <span class="token number">0</span> <span class="token punctuation">,</span> <span class="token number">300</span> <span class="token punctuation">]</span> <span class="token punctuation">]</span> <span class="token punctuation">)</span> M <span class="token operator">=</span> cv2 <span class="token punctuation">.</span> getPerspectiveTransform <span class="token punctuation">(</span> source_points <span class="token punctuation">,</span> dest_points <span class="token punctuation">)</span> dst <span class="token operator">=</span> cv2 <span class="token punctuation">.</span> warpPerspective <span class="token punctuation">(</span> image <span class="token punctuation">,</span> M <span class="token punctuation">,</span> <span class="token punctuation">(</span> <span class="token number">500</span> <span class="token punctuation">,</span> <span class="token number">300</span> <span class="token punctuation">)</span> <span class="token punctuation">)</span> <span class="token keyword">return</span> dst |
Here fix the hard target coordinates is 500×300 image for close to the size of the identity card. Readers can change it. Next we proceed to transform
1 2 3 4 5 6 7 | source_points <span class="token operator">=</span> np <span class="token punctuation">.</span> float32 <span class="token punctuation">(</span> <span class="token punctuation">[</span> label_boxes <span class="token punctuation">[</span> <span class="token string">'top_left'</span> <span class="token punctuation">]</span> <span class="token punctuation">,</span> label_boxes <span class="token punctuation">[</span> <span class="token string">'top_right'</span> <span class="token punctuation">]</span> <span class="token punctuation">,</span> label_boxes <span class="token punctuation">[</span> <span class="token string">'bottom_right'</span> <span class="token punctuation">]</span> <span class="token punctuation">,</span> label_boxes <span class="token punctuation">[</span> <span class="token string">'bottom_left'</span> <span class="token punctuation">]</span> <span class="token punctuation">]</span> <span class="token punctuation">)</span> <span class="token comment"># Transform </span> crop <span class="token operator">=</span> perspective_transoform <span class="token punctuation">(</span> image <span class="token punctuation">,</span> source_points <span class="token punctuation">)</span> |
We get the following result
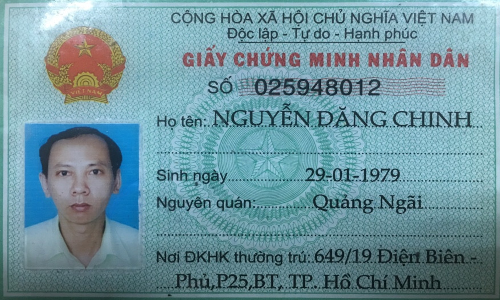
As you can see, this result is easier to handle. You can experiment a lot with newer images
Conclude
This article is quite simple with the hope that you can understand roughly the steps of handling Alignment for identity cards like. Using the Detecto library makes model training very simple and gradually makes us feel that using Deep Learning is also a tool to help us better program and solve problems, not Something terrible as people have thought. Have fun and see you in the following articles
