In iOS, the Foundation framework provides a low-level mechanism for storing Preference data. There are two ways to change these preferences data:
- Change right inside the app
- Use the Settings bundle to manage preferences from the Settings app
According to Apple docs: An app can display settings both in the app and in the phone’s Settings app. It depends on how you want the user to interact with the settings.
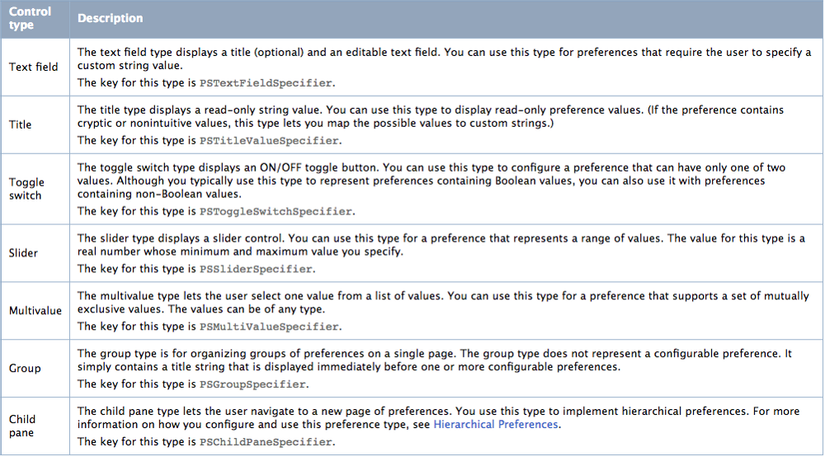
The table below contains a list of the Control Types you can use in settings.bundle
Every app with an Install package has at least one option page, called the main page. If your app has only a handful of options, the main page might be the only page you need. However, if the number of options is too large to fit the main page, you can create subpages that link to the main page or other subpages. There is no specific limit to the number of subpages you can create, but you should try to keep your preferences as simple and easy to navigate as possible.
A Settings bundle is named Settings.bundle and is located in the top-level directory of the app bundle. This bundle contains one or more Settings page files describing individual option pages. It may also include other supporting files needed to render your preferences, such as localized string or image.
You can localize the Info.plist file and show the settings in your desired language.Please read more in the official docs.
Add a Settings Bundle
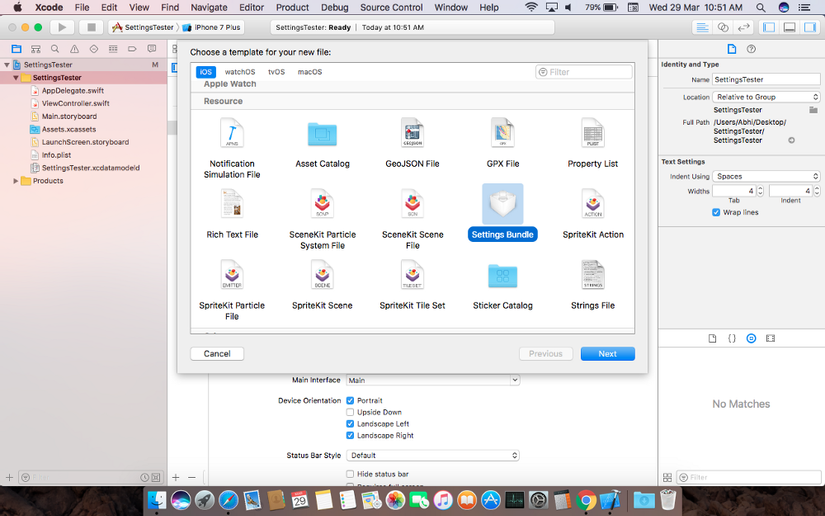
To add a settings bundle to the Xcode project:
- Choose File> New> New File.
- Select Resource in the iOS section, and select Settings Bundle template.
- Name the Settings.bundle
In addition to adding a new Settings bundle to your project, Xcode automatically adds that bundle to the Copy Bundle Resources build phase of the app target. Therefore, all you have to do is modify the property list files of the Settings bundle and add any necessary resources.
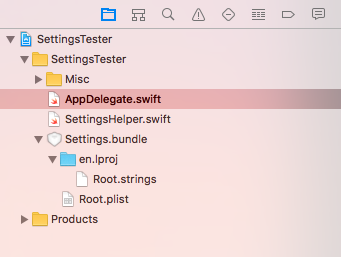
The new settings bundle has the following structure:
Click the Root.plist file. You will see a list of properties as follows:
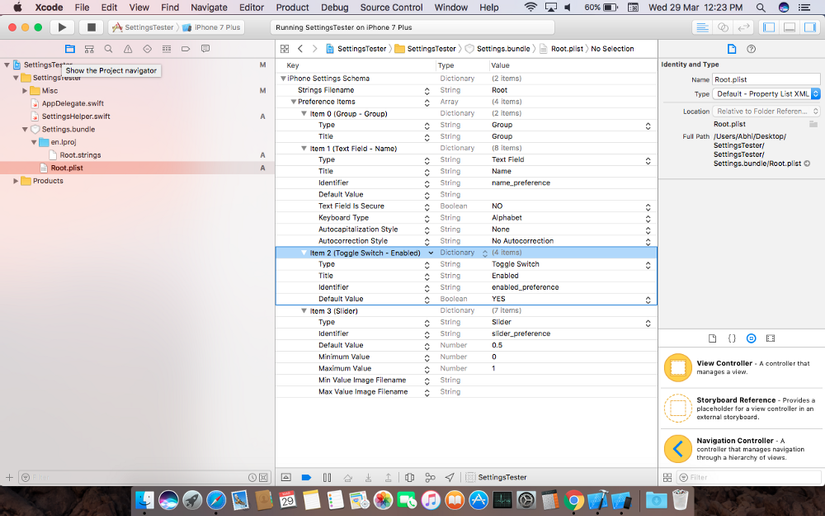
Preference items is an array of dictionary controls. Go to Figure 1 for all the Controls we can add in the settings app bundle. For this demo app, I only need one group, one to show the app version number, one to show the build number, and a toggle switch to reset the app. So delete all the items in the array preference items and add the items mentioned above.
So for our application, the Root.plist file will look like this:
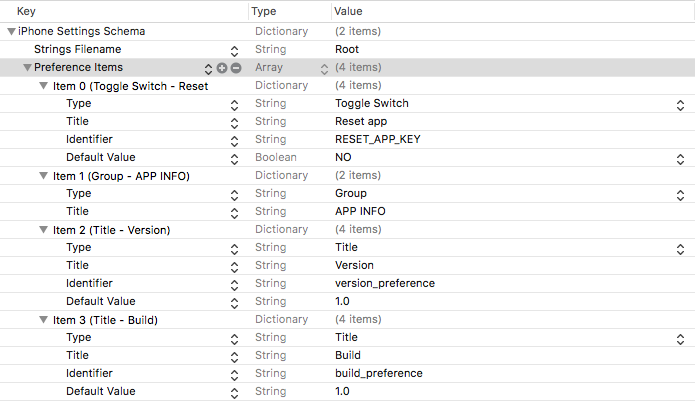
The identifier is the Userdefaults key that you can use inside the code to make the appropriate changes. Don’t forget to add default values for Title. If not, it won’t appear in settings.
Tip: If you are worried about the order of the controls in the plist, Right click on the plist file and open it as source code. Can be easily edited xml instead of plist directly.
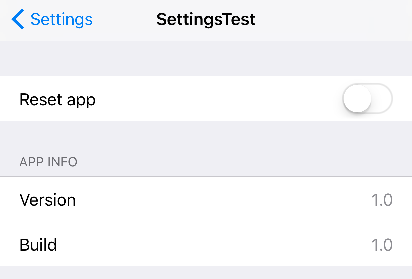
The setup UI will look like this for the plist file above:
Now, let’s create a class called SettingsBundleHelper.swift to handle the setting changes …
1 2 3 4 5 6 7 8 9 10 11 12 13 14 15 16 17 18 19 20 21 22 23 24 25 26 27 28 29 30 31 | // // SettingsBundleHelper.swift // // Created by Abhilash on 28/03/17. // import Foundation class SettingsBundleHelper { struct SettingsBundleKeys { static let Reset = "RESET_APP_KEY" static let BuildVersionKey = "build_preference" static let AppVersionKey = "version_preference" } class func checkAndExecuteSettings() { if UserDefaults.standard.bool(forKey: SettingsBundleKeys.Reset) { UserDefaults.standard.set(false, forKey: SettingsBundleKeys.Reset) let appDomain: String? = Bundle.main.bundleIdentifier UserDefaults.standard.removePersistentDomain(forName: appDomain!) // reset userDefaults.. // CoreDataDataModel().deleteAllData() // delete all other user data here.. } } class func setVersionAndBuildNumber() { let version: String = Bundle.main.object(forInfoDictionaryKey: "CFBundleShortVersionString") as! String UserDefaults.standard.set(version, forKey: "version_preference") let build: String = Bundle.main.object(forInfoDictionaryKey: "CFBundleVersion") as! String UserDefaults.standard.set(build, forKey: "build_preference") } } |
I added the code to reset the data and set the version number in AppDelegate like this:
1 2 3 4 5 | func applicationDidBecomeActive(_ application: UIApplication) { SettingsBundleHelper.checkAndExecuteSettings() SettingsBundleHelper.setVersionAndBuildNumber() } |
Update Defaults with Observers
The above method has a limitation: we have to call the code every time the app starts. Also, you can set an observer for UserDefaults by using UserDefaults.didChangeNotification.
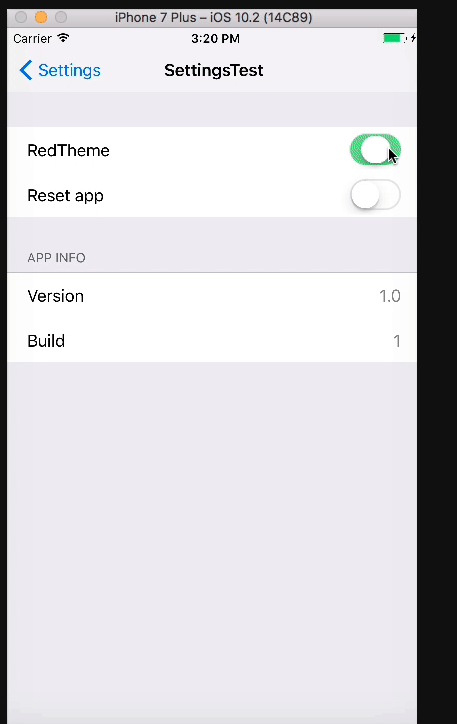
1 2 3 4 5 6 7 8 9 10 11 12 13 14 15 16 17 18 19 20 21 22 23 24 25 26 27 28 29 30 31 32 33 34 35 36 | // // ViewController.swift // SettingsTest // // Created by Abhilash on 29/03/17. // Copyright © 2017 Abhilash. All rights reserved. // import UIKit class ViewController: UIViewController { override func viewDidLoad() { super.viewDidLoad() registerSettingsBundle() NotificationCenter.default.addObserver(self, selector: #selector(ViewController.defaultsChanged), name: UserDefaults.didChangeNotification, object: nil) defaultsChanged() } func registerSettingsBundle(){ let appDefaults = [String:AnyObject]() UserDefaults.standard.register(defaults: appDefaults) } func defaultsChanged(){ if UserDefaults.standard.bool(forKey: "RedThemeKey") { self.view.backgroundColor = UIColor.red } else { self.view.backgroundColor = UIColor.green } } deinit { //Not needed for iOS9 and above. ARC deals with the observer in higher versions. NotificationCenter.default.removeObserver(self) } } |
But if you are using multiple UserDefaults, then you should add the proper condition check and execute the above code. Also in versions of iOS prior to iOS 9, it is possible that memory issues can occur when you constantly receive multiple notifications like this. Before iOS9, we needed to delete observer to manage memory well.
1 2 3 4 5 | deinit { //Not needed for iOS9 and above. ARC deals with the observer in higher versions. NotificationCenter.default.removeObserver(self) } |
Note: This is a basic guide to settings.bundle. There are some more advanced options like the sub settings page, adding a slider, etc. that are very easy to do that I haven’t covered here.
Note: If the setting doesn’t show you, try using the App Switching UI (double tap the Home button) to turn off the Installed Apps and launch it again.
Full Project Github link (code is in swift 3).
Reference source: Adding settings to your iOS app