In this article, you'll learn how to use service workers and web-push to create push notifications in the browser. In addition, you learn how to register users and push notifications in the browser.
1. Preparation
We need to use the terminal to create the necessary files. Run the command npm init y to initialize a new Node project.
The next step we need to install the necessary dependencies used in the project:
1 2 | npm install dotenv body-parser express web-push -S |
Explain:
- dotenv : Download environment variables from
.envfile toprocess.envfile - express : Framework of Node
- body-parser : Middleware for parsing incoming request bodies.
- web-push : Web Push library for Node.js
2. Generate VAPID Keys
The web-push library relies on a series of VAPID keys to work. The VAPID keys are the public and private key pairs used to check the validity of the registration to the application server, and identify the server that is sending push notifications.
We can generate a VAPID key pair by running the following command:
1 2 | ./node_modules/.bin/web-push generate-vapid-keys |
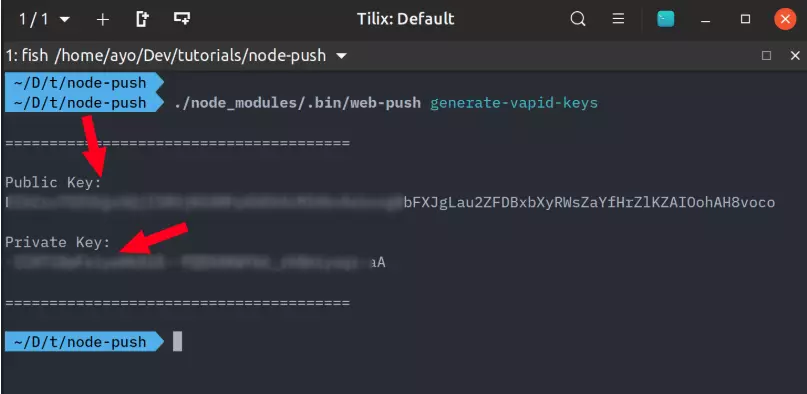
Copy the newly generated key pairs and save them in variables.env file in the project:
1 2 3 4 5 | // variables.env PORT=5000 PUBLIC_VAPID_KEY=<your public key> PRIVATE_VAPID_KEY=<your private key> |
3. Server settings
Create the index.js file at the root of the project as follows:
1 2 3 4 5 6 7 8 9 10 11 12 13 14 15 16 17 18 19 20 21 22 23 24 25 26 27 28 29 30 31 32 33 34 35 36 37 | // index.js require('dotenv').config({ path: 'variables.env' }); const express = require('express'); const webPush = require('web-push'); const bodyParser = require('body-parser'); const path = require('path'); const app = express(); app.use(bodyParser.json()); app.use(express.static(path.join(__dirname, 'client'))); const publicVapidKey = process.env.PUBLIC_VAPID_KEY; const privateVapidKey = process.env.PRIVATE_VAPID_KEY; webPush.setVapidDetails('mailto: <a href="/cdn-cgi/l/email-protection" class="__cf_email__" data-cfemail="fb8f9e888fbb9e839a968b979ed5989496">[email protected]</a> ', publicVapidKey, privateVapidKey); app.post('/subscribe', (req, res) => { const subscription = req.body res.status(201).json({}); const payload = JSON.stringify({ title: 'Push notifications with Service Workers', }); webPush.sendNotification(subscription, payload) .catch(error => console.error(error)); }); app.set('port', process.env.PORT || 5000); const server = app.listen(app.get('port'), () => { console.log(`Express running → PORT ${server.address().port}`); }); |
We can access the VAPID key pair in gile variables.env thanks to the dotenv package. The first argument of the setVapidDetails() function is called an email. It provides a contact point in case the push service needs to contact the sender. /subscribe API is used to trigger event to push notifications to the service worker.
Above are the necessary things on the server side. To start the server, run the command:
1 2 | node index.js |
4. Client settings
Create the client directory containing all the client-side code and in turn create the following files:
1 2 | touch index.html style.css main.js sw.js |
In the index.html file contains the entire interface code of the app:
1 2 3 4 5 6 7 8 9 10 11 12 13 14 15 16 17 18 19 20 21 22 23 24 25 | // client/index.html <!DOCTYPE html> <html lang="en"> <head> <meta charset="UTF-8"> <meta name="viewport" content="width=device-width, initial-scale=1.0"> <meta http-equiv="X-UA-Compatible" content="ie=edge"> <title>Push Notifications using Node.js and Web Push</title> <link rel="icon" type="image/png" href="https://d2cy1obokpvee9.cloudfront.net/manifest/favicon-196x196.png" sizes="196x196" class="next-head"> <link rel="stylesheet" href="style.css"> </head> <body> <header> <h1>Web Push Notifications Demo</h1> </header> <div class="buttons"> <button class="trigger-push">Trigger Push Notification</button> </div> <script src="main.js"></script> </body> </html> |
The next file in main.js will handle the registration of the service worker:
1 2 3 4 5 6 7 8 9 10 11 12 13 14 15 16 17 18 19 20 21 22 23 24 25 26 27 28 29 30 31 32 33 34 35 36 37 38 39 40 41 42 43 44 45 46 47 48 | // client/main.js function urlBase64ToUint8Array(base64String) { const padding = '='.repeat((4 - base64String.length % 4) % 4); const base64 = (base64String + padding) .replace(/-/g, '+') .replace(/_/g, '/'); const rawData = window.atob(base64); const outputArray = new Uint8Array(rawData.length); for (let i = 0; i < rawData.length; ++i) { outputArray[i] = rawData.charCodeAt(i); } return outputArray; } const publicVapidKey = '<your public vapid key>'; const triggerPush = document.querySelector('.trigger-push'); async function triggerPushNotification() { if ('serviceWorker' in navigator) { const register = await navigator.serviceWorker.register('/sw.js', { scope: '/' }); const subscription = await register.pushManager.subscribe({ userVisibleOnly: true, applicationServerKey: urlBase64ToUint8Array(publicVapidKey), }); await fetch('/subscribe', { method: 'POST', body: JSON.stringify(subscription), headers: { 'Content-Type': 'application/json', }, }); } else { console.error('Service workers are not supported in this browser'); } } triggerPush.addEventListener('click', () => { triggerPushNotification().catch(error => console.error(error)); }); |
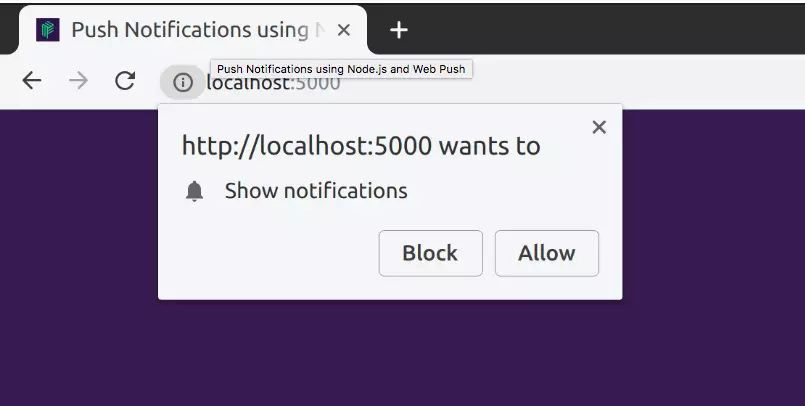
When the user clicks the Trigger Push Notification button, it registers the service workers in the sw.js file and creates the registration that displays a prompt confirming the user allows to display the message on the current page. When using the VAPID key, we must convert the URL safe base 64 string to Uint8Array using the urlBase64ToUint8Array function. Don't forget to replace the <your public vapid key> with the public key you just received when Generate VAPID Keys earlier.
Next call API /subscribe to trigger a new push event. Now, we just need to listen to the service worker event and display a notification every time the user triggers the push event by clicking the Trigger Push Notification button.
In the sw.js file, the event handler receives a push event as follows:
1 2 3 4 5 6 7 8 9 10 | // client/sw.js self.addEventListener('push', event => { const data = event.data.json(); self.registration.showNotification(data.title, { body: 'Yay it works!', }); }); |
We create a message thanks to the showNotification() function.
Finally to check the results. We run the command:
1 2 | node index.js |
Then open the link http: // localhost: 5000 / and get the following result:
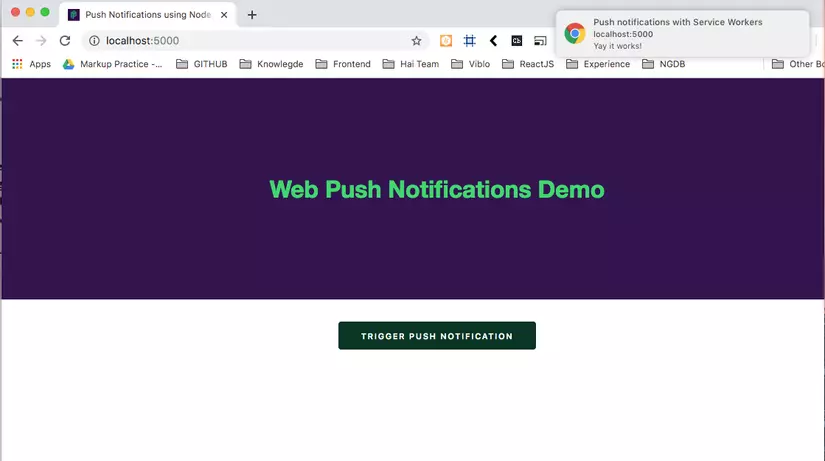
Conclude:
The article shows you how to install and run a push notifications on the web using service worker and Web Push. You can refer to the source code at source .