Make your application more beautiful? Why not?
Prerequisites
You don’t need to have an in-depth knowledge of iOS app development, so feel free! All you need is a computer with MacOS and Xcode. 
By the end of the lesson, we will have:
- Background animation rotates continuously through predefined colors.
- Countdown progress bar is in the middle.
- Pulsing animation around the progress bar.
Few, but I hope it helps a little when you get started with Core Animation!
Tutorial
Go ahead and create a new application in Xcode. First we will start with the background, and how to get such animation.
Gradient Background
1 2 3 | CAGradientLayer Một layer vẽ một dải màu trên màu nền của nó, điền vào hình dạng của layer (bao gồm các góc tròn) |
For background, we will use CAGradientLayer to effect it. We will declare such variables: 
First we created the CAGradientLayer and also an array that will contain many different colors, which will be used as the following gradient. 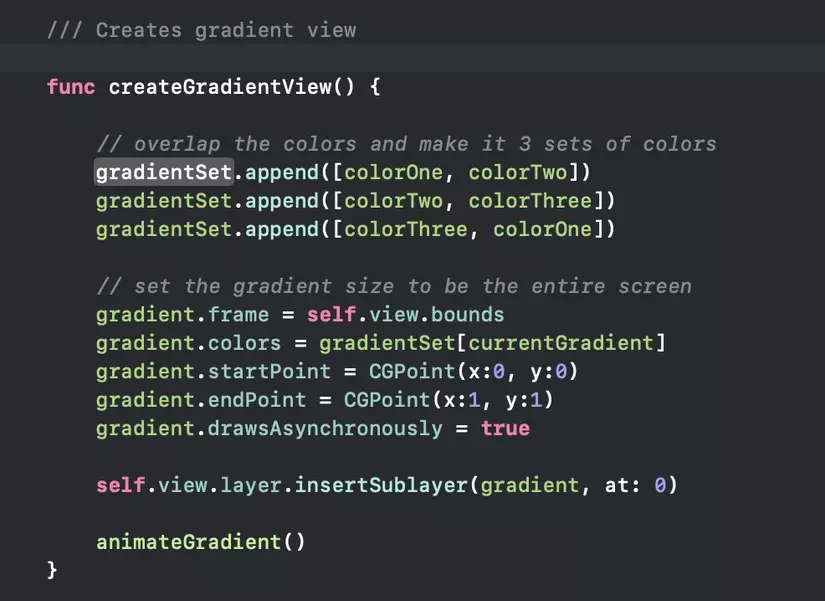
Once the View loads, we will create the gradient view as above.
- Append all available colors to Set
- Set the gradient frame to occupy the entire screen
- Set the initial color used, which is the index 0 in our gradient set
- We have defined the start and end points so that the gradient flow is diagonal from top left to bottom right.
- And finally, I added the gradient as the first fairy layer in the sublayers.
After I’ve set up the gradient layer, it’s time to create effects for the layer!
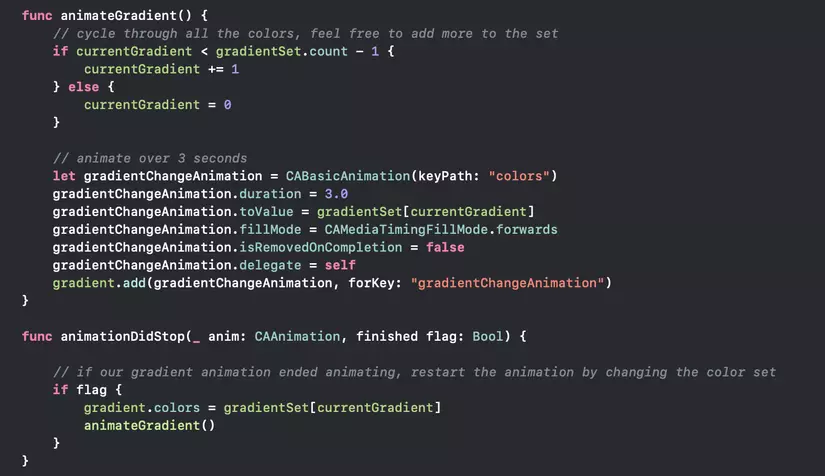
- Whenever this function is called, I will increase the
currentGradientindex to 1 and repeat accordingly. - Set
CABasicAnimationto changecolors - Set animation to animate
toValuecurrent color index in our set in 3 seconds time. - The next few lines to ensure that our gradient animations are not deleted upon completion.
- Use the delegate
animationDidStopto detect when our gradient animation has finished. If it has finished, update the current gradient color to our current index (this will work likefromValuein our animation) and callanimateGradient ().
Great! Animating background through CAGradientLayer quite simple! Let go ahead and add a countdown progress bar!
Countdown Progress Bar
To achieve the above effect, we will need the following:
- 3
CAShapeLayers– One for background, one for foreground and one for pulsation - 2
CAGradientLayerThis is to have a stroke with some gradients compared to a solidUIColor Timerto track the remaining time and updateUILabelon the screen
First, I created a class and followed it up with UIView so I could use it programmatically or through the storyboard .
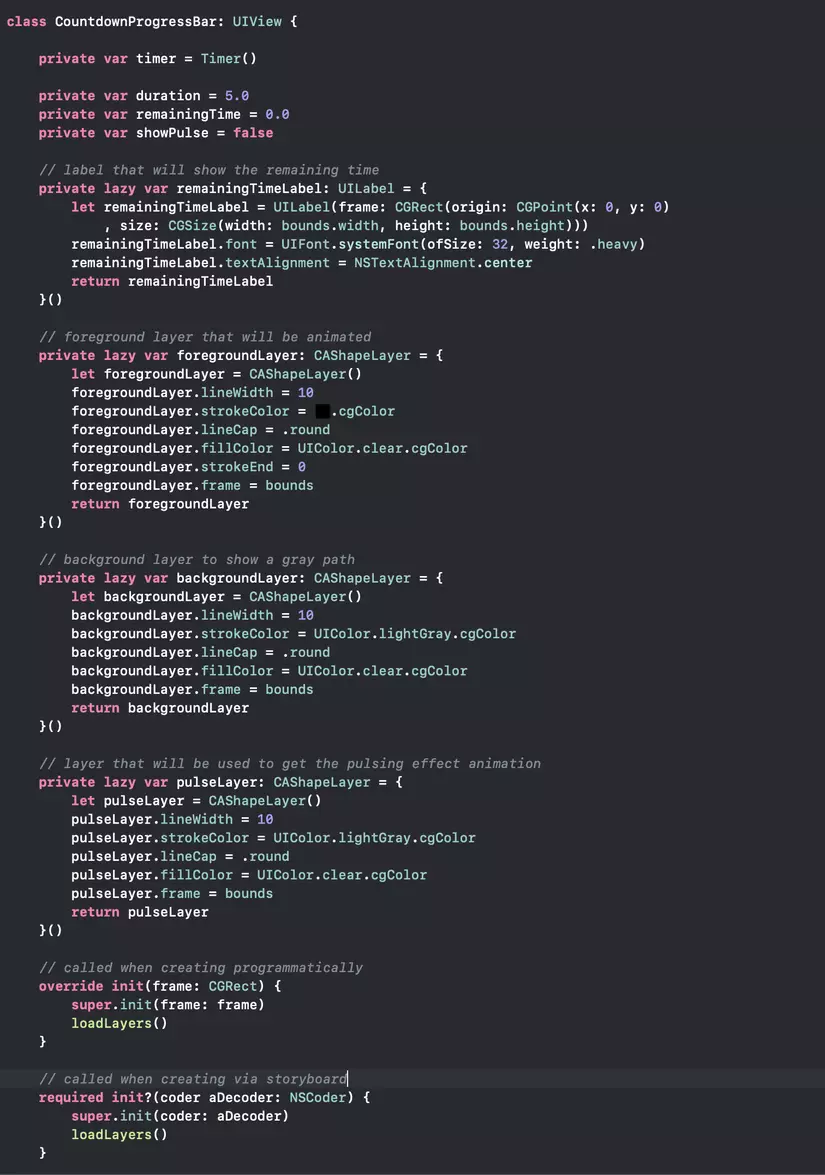
What I originally claimed was 3 necessary CAShapeLayer and a UILabel , which were lazy variables and I gave them the initial values. Lazy means closures will be executed when these variables are called at run time.
Also, because I have a timer , I’ve also added a deinit to make sure that the timer is invalid when the view is canceled:
1 2 3 4 | deinit { timer.invalidate() } |
Also, because I want my foreground and pulse to have some gradientc, I created 2 more variables, of type CAGradientLayer . We will cover our foreground and pulse on the gradient layers to achieve the effect we want.
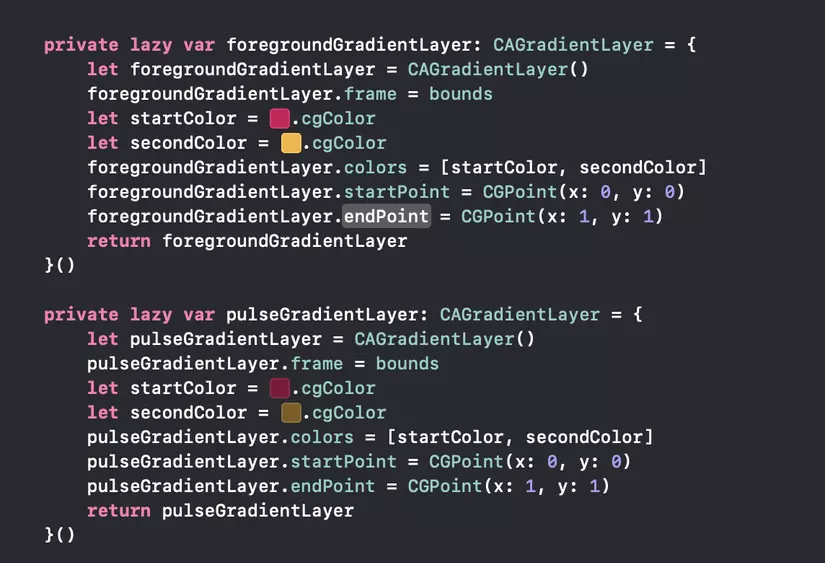
I gave them some gradient colors as well as their position. These are all the variables we need to get started! The init function calls a loadLayers () method to allow to see what it does.
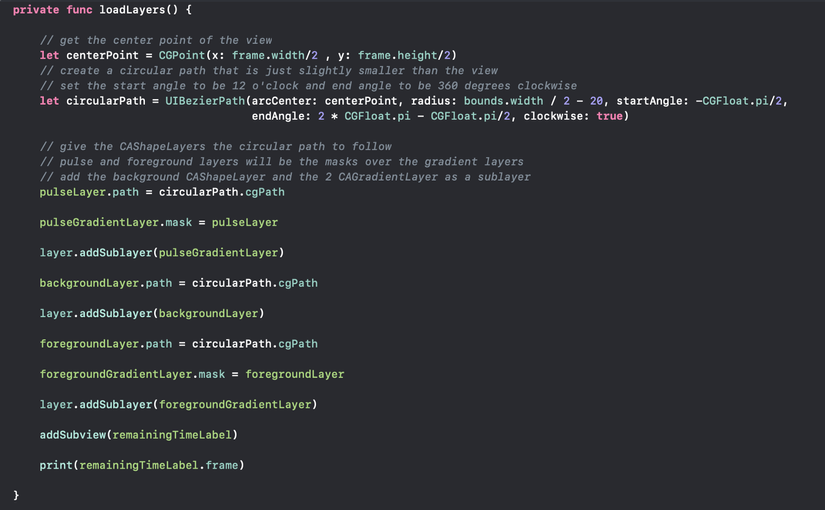
When we call the method, we first create a circular path that will be used by CAShapeLayers . Since we want the foreground and pulse to have gradients, I applied the corresponding mask. Finally, I added the UILabel in the middle of the View that will be used to display the remaining time.
Animating for layers
Now that we have all the layers set up, let’s look at how we can achieve animations. Below shows how we can do animate foreground layer.
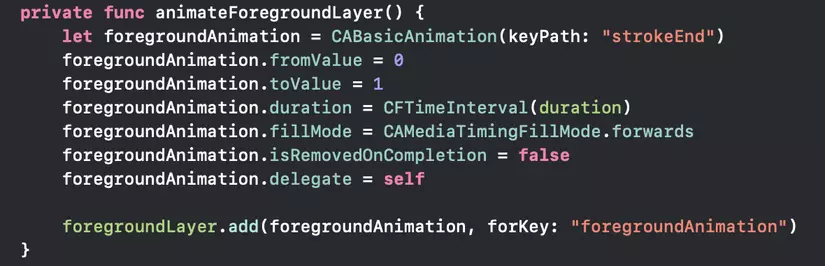
We have declared CABasicAnimation with the keyPath 'StroEnd' This means we want to create the effect where the stroke will end.
The animation will go from beginning to end (a circle as specified in our path earlier) for a specified period of time. Finally, we don’t want our Animation to be deleted when it’s finished, so we set isRemondOnCompletion to false. The final step is to add Animation to our foregroundLayer (CAShapeLayer)
The pulsing layer animation is almost the same, except that we will group 2 animations. If you see the final result, our pulse layer scales outward and also becomes less visible toward the end.
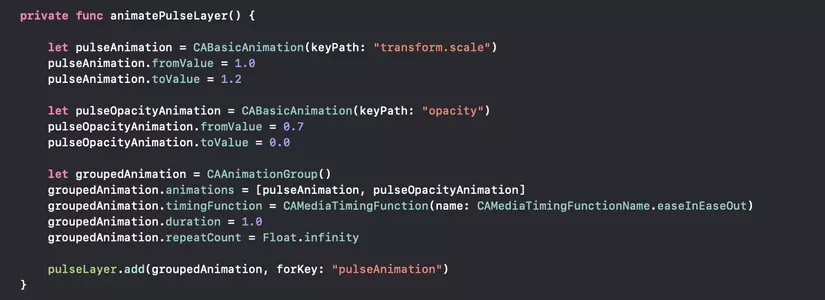
We will declare 2 CABasicAnimations with transform.scale paths to adjust the size and opacity to adjust the visibility. The layer will increase by 20% in size and reduce to 0 opacity during the animation. Once we have declared two animations, we can use CAAnimationgroup to add the animations together. Then, to make it look more beautiful and non-linear like our foreground animation, we set the timingFunction to easyInEaseOut , which means our animation will start slow, speeding up between its duration and then slow down before it finishes. Finally, we set the duration to 1 second and repeated the animation continuously. But don’t worry, when we find out that our foreground animation has stopped (meaning the remaining time is 0), we will also remove pulsing animation.
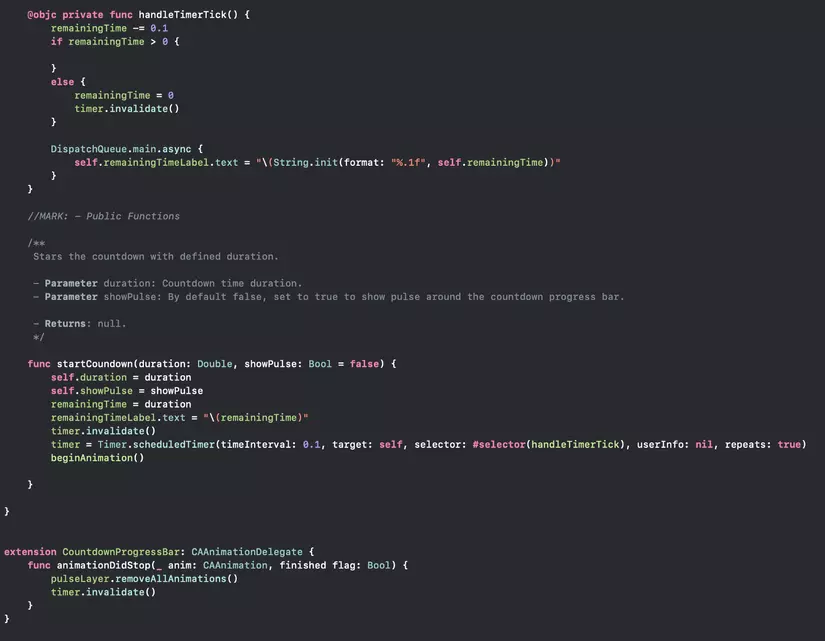
Finally, here are the rest of the methods found in our file. HandleTimerTick reduces the remaining time to 0.1 seconds and updates our UILabel using the main thread (because this is a UI operation).
Our only public method is startCountdown , which takes a lot of time and is animate or not.
AnimationDidStop delegate works just like our b ackground gradient we did earlier. When our foreground layer finishes animating, we will delete all animations and invalidate our timer.
That’s all we really need to get the same output! Here are 2 files if anyone gets lost.
1 2 3 4 5 6 7 8 9 10 11 12 13 14 15 16 17 18 19 20 21 22 23 24 25 26 27 28 29 30 31 32 33 34 35 36 37 38 39 40 41 42 43 44 45 46 47 48 49 50 51 52 53 54 55 56 57 58 59 60 61 62 63 64 65 66 67 68 69 70 71 72 73 74 75 76 77 78 79 80 81 82 83 84 85 86 87 88 89 90 91 92 93 94 95 96 97 | // // ViewController.swift // Core Animations // // Created by Bilguun Batbold on 29/3/19. // Copyright © 2019 Bilguun. All rights reserved. // import UIKit class ViewController: UIViewController, CAAnimationDelegate { let gradient = CAGradientLayer() // list of array holding 2 colors var gradientSet = [[CGColor]]() // current gradient index var currentGradient: Int = 0 // colors to be added to the set let colorOne = #colorLiteral(red: 0.2392156869, green: 0.6745098233, blue: 0.9686274529, alpha: 1).cgColor let colorTwo = #colorLiteral(red: 0.8078431487, green: 0.02745098062, blue: 0.3333333433, alpha: 1).cgColor let colorThree = #colorLiteral(red: 0.9607843161, green: 0.7058823705, blue: 0.200000003, alpha: 1).cgColor // create outlet in the storyboard with type CountdownProgressBar @IBOutlet weak var countdownProgressBar: CountdownProgressBar! override func viewDidLoad() { super.viewDidLoad() // Do any additional setup after loading the view. view.addGestureRecognizer(UITapGestureRecognizer(target: self, action: #selector(handleTap))) } override func viewDidLayoutSubviews() { super.viewDidLayoutSubviews() createGradientView() countdownProgressBar.startCoundown(duration: 10, showPulse: true) } /// Creates gradient view func createGradientView() { // overlap the colors and make it 3 sets of colors gradientSet.append([colorOne, colorTwo]) gradientSet.append([colorTwo, colorThree]) gradientSet.append([colorThree, colorOne]) // set the gradient size to be the entire screen gradient.frame = self.view.bounds gradient.colors = gradientSet[currentGradient] gradient.startPoint = CGPoint(x:0, y:0) gradient.endPoint = CGPoint(x:1, y:1) gradient.drawsAsynchronously = true self.view.layer.insertSublayer(gradient, at: 0) animateGradient() } @objc func handleTap() { print("Tapped") countdownProgressBar.startCoundown(duration: 10, showPulse: true) } func animateGradient() { // cycle through all the colors, feel free to add more to the set if currentGradient < gradientSet.count - 1 { currentGradient += 1 } else { currentGradient = 0 } // animate over 3 seconds let gradientChangeAnimation = CABasicAnimation(keyPath: "colors") gradientChangeAnimation.duration = 3.0 gradientChangeAnimation.toValue = gradientSet[currentGradient] gradientChangeAnimation.fillMode = CAMediaTimingFillMode.forwards gradientChangeAnimation.isRemovedOnCompletion = false gradientChangeAnimation.delegate = self gradient.add(gradientChangeAnimation, forKey: "gradientChangeAnimation") } func animationDidStop(_ anim: CAAnimation, finished flag: Bool) { // if our gradient animation ended animating, restart the animation by changing the color set if flag { gradient.colors = gradientSet[currentGradient] animateGradient() } } } |
1 2 3 4 5 6 7 8 9 10 11 12 13 14 15 16 17 18 19 20 21 22 23 24 25 26 27 28 29 30 31 32 33 34 35 36 37 38 39 40 41 42 43 44 45 46 47 48 49 50 51 52 53 54 55 56 57 58 59 60 61 62 63 64 65 66 67 68 69 70 71 72 73 74 75 76 77 78 79 80 81 82 83 84 85 86 87 88 89 90 91 92 93 94 95 96 97 98 99 100 101 102 103 104 105 106 107 108 109 110 111 112 113 114 115 116 117 118 119 120 121 122 123 124 125 126 127 128 129 130 131 132 133 134 135 136 137 138 139 140 141 142 143 144 145 146 147 148 149 150 151 152 153 154 155 156 157 158 159 160 161 162 163 164 165 166 167 168 169 170 171 172 173 174 175 176 177 178 179 180 181 182 183 184 185 186 187 188 189 190 191 192 193 194 195 196 197 198 199 200 201 202 203 204 205 206 207 208 209 210 211 212 213 214 215 216 217 218 219 220 221 222 223 | // // CountdownProgressBar.swift // Core Animations // // Created by Bilguun Batbold on 29/3/19. // Copyright © 2019 Bilguun. All rights reserved. // import Foundation import UIKit class CountdownProgressBar: UIView { private var timer = Timer() private var duration = 5.0 private var remainingTime = 0.0 private var showPulse = false // label that will show the remaining time private lazy var remainingTimeLabel: UILabel = { let remainingTimeLabel = UILabel(frame: CGRect(origin: CGPoint(x: 0, y: 0) , size: CGSize(width: bounds.width, height: bounds.height))) remainingTimeLabel.font = UIFont.systemFont(ofSize: 32, weight: .heavy) remainingTimeLabel.textAlignment = NSTextAlignment.center return remainingTimeLabel }() // foreground layer that will be animated private lazy var foregroundLayer: CAShapeLayer = { let foregroundLayer = CAShapeLayer() foregroundLayer.lineWidth = 10 foregroundLayer.strokeColor = #colorLiteral(red: 0, green: 0, blue: 0, alpha: 1).cgColor foregroundLayer.lineCap = .round foregroundLayer.fillColor = UIColor.clear.cgColor foregroundLayer.strokeEnd = 0 foregroundLayer.frame = bounds return foregroundLayer }() // background layer to show a gray path private lazy var backgroundLayer: CAShapeLayer = { let backgroundLayer = CAShapeLayer() backgroundLayer.lineWidth = 10 backgroundLayer.strokeColor = UIColor.lightGray.cgColor backgroundLayer.lineCap = .round backgroundLayer.fillColor = UIColor.clear.cgColor backgroundLayer.frame = bounds return backgroundLayer }() // layer that will be used to get the pulsing effect animation private lazy var pulseLayer: CAShapeLayer = { let pulseLayer = CAShapeLayer() pulseLayer.lineWidth = 10 pulseLayer.strokeColor = UIColor.lightGray.cgColor pulseLayer.lineCap = .round pulseLayer.fillColor = UIColor.clear.cgColor pulseLayer.frame = bounds return pulseLayer }() // called when creating programmatically override init(frame: CGRect) { super.init(frame: frame) loadLayers() } // called when creating via storyboard required init?(coder aDecoder: NSCoder) { super.init(coder: aDecoder) loadLayers() } deinit { timer.invalidate() } private lazy var foregroundGradientLayer: CAGradientLayer = { let foregroundGradientLayer = CAGradientLayer() foregroundGradientLayer.frame = bounds let startColor = #colorLiteral(red: 0.8078431487, green: 0.02745098062, blue: 0.3333333433, alpha: 1).cgColor let secondColor = #colorLiteral(red: 0.9607843161, green: 0.7058823705, blue: 0.200000003, alpha: 1).cgColor foregroundGradientLayer.colors = [startColor, secondColor] foregroundGradientLayer.startPoint = CGPoint(x: 0, y: 0) foregroundGradientLayer.endPoint = CGPoint(x: 1, y: 1) return foregroundGradientLayer }() private lazy var pulseGradientLayer: CAGradientLayer = { let pulseGradientLayer = CAGradientLayer() pulseGradientLayer.frame = bounds let startColor = #colorLiteral(red: 0.5090036988, green: 0.04135338217, blue: 0.2113225758, alpha: 1).cgColor let secondColor = #colorLiteral(red: 0.4990308285, green: 0.3679353595, blue: 0.1137484089, alpha: 1).cgColor pulseGradientLayer.colors = [startColor, secondColor] pulseGradientLayer.startPoint = CGPoint(x: 0, y: 0) pulseGradientLayer.endPoint = CGPoint(x: 1, y: 1) return pulseGradientLayer }() private func loadLayers() { // get the center point of the view let centerPoint = CGPoint(x: frame.width/2 , y: frame.height/2) // create a circular path that is just slightly smaller than the view // set the start angle to be 12 o'clock and end angle to be 360 degrees clockwise let circularPath = UIBezierPath(arcCenter: centerPoint, radius: bounds.width / 2 - 20, startAngle: -CGFloat.pi/2, endAngle: 2 * CGFloat.pi - CGFloat.pi/2, clockwise: true) // give the CAShapeLayers the circular path to follow // pulse and foreground layers will be the masks over the gradient layers // add the background CAShapeLayer and the 2 CAGradientLayer as a sublayer pulseLayer.path = circularPath.cgPath pulseGradientLayer.mask = pulseLayer layer.addSublayer(pulseGradientLayer) backgroundLayer.path = circularPath.cgPath layer.addSublayer(backgroundLayer) foregroundLayer.path = circularPath.cgPath foregroundGradientLayer.mask = foregroundLayer layer.addSublayer(foregroundGradientLayer) addSubview(remainingTimeLabel) print(remainingTimeLabel.frame) } private func beginAnimation() { animateForegroundLayer() // only show the pulse if required if showPulse { animatePulseLayer() } } private func animateForegroundLayer() { let foregroundAnimation = CABasicAnimation(keyPath: "strokeEnd") foregroundAnimation.fromValue = 0 foregroundAnimation.toValue = 1 foregroundAnimation.duration = CFTimeInterval(duration) foregroundAnimation.fillMode = CAMediaTimingFillMode.forwards foregroundAnimation.isRemovedOnCompletion = false foregroundAnimation.delegate = self foregroundLayer.add(foregroundAnimation, forKey: "foregroundAnimation") } private func animatePulseLayer() { let pulseAnimation = CABasicAnimation(keyPath: "transform.scale") pulseAnimation.fromValue = 1.0 pulseAnimation.toValue = 1.2 let pulseOpacityAnimation = CABasicAnimation(keyPath: "opacity") pulseOpacityAnimation.fromValue = 0.7 pulseOpacityAnimation.toValue = 0.0 let groupedAnimation = CAAnimationGroup() groupedAnimation.animations = [pulseAnimation, pulseOpacityAnimation] groupedAnimation.timingFunction = CAMediaTimingFunction(name: CAMediaTimingFunctionName.easeInEaseOut) groupedAnimation.duration = 1.0 groupedAnimation.repeatCount = Float.infinity pulseLayer.add(groupedAnimation, forKey: "pulseAnimation") } @objc private func handleTimerTick() { remainingTime -= 0.1 if remainingTime > 0 { } else { remainingTime = 0 timer.invalidate() } DispatchQueue.main.async { self.remainingTimeLabel.text = "(String.init(format: "%.1f", self.remainingTime))" } } //MARK: - Public Functions /** Stars the countdown with defined duration. - Parameter duration: Countdown time duration. - Parameter showPulse: By default false, set to true to show pulse around the countdown progress bar. - Returns: null. */ func startCoundown(duration: Double, showPulse: Bool = false) { self.duration = duration self.showPulse = showPulse remainingTime = duration remainingTimeLabel.text = "(remainingTime)" timer.invalidate() timer = Timer.scheduledTimer(timeInterval: 0.1, target: self, selector: #selector(handleTimerTick), userInfo: nil, repeats: true) beginAnimation() } } extension CountdownProgressBar: CAAnimationDelegate { func animationDidStop(_ anim: CAAnimation, finished flag: Bool) { pulseLayer.removeAllAnimations() timer.invalidate() } } |
Use the CountdownProgressBar class
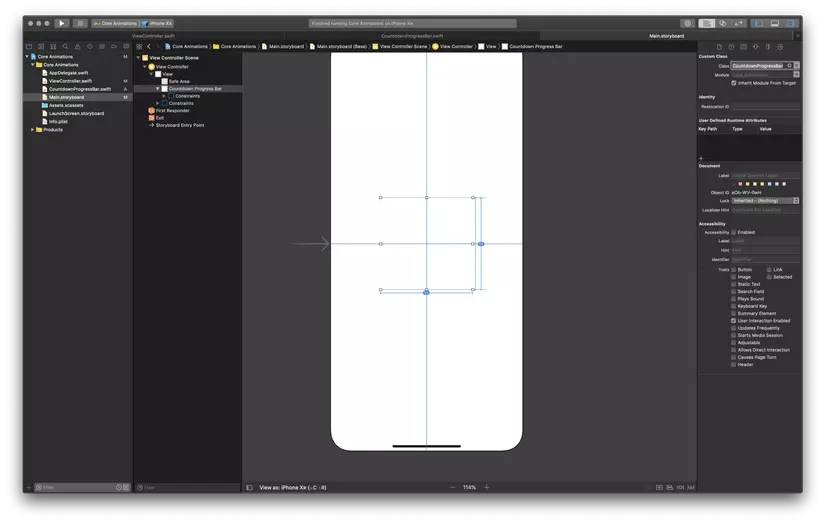
To use our class, I first created a UIView and placed it in the middle of the View. I then changed its class to our CountdownProgressBar class. Finally, in my ViewControll.swift , I started animation like this:
countdownProgressBar.startCoundown(duration: 10, showPulse: true)
Check out the pulsation animation or try disabling it.
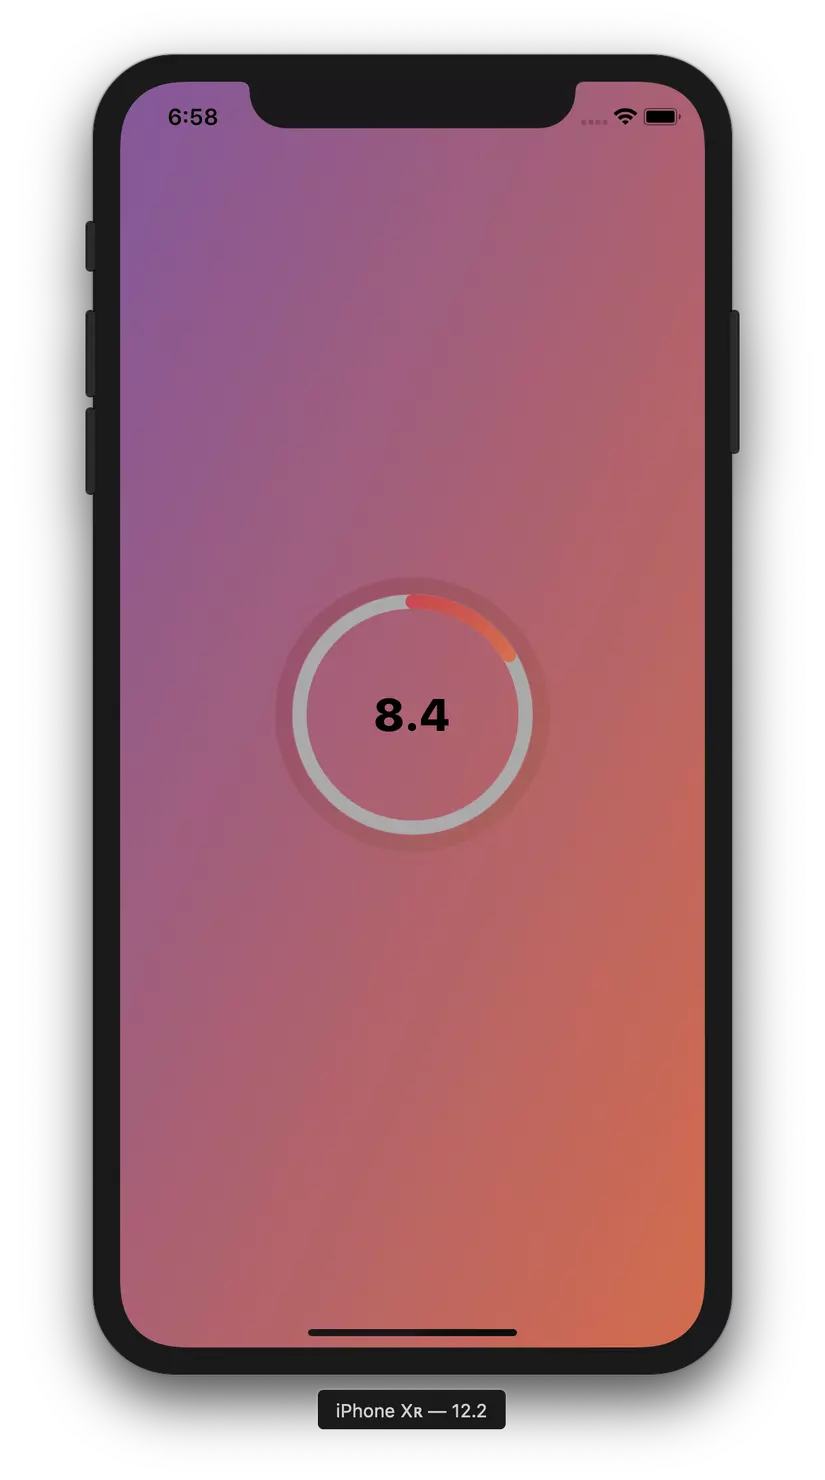
It’s done! We have made some really interesting animations that are not difficult at all! I originally wrote my own custom countdown class for a project I’m working on, and couldn’t find many examples online. Feel free to modify and use the code as you wish.
There are many interesting things you can do, with greater efficiency than UIView , using CALayers !
First, you can experiment with different values and colors to really understand how the code works. For example, you can edit the background color, adjust the radius of our pulsing effect or play with the color of the foreground layer.
These are just some simple examples of how you can spice up your application. It would be nice to combine an animated background for your Login Pag e or create your own custom loading bar .